Table of Contents >> Show >> Hide
- Quick Reality Check: How Much Water Do You Actually Need?
- What Makes a Water Container Emergency-Ready?
- Best Emergency Water Storage Containers (By Category)
- 1) Stackable “Water Bricks” (Best for small spaces and organized people)
- 2) Rugged 5-Gallon Jerry Cans / Military-Style Cans (Best for durability and “grab it and go”)
- 3) 7-Gallon Upright Jugs with Spigots (Best budget-friendly home option)
- 4) Heavy-Duty 5–6 Gallon “Cube” Containers (Best for stacking + sturdier builds)
- 5) Collapsible Water Carriers (Best for evacuation, refills, and “I have zero storage space”)
- 6) Large Barrels and Home Tanks (Best for whole-house resilience)
- A Smart Water Setup: The “Three-Tier” Approach
- How to Clean, Fill, Label, and Rotate Stored Water
- Common Mistakes That Ruin Otherwise Good Water Storage
- A No-Regrets Buying Checklist
- Bottom Line
- Experience Notes: What People Learn After the First Real Outage (and Wish They’d Known Before)
Water is the least exciting prep… right up until the moment it becomes the only prep that matters. In hurricanes, floods, ice storms, earthquakes, wildfires, and “why is the city water brown?” moments, the fastest way to turn your home into a stress factory is realizing you can’t safely drink, cook, or wash up. The good news: building a solid emergency water setup is mostly about picking the right containersones that won’t leak, won’t funk up your water, and won’t make you regret every life choice the first time you try to carry them.
This guide breaks down the best emergency water storage containers by situation (apartment vs. house, sheltering vs. evacuating), what to look for (food-grade, seals, spigots, stackability), and how to clean, fill, and rotate your stash so it’s actually usable when the lights go out and your group chat turns into a live blog of everyone’s panic-shopping.
Quick Reality Check: How Much Water Do You Actually Need?
The baseline recommendation from U.S. public health guidance is at least 1 gallon of water per person per day, and you want at least 3 days on hand. If you have space, a 2-week supply is even better. Plan to store extra for hot climates, illness, pregnancy, and pets.
Simple planning math:
- 1 person, 3 days = 3 gallons
- 2 people, 7 days = 14 gallons
- Family of 4, 14 days = 56 gallons
Now translate that into containers you can actually live with. Fifty-six gallons sounds manageable until you remember water is heavy (about 8.3 pounds per gallon). That’s why the “best” container isn’t one magical tankit’s usually a mix of sizes that you can move, pour, and protect from contamination.
What Makes a Water Container Emergency-Ready?
You’re not just buying plastic. You’re buying confidence: confidence your water won’t taste like a pool toy, confidence you won’t discover a slow leak the hard way, and confidence you won’t need three hands to dispense a cup of water. Here’s what matters most.
1) Food-grade material (non-negotiable)
If you’re filling containers yourself, use FDA-approved food-grade water storage containers. Avoid anything that previously held toxic chemicals (even if you “rinsed it really well”). Also skip reused milk or juice jugsresidues can be hard to remove and can encourage bacterial growth.
2) A seal that actually seals
Look for thick caps, intact gaskets, and threads that don’t feel like they were designed by an enemy. A container is only as good as the part that keeps outside stuff from becoming inside stuff.
3) Practical dispensing
For at-home storage, a spigot is a sanity-saver. For mobile containers, a pour spout (or a cap that pours cleanly) matters more than you’d thinkespecially at 2 a.m. when you’re trying not to wake the whole house.
4) Cleanability
Wide openings make cleaning easier. Narrow necks can reduce contamination risk when pouring, but they can be annoying to scrub. The sweet spot is a design you’ll actually maintain.
5) Stackability and storage footprint
If your plan is “I’ll store it in the garage,” remember garages are where chemicals, temperature swings, and sunlight love to party. Opaque or semi-opaque containers and stable, indoor-friendly shapes help protect your stash.
6) Certifications and “drinking-water-safe” signals
For larger tanks/barrels (and any fittings that touch the water), it’s smart to look for products designed for potable water and pay attention to recognized standards used for components in contact with drinking water (for example, NSF/ANSI 61 is commonly referenced for drinking-water system components). You’re aiming for materials that won’t add unwanted substances to your supply.
Best Emergency Water Storage Containers (By Category)
Instead of crowning one “winner,” here are the best container types for real-life disaster scenariosplus examples you’ll commonly see in U.S. retailers and preparedness checklists. Think of this as building a small team where every container has a job.
1) Stackable “Water Bricks” (Best for small spaces and organized people)
If you live in an apartment, have limited closet space, or simply enjoy the calm feeling of tidy rectangles, stackable “brick” containers are hard to beat. They’re modularso you can scale up your supply without committing to one massive barreland each unit stays liftable for most adults.
- Best for: Apartments, closets, under-bed storage, neat stacking
- Why they shine: Efficient footprint, easier to move than huge tanks, good redundancy (one leak doesn’t ruin everything)
- Watch-outs: You’ll want a good funnel for filling; check caps/gaskets before you trust them
2) Rugged 5-Gallon Jerry Cans / Military-Style Cans (Best for durability and “grab it and go”)
For evacuation, vehicle kits, or anyone who wants a container that can survive getting bumped, dragged, and sworn at, 5-gallon jerry-can styles are a classic. Outdoor gear testing often highlights these as some of the toughest options available, with thick plastic and practical caps.
- Best for: Vehicle storage, evacuations, camping-style emergencies, rough handling
- Why they shine: Durable build, easy to carry, commonly available spouts/caps
- Watch-outs: Some designs can leak if stored on their side; new containers may need thorough rinsing/airing before first use
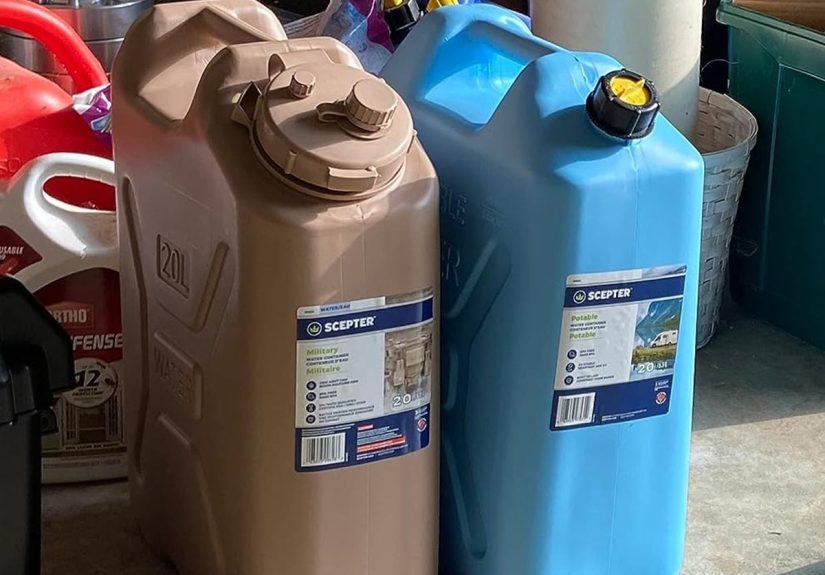
3) 7-Gallon Upright Jugs with Spigots (Best budget-friendly home option)
The iconic blue or tan upright jug with a spigot is popular for a reason: it’s relatively inexpensive, holds a meaningful amount of water, and dispenses easily. Many people build their baseline home supply around several of these because you can rotate and replace water without needing special tools.
- Best for: Short-to-medium outages, sheltering at home, budget builds
- Why they shine: Built-in spigot, good capacity per container, easy to understand and use
- Watch-outs: Spigots are the weak pointconsider keeping a spare spigot or gasket; store upright and test for slow leaks
4) Heavy-Duty 5–6 Gallon “Cube” Containers (Best for stacking + sturdier builds)
Cube-style containers (often around 5–6 gallons) split the difference between budget jugs and heavy-duty jerry cans. Many are designed to stack more neatly than tall jugs and can be easier to pack into a closet or pantry.
- Best for: Closets, pantry corners, under-shelf storage
- Why they shine: Space-efficient shapes, typically sturdier than the cheapest jugs
- Watch-outs: Check cap design and spigot reliability; don’t assume “stackable” means “won’t bow under weight”
5) Collapsible Water Carriers (Best for evacuation, refills, and “I have zero storage space”)
Collapsible carriers roll up small, then expand when you need to haul water from a distribution point, neighbor, or relief station. They’re not always ideal for long-term storage (materials are thinner), but they’re amazing “support players” in a disaster kit.
- Best for: Evacuation kits, refilling trips, temporary hauling, camping boxes
- Why they shine: Tiny packed size, lightweight, easy to stash in vehicles
- Watch-outs: Harder to clean thoroughly; spigots can be awkward; treat as short-term carriers unless rated for storage
6) Large Barrels and Home Tanks (Best for whole-house resilience)
If you have the space (garage corner, basement, utility area), larger barrels or tanks can carry you through longer disruptions. But bigger storage comes with bigger responsibility: sanitation, stable temperatures, safe placement, and a dispensing plan that doesn’t involve you trying to tip a small boulder of water.
- Best for: Long outages, large families, households in hurricane/wildfire zones
- Why they shine: High capacity, fewer containers to manage
- Watch-outs: Must be food-grade/potable-water appropriate; needs proper cleaning; plan for pumping/dispensing; keep out of sunlight and away from chemicals
A Smart Water Setup: The “Three-Tier” Approach
The most practical emergency water plans usually have three layers:
- Tier 1: Grab-and-go small bottles or compact containers you can carry immediately if you evacuate.
- Tier 2: Daily-use containers 2–7 gallon jugs/cans that are easy to rotate and dispense from at home.
- Tier 3: Bulk storage barrels/tanks for extended disruptions, plus a way to treat/filter water if needed.
This mix avoids the two classic mistakes: (1) storing only tiny bottles (easy, but not enough), or (2) storing one huge tank (enough, but a pain to manage).
How to Clean, Fill, Label, and Rotate Stored Water
The best container in the world won’t help if the water inside it is questionable. Use a simple, repeatable process. Public health guidance recommends cleaning and sanitizing containers before filling.
Step-by-step container prep
- Wash the container with soap/dishwashing detergent and water; rinse completely.
- Sanitize with a bleach solution (commonly: 1 teaspoon of unscented household liquid bleach per quart of water), ensuring it contacts all interior surfaces.
- Drain the solution, then air-dry or rinse with safe water, depending on your process and guidance.
- Fill with safe water (treated municipal tap water is typically fine; use clean hoses/funnels).
- Label as “Drinking Water” and write the date.
Rotation (so your “emergency water” doesn’t become “mystery water”)
If you fill containers yourself, many public health guidelines recommend replacing the stored water on a schedule (commonly every 6 months) and keeping containers tightly sealed until use. Store water in a cool, consistent-temperature area, out of direct sunlight, and away from gasoline, pesticides, and other chemicals.
Common Mistakes That Ruin Otherwise Good Water Storage
- Using the wrong containers: anything that held chemicals is a hard no; reused milk/juice jugs are also a bad idea for long storage.
- Going too big, too fast: very large containers are greatuntil you realize you can’t lift, move, or dispense from them easily. Some extension guidance notes that smaller containers can be easier to manage and reduce losses if a leak happens.
- Ignoring the spigot: spigots are convenient but can leak. Test them, keep spares if possible, and store upright.
- Storing water in sunlight or chemical zones: heat and chemicals are not your water’s friends. Neither is the “hot garage shelf above the lawn fertilizer.”
- Never practicing: the first time you use your system shouldn’t be during a disaster. Run a mini-drill: dispense, refill, and sanitize once.
A No-Regrets Buying Checklist
Use this checklist to choose containers that match your life (not an imaginary version of you who loves lifting 50-pound objects).
- Capacity that fits your strength: 2–3.5 gallons for easy carry; 5–7 gallons for efficient home storage; bulk tanks for long duration.
- Food-grade / potable-water safe: manufacturer states it’s intended for drinking water.
- Tight, reliable cap: thick threads + gasket; minimal wobble.
- Dispensing you’ll actually use: spigot for home; spout/cap for mobile.
- Easy cleaning access: opening size matches your willingness to scrub.
- Stackability and footprint: bricks/cubes for closets; jerry cans for vehicles; barrels for utility areas.
- Redundancy: several medium containers beat one giant container for most households.
- Spare parts: consider extra spigots, gaskets, or capssmall parts fail at the worst times.
Bottom Line
The best emergency water storage containers are the ones you can maintain, move, and trust. For most households, the sweet spot is a mix: a few stackable bricks or 2–3 gallon carriers for flexibility, several 5–7 gallon containers for daily use, and (if space allows) a bulk barrel/tank for extended disruptions. Clean them properly, date them, rotate them, and do a quick practice runbecause “I’ll figure it out during the disaster” is a plan that has never worked out for anyone in the history of plans.
Experience Notes: What People Learn After the First Real Outage (and Wish They’d Known Before)
If you ask people who’ve lived through major storms, boil-water notices, and multi-day power outages what surprised them most, it’s rarely the lack of water itselfit’s the logistics. On paper, “one gallon per person per day” sounds clean and tidy. In real life, you discover that water gets used in dozens of sneaky ways: rinsing a cutting board, washing sticky hands, brushing teeth when you’re too tired to be careful, and cleaning up the little messes that multiply when routines fall apart. That’s why many experienced preppers and disaster survivors quietly pad their numbers and keep extra containers beyond the minimum.
Another common lesson: the container you love in your head can be the container you hate in your hands. A full 7-gallon jug can be awkward to lift and pour, especially for smaller adults, older family members, or anyone dealing with stress and fatigue. People often end up wishing they had more “medium” containers (2–3.5 gallons) rather than relying on fewer, heavier ones. It’s not just about strength; it’s about control. Spilling precious water because your container pours like a confused fire hose is a special kind of rage. Containers with stable handles and predictable spouts/spigots tend to win hearts after the first messy attempt.
Then there’s the “spigot reality check.” Built-in spigots feel like genius until one drips overnight or gets bumped open by a curious kid, a dog, or your own knee while you’re shuffling around in the dark. People who store jugs with spigots often learn to place them in a shallow tray, keep them upright, and test them periodically. Some even keep a spare spigot or gasket because the tiny parts are what turn a perfectly good container into a useless plastic monument.
Taste and smell are another surprise. Even when containers are designed for water, new plastics can have an odor out of the box. Many users find that cleaning, sanitizing, rinsing, and letting the container air out before first fill dramatically improves the experience. And if you’re storing water for longer periods, people frequently report that running it through a basic carbon filter at time of use makes it taste more “normal,” which matters more than you’d think when you’re already stressed.
Finally, the most repeated lesson is embarrassingly simple: the best time to discover your system’s flaws is on a calm Saturday afternoon, not during a natural disaster. Households that do a quick “water drill” (dispense water for cooking, refill a bottle, wash hands, sanitize and refill) tend to fix problems fastlike realizing their funnel doesn’t fit, their storage spot gets too warm, or their biggest container is impossible to move without help. The goal isn’t perfection. The goal is a setup that works when you’re tired, distracted, and operating on “battery saver mode” as a human being.