Table of Contents >> Show >> Hide
- Why Wire Shelves Get Messy (And Why Dividers Work)
- Quick Planning: Measure Once, DIY Once
- Tools and Materials
- Method 1: The “Budget and Brilliant” Coroplast + Zip Tie Divider
- Method 2: The “Looks Store-Bought” Acrylic + Clip-On Hardware Divider
- Method 3: The “Super Sturdy” PVC Grip Channel + Hardboard Divider
- Method 4: The “Pantry Workhorse” Wire Grid Divider + Zip Ties
- Method 5: The “No-Tools, Renter-Friendly” Clip + Panel Divider
- Making Dividers Actually Stay Put
- Where DIY Wire Shelf Dividers Shine (With Specific Examples)
- When It’s Smarter to Buy Clip-On Dividers
- Troubleshooting: Common Problems and Easy Fixes
- Conclusion: A Little Structure Goes a Long Way
- Experiences: What DIY Wire Shelf Dividers Are Like in Real Life (500+ Words)
Wire shelves are the unsung heroes of home organization: affordable, breathable, and strong enough to hold everything from sweaters to cereal boxes.
They’re also chaos’s favorite playground. One leaning towel stack and suddenly your “linen closet” becomes a “fabric avalanche museum.”
The fix is surprisingly simple: wire shelf dividers. Store-bought versions clip on in seconds, but you can also DIY dividers that are
sturdier than they look, friendlier to your budget, and customized to your exact shelf depth, wire spacing, and “please don’t fall over” tolerance.
This guide walks you through multiple DIY methodsrenter-friendly options includedplus planning tips so you don’t build a divider that fits your shelf
the way a square peg fits a round hole (with optimism and regret).
Why Wire Shelves Get Messy (And Why Dividers Work)
Wire shelving is ventilated, which is great for airflow, but the open structure makes it easier for items to tip, snag, or slide. When you stack folded
clothes, towels, or pantry staples, the pile’s center of gravity creeps forward as you pull one item out. Without a boundary, the stack shifts, collapses,
and drags its neighbors with it like a tiny domino show.
A divider solves the two biggest problems:
- Containment: It gives each category a “lane,” so stacks stay upright and separated.
- Reset speed: When things do shift, you can straighten one section without rebuilding the entire shelf like a Jenga tower.
Quick Planning: Measure Once, DIY Once
Before you cut anything, take five minutes to plan. This is the difference between “custom solution” and “mysterious plastic panels you swear you’ll use
someday.”
1) Identify what you’re organizing
- Closet shelves: sweaters, jeans, tees, handbags, hats, linens
- Linen closet: towels, sheet sets, extra blankets
- Pantry or laundry shelves: bins, detergent refills, paper goods
- Garage wire racks: spray bottles, gloves, shop towels (aka “the stuff you own three versions of”)
2) Pick a divider height
A good rule: your divider should be about as tall as your typical stackor slightly taller if you’re stacking slippery items like
athletic tees or microfiber towels. If you routinely stack higher than about a foot, consider splitting the category into two sections, using bins, or
lowering the stack height for stability.
3) Check shelf depth and wire spacing
Many closet shelves fall in the 12–16 inch depth range. Wire spacing varies by brand and style, but you can usually attach to the front lip and at least
one interior wire. If you can hook or clamp onto two wires, your divider will behave better and slide less.
Tools and Materials
You won’t need everything on this listeach method uses a different combo. Choose your divider style first, then shop.
- Measuring tape and a marker
- Scissors (for plastic sheets) or a utility knife (for corrugated plastic)
- Zip ties (aka the DIY world’s duct tape)
- Binder clips or spring clamps
- Corrugated plastic sheet (often called coroplast)
- Acrylic sheet (clear or frosted for a clean look)
- PVC pipe (for a “grip channel” base)
- Sandpaper or a nail file (for smoothing sharp edges)
- Rubber shelf liner (optional, helps prevent sliding)
Method 1: The “Budget and Brilliant” Coroplast + Zip Tie Divider
Corrugated plastic is lightweight, moisture-resistant, easy to cut, and doesn’t mind living in a linen closet. Zip ties anchor it to wire shelves without
drilling. This is one of the best options if you want removable dividers that won’t damage the shelving.
Materials
- Corrugated plastic sheet
- Zip ties (4–8 per divider)
- Scissors or utility knife
- Sandpaper or nail file
Steps
- Measure divider size: Depth of shelf (front to back) and your preferred divider height.
- Cut the panel: Cut a rectangle to size. Round the top corners slightly so it doesn’t snag sleeves or towels.
- Create tie points: Poke small holes near the bottom edge of the panel (two near the front, two near the back).
- Anchor to shelf wires: Thread zip ties through the panel holes and around the shelf wires. Tighten firmly.
- Trim and smooth: Clip excess tie tail and file any sharp zip-tie edges.
Pro tips
- Add a strip of rubber shelf liner under your stacks. It reduces sliding and makes your dividers feel like they cost more than $3.
- If the divider flexes, double up the coroplast (two panels zip-tied together), or add a “spine” by folding a 1-inch flap along the back edge.
Method 2: The “Looks Store-Bought” Acrylic + Clip-On Hardware Divider
Want dividers that look like they came from a fancy closet system? Acrylic is your friend. This method is ideal for closets where you want a
clean, minimalist look, and it’s easy to wipe down.
Materials
- Acrylic sheet (clear or frosted)
- Heavy-duty binder clips or small clamp-style clips
- Optional: thin rubber pads or shelf liner scraps
Steps
- Cut or order acrylic: Many hardware stores cut acrylic to size. Aim for shelf depth minus about 1/2 inch.
- Pad your clips: Add rubber pads where the clip touches acrylic to prevent scratches and slipping.
- Clip to the shelf: Clamp the acrylic to the front lip wire and at least one interior wire line.
- Test for wobble: Push gently side-to-side. If it shifts, add a second clip point toward the back.
Pro tips
- Acrylic edges can be sharp. Lightly sand edges or ask for polished edges if you’re ordering cuts.
- For a stronger hold, use two clip points: one near the front lip and one about two-thirds back.
Method 3: The “Super Sturdy” PVC Grip Channel + Hardboard Divider
If you’re organizing heavier items (think denim stacks, bulky towels, or pantry bins), build a divider that grips the shelf like it means it.
PVC pipe cut lengthwise becomes a channel that snaps over a wire. Attach a vertical panel to it, and you’ve got a surprisingly strong divider base.
Materials
- PVC pipe (diameter depends on shelf wire thickness; many wire shelves can work with 1/2″ to 3/4″ PVC as a starting point)
- Hardboard, thin plywood, or a rigid plastic panel
- Short screws + washers (or strong adhesive rated for plastic-to-wood)
- Hacksaw (or PVC cutter) and sandpaper
Steps
- Cut the PVC: Cut a piece equal to your shelf depth (minus about 1/2 inch).
-
Slice a channel: Carefully cut a lengthwise slit so the pipe can snap over a wire.
Sand the cut edge so it won’t scratch the shelf coating. - Attach the divider panel: Screw the panel to the PVC using washers to prevent pull-through.
- Snap onto the shelf: Press the PVC channel over a shelf wire line so it grips firmly.
- Stabilize if needed: Add a second PVC channel (front and back wire) for extra stability.
Pro tips
- If your shelf has a thicker front lip, position the PVC channel on an interior wire and use a small clamp at the front.
- If you ever cut wire shelving (to shorten it), smooth sharp ends and cap themwire ends can snag fabric and hands.
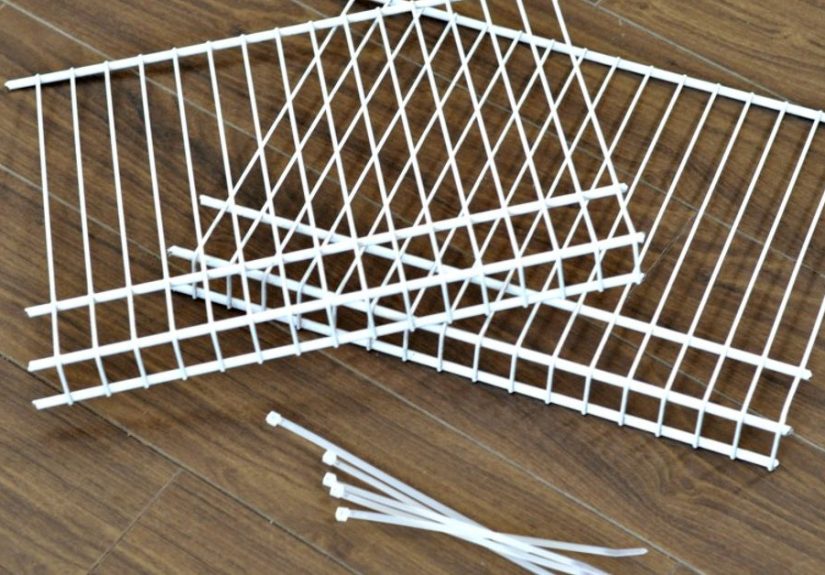
Method 4: The “Pantry Workhorse” Wire Grid Divider + Zip Ties
In pantries and laundry rooms, the goal is often “keep bins upright” more than “look like a showroom.” A small wire grid panel (or even a sturdy cooling rack)
zip-tied vertically can act as a divider that’s breathable and tough.
Materials
- Small wire grid panel (or sturdy rack)
- Zip ties
- Optional: rubber liner under items
Steps
- Choose size: Divider depth should match your shelf depth. Height depends on what you’re storing.
- Position the divider: Place it perpendicular to the shelf wires, centered where you want the split.
- Zip-tie in multiple spots: Tie near the front, middle, and back for stability.
- Load test: Place bins or stacks on each side and ensure the divider doesn’t bow.
Method 5: The “No-Tools, Renter-Friendly” Clip + Panel Divider
If you want something you can set up in ten minutes and remove without leaving evidence, combine a lightweight panel with removable clips.
This is perfect for dorms, rentals, and anyone who gets hives when a project requires a drill.
Materials
- Foam board, plastic canvas, or thin lightweight panel
- Medium or large binder clips
- Optional: adhesive rubber pads
Steps
- Cut panel to size: Match shelf depth and desired height.
- Clip at two points: Clip the panel to the front lip wire and an interior wire.
- Stop sliding: Add a small piece of rubber pad or liner under the clip contact area.
Making Dividers Actually Stay Put
If your divider slides, it’s not “broken”it just needs friction and better anchoring. Here are easy upgrades:
- Anchor front + back: One attachment point is a suggestion. Two is a plan.
- Add shelf liner: A thin rubber liner reduces shifting and keeps stacks from drifting into the “neighbor lane.”
- Shorten stacks: Very tall stacks are inherently unstable. Split into two categories or use bins.
- Keep heavy items low: Put dense stacks (jeans, towels) closer to shelf supports.
Where DIY Wire Shelf Dividers Shine (With Specific Examples)
Closet shelf: sweaters and jeans
Make 10–12 inch “lanes” so folded stacks don’t topple. Use acrylic or coroplast if you want visibility and an easy wipe-down surface.
If you share a closet, designate lanes per person to prevent the classic “Why is your hoodie living on my side?” mystery.
Linen closet: towels and sheet sets
Towel stacks look tidy until someone grabs one from the middle like they’re playing tug-of-war with the universe. Dividers keep stacks upright.
Consider taller dividers for bulky bath towels and shorter dividers for hand towels and washcloths.
Pantry wire shelves: snacks, paper goods, and bins
Dividers help bins stay aligned so you can pull one without dragging five others into a group project. Wire-grid dividers work well here because
they’re sturdy and tolerate spills without warping.
When It’s Smarter to Buy Clip-On Dividers
DIY is fantastic, but there are times when a store-bought clip-on divider is the right call:
- You want adjustability: If your categories change often, clip-on dividers slide and reposition quickly.
- You’re organizing heavy stacks: A metal, purpose-built divider may resist bending better long-term.
- You want a matching system look: Some closet systems offer dividers designed for their specific shelf style.
Even if you buy dividers later, DIY versions are great for testing spacing and figuring out what widths you actually use.
Troubleshooting: Common Problems and Easy Fixes
“My divider leans.”
Add a second anchor point toward the back. If the panel itself is too flexible, switch to a thicker material or double up.
“It slides when I pull clothes out.”
Add shelf liner under stacks and increase friction where the divider meets the shelf (rubber pads help). Also, clip or tie to two wires instead of one.
“It snags fabric.”
Round corners and sand edges. For zip ties, rotate the locking head away from where clothes brush past, then trim the tail flush.
“The shelf bows.”
Dividers don’t fix sagging shelves. Reduce load, redistribute heavy items closer to brackets/supports, and consider adding more supports if your shelving system allows.
Conclusion: A Little Structure Goes a Long Way
Wire shelf dividers are one of the highest-impact, lowest-drama upgrades you can make in a closet, linen cabinet, pantry, or laundry room.
Whether you choose coroplast and zip ties, sleek acrylic clips, or a sturdier PVC channel build, the best divider is the one that fits your shelf and your habits.
Start with one shelf, test your spacing, then scale the method you like most. Organization doesn’t require perfectionjust boundaries that keep your stacks from
auditioning for a gravity documentary.
Experiences: What DIY Wire Shelf Dividers Are Like in Real Life (500+ Words)
The first time you add dividers to a wire shelf, the biggest “aha” moment usually isn’t visualit’s behavioral. Suddenly, you stop stacking like you’re
trying to win a height contest. The divider quietly tells you, “This lane is full,” and that tiny limit changes how you put things away. Instead of building
one wobbly pile that leans into the next, you form smaller, calmer stacks that are easier to grab from the front without pulling the entire shelf into a
slow-motion collapse.
A common experience is realizing you don’t actually need as many categories as you thought. At first, it’s tempting to create ten narrow sections:
“Sweaters, hoodies, jeans, joggers, workout tops, workout bottoms…” But after a week, you may notice that ultra-specific lanes either sit empty or overflow.
Many DIYers end up simplifying into broader groupslike “cold-weather,” “everyday,” and “workout”and then using a bin inside a lane for smaller subcategories.
Dividers make this kind of tweaking easy because you can slide, reclamp, or retie them without redoing the whole shelf.
Another very real moment: discovering which fabrics are “shelf bullies.” Slippery athletic materials and silky pajama sets tend to slide and slouch,
especially on wire shelves. That’s why so many people end up adding a thin rubber shelf liner after the fact. The liner doesn’t just stop slidingit makes
the shelf feel more finished and reduces the little wire imprints you sometimes see on folded items. It’s also one of those upgrades you’ll wish you did on
day one, right after you spend five minutes re-folding a stack that mysteriously migrated into the next section.
In pantries, the “experience” is often about speed. Without dividers, you might push a box of granola bars onto the shelf and accidentally nudge a cereal box
forward, which bumps a bag of chips, which triggers the snack landslide. Dividers turn shelves into predictable zones. When you reach for something, you’re
no longer bracing for the chain reaction. People commonly describe it as making the pantry feel “quieter,” which sounds dramatic until you’ve lived through
a falling-box ambush while holding a mug of coffee.
There’s also a practical learning curve around placement. If you position dividers too close to shelf supports or wall clips, you might find they interfere
with how you slide bins in and out. Most DIYers eventually shift dividers slightly forward (or slightly back) to match how they naturally grab items. For
folded clothes, that sweet spot is often where you can pull from the front without catching sleeves on the divider edge. For towels and sheets, it’s where
you can lift a stack up and out without scraping knuckles along the wire.
And finally: the satisfaction is real. The best part isn’t having a photo-ready shelf (though that’s a nice bonus). It’s opening a closet door and seeing
categories that stay putday after daywithout constant re-stacking. Even simple DIY dividers can make your space feel more intentional, like you upgraded
your storage without committing to a full closet renovation. It’s the kind of project that quietly pays you back every time you don’t have to refold
everything just to grab one shirt.