Table of Contents >> Show >> Hide
- Why a Jute Bag Planter Is Actually Genius
- Before You Start: A Quick Word on “What Kind of Jute Bag Is This?”
- Materials and Tools
- Method A: The Easy “Planter Cover” (Best for Indoors)
- Method B: The “True Jute Bag Planter” (Lined + Drain-Ready)
- Best Plants for a DIY Jute Bag Planter
- Care and Maintenance: How to Keep It Cute (and Alive)
- Decoration Ideas That Don’t Ruin the Planter
- Troubleshooting: Common Problems (and Quick Fixes)
- FAQ: DIY Jute Bag Planters
- Wrap-Up: Your Plant Deserves a Better “Outfit”
- Real-World Experiences: What People Learn After Making a DIY Cute Jute Bag Planter
If you’ve ever looked at a jute tote bag and thought, “You were born to hold something greener than my receipts,” you’re in the right place.
A DIY jute bag planter is one of those projects that looks boutique-shop expensive but is secretly “I made this with stuff I already had.”
It’s also a brilliant way to turn an ordinary container plant into décor that says, I’m a plant personwithout screaming it like a neon cactus sign.
In this guide, you’ll learn two easy ways to make a jute bag planter:
(1) the no-drama planter cover method (fast, tidy, great for indoors), and
(2) the true planter method (lined and drain-ready, great for patios and porches).
We’ll also talk soil, plant picks, watering realities, and how to make it cute without accidentally creating a swamp in a handbag.
Why a Jute Bag Planter Is Actually Genius
It’s cute, but it’s also practical
Jute (often sold as burlap-like fabric or woven into sturdy tote bags) is breathable and textured, which gives your planter a warm, rustic look.
That texture also helps visually “soften” balconies, patios, front steps, and indoor corners that feel a little too hard-edged.
Plus, jute bags are lightweight and easy to moveso you can chase sunlight like your plants are VIPs and your windows are the red carpet.
It’s upcycling-friendly
Many jute bags are designed for transport and storage, including coffee sacks and shopping totes.
Repurposing one keeps it out of the trash and gives you a container with personality.
Basically: you’re doing décor, gardening, and a tiny eco-flex all at once.
It works for multiple styles
Jute can go farmhouse, coastal, boho, minimalist, or “I shop at farmers markets and I want everyone to know.”
Add a tag, ribbon, lace trim, stenciled pattern, or leather handlessuddenly it looks like a curated piece.
Before You Start: A Quick Word on “What Kind of Jute Bag Is This?”
Not all burlap/jute is treated the same way. Some sacks are made for food transport and are minimally treated,
while others (especially those intended for landscaping or heavy-duty outdoor use) can be treated for extra durability.
If your bag smells strongly chemical, feels tacky/coated, or sheds odd residue, treat it as “decor-only” and keep it as an outer cover with an inner pot.
For edible plants (like herbs you’ll actually eat), it’s smartest to use the bag as a decorative sleeve around a food-safe inner pot,
or use a solid liner so soil and roots aren’t directly touching the bag’s fabric.
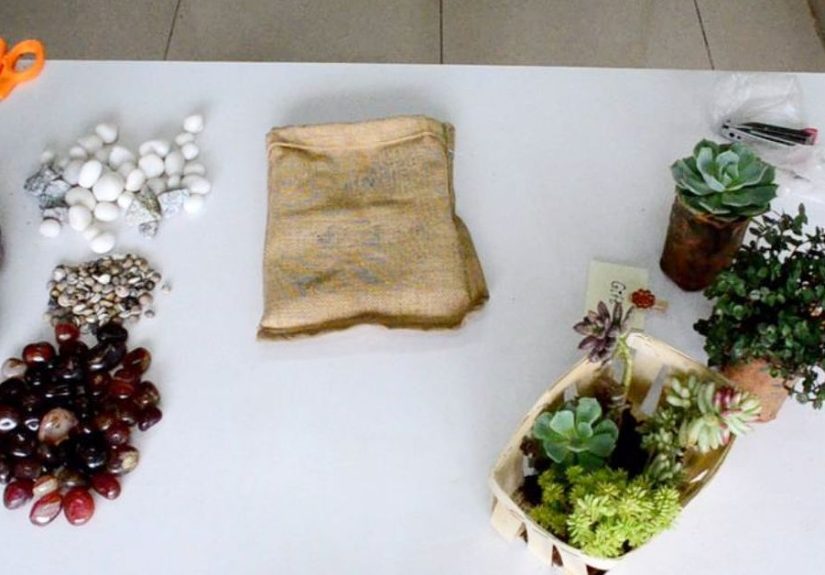
Materials and Tools
Core supplies (for both methods)
- Jute tote bag or clean burlap/jute sack (sturdy seams are your friend)
- Plant container (nursery pot, plastic pot, or a lightweight planter that fits inside)
- Potting mix (container mix, not garden soil)
- Plant(s) (flowers, herbs, leafy greens, or a cute combo arrangement)
- Scissors (fabric scissors are ideal)
Extras for the “true planter” method
- Liner: thick plastic (garden-safe), a pond liner scrap, or a reusable plastic bag
- Drainage tools: hole punch, awl, scissors, or a craft knife
- Optional: landscape fabric or coffee filters (to keep soil from escaping)
- Saucer or tray (especially for balconies, decks, or indoor use)
Cute factor add-ons (pick your personality)
- Ribbon, lace trim, or twine bow
- Iron-on vinyl letters (“HERBS,” “HELLO,” “DON’T DIE ON ME”)
- Stencils + outdoor acrylic paint
- Wooden tag, chalkboard label, or a cute plant “name” tag
- Handles: leather straps, rope, or the bag’s original handles
Method A: The Easy “Planter Cover” (Best for Indoors)
This method turns your jute bag into a stylish sleeve. Your plant stays in its normal pot,
which keeps everything clean, controlled, and way less likely to leak onto your floor like a botanical betrayal.
Step 1: Fit the inner pot
Place your plant (in its nursery pot or a standard plastic pot with drainage) inside the jute bag.
Ideally, the pot sits upright without pushing the bag’s sides outward too much.
If it’s wobbly, add a folded towel, cardboard circle, or a thin piece of foam at the bottom to stabilize it.
Step 2: Add a drip-catching strategy
If your inner pot has drainage holes (it should), put a waterproof saucer underneath it inside the bag,
or place the entire bag on a tray outside the bag. For a cleaner look, use a clear saucer or a low-profile plant tray.
Step 3: Style the top edge
Fold the top of the jute bag down once or twice to create a thick, tidy cuff.
This instantly looks intentionallike you didn’t just shove a plant into a grocery tote and call it a day (even if you did).
Step 4: Decorate lightly
Add a tag, a little bow, or a simple stencil. Keep it minimal so the plant remains the star.
Your pothos should not be upstaged by glitter. (Unless that’s your brand. No judgment. Mild concern, maybe.)
Method B: The “True Jute Bag Planter” (Lined + Drain-Ready)
This method lets the jute bag function as the planter body. Because jute isn’t naturally waterproof,
you’ll use a liner and add drainage. This is best for outdoor areas or places where you can set a tray underneath.
Step 1: Decide the final height
Roll the top of the bag down to your preferred height.
A shorter bag looks fuller and more “designer,” while a taller bag gives you more soil volume for larger plants.
Once you like the look, unroll it so you can work with the full bag.
Step 2: Add the liner (the leak-prevention hero)
Insert your liner inside the bag. The liner should cover the bottom and sides, but you can keep it a little below the rim
so it doesn’t show. Smooth it into the corners so the bag keeps its shape.
Step 3: Add drainage holes (yes, you really need them)
Drainage is everything in container gardening. If water can’t escape, roots sit in soggy soil and rot throws a party.
Use scissors or a hole punch to add 4–8 small holes in the liner at the bottom.
If your jute bag has a flat base, space the holes evenly. If it’s rounded, cluster holes in the lowest area.
Tip: If you’re tempted to add a thick layer of rocks at the bottom “for drainage,” skip it.
The better strategy is consistent potting mix throughout and proper drainage holes.
If you want to stop soil from escaping, place a coffee filter or a small piece of landscape fabric over the holes.
Step 4: Add potting mix (not yard soil)
Use a quality potting mix designed for containers. Garden soil compacts in containers, drains poorly, and makes roots work too hard.
For extra performance, mix in a little compost (for nutrients) and perlite or coconut coir (for aeration and moisture balance),
but don’t turn it into a science fairgood bagged potting mix goes a long way.
Step 5: Plant and arrange
Add soil until the bag is about halfway full, then position your plant(s).
For a “cute planter arrangement,” try the classic combo:
- Thriller: something upright (spiky dracaena, small ornamental grass, or a compact salvia)
- Filler: something bushy (petunias, calibrachoa, coleus, basil)
- Spiller: something trailing (sweet potato vine, ivy, creeping Jenny)
Fill around plants with potting mix, gently firm it (don’t pack it like concrete), and water thoroughly until excess drains.
Step 6: Roll the rim and finish the look
Roll the rim down to your chosen height. Add a bow, label, or tag. Step back and admire.
Optional: say “I made this” out loud once, for morale.
Best Plants for a DIY Jute Bag Planter
For maximum cute with minimal stress
- Herbs: basil, parsley, cilantro, thyme (great scent, easy harvest)
- Annual flowers: petunias, marigolds, pansies, begonias (big payoff)
- Leafy greens: lettuce, arugula, spinach (quick crops, shallow roots)
If you live somewhere hot or windy
Fabric-style planters can dry out faster than plastic pots because air moves through the sides.
In hot weather, choose plants that tolerate regular watering or consider placing the jute bag planter inside a larger tray
(so it can sip water between wateringswithout becoming swampy).
Succulents: possible, but do it correctly
If you want a succulent jute bag planter (very cute!), use the planter-cover method or a true planter with excellent drainage.
Use cactus/succulent mix and avoid overwatering. Succulents prefer “soak, then dry,” not “always moist.”
Care and Maintenance: How to Keep It Cute (and Alive)
Watering: check more often than you think
Container plants typically need more frequent watering than in-ground plants, and porous containers can increase that need.
A simple routine:
- Stick your finger into the soil about 1–2 inches.
- If it feels dry, water deeply until it drains.
- If it feels damp, wait and check again tomorrow.
Early morning watering is ideal outdoors. Indoors, water in the sink or on a tray and never let the planter sit in standing water for long periods.
Feeding: containers get hungry
Nutrients wash out of pots faster than garden beds. Use a slow-release fertilizer mixed into potting soil,
or feed with a diluted liquid fertilizer every couple weeks during active growth (especially for flowers and herbs).
If your leaves start looking pale or growth slows, your plant is basically sending a polite “snack?” email.
Sunlight: match the plant’s needs
Most flowering plants and many herbs do best with around 6+ hours of sun. Leafy greens can handle partial sun.
If you’re not sure, start with bright morning sun and some afternoon shade, then adjust based on how the plant behaves.
Longevity: jute is charming, not immortal
Outdoors, jute can fade, soften, and eventually wear down (especially with frequent wetting).
That’s not failurejust “seasonal fashion.”
If you want it to last longer, use it as a decorative sleeve (Method A), or keep the liner snug so the jute stays drier.
Decoration Ideas That Don’t Ruin the Planter
1) Stencils that look boutique
Use a stencil and outdoor acrylic paint. Dab paint lightly (don’t soak the fabric) and let it dry fully.
Stick to bold shapes or simple words: “HERBS,” “GROW,” “HI,” or your household’s most accurate motto: “WATER ME.”
2) Label tags for herb planters
A small chalkboard tag or wooden plant marker tied with twine makes the planter look organized and intentional.
Bonus: it helps you remember which green thing is basil and which is… “mystery leaf #3.”
3) Add handles that mean business
If your jute bag doesn’t have strong handles, you can add rope handles through reinforced holes (use grommets if possible),
or wrap the existing handles with twine for a cleaner look.
Troubleshooting: Common Problems (and Quick Fixes)
“My bag is getting mildew.”
Increase airflow, reduce splash watering on the fabric, and make sure water drains freely.
If outdoors, move it to a spot where it can dry faster after watering.
“The soil dries out crazy fast.”
Use a moisture-retentive potting mix (some include coconut coir), add a thin layer of mulch on top,
and consider a tray underneath outdoors to catch runoff (empty it if it stays full too long).
“My plant looks sad even though I water it.”
Overwatering can look like underwatering (droopy leaves, stress). Check drainage holes, switch to a better potting mix,
and confirm the plant is getting the right light.
FAQ: DIY Jute Bag Planters
Can I plant directly into a jute bag with no liner?
Technically you can, but it’s riskywater will seep, the bag can break down faster, and you’ll have less control over mess and moisture.
A liner makes the planter more reliable and helps your jute stay cute longer.
Do I need a saucer under a jute bag planter?
If it’s indoors, yes. Outdoors, it dependsbut it’s often smart on balconies, decks, and patios to protect surfaces and manage runoff.
What size jute bag works best?
Medium tote size is the sweet spot: big enough for roots, small enough to move easily.
If you’re growing veggies (like peppers or tomatoes), you’ll want a larger volume container or a dedicated grow bag size.
Wrap-Up: Your Plant Deserves a Better “Outfit”
A DIY cute jute bag planter is the rare craft that’s genuinely useful, looks expensive, and doesn’t require a glue gun meltdown.
Start with the easy planter-cover method for clean indoor styling, or go full “true planter” with a liner and drainage for outdoor growing.
Either way, you get a cozy, textured planter that makes your plants look like they have their life togethereven if the rest of us don’t.
Real-World Experiences: What People Learn After Making a DIY Cute Jute Bag Planter
Here’s the funny thing about a jute bag planter: it’s adorable on day one, and then it starts teaching you lessons like a tiny, leafy life coach.
Most DIYers don’t mess up because they’re “bad at plants.” They mess up because containers behave differently than garden beds,
and jute-style planters add a few extra quirks. The good news? The learning curve is short, and the results are worth it.
One of the first “aha” moments is realizing how fast soil can dry out in breathable containersespecially on a sunny patio or a windy balcony.
People often water the way they’d water a ceramic pot, then wonder why their basil looks like it just read a tragic novel.
The fix usually isn’t flooding the planter; it’s checking moisture more often and watering deeply when it’s actually needed.
Many gardeners end up loving the finger-test routine because it’s simple and it prevents both extremes: crispy plants and swampy roots.
Another common experience is discovering that “cute” and “functional” need to be friends, not enemies.
For example, painting the entire bag in thick craft paint might look great for an hour, but it can stiffen the fabric, trap moisture,
and lead to funky smells. The successful approach tends to be light decorationstencils, tags, a folded cuff, maybe a ribbon
while leaving most of the material breathable and natural-looking.
People also learn quickly that keeping the inside tidy matters more than they expected: a liner turns a potential mess into a reliable planter.
Many DIYers also report a surprisingly satisfying “upgrade effect” when they switch from garden soil to real potting mix.
It sounds boring, like a lecture from the container gardening police, but it’s a real difference you can see:
potting mix drains better, stays lighter, and helps roots get oxygen. Once you’ve had one container fail because soil compacted into a brick,
you become a potting-mix evangelist. Not the annoying kindjust the kind who quietly nods when someone says, “My container plant isn’t thriving.”
A big real-life win is using the jute bag as a decorative sleeve around a normal nursery pot.
People who try this method first often say it makes them feel “instantly more organized,” because they can lift the plant out to water it in the sink,
let it drain, and put it backno puddles, no mystery drips, no ruined shelf.
The bag stays clean longer, too, and you can swap plants seasonally without rebuilding the whole setup.
That flexibility becomes a huge part of the charm: spring pansies become summer petunias, then fall mums, then maybe a winter evergreen arrangement.
Finally, there’s the emotional experience: jute bag planters tend to make people notice their plants more.
When something is styled nicely, you pay attention to itso you catch issues earlier (wilting, pests, dry soil, or a plant that needs more light).
The planter becomes part of your space, not a random pot shoved into a corner.
And honestly? That’s often the difference between “I kill plants” and “I’m learning plants.”
The jute bag isn’t magicit just makes the whole thing feel more approachable, more fun, and a lot more you.