Table of Contents >> Show >> Hide
- Secret #1: Pick the sunniest, most convenient spot (not the prettiest one)
- Secret #2: Treat soil like the main character (because it is)
- Secret #3: Start smalland choose “easy wins” on purpose
- Secret #4: Plant by dates and spacing, not vibes
- Secret #5: Water deeply and consistently (your plants hate surprises)
- Secret #6: Mulch early, monitor often, and prevent pests the low-drama way
- Quick Start Checklist (Print This, Tape It to Something, Thank Yourself Later)
- 500+ Words of Real-World Experience: What First-Time Gardeners Actually Run Into
- Experience #1: The “I planted everything on Saturday” sprint
- Experience #2: The “my bed is tiny, so I can fit more plants” math problem
- Experience #3: The watering roller coaster
- Experience #4: The first pest panic (and how people learn to stay calm)
- Experience #5: The confidence boost that changes everything
- Conclusion: Your first garden doesn’t need to be perfectjust well-started
Starting your first vegetable garden is equal parts “Wholesome cottagecore fantasy” and “Why is my zucchini
suddenly the size of a submarine?” The good news: most beginner gardening heartbreak is preventable.
The better news: the fixes are simpleif you know the right order to do them in.
This guide breaks down six practical, beginner-friendly secrets to starting a vegetable garden the smart wayplus a
longer “real-life experience” section at the end so you can learn from the glorious, muddy mistakes that nearly
every first-time gardener makes. (Consider it garden wisdom… without the emotional scarring.)
Secret #1: Pick the sunniest, most convenient spot (not the prettiest one)
Your first vegetable garden doesn’t need a perfect yard. It needs a spot that gets enough sun, drains well, and
is easy to reach with a hose. Beginners often choose the “cute corner” of the yard and then wonder why their
tomatoes look like they’re doing slow-motion collapse. Vegetables are basically solar-powered food factories.
What “full sun” really means
- Aim for 6–8+ hours of direct sunlight for classic warm-season crops like tomatoes, peppers, cucumbers, squash, and basil.
- If you only get 4–6 hours, lean into leafy greens and some roots (lettuce, spinach, arugula, radishes, beets).
- Watch the light late morning through afternoonthat’s when shade from buildings/trees can quietly sabotage your plans.
Convenience is not optional
The best garden is the one you actually check. Put it where you’ll see it:
near a door, on your normal walking path, or close to your water source. If watering requires a 200-foot hose,
a three-part assembly, and a motivational speech, your garden will “accidentally” become a drought experiment.
Quick site checklist
- Sunny most of the day
- No standing water after rain; no “mystery puddle zone”
- Easy hose access
- Room to move around without stepping on plants
Secret #2: Treat soil like the main character (because it is)
New gardeners love shopping for plants. Experienced gardeners love improving soil. The difference is yield.
Vegetables are hungry, fast-growing plants. If your soil is compacted, low in organic matter, or wildly off in pH,
your garden will struggle no matter how adorable your seedlings are.
Do one unsexy thing: get a soil test
A soil test is the cheat code for beginners. It tells you what you actually havepH, nutrients, and what to add
(or not add). Without it, it’s easy to overdo fertilizer, underdo lime, or guess your way into a disappointing season.
Many county extension offices make testing cheap and simple.
Build soil with organic matter (compost is your best friend)
If you do nothing else, add compost. Compost improves drainage in clay, helps sandy soil hold moisture,
and supports the soil life that makes nutrients available to plants.
Beginner-friendly soil upgrade plan:
- Loosen soil (or fill a bed) so roots can expand easily.
- Mix in 2–3 inches of compost into the top layer (or top-dress if plants are already growing).
- Follow soil test recommendations for lime/sulfur and nutrients.
Raised bed or in-ground: which is better for beginners?
Either can work. But many first-timers love raised beds because they warm faster in spring, drain well,
and make soil improvement easier. The tradeoff: raised beds can dry out fasterso your watering strategy matters
(we’ll fix that in Secret #5).
Secret #3: Start smalland choose “easy wins” on purpose
Your first vegetable garden should feel manageable, not like a second job with surprise insects.
A small, well-tended garden usually outperforms a big, chaotic one.
A smart first-garden size
- Containers: 3–5 large pots can produce a surprising amount of food (herbs, lettuce, peppers).
- Raised bed: a single 4’ x 8’ bed is beginner goldenough space to learn without overwhelm.
- In-ground: start with one or two short rows (8–12 feet long).
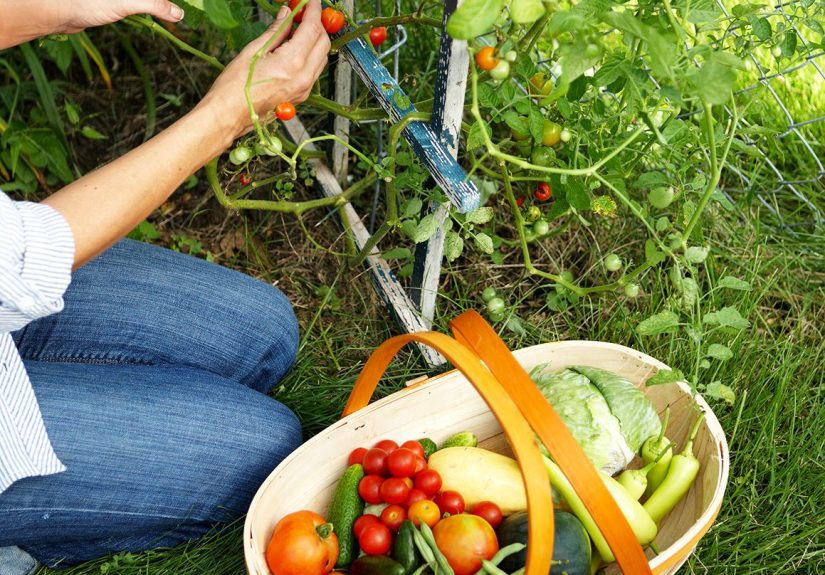
Beginner-friendly crops (low drama, high reward)
- Leafy greens: lettuce, spinach, arugula (fast, forgiving, great for early spring/fall)
- Roots: radishes (quick confidence boost), carrots (best in loose soil), beets
- Legumes: bush beans (productive, straightforward)
- Summer staples: zucchini (productivealmost aggressively), cherry tomatoes, basil
- Hardy herbs: chives, parsley, thyme (in containers or borders)
Skip these until year two (unless you love puzzles)
- Cauliflower and head broccoli (timing-sensitive)
- Corn (needs space, pollination blocks)
- Big pumpkins (space + long season)
Easy wins build momentumand momentum is the secret fertilizer nobody sells in a bag.
Secret #4: Plant by dates and spacing, not vibes
Gardening rewards optimism… but only if you pair it with a calendar. The biggest beginner mistake is planting warm-season
crops too early (hello, sad frost-bitten tomatoes) or cramming plants too close because “they look lonely.”
Plants don’t need emotional support. They need air flow.
Know your frost dates and your USDA zone
Your last spring frost date tells you when it’s generally safe to transplant warm-season crops outdoors.
Your USDA hardiness zone matters most for perennials, but it helps you understand climate patterns and seasonal timing.
Use a reputable planting calendar or your local extension’s schedule.
A simple beginner planting flow
- Early spring: peas, lettuce, spinach, radishes (as soon as soil can be worked)
- After frost risk drops: beans, cucumbers, squash, tomatoes, peppers
- Late summer: plant fall greens and quick roots for a second wave of harvest
Spacing: the quiet hero of plant health
Crowding leads to weak plants, mildew, and tiny harvests. Follow the seed packet or transplant tag spacing.
If it says 18–24 inches, it’s not being dramatic. It’s trying to prevent your garden from becoming
an all-you-can-eat buffet for disease.
Example: A beginner-friendly 4’ x 8’ bed layout
- One trellis side: cucumbers or pole beans (vertical growing saves space)
- Middle: 2–3 pepper plants, plus basil
- Front edge: lettuce in spring → replaced by bush beans in early summer → replaced by fall greens
That last partreplacing crops as seasons changeis not advanced gardening. It’s just good planning.
(Which brings us to a pro move you can steal immediately: succession planting.)
Bonus tactic: succession planting for steady harvests
Instead of planting all your beans at once and drowning in them for two weeks, sow a smaller batch every couple of weeks.
Or follow an early crop (radishes) with a warm-season crop (beans), and then finish with fall lettuce. This keeps your
garden productive longer and reduces the “everything ripened at once” panic.
Secret #5: Water deeply and consistently (your plants hate surprises)
Vegetables aren’t drought-tolerant champs. Many problems beginners blame on “bad luck” are actually
inconsistent watering: bitter cucumbers, cracked tomatoes, blossom-end rot, tough greens, and stunted growth.
Your goal isn’t constant soggy soil. It’s even moisture.
What “deep watering” means in practice
- Water so moisture reaches about 6–8 inches deep once plants are established.
- In many gardens, a common target is roughly about 1 inch of water per week from rain + irrigation (more in heat, wind, and sandy soil).
- Seedlings and new transplants need more frequent watering at first because their roots are shallow.
Morning watering is the move
Watering earlier gives leaves time to dry, which helps reduce the risk of many foliar diseases.
If you use sprinklers, morning is usually the best window.
Beginner-proof watering setups
- Soaker hose: simple, cheap, and targets the root zone
- Drip irrigation: efficient and consistent (excellent if you’re scaling up)
- Mulch + deep watering: the combo that makes you look like you’ve been gardening for years
If you’re using raised beds, check moisture more oftenthose mixes can drain fast, especially in the first year.
Don’t guess by surface appearance; feel the soil a couple inches down.
Secret #6: Mulch early, monitor often, and prevent pests the low-drama way
The goal isn’t a perfect, pest-free garden (that’s a fairy tale). The goal is a garden where problems stay small.
Most pest or disease disasters happen because a small issue goes unnoticed for two weeksand then throws a party.
Your best strategy is simple prevention.
Mulch is your garden’s “set it and forget it” helper
Organic mulch (like shredded leaves, straw, or untreated grass clippings used carefully) helps conserve soil moisture,
suppress weeds, moderate soil temperature, and reduce soil splash that can spread disease. Apply after plants are established,
leaving a little breathing room around stems.
Use IPM: the calm, grown-up approach to pests
Integrated Pest Management (IPM) sounds fancy, but it’s basically: identify the pest, use the least intense fix first,
and save chemicals for last resort. Beginner-friendly IPM habits:
- Scout weekly: check undersides of leaves, stems, and new growth
- Hand-remove: bigger pests (hornworms) and egg clusters
- Water spray: knocks back aphids on sturdy plants
- Physical barriers: row covers for young plants can prevent early damage
- Protect beneficials: avoid broad sprays that wipe out the “good bugs”
Rotate crops to break pest and disease cycles
Even in a small garden, try not to plant the same plant family in the same spot year after year.
Rotation can help reduce buildup of soil-borne diseases and recurring insect issues.
A beginner-friendly method: divide your bed into 3–4 “zones” and move plant families each season.
Simple plant family groups:
- Nightshades: tomatoes, peppers, eggplant, potatoes
- Cucurbits: cucumbers, squash, melons
- Brassicas: broccoli, cabbage, kale
- Legumes: beans, peas
Mulch, monitor, rotate. That’s the “secret handshake” of gardeners who harvest more and stress less.
Quick Start Checklist (Print This, Tape It to Something, Thank Yourself Later)
- Choose a sunny spot near water (6–8+ hours if possible).
- Do a soil test; add compost; adjust based on results.
- Start small: one bed, a few pots, or a short row.
- Pick beginner crops and plant by frost dates.
- Follow spacing; add support (trellis/cage) early.
- Water deeply and consistently; mulch once plants are established.
- Scout weekly; use simple IPM; plan to rotate crops next year.
500+ Words of Real-World Experience: What First-Time Gardeners Actually Run Into
Below are “experience-style” lessons drawn from patterns that show up again and again for new gardeners. Think of these
as composite storiesrealistic scenarios that capture the most common first-season wins, surprises, and facepalms.
If you recognize yourself in any of them, congratulations: you’re officially a gardener.
Experience #1: The “I planted everything on Saturday” sprint
A classic first-year move is to buy a cart full of seedlings on a sunny weekend, plant them all at once, and then feel
like a superhero. Two weeks later, reality hits: some plants are thriving, some are barely moving, and a few look like
they’re writing a sad poem about their struggle. The hidden issue is usually timing. Cool-season crops (lettuce, peas,
spinach) can handle chillier weather, while warm-season crops (tomatoes, peppers, cucumbers) sulk in cold soil and stall
if nights are too cold. The fix is simple: split your planting into waves. Early spring is for cool-season crops; late spring
after frost risk is for warm-season crops. When you treat your garden like a season-long project instead of a one-day event,
plants respond with better growth and fewer “mystery problems.”
Experience #2: The “my bed is tiny, so I can fit more plants” math problem
New gardeners often look at spacing guidelines and think, “That’s not a rule; that’s a suggestion.” So tomatoes get tucked
in 12 inches apart, peppers get crowded like concert seating, and basil becomes a leafy brawl. At first, it looks lushlike an
edible jungle. Then airflow disappears, leaves stay damp longer, and mildew shows up as if it got a formal invitation. The harvest
can also be surprisingly small because plants compete for light, water, and nutrients. The experience-based takeaway is this:
spacing is yield insurance. A bed with fewer plantsproperly spaced, supported, and fedalmost always produces more food than a bed
crammed to the edges. It also makes weeding, watering, and harvesting way easier (which means you actually do it).
Experience #3: The watering roller coaster
Another common first-season story: a gardener waters lightly every day for a week, then gets busy and skips several days, then
over-corrects with a flood. Plants hate this. Inconsistent moisture can lead to issues like cracking fruit, bitter flavors, and weak growth.
A big “aha” moment for many beginners is learning to water deeper and less oftenencouraging roots to grow downand then using mulch
to smooth out the moisture swings. After gardeners switch to a soaker hose or drip line and add mulch once plants are established, the garden
stops feeling like a high-maintenance pet and starts behaving like a productive system.
Experience #4: The first pest panic (and how people learn to stay calm)
The first time a new gardener sees chewed leaves, it can feel personal. But most experienced gardeners will tell you: pests happen.
The real experience-based lesson is to respond early and lightly. Many beginners learn to scout once a weekflip leaves, check stems,
look for clusters of eggsand solve problems when they’re still small: a blast of water for aphids, hand-removal of caterpillars,
a barrier cloth for young plants, or simply pruning off badly damaged leaves. That calm approach (instead of “nuke the yard from orbit”)
often leads to better long-term results, especially because it preserves beneficial insects that naturally reduce pest populations.
Experience #5: The confidence boost that changes everything
Nearly every first-time gardener has a moment when it “clicks”maybe it’s the first radish pulled from the soil, the first salad made
entirely from their own greens, or the first cherry tomato eaten warm from the vine. That moment creates the motivation to keep going:
to add compost next season, to plan a better layout, to try succession planting, to keep a simple garden notebook. Starting small and choosing
easy wins makes that moment far more likely. And once you’ve tasted that first real harvest, you stop asking whether you can garden and start
asking what you’ll grow next.
Conclusion: Your first garden doesn’t need to be perfectjust well-started
If you remember nothing else, remember this: a successful first vegetable garden is built on a few smart foundationssun, soil, simple crops,
good timing, consistent watering, and low-drama prevention. Do those things, and you’ll spend less time troubleshooting and more time eating.
And if something still goes sideways? Welcome to gardening. You’ll learn, adjust, and come back next season betterlike a normal person with
dirt under their nails and a suspicious number of zucchini recipes.