Table of Contents >> Show >> Hide
- Why Reclaimed Wood + Pipe Is a Design Win
- Plan First (So You Don’t Buy 19 Elbows by Accident)
- Materials: What You’ll Need
- Pick and Prep Reclaimed Wood (The Step That Makes It Look Expensive)
- A Simple, Good-Looking Plan (With Real Measurements)
- Build Steps: Reclaimed Wood + Pipe TV Stand
- Step 1: Sketch the frame and count fittings
- Step 2: Clean the pipe (unless you love black smudges on everything)
- Step 3: Cut shelves to size and refine the edges
- Step 4: Sand smart (and keep the character)
- Step 5: Dry-fit the pipe frame on the floor
- Step 6: Mark flange locations and predrill
- Step 7: Attach the top shelf, then add lower shelf supports
- Step 8: Add cable management
- Step 9: Finish the wood (this is where it becomes “furniture”)
- Safety and Stability (Unsexy But Important)
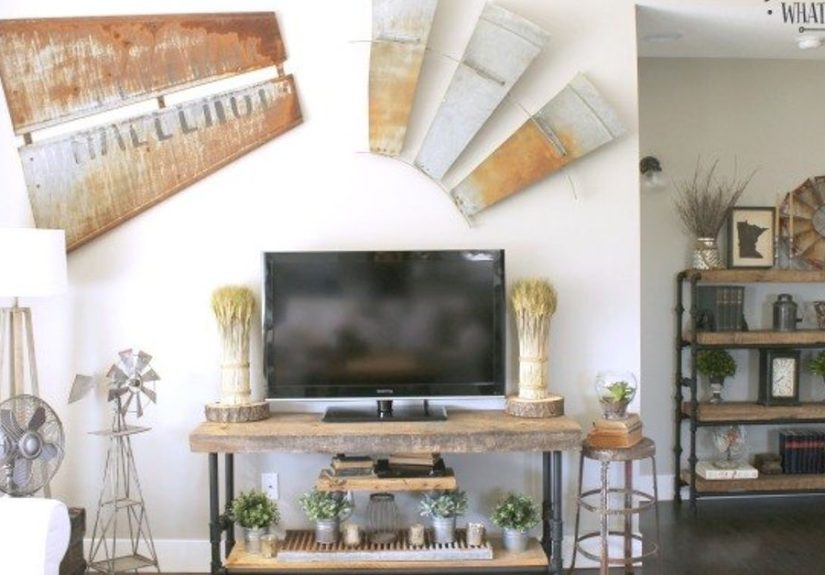
- Style Upgrades That Make It Look Custom
- Budget Expectations and Where to Source Materials
- Troubleshooting: Common Problems (And Fixes)
- Real-World Build Notes (About of Been-There Experience)
- Conclusion
Your TV is basically the loudest piece of art you ownso why is it sitting on a flimsy “temporary” table you’ve had since the last three streaming services ago?
A reclaimed wood-and-pipe TV stand is the sweet spot between rustic cozy and industrial cool, and it’s surprisingly beginner-friendly.
You get a sturdy media console, open shelving for gear, and that “I totally have my life together” vibewithout paying designer prices.
In this guide, you’ll learn how to plan the right size, pick safe reclaimed wood, build a rock-solid black iron pipe frame, and finish everything so it looks intentional
(not like a science project that escaped the garage). Let’s build an industrial TV stand you’ll actually be proud to show off.
Why Reclaimed Wood + Pipe Is a Design Win
Reclaimed wood brings character: knots, saw marks, color variation, and that “this board has stories” texture you can’t fake with a brand-new 2×10.
Black steel pipe adds structure and contrastclean lines, visible fittings, and a vintage factory vibe that fits right in with modern farmhouse, loft, rustic, and urban industrial styles.
- It’s modular: Threaded fittings let you tweak heights and shelf spacing without complicated joinery.
- It’s strong: Pipe frames handle weight well, and open shelves keep components ventilated.
- It looks custom: Even a simple two-shelf build can look like boutique furniture.
Plan First (So You Don’t Buy 19 Elbows by Accident)
The best DIY TV stand starts with three numbers: width, depth, and height. Measure your TV, your space, and your “stuff.”
(Yes, “stuff” is a technical term in carpentry.)
1) Choose the right width
A good rule: make the stand at least as wide as the TV, and ideally 6–12 inches wider overall for balance and styling room.
If you’re adding tower speakers or big decor, go wider.
2) Don’t skimp on depth
Many media consoles fall in the 16–20 inch depth range because it fits most receivers, game consoles, and cable management without looking bulky.
If you have a large AV receiver, check its depth (including cables) and give yourself breathing room.
3) Set a comfortable height
If the TV will sit on the stand, aim for viewing comfort: the center of the screen should land close to seated eye level for most setups.
In many living rooms, that “sweet spot” is around the low-40-inch range from the floor to the screen center, depending on your sofa height and TV size.
If your TV is wall-mounted above the stand, you can prioritize storage and aestheticsjust keep the stand height proportional.
Ventilation and cable reality check
- Leave open space around consoles and receivers so they don’t cook themselves.
- Plan at least one cable pass-through hole per shelf (or an open back).
- If you’re hiding a power strip, mount it under a shelf so it’s accessible but out of sight.
Materials: What You’ll Need
You can build this with either 1/2-inch or 3/4-inch black steel pipe. For a TV stand, 3/4-inch often looks more substantial,
but 1/2-inch is easier to find and budget-friendly. Either can work beautifully with smart design (and a center support when needed).
Wood
- Reclaimed boards (common picks: 1×10, 1×12, scaffold planks, old barn boards)
- Optional: a second board laminated underneath for extra thickness and stiffness
Pipe + fittings (typical parts)
- Floor flanges (these screw to the wood shelves)
- Tees and elbows (for corners and shelf supports)
- Threaded nipples (short straight pipe sections)
- Optional: unions (make disassembly easier), caps, and adjustable feet
Fasteners + finishing supplies
- Wood screws for flanges (length depends on shelf thickness)
- Sandpaper (80 → 120 → 180/220 grit progression works well)
- Wood finish: wipe-on polyurethane, hardwax oil, or a matte clear coat
- Optional: stain or tinted oil
- Degreaser and clean rags for pipe cleaning
Tools
- Measuring tape, pencil, square
- Drill/driver + bits (including a countersink bit if you like clean screw heads)
- Sander (random orbit is great) or sanding block
- Saw (circular saw, miter saw, or table sawuse what you’ve got)
- Stud finder (if anchoring to wall), level
- Optional but smart: a metal detector for reclaimed wood scanning
Pick and Prep Reclaimed Wood (The Step That Makes It Look Expensive)
Reclaimed wood is gorgeousbut it can also be sneaky. Nails, staples, grit, old finishes, and mystery paint are all part of the “charm.”
Your job is to keep the charm and remove the hazards.
Scan for metal (seriously)
Hidden nails can destroy saw blades, nick planer knives, and ruin your day in record time. Scan boards carefully and pull anything you find.
If you do a lot of reclaimed projects, a handheld metal detector is worth it.
Clean first, sand second
Brush off dirt and vacuum cracks before sanding. Sanding a dusty board can grind grit deeper and create ugly scratches.
For deep grime, a damp rag and mild cleaner can helpjust let the wood dry fully before finishing.
Painted wood: treat it like it might be lead-based
If the reclaimed wood is painted (especially if it looks old), be cautious. Lead-based paint and lead-contaminated dust are serious hazards,
and sanding or scraping old paint the wrong way can create a dust problem you do not want in your home.
If you can’t confirm it’s lead-free, skip aggressive sanding of painted areas and consider sealing the surface insteador choose unpainted boards.
A Simple, Good-Looking Plan (With Real Measurements)
Here’s a reliable “starter” design that looks balanced in most living rooms:
- Overall size: 60″ wide × 18″ deep × ~20″ tall
- Shelves: Two shelves (top for TV, lower for components/baskets)
- Support: Four corner legs + optional center leg under the top shelf if your span is long
Example cut list (wood)
- (2) shelves: 60″ × 18″ (or whatever fits your space)
Example pipe concept (not a strict shopping list)
Because pipe stands are modular, the exact parts depend on your height and shelf layout. The easiest way to plan is to sketch the frame and
count fittingsone tee here, an elbow there, flanges where pipe meets wood. Then choose nipple lengths to create your shelf spacing.
Build Steps: Reclaimed Wood + Pipe TV Stand
Step 1: Sketch the frame and count fittings
Draw a quick front and side view. Mark where each shelf will sit, where legs land, and where you might add a center support.
This is the moment to realize you need four flanges, not “probably four-ish.”
Pro tip: threaded pipe projects often take a little patience to align neatly (because tightening threads can rotate parts slightly).
Plan for small adjustments during assembly.
Step 2: Clean the pipe (unless you love black smudges on everything)
Many black steel pipes and fittings come coated in a rust-preventative oil. Wipe everything down thoroughly with a degreaser or solvent,
then dry it right away. If you skip this step, paint won’t stick well, clear coats can fisheye, and your hands will look like you changed a tractor’s oil.
Optional upgrade: after cleaning, apply a clear protective coat (or even a thin wax) to reduce fingerprints and slow surface rustespecially in humid climates.
Step 3: Cut shelves to size and refine the edges
Cut your shelves to final dimensions. If you want the “high-end furniture” look, soften sharp edges with sandpaper (a slight round-over is enough).
For reclaimed wood, don’t chase perfectionaim for “comfortable to touch” and “splinter-free.”
Step 4: Sand smart (and keep the character)
Start around 80 grit if the wood is rough, then move up through 120 and finish around 180/220.
You’re not sanding a dining table for a museumjust smoothing the surface so it’s clean, safe, and finish-ready.
Keep saw marks or dents if you like that timeworn look; just knock down the sharp bits.
Step 5: Dry-fit the pipe frame on the floor
Assemble the legs and side frames first, then connect them with horizontal pipes.
Use a square and a level to check the frame. If something is slightly twisted, loosen and re-tighten in a different sequence.
- If your stand will be wide: add a center leg or center support to reduce shelf sag over time.
- If your floor is uneven: consider adjustable feet or stick-on felt pads for fine tuning.
Step 6: Mark flange locations and predrill
Set the frame on the underside of the shelf and mark flange holes. Remove the frame, then predrill pilot holes.
Predrilling helps prevent splitting and makes driving screws easierespecially in dense reclaimed hardwoods.
Use screws that bite securely but won’t poke through the top surface. If your shelves are thinner, choose shorter screws or add thickness with a hidden runner underneath.
Step 7: Attach the top shelf, then add lower shelf supports
Screw the flanges to the underside of the top shelf first. Flip the assembly carefully (get helpTV stands love to do the awkward wobble dance),
then install the lower shelf supports at your planned spacing. Once those supports are solid, attach the lower shelf.
Step 8: Add cable management
Easiest move: keep the back open. If you want cleaner cable runs, drill one or two large holes near the back corners of each shelf
and use a grommet. You can also mount a power strip under the top shelf so everything plugs in neatly.
Step 9: Finish the wood (this is where it becomes “furniture”)
Choose your finish based on the vibe:
- Matte clear coat: keeps the reclaimed look and protects from rings and scratches.
- Wipe-on polyurethane: forgiving, durable, great for a household that actually uses the living room.
- Hardwax oil: silky feel and easy spot-repairs, with a warm tone.
- Stain + clear: if you want to match other furniture, test on scrap firstreclaimed wood can absorb unevenly (that’s part of the adventure).
Let finishes cure fully before loading electronics. Some finishes feel dry fast but need extra time before they’re truly tough.
Safety and Stability (Unsexy But Important)
TVs and furniture can tip, especially on slick floors or if someone bumps/climbs/pullskids and pets don’t exactly RSVP before doing chaos.
If your stand is tall, narrow, or holding a heavy TV, consider anchoring it to the wall with an anti-tip device.
It’s a small step that can prevent big accidents.
- Keep heavier components on lower shelves to lower the center of gravity.
- Level the stand so it doesn’t rock.
- If anchoring, connect to wall studs (not just drywall) whenever possible.
Style Upgrades That Make It Look Custom
- Add casters: Industrial rolling console vibe (and easier cleaning behind it).
- Mix wood tones: top shelf darker, bottom shelf lighter for contrast.
- Basket storage: woven baskets on the lower shelf hide “visual noise” (controllers, cables, etc.).
- Pipe color tweak: keep raw black, or paint to oil-rubbed bronze for warmer metal tones.
- Matching wall shelves: one small pipe-and-wood shelf nearby ties the whole media wall together.
Budget Expectations and Where to Source Materials
Cost depends on pipe size and reclaimed wood pricing in your area. Reclaimed boards from architectural salvage can cost more than new lumber,
but you’re buying character. For cheaper reclaimed options, look for:
- Habitat for Humanity ReStore locations
- Local salvage yards and reclaimed lumber shops
- Old shelving, barn wood, scaffold boards (inspect carefully)
Pipe and fittings add up fast, so planning your fitting count before shopping can save real money (and prevent the “I guess I’ll build a second stand with the leftovers” situation).
Troubleshooting: Common Problems (And Fixes)
“My stand wobbles.”
Usually it’s an uneven floor or a slightly twisted frame. Add felt pads, adjustable feet, or re-tighten the frame in a new sequence while it’s on a flat surface.
“The pipe leaves black marks.”
That’s leftover oil or residue. Clean again, dry thoroughly, and apply a clear coat or wax to seal it.
“My shelf is starting to sag.”
Add a center support leg under the longest span, or stiffen the shelf with a hidden wood cleat/running support underneath.
“The reclaimed wood looks blotchy after stain.”
Totally normal. Try a pre-stain conditioner on softwoods, or embrace the variation with a tinted oil finish that blends more naturally.
Always test on a hidden area first.
Real-World Build Notes (About of Been-There Experience)
The first time I built a reclaimed wood and pipe TV stand, I thought the “hard part” would be cutting the wood. Plot twist: it was the pipespecifically,
the way pipe fittings can make you feel like you’re assembling a metal octopus that refuses to sit straight.
I laid everything out on the floor, felt very confident, and then realized I’d counted tees wrong. Not by one. By four.
That’s when I learned the golden rule of pipe projects: sketch it, count it, then count it again like you’re checking your bank balance after a weekend trip.
The second surprise was the coating on the pipe. Even after a quick wipe, my hands looked like I’d been eating charcoal for lunch.
Once I actually degreased every piece properly and dried it right away, the difference was hugeno smudges on the wood, no fingerprints, and the finish looked cleaner.
If you want a “styled home” look (instead of “unfinished workshop”), sealing the pipe after cleaning is the secret sauce. A light clear coat kept it looking crisp,
especially in a humid room where metal can flash-rust if it feels neglected.
Reclaimed wood was the fun part… until it wasn’t. One board had a tiny staple hiding right where my saw wanted to go.
After that, I became a metal-detecting zealot. Scan, mark, pull, repeat. It’s not glamorous, but it saves blades and prevents that heart-stopping moment when your tool hits something it shouldn’t.
I also stopped trying to sand every “imperfection” away. The little dents and saw marks were exactly why I chose reclaimed wood in the first place.
Instead, I focused on sanding for touchno splinters, no sharp corners, nothing that would snag a blanket during movie night.
The best design upgrade I made was adding a subtle center support under the top shelf. On a wide stand, that extra support is cheap insurance.
TVs are lighter than they used to be, but a big screen plus a soundbar plus someone leaning on the corner can add up.
With a center leg, the whole stand felt more “solid furniture” and less “cool-looking DIY.”
Finally, finishing taught me patience. I wanted to load everything back on the shelves immediatelybecause once you’ve been living with a temporary setup,
you’re emotionally attached to the idea of “done.” But letting the finish cure properly meant fewer scuffs, fewer sticky spots, and a surface that could handle real life:
sweaty iced drinks, controller tosses, and the occasional “I swear I put the remote right here.”
When it was finished, the stand didn’t just hold the TVit anchored the room. And yes, I absolutely pointed at it and said,
“We could buy furniture, but we make furniture,” like I was hosting a tiny DIY award show in my living room.
Conclusion
A reclaimed wood and pipe TV stand is one of those rare projects that hits the trifecta: it looks high-end, it’s genuinely functional, and it’s flexible enough
to customize for your exact space. Measure with intention, prep reclaimed wood safely, clean and seal the pipe, and don’t be shy about adding center support on wider builds.
You’ll end up with a rustic industrial media console that feels tailoredbecause it is.