Table of Contents >> Show >> Hide
- What Is Pavlova?
- Where Did Pavlova Come From?
- Why Pavlova Works (A Quick, Helpful Science Moment)
- Ingredients You Need (and Why Each One Matters)
- Classic Pavlova Recipe (Crisp Shell, Marshmallow Center)
- Troubleshooting Pavlova (Because Meringue Has Feelings)
- Make-Ahead and Storage Tips
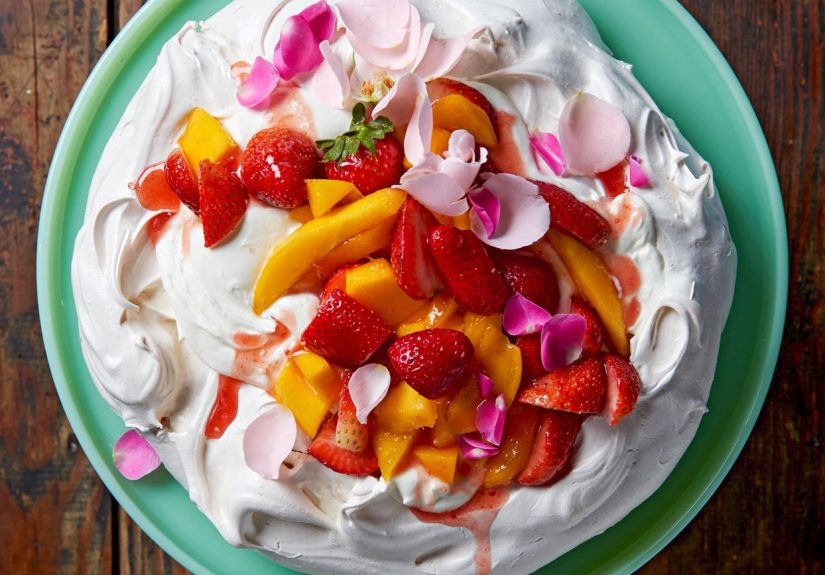
- Topping Ideas That Make Pavlova Look Like You Tried Very Hard
- Pavlova FAQ
- Conclusion
- Real-Life Pavlova Moments: What Making One Actually Feels Like (Extra Experiences)
Pavlova is the dessert equivalent of showing up to a party in sneakers… and somehow still looking like you belong on the cover of a magazine.
It’s light, dramatic, and oddly forgiving once you learn the few rules that actually matter. At its core, pavlova is a big, baked meringue “cake”
with a crisp shell and a soft, marshmallowy center, topped with clouds of whipped cream and a pile of fruit. In other words: crunchy, creamy, juicy,
and just fancy enough to make people assume you own linen napkins.
In this guide, you’ll learn what pavlova is (and what it isn’t), why it behaves the way it does, and exactly how to make itstep by stepwith
troubleshooting tips, topping ideas, and a realistic look at what the process feels like in an actual home kitchen.
What Is Pavlova?
Pavlova is a meringue-based dessert made primarily from egg whites and sugar, baked at a low temperature until the outside becomes crisp while the
inside stays tender and marshmallow-soft. After cooling, it’s typically topped with whipped cream and fresh fruitoften berries, kiwi, passionfruit,
or whatever looks best at the store that day.
If you’ve had meringue cookies, pavlova is like their bigger, more glamorous cousin who studied abroad. A classic meringue cookie is usually crisp
all the way through. Pavlova is built for contrast: shattery shell on the outside, pillowy center inside. That signature texture is helped along by
a small amount of starch (usually cornstarch) plus a little acid (like vinegar or lemon juice), which stabilizes the foam and nudges the interior
toward that marshmallow-like bite.
Where Did Pavlova Come From?
The short version: pavlova is strongly associated with Australia and New Zealand, and both countries claim it as their own. The name is widely
linked to Russian ballerina Anna Pavlova, whose tours in the 1920s inspired the dessert’s airy, tutu-like vibe. The long version involves cookbooks,
food historians, national pride, and enough friendly arguing to power a family holiday dinner for decades.
The practical takeaway for your kitchen is simpler: pavlova is a beloved celebration dessertespecially for warm-weather gatheringsbecause it looks
impressive, tastes bright and fresh, and doesn’t require you to wrestle with layers of cake. It’s a “centerpiece dessert” that’s secretly a
“whip egg whites and walk away” dessert once you know the method.
Why Pavlova Works (A Quick, Helpful Science Moment)
Pavlova is basically an edible foam. When you whip egg whites, you trap air bubbles inside a network of proteins. Sugar strengthens and stabilizes
that network, giving the meringue structure and shine. Add the sugar slowly and you get a smoother, more stable foam with less risk of gritty
crystals.
A little cornstarch helps manage moisture (think: “anti-sweat insurance”) and encourages that tender interior. A small amount of acidvinegar,
lemon juice, or cream of tartaralso supports stability and can help reduce the odds of collapse. Then low-and-slow baking dries the outside without
browning it too much, and slow cooling helps prevent dramatic cracking or sinking.
Ingredients You Need (and Why Each One Matters)
For the pavlova base
- Egg whites (fresh, room temperature): the structure and volume of the whole show.
- Superfine sugar (a.k.a. caster sugar): dissolves more easily for a smoother, glossier meringue.
- Cornstarch: helps absorb moisture and supports that marshmallow-soft center.
- Acid (white vinegar or lemon juice, or cream of tartar): stabilizes the whipped egg whites.
- Vanilla extract (optional but recommended): adds warmth and aroma.
- Pinch of salt: balances sweetness and keeps the flavor from tasting one-note.
For topping
- Heavy cream (cold): whips up fluffy and rich.
- Optional sweetener (powdered sugar, honey, or a spoonful of sugar): just enough to round out the cream.
- Fruit: berries, kiwi, mango, passionfruit, citrus segmentsanything bright and juicy.
- Optional extras: lemon curd, chocolate shavings, toasted nuts, fresh mint.
Tools that make life easier
- Stand mixer or hand mixer
- Large mixing bowl (clean and grease-free)
- Parchment paper + baking sheet
- Spatula
- Optional: kitchen scale (helpful for consistent results)
Classic Pavlova Recipe (Crisp Shell, Marshmallow Center)
Makes: One 8–9 inch pavlova (about 8 servings) | Skill level: Moderate (but totally doable)
Time: 20 minutes prep + 90 minutes bake + 2–3 hours cooling (mostly hands-off)
Ingredients
- 6 large egg whites, room temperature
- 1 1/2 cups superfine sugar (or pulse regular sugar in a food processor for 30–60 seconds)
- 1 tablespoon cornstarch
- 1 teaspoon white vinegar or 1 teaspoon lemon juice
- 1 teaspoon vanilla extract
- Pinch of fine salt
For the topping
- 1 1/2 cups cold heavy cream
- 1–2 tablespoons powdered sugar (optional)
- 1 teaspoon vanilla (optional)
- 2–3 cups fresh fruit (berries, kiwi, passionfruit, etc.)
Step-by-step instructions
-
Prep your pan and oven.
Heat oven to 250°F. Line a baking sheet with parchment paper. Trace an 8–9 inch circle on the parchment (flip it pencil-side-down
so you don’t bake ink into dessertbecause yes, that’s a thing we worry about now). -
Separate eggs carefully.
Even a tiny bit of yolk can keep whites from whipping properly. A smart habit: crack each egg into a small bowl first, then pour the white into
your mixing bowl only if it’s clean. -
Whip to soft peaks.
Beat egg whites with a pinch of salt on medium speed until they look foamy, then continue until soft peaks form (they’ll droop at
the tip when you lift the whisk). -
Add sugar slowly (this is the non-negotiable part).
With the mixer running, add sugar one tablespoon at a time. This helps it dissolve, which means a smoother pavlova and less risk
of weeping later. Once all sugar is added, keep beating until the meringue is thick, glossy, and holds stiff peaks.Quick test: rub a little meringue between your fingers. If it feels gritty, keep beating for another minute or two.
-
Fold in cornstarch and add acid + vanilla.
Sprinkle cornstarch over the meringue and fold gently with a spatula. Add vinegar (or lemon juice) and vanilla, then fold just until combined.
Don’t beat aggressively hereyou worked hard for those air bubbles; let them live. -
Shape the “nest.”
Spoon meringue onto the parchment circle. Shape it into a tall-ish round with swoops. Create a shallow crater in the center to hold cream and
fruit later. Leave a couple inches of space around itpavlova can puff and spread slightly. -
Bake low and slow.
Bake at 250°F for about 90 minutes, until the outside looks dry and set. It should feel crisp to the touch.
(Avoid opening the oven repeatedly. Pavlova is sensitive, like a cat that doesn’t want to be perceived.) -
Cool gradually (this prevents drama).
Turn off the oven and leave the pavlova inside with the door closed for at least 2 hours (or up to overnight).
Slow cooling helps reduce cracking and collapse. -
Whip the cream.
Right before serving, whip cold cream to soft-to-medium peaks. Sweeten lightly if you want. (Pavlova is sweet already; the cream is the calm,
unsweetened friend who keeps things balanced.) -
Assemble and serve.
Place the cooled pavlova on a serving platter. Spoon whipped cream into the center. Top with fruit. Serve immediately for the best crisp-creamy
contrast.
Troubleshooting Pavlova (Because Meringue Has Feelings)
“My pavlova cracked!”
Cracks are common and usually not a problemthink “rustic charm,” not “failure.” Big cracks can happen from temperature changes or cooling too fast.
Bake low, cool slowly in the oven, and try not to slam the oven door like you’re mad at a group chat.
“It wept or got sticky.”
Weeping (little beads of syrup) or a sticky surface often comes from undissolved sugar, humidity, or underbaking. Add sugar slowly, whip until
glossy and non-gritty, and bake long enough to dry the shell. In very humid weather, pavlova can soften fasterplan to assemble close to serving.
“It collapsed in the center.”
A slightly sunken center is normal (and honestly helpful, since that’s where the toppings go). Major collapse can come from overbeating, opening the
oven too early, or rapid cooling. Stick to slow cooling, and avoid turning the meringue into a dry, over-whipped foam.
“The outside browned.”
Your oven may run hot. Pavlova likes a gentle, low bake. If your shell turns tan, try lowering the temperature slightly next time or using an oven
thermometer to confirm accuracy.
“My bowl had grease and everything went wrong.”
Grease is the arch-nemesis of whipped egg whites. Make sure bowls and beaters are squeaky clean and dry. Avoid plastic bowls if they hold onto
residues. Stainless steel or glass is your best friend here.
Make-Ahead and Storage Tips
Pavlova is a “make-ahead base, assemble later” dessert. The baked shell can be made the day before and stored in a dry, airtight container at room
temperature. Once you add whipped cream and fruit, the moisture starts softening the shelldelicious, but less crisp over time.
- Make ahead: bake the shell up to 24 hours in advance; keep it dry and sealed.
- Do not refrigerate the plain shell: fridges are humid, and pavlova hates humidity.
- Assemble close to serving: ideally within 30–60 minutes for best texture contrast.
- Leftovers: store assembled pavlova in the fridge and accept that it will soften (still tasty, just more “meringue pudding vibe”).
Topping Ideas That Make Pavlova Look Like You Tried Very Hard
Pavlova is a blank canvasbut a delicious one that’s already wearing lipstick. Keep toppings bright, not too heavy, and a little tart to balance
sweetness.
Classic crowd-pleasers
- Berries + vanilla cream: strawberries, raspberries, blueberriessimple and always right.
- Kiwi + passionfruit: tangy and tropical; also extremely photogenic.
- Citrus + curd: a thin layer of lemon curd under the cream makes everything pop.
Fun upgrades
- Chocolate pavlova: add a little cocoa powder to the meringue and top with cream + shaved chocolate.
- Holiday vibes: make a wreath shape, fill with cream, and top with red fruit and mint for a festive look.
- “Black Forest-ish”: whipped cream, chocolate ganache drizzle, and boozy cherries for a grown-up twist.
- Mini pavlovas: portion them into individual nests so everyone gets their own crunchy edges (the best part).
Pavlova FAQ
Can I use regular granulated sugar?
Yes. Superfine sugar dissolves faster, but you can pulse regular granulated sugar in a food processor to make it finer. The goal is simple:
dissolve it well so the meringue is glossy, not gritty.
Do I have to use vinegar?
Not specifically. Vinegar or lemon juice works, and cream of tartar is also common. The point is to add a bit of acid to support stability.
You won’t taste it when used in small amounts.
Why does pavlova need cornstarch?
Cornstarch helps manage moisture and contributes to that signature soft interior. It’s one of the reasons pavlova feels different from a fully crisp,
dried meringue.
Can I make pavlova on a humid day?
You can, but plan to assemble close to serving and accept that it may soften faster. If it gets sticky, it’s usually still deliciousjust less
crackly.
Conclusion
Pavlova is one of the best “wow” desserts per minute of effort: whip egg whites, bake low, cool slowly, and pile on whipped cream and fruit. The
result is crisp on the outside, soft in the center, and basically guaranteed to make someone say, “Wait… you made this?”
If you remember only three things, make them these: keep everything grease-free, add sugar slowly until it dissolves, and cool the pavlova gradually
in the oven. Do that, and pavlova goes from “mysterious bakery magic” to “I could absolutely bring this to every party forever.”
Real-Life Pavlova Moments: What Making One Actually Feels Like (Extra Experiences)
The first time most people make pavlova, the vibe is equal parts confidence and suspicion. Confidence because, technically, you’re “just” whipping
egg whites. Suspicion because every baking blog on Earth has warned you that a single molecule of yolk will end your dreams. So you start like a
careful scientist: wiping bowls, checking beaters, cracking each egg into a separate small dish like it’s a tiny audition. That caution is normal,
and honestly, it’s part of the pavlova charmthis dessert makes you feel like you’re doing something important even though the ingredients are
comically simple.
Then comes the strangely satisfying phase: watching egg whites go from clear and slippery to foamy, to soft peaks, to a glossy, thick cloud that
holds shape. This is the moment people usually realize pavlova is not hardit’s just particular. Adding sugar slowly can feel tedious at first, but
it quickly becomes meditative. Spoon. Wait. Spoon. Wait. You’ll notice the meringue changing texture and sheen as you go, becoming smoother and more
stable. It’s also when the kitchen starts to feel like a pastry lab, especially if you pause to rub a bit of meringue between your fingers to check
for graininess. If it feels gritty, you keep mixing. If it feels silky, you’ve officially crossed into “this is going to work” territory.
Shaping the pavlova is where people accidentally get creative. You can smooth it into a neat circle, but most home bakers end up making swoops and
peaks because it’s fun and it looks fancy. The little crater in the middle is another oddly practical “experience moment”: you realize you’re
designing a dessert bowl for whipped cream and fruit. It’s like edible architecture, but lower stakes.
Baking is the part that teaches patience. Pavlova doesn’t give you the immediate gratification of a cookie tray that smells done in 10 minutes.
Instead, it quietly dries out in the oven while you second-guess everything. Is it too hot? Is it too low? Should it be browning? Should it be
cracking? Here’s the truth most experienced pavlova makers learn: a few cracks are not a disaster, and a slightly sunken center is basically a
feature. The shell is there to hold toppings; it doesn’t need to look like a ceramic bowl from a museum.
Cooling is where the dessert feels almost theatricallike the oven is a backstage dressing room and the pavlova is a performer who needs time to
compose itself. Leaving it in the oven as it cools feels like you’re doing nothing, but it’s actually one of the best habits you can develop. Slow
cooling helps the shell set without sudden temperature shock, and it’s often the difference between “gentle cracks” and “landslide.”
Finally, assembly is the victory lap. The whipped cream goes on like a soft blanket, and the fruit makes everything look bright and celebratory.
This is also when pavlova becomes social: people hover, ask questions, and try to “help” by sneaking a berry. When you slice in, you get the
signature experiencethe crisp shell snaps, the interior yields like a marshmallow, and the cream and fruit melt everything together. Even if it’s a
little messy, it’s the good kind of messy: the kind that makes everyone reach for a second bite before they’ve finished their first.