Table of Contents >> Show >> Hide
- Before You Start: What “Dress Size” Really Means
- Quick Cheat Sheet: The 3 Measurements That Matter Most
- How to Determine Your Dress Size: 13 Steps
- Step 1: Grab the right tools (no, a phone charging cable is not a measuring tape)
- Step 2: Measure in the right outfit
- Step 3: Keep the tape levelparallel to the floor
- Step 4: Measure your bust the correct way
- Step 5: Find your natural waist (the “teapot bend” trick)
- Step 6: Measure your hipslower than many people expect
- Step 7: Take one extra measurement that often saves the day: your dress length preference
- Step 8: Write it down (and measure twice if the stakes are high)
- Step 9: Find the brand’s size chart and confirm you’re using body measurements
- Step 10: Choose your size based on your largest measurement (then plan for fit tweaks)
- Step 11: Account for the dress style and fabric (stretch changes everything)
- Step 12: Consider “category sizing”: misses vs. juniors vs. plus vs. petite/tall
- Step 13: Validate with real-world fit signals (reviews, fit tools, and the “two-size checkout”)
- Common Mistakes That Make Dress Sizing Harder Than It Needs to Be
- FAQ: Dress Size Questions People Google at 2 A.M.
- Real-World Experiences: What People Learn After Buying “The Wrong Size” (500+ Words)
- Conclusion
If dress sizes were a universal language, you could buy a “size 8” anywhere and stroll off into the sunset.
Instead, clothing sizes are more like regional dialects: the same word, wildly different meaning. The good news?
You can absolutely figure out your dress size (and shop online with fewer “why does this zipper hate me?” moments)
by using a simple system: accurate body measurements + the right size chart + a little strategy.
This guide walks you through 13 practical steps to determine your dress sizewhether you’re shopping in-store,
ordering online, or trying to decode a brand’s size chart that looks like it was designed by an escape-room architect.
Before You Start: What “Dress Size” Really Means
In the U.S., most women’s dresses are sized using either:
numeric sizes (like 0–18, 00–24, 14W–24W),
alpha sizes (XS–XL, 1X–3X), or a mix of both.
The catch is that many brands define those numbers differently, so you’re not looking for a single forever-number.
You’re building a repeatable method to pick the best size for each brand and dress style.
Quick Cheat Sheet: The 3 Measurements That Matter Most
- Bust: Around the fullest part of your bust (usually over a bra).
- Waist: Around your natural waist (the smallest part of your torso, not your low-rise jeans line).
- Hips: Around the fullest part of hips and seat, with feet together.
Most dress size charts use these body measurements (not the dress’s measurements), then map them to a size.
The goal is to measure accurately, then match the chart that goes with the brand and garment you’re buying.
How to Determine Your Dress Size: 13 Steps
-
Step 1: Grab the right tools (no, a phone charging cable is not a measuring tape)
Use a soft, flexible tape measure made for body measurements. If you don’t have one,
you can wrap a ribbon or string around your body, mark the length, and compare it to a ruler or yardstick.
It’s not glamorous, but neither is returning five dresses because you guessed. -
Step 2: Measure in the right outfit
For the most accurate numbers, measure over underwear or thin, fitted clothing (not over a sweatshirt
that could qualify as home insulation). For bust measurements, wear an everyday bra that fits wellyour dress size
depends on the shape you’ll actually be wearing under clothes. -
Step 3: Keep the tape levelparallel to the floor
This is the silent difference between “perfect fit” and “why does this dress feel like a parachute?” Keep the tape
measure parallel to the floor as you measure. If you’re measuring alone, use a mirroror recruit a friend
for the role of “human level.” -
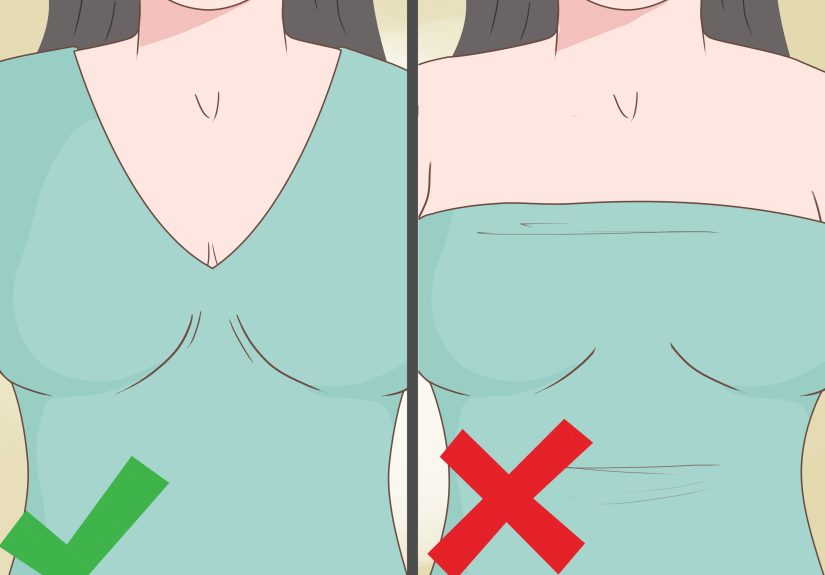
Step 4: Measure your bust the correct way
Stand naturally, arms relaxed. Wrap the tape around the fullest part of your bust.
Keep it snug but not tight. You should be able to breathe and blink without the tape screaming for help.Pro tip: If you’re between two bust measurements, recheck with the tape slightly higher and slightly lower.
The “fullest part” isn’t always where you assume it is. -
Step 5: Find your natural waist (the “teapot bend” trick)
Your natural waist is usually the narrowest part of your torso. A reliable way to find it: bend to one side
like you’re doing a dramatic teapot impression. Where your body creases is typically your natural waistline.
Measure around that point. -
Step 6: Measure your hipslower than many people expect
Stand with feet together and measure around the fullest part of your hips and seat.
Keep the tape level. Many people accidentally measure too high (around hip bones) instead of around the fullest point.
For dresses, this matters a lotespecially for fitted skirts, bodycon styles, or anything with a structured hip. -
Step 7: Take one extra measurement that often saves the day: your dress length preference
Size charts tell you “bust/waist/hip,” but you also want a dress that hits where you like. Measure from the top of your
shoulder down to where you prefer a hem to land (knee, mid-calf, ankle). If you’re petite or tall, this helps you decide
whether to shop petite, regular, or tall sizing when available. -
Step 8: Write it down (and measure twice if the stakes are high)
Record your measurements in inches (and centimeters if you shop international brands). Then measure again.
If your numbers vary by more than about half an inch, do a third check and average the closest two. Accuracy beats optimism. -
Step 9: Find the brand’s size chart and confirm you’re using body measurements
Here’s where many shoppers get tricked: some charts list body measurements, while some list garment measurements,
and some list a mix plus “fit notes.” Look for wording like “these are body measurements” or “measure yourself.”
If the chart is based on body measurements, match your bust/waist/hip to the closest size range. -
Step 10: Choose your size based on your largest measurement (then plan for fit tweaks)
For many dresses, your best starting size is the one that fits your largest measurement
(often hips or bust). A dress can usually be taken in at the waist more easily than it can be made larger at the hips
or bustespecially if there’s a zipper.Example:
- Bust: 37″
- Waist: 30″
- Hips: 41″
If a brand chart puts your bust in one size and your hips in a larger size, start with the size that fits your hips
(or the area that must fit for the dress style). Then consider tailoring or a belted waist for refinement. -
Step 11: Account for the dress style and fabric (stretch changes everything)
A knit wrap dress and a woven sheath dress do not play by the same rules. Before you pick a final size, check:
- Stretch level: Rib knit, jersey, and spandex blends are more forgiving than rigid woven fabrics.
- Structure: Boning, lining, and heavy zippers mean less “wiggle room.”
- Silhouette: A-line and fit-and-flare are hip-friendly; bodycon is not here for ambiguity.
If the fabric is structured and you’re between sizes, sizing up is often the smarter choiceespecially for fitted bodices.
-
Step 12: Consider “category sizing”: misses vs. juniors vs. plus vs. petite/tall
Some retailers classify women’s clothing by categories that affect proportionsnot just circumference:
- Juniors: Often cut straighter and smaller through hips/waist; sizes may run differently.
- Misses/regular: Standard women’s sizing proportions.
- Plus (often “W” sizes): Pattern grading changes more than just width; the overall shape can differ.
- Petite/tall: Adjusts length proportions (waist placement, torso length, hem points), not just height.
If you frequently find that waists hit too high/low or hems land awkwardly, exploring petite/tall sizing can be a game-changer.
-
Step 13: Validate with real-world fit signals (reviews, fit tools, and the “two-size checkout”)
Before you click “Buy,” use any available fit guidance:
- Product reviews: Look for patterns like “runs small in the bust” or “waist is generous.”
- Retailer fit tools: Some stores offer size predictors based on purchase/return patterns or user inputs.
- If returns are easy: Order two sizes and keep the winner. It’s not indecisiveit’s strategic.
The goal isn’t to prove you are “a size X.” The goal is to find a dress that fits your body comfortably and looks great.
The tag is just a tiny piece of fabric with an ego problem.
Common Mistakes That Make Dress Sizing Harder Than It Needs to Be
- Measuring over bulky clothing (hoodies add “mystery inches”).
- Holding the tape too tight (you need a dress size, not a compression rating).
- Using one brand’s size chart for another (sizes varyoften a lot).
- Ignoring fabric and silhouette (stretch vs. structured changes the outcome).
- Forgetting height proportions (petite/tall can fix fit issues even when width is right).
FAQ: Dress Size Questions People Google at 2 A.M.
Why does my dress size change between brands?
Because brands use different fit models, different grading rules, and sometimes different sizing philosophies.
Add modern “vanity sizing” and the fact that sizing standards aren’t enforced, and the same labeled size can fit differently
across retailerseven within the same retailer’s different lines.
What if my bust, waist, and hips match different sizes?
Pick the size that fits the area that must fit for the dress style (often bust for structured bodices, hips for fitted skirts),
then adjust with tailoring, styling, or a different cut. Many people are “in between” sizesthis is normal, not a personal failure.
Should I size up or down if I’m between sizes?
If the fabric is structured or the dress is fitted, size up.
If the fabric is very stretchy or the dress is intentionally loose, you can consider sizing downespecially if reviews confirm
it runs large. When in doubt, compare your measurements to the chart and prioritize comfort.
Do I need to re-measure over time?
Yes. Bodies change (sometimes subtly, sometimes dramatically). Recheck every few months if you shop often,
or anytime your clothes start feeling consistently different. Keeping fresh measurements makes online shopping far less chaotic.
Real-World Experiences: What People Learn After Buying “The Wrong Size” (500+ Words)
If you’ve ever ordered a dress online and felt personally betrayed by the zipper, you’re in good company.
Real-life dress sizing often comes with plot twistsand most of them have nothing to do with your body and everything to do
with how clothing is made, labeled, and photographed.
One common experience: someone assumes their “usual size” will work everywhere. It does not. They buy a fitted sheath in their
standard number, only to discover the waist is perfect and the hips are… not invited to the party. The fix usually isn’t
“I should feel bad.” The fix is “I should pick my size by measurement, not by habit.” Once people switch to measuring
and using size charts, they often report a dramatic drop in returnsand a dramatic increase in confidence.
Another classic scenario: the “stretch-fabric surprise.” Shoppers see a jersey wrap dress and size up “just in case,”
then end up swimming in fabric because knit dresses are forgiving. The reverse also happens with structured fabrics:
someone buys a woven dress in a size that worked in a stretchy style, then finds it won’t zip at the ribcage.
Many people say the moment they started checking fabric content (especially spandex percentage) and silhouette
(bodycon vs. A-line) was the moment online shopping stopped feeling like gambling.
Reviews become a lifesaver in these stories. People learn to scan for repeated phrases: “runs small in the bust,”
“tight at the hips,” “waist is generous,” or “size down if you want it fitted.” The trick is to look for patterns,
not one-off opinions. If 40 reviewers mention the same fit issue, that’s not noisethat’s a warning label.
Height proportions create another wave of “aha” moments. Plenty of shoppers discover they’re not “shaped wrong”
they’re simply wearing dresses designed for a different torso length. For petite shoppers, waist seams can fall too low,
turning a flattering fit-and-flare into a confusing geometry lesson. For tall shoppers, hemlines may land higher than intended,
and sleeve/strap lengths can feel just a bit off. When people try petite or tall sizing (when offered), the fit often improves
immediatelyeven when their bust/waist/hip measurements didn’t change at all.
Then there’s the “two-size checkout” strategy: ordering two sizes on purpose. Many shoppers initially resist this because
it feels wasteful or indecisive. But after a few rounds of returns (and the emotional rollercoaster of “will it fit?”),
people often adopt a calmer approach: order the two most likely sizes, try them on at home with good lighting,
keep the winner, return the other. It’s not excessiveit’s efficient, especially when return shipping is easy.
Finally, tailoring comes up in a lot of success storiesparticularly for special events. Shoppers find a dress that fits
bust and hips beautifully, then have the waist taken in or straps adjusted. The result looks custom, feels comfortable,
and turns “good enough” into “wow.” The big lesson people share? A dress size is a starting point, not a verdict.
Measuring yourself and shopping intentionally doesn’t just find the right dressit makes the whole experience less stressful,
more predictable, and (yes) actually fun.
Conclusion
Determining your dress size isn’t about chasing a perfect numberit’s about using a reliable method:
measure your bust/waist/hips accurately, match them to the correct brand chart, and factor in fabric, silhouette, and proportions.
Once you do, you’ll spend less time guessing and more time wearing dresses that fit like they were rooting for you all along.