Table of Contents >> Show >> Hide
- Why Plumbing Success Is Usually About Technique, Not Heroics
- 13 Plumbing Tricks of the Trade for Weekend Plumbers
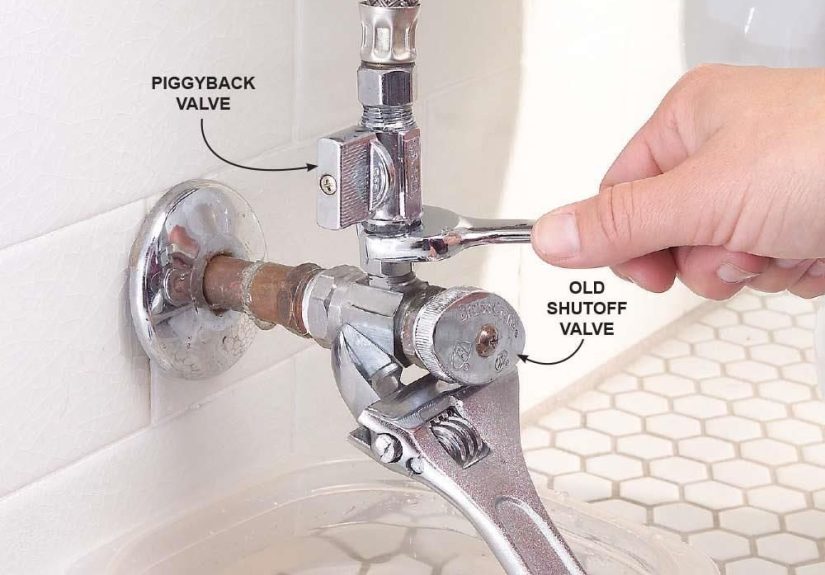
- 1. Find Every Shutoff Valve Before You Need It
- 2. Take a Photo Before You Take Anything Apart
- 3. Keep a Bucket, Towel, and Small Tray Under Every Repair
- 4. Use PTFE Tape the Right Way, and Only Where It Belongs
- 5. Don’t Overtighten Compression Fittings
- 6. Use Two Wrenches to Protect the Pipe
- 7. Cut Pipe Square and Deburr Every Edge
- 8. Dry-Fit First, Especially on Drain and PVC Work
- 9. Use the Right Lubricant on O-Rings and Moving Seals
- 10. Flush Supply Lines Before Connecting a New Faucet
- 11. Diagnose Leaks Before Replacing Parts at Random
- 12. Treat Slow Drains Early and Skip the Harsh Chemical Habit
- 13. Know the Difference Between a DIY Job and a “Call the Plumber” Job
- Common Mistakes Weekend Plumbers Should Avoid
- Final Thoughts
- Extra : Weekend Plumber Experiences and Lessons Learned
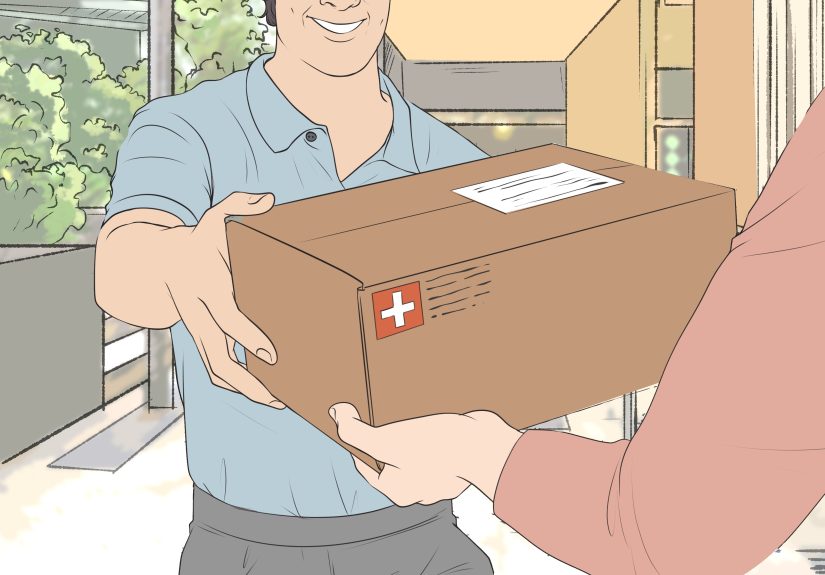
If you’ve ever crawled under a sink with a flashlight in your teeth and a wrench in your hand, congratulations: you are already living the glamorous life of the weekend plumber. It starts innocently enough. One drip. One wobbling faucet handle. One suspicious puddle under the vanity that you optimistically call “condensation.” Before long, you’re on a first-name basis with the plumbing aisle and wondering why every repair requires exactly one part you forgot to buy.
The good news? Plenty of everyday plumbing fixes really are DIY-friendly when you know a few smart tricks. The better news? Most successful plumbing repairs don’t come down to brute force or expensive tools. They come down to technique, patience, and knowing when not to do something that sounds clever at the time. In this guide, you’ll learn 13 plumbing tricks of the trade that make weekend projects cleaner, faster, and far less likely to end with you shouting, “Why is there water coming out of the wall?”
Why Plumbing Success Is Usually About Technique, Not Heroics
Professional plumbers make hard jobs look easy because they rely on repeatable habits. They prep before loosening anything. They protect finishes. They know which joints need thread sealant and which ones absolutely do not. They test repairs in stages. And most importantly, they respect water. Water is sneaky, relentless, and deeply committed to finding the one gap you thought was “probably fine.”
If you’re a DIY homeowner, these trade tricks can help you avoid the classic mistakes: overtightening, cross-threading, using the wrong sealant, misdiagnosing a leak, or turning a ten-dollar fix into a Saturday-long festival of regret.
13 Plumbing Tricks of the Trade for Weekend Plumbers
1. Find Every Shutoff Valve Before You Need It
The first rule of weekend plumbing is simple: know how to stop the water before the water starts winning. Locate the main shutoff valve for the house and the local shutoff valves under sinks, behind toilets, and near appliances. A repair moves much faster when you aren’t panic-searching for a valve while a supply line is impersonating a lawn sprinkler.
Make this a five-minute home tour project. Label stubborn or hard-to-see valves if needed. And if a local shutoff valve doesn’t fully stop water flow, add that to your repair list. A working shutoff valve is not exciting, but it is one of the most useful non-exciting things in your house.
2. Take a Photo Before You Take Anything Apart
This sounds almost too obvious, which is exactly why people skip it. Don’t. Before removing supply lines, stoppers, clips, trim, or faucet parts, snap a few clear photos from multiple angles. That picture becomes your roadmap when it’s time to reassemble the mystery puzzle of washers, nuts, rings, stems, and “extra” parts you swear were not on the counter five minutes ago.
This trick is especially helpful on faucet repairs, sink stoppers, and aerators, where part order matters. Your future self will be grateful, and your future self deserves nice things.
3. Keep a Bucket, Towel, and Small Tray Under Every Repair
Plumbers know a secret that weekend DIYers learn the wet way: even after shutting off the water, pipes still hold water. Put a bucket under traps, supply lines, and valves before loosening anything. Lay down a towel to catch drips and protect the cabinet floor. Use a small tray or magnetic dish to hold screws, clips, and tiny parts that would otherwise vanish into another dimension.
This is not glamorous advice. It is also some of the best advice in the room.
4. Use PTFE Tape the Right Way, and Only Where It Belongs
Thread seal tape is useful, but it is not magic ribbon from the plumbing gods. Use it on threaded pipe joints where the threads themselves form the seal. Wrap it clockwise, keep it tight, and start one or two threads back from the end so little shreds do not end up in the line. Usually, a few neat wraps beat a giant fluffy mummy-wrap every time.
Just as important: don’t use tape everywhere. Compression fittings and many slip-joint connections are designed to seal with a ferrule, gasket, or washer, not with thread sealant. Using tape there can actually make leaks more likely. In plumbing, “more product” does not automatically mean “more better.”
5. Don’t Overtighten Compression Fittings
Weekend plumbers often assume a leaking fitting needs more force. Sometimes it does. Frequently, it needs less enthusiasm. Compression fittings seal by squeezing a ferrule or compression ring into place. If you crank too hard, you can deform the ring, damage the fitting, or create the very leak you were trying to prevent.
The better approach is to hand-tighten first, then snug the connection with a wrench in small increments. Test. If needed, tighten a little more. This is a “quarter-turn and patience” situation, not a “channel-locks and vengeance” situation.
6. Use Two Wrenches to Protect the Pipe
Here is one of the best pro habits to steal: use two wrenches on many threaded or compression connections. One wrench holds the valve body or fitting steady; the other turns the nut. That keeps torque from twisting the pipe inside the wall or stressing the connection behind the cabinet.
This trick matters when you’re working on shutoff valves, supply lines, and compression joints. It feels slightly more professional, and more importantly, it prevents the dreaded “I fixed one leak and created another behind the drywall” sequel.
7. Cut Pipe Square and Deburr Every Edge
A rough cut pipe is one of those tiny mistakes that causes oversized headaches. Whether you’re working with copper, PVC, or another material, make clean, square cuts. Then deburr the inside edge and smooth the outside. Burrs can restrict flow, catch debris, damage seals, and create leak paths.
Think of this as the plumbing version of mise en place. Prep work is not the flashy part, but it is the part that makes everything else behave. A straight cut and a smooth edge can be the difference between “professional-looking repair” and “why does this joint hate me?”
8. Dry-Fit First, Especially on Drain and PVC Work
Before you commit to assembly, dry-fit your parts. Test the alignment. Check the length. Confirm the angle. Make sure the pipe seats properly. This is especially important with drain assemblies and solvent-welded plastic pipe, because once cement is applied, the clock starts ticking and second thoughts become decorative.
Dry-fitting also helps you spot the real issue early. Sometimes the part isn’t wrong; the angle is off. Sometimes the angle is fine; the cut is short. Sometimes the whole thing would work beautifully if the cabinet designer had not clearly hated plumbers.
9. Use the Right Lubricant on O-Rings and Moving Seals
When replacing faucet cartridges, spouts, or O-rings, a little proper lubricant can make reassembly smoother and help seals seat correctly. The important phrase here is proper lubricant. Use the manufacturer-recommended silicone-based grease or an appropriate non-petroleum plumber’s grease where applicable. Do not improvise with random household grease, oil, or “something from the garage.” That path leads to swollen rubber parts and fresh disappointment.
If a faucet handle is stiff, a spout squeaks, or an O-ring keeps bunching during installation, the right dab of lubricant often feels like a cheat code.
10. Flush Supply Lines Before Connecting a New Faucet
New faucets and cartridges do not love grit, solder debris, or mineral bits. Before connecting a new fixture, flush the supply lines briefly into a bucket. This simple step can keep sediment from damaging a fresh cartridge or clogging an aerator on day one.
It is a tiny move with a very professional feel. You spend thirty seconds now to avoid troubleshooting a “defective faucet” that is actually just choking on crud from the old line.
11. Diagnose Leaks Before Replacing Parts at Random
Not every drip means the same thing. A leak at the faucet spout may point to a worn cartridge or washer. A leak near the handle may involve an O-ring. Water under the sink might come from the trap, the supply line, the drain assembly, or water running down from above. Translation: don’t buy parts like you’re playing plumbing roulette.
Dry the area thoroughly, then test methodically. Run only the hot side. Then only the cold side. Fill and drain the sink. Wipe each connection with a dry paper towel to pinpoint where moisture first appears. Good diagnosis saves money, saves time, and keeps you from replacing a perfectly innocent part.
12. Treat Slow Drains Early and Skip the Harsh Chemical Habit
One of the best plumbing tricks is preventative: deal with a slow drain when it is still merely annoying, not when the sink turns into a decorative pond. Hair, soap residue, grease, and food buildup are easier to manage early with a plunger, drain snake, stopper cleaning, hot water flushing where appropriate, and sensible maintenance habits.
Harsh chemical drain cleaners often create more problems than they solve, especially with repeated use. They can be hard on pipes, hard on fixtures, and hard on the person who later has to open that drain. In kitchens, avoid sending grease down the drain and run cold water with the garbage disposal. In bathrooms, use strainers and clean out hair before it stages a hostile takeover.
13. Know the Difference Between a DIY Job and a “Call the Plumber” Job
This may be the most valuable trade trick of all. Weekend plumbers do well with leaky faucets, new shutoff valves, sink traps, toilet flappers, showerheads, drain cleaning, and basic fixture swaps. But some jobs cross the line into professional territory fast: hidden leaks inside walls, drain line replacements, sewer odors with unclear causes, recurring backups, water heater issues, slab leaks, gas lines, or anything requiring code-heavy rerouting.
Smart DIY is not about doing everything yourself. It is about doing the right things yourself. There is no medal for turning a simple repair into a structural science experiment.
Common Mistakes Weekend Plumbers Should Avoid
The biggest plumbing mistakes are surprisingly consistent. People overtighten fittings. They use the wrong sealant. They skip surface cleaning. They forget to test shutoff valves. They replace parts before diagnosing the leak. They throw chemical cleaners at clogs that really need mechanical clearing. And perhaps most famously, they start a project at 8:30 p.m. on Sunday with one hardware store run left in the universe.
A better strategy is boring in the best possible way: prep carefully, work methodically, test before closing up, and buy one extra washer or gasket if the part is cheap. Plumbing rewards calm people far more than bold people.
Final Thoughts
The best weekend plumbers are not reckless. They are observant. They know that successful plumbing repairs come down to small details: the direction of tape, the condition of a washer, the angle of a cut, the difference between snug and strangled. Once you learn those details, everyday repairs become far less intimidating.
So the next time a faucet drips, a drain slows, or a shutoff valve starts acting suspiciously dramatic, you won’t need superhero energy. You’ll need a flashlight, the right wrench, a bucket, and a few trade tricks that keep the whole job under control. Which, frankly, is much better than mopping the kitchen at midnight.
Extra : Weekend Plumber Experiences and Lessons Learned
Ask a few homeowners about their DIY plumbing experiences and a pattern appears almost immediately. The first lesson usually arrives with a leak that looked tiny and harmless. A faint drip under the sink seems like something you can “watch for a while” until that while becomes warped cabinet wood, a musty smell, and a grocery bag full of paper towels. That is when many weekend plumbers learn their first real trade lesson: plumbing problems are usually cheapest and easiest at the very beginning.
Another common experience is discovering that the repair itself is not the hardest part. The hardest part is often the setup. Clearing out the cabinet, placing a bucket correctly, finding a headlamp, shutting off the right valve, and making sure you have the replacement part in hand can take longer than the wrench work. Seasoned DIYers eventually stop resenting this and start embracing it. They realize plumbing rewards preparation in a way many other home projects do not.
Then there is the famous “quick faucet fix” that turns into a hardware store pilgrimage. A homeowner removes a cartridge, proudly carries it to the store, returns with what looks like the same part, and discovers it is actually the near-identical cousin from a different model year. By the second trip, that homeowner has learned another valuable trade trick: bring the old part, the brand name, the model number if available, and a couple of photos. Humility is a valid plumbing tool.
Many weekend plumbers also remember the first time they overtightened something. It usually feels productive in the moment. The fitting still leaks, so you tighten harder. Then the plastic nut cracks, the ferrule deforms, or the connection starts leaking in a newer, more insulting way. That experience tends to cure the “stronger is better” mindset forever. After that, the homeowner becomes the person who says, very wisely, “Let’s snug it a little and test first.”
Drain clogs teach another memorable lesson. Plenty of people start with a bottle of harsh cleaner because it seems easy. But after one stubborn clog, one unpleasant smell, or one awkward encounter with caustic liquid in a trap, they begin to appreciate simpler methods: removing the stopper, cleaning out hair, using a snake, plunging correctly, and maintaining the drain before it becomes a full-blown backup. Nothing builds respect for prevention like seeing what comes out of a bathroom drain. Truly, some knowledge changes a person.
And then there is the confidence shift. Once homeowners successfully replace a flapper, install a shutoff valve, reseat a sink drain, or swap a faucet without creating a flood, they stop thinking of plumbing as mysterious wizardry. They start seeing it for what it often is: a system of parts, seals, pressure, and gravity. That confidence matters. It does not mean they should tackle every plumbing issue alone. It means they can approach small repairs calmly, spot warning signs earlier, and make better decisions about when to DIY and when to call a professional.
In the end, the real trade secret for weekend plumbers is not just technique. It is mindset. Go slower than your ego wants to go. Double-check what you assume. Respect the shutoff valve. Keep spare towels nearby. And remember that the best plumbing victory is not the dramatic one. It is the quiet moment when you turn the water back on, watch carefully, and see absolutely nothing happen. In plumbing, that is a beautiful ending.