Table of Contents >> Show >> Hide
- Why plant pots make shockingly good wall lamps
- Materials and tools
- Step-by-step: the “five-minute” cordless wall lamp
- Design upgrades that make it look “expensive”
- Lighting performance: what to realistically expect
- Safety and “please don’t summon chaos” notes
- Where this hack looks best
- Frequently asked questions
- Conclusion: cozy, cordless, and weirdly impressive
- Real-life experience: what I learned after actually living with these cordless pot sconces
You know that moment when you want wall sconceslike, real sconcesbut your home says,
“Sure, as soon as you open up the drywall, run electrical, patch, paint, and possibly cry”?
Yeah. This hack is for everyone who wants cozy, designer-looking wall lamps without inviting an electrician
(or a second mortgage) into the group chat.
The concept is delightfully simple: take a decorative IKEA-style metal plant pot (the kind with cutouts),
flip it into “shade mode,” tuck a battery puck light inside, and mount it on the wall. The pot becomes the sconce body,
the cutouts throw pretty shadow patterns, and the puck light does the whole “I’m a lamp now” thingcordlessly.
It’s fast, budget-friendly, renter-aware, and weirdly satisfying.
Why plant pots make shockingly good wall lamps
Plant pots already have three things a wall lamp needs: (1) a sturdy “shell,” (2) a built-in design (texture, cutouts, pattern),
and (3) the emotional readiness to be repurposed. When you use a perforated metal planter as a shade, you get
that boutique-hotel glowlight + shadow + vibewithout paying boutique-hotel prices.
The real magic: light-and-shadow drama
Many IKEA-inspired planters (especially the lacy, cutout metal styles) cast patterned light that feels intentionally designed.
The wall becomes part of the decor. Suddenly your hallway isn’t a hallwayit’s a mood.
It’s cordless by design
Instead of wiring, this hack leans on modern battery LED puck lights (often remote-controlled, sometimes dimmable, sometimes timer-equipped).
That means you can add a “sconce” to places that were never blessed with outlets: reading nooks, stair landings, kids’ rooms,
awkward corners, and that one spot you keep forgetting exists until you stub your toe.
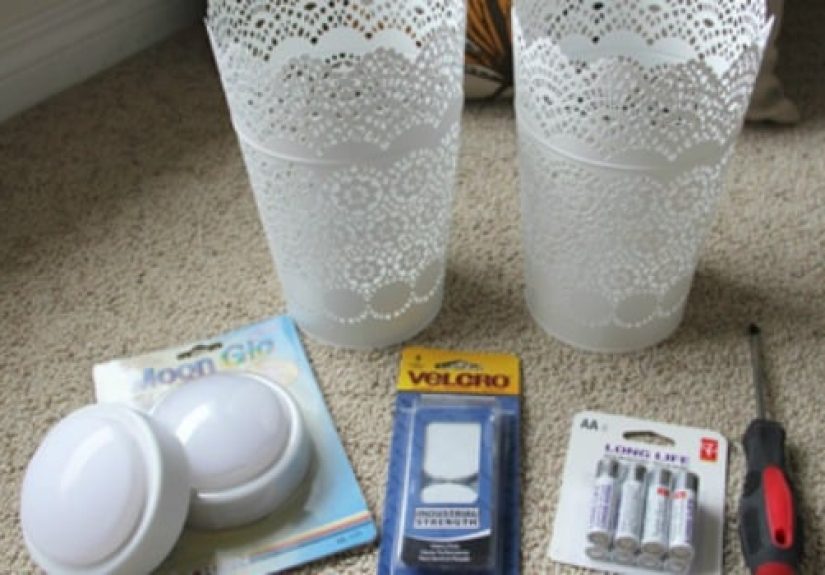
Materials and tools
Shopping list
- Decorative metal plant pot (IKEA-style). Look for a cutout pattern you love and a size that feels sconce-appropriate.
- Battery-powered LED puck light (remote optional but highly recommended for sanity).
- Mounting method: screws + wall anchors (most secure) or removable picture-hanging hooks/strips (more renter-friendly).
- Fastener for puck light: heavy-duty hook-and-loop dots/strips, strong double-sided tape, or the adhesive pad included with some puck lights.
- Batteries (or a rechargeable puck light set).
Helpful tools
- Tape measure and pencil
- Level (or your phone’s level appwelcome to the future)
- Screwdriver or drill (if using screws/anchors)
- Rubbing alcohol + clean cloth (for prepping surfaces)
Step-by-step: the “five-minute” cordless wall lamp
This is the classic version: plant pot + puck light + mount. No wiring. No drama. Minimal swearing.
Step 1: Pick the right pot (size and shape matters)
Hold the pot up to the wall where you want it. A good sconce size usually reads as “hand-sized to small mixing-bowl-sized,”
depending on your space. If it’s too tiny, it looks accidental. Too big, it starts giving “upside-down birdcage.”
Quick rule: for bedside placement, center the light roughly around shoulder-to-head height when you’re sitting up in bed.
For hallways, go a little higher so it feels like ambient lighting, not an interrogation lamp.
Step 2: Decide your “switch strategy”
Some puck lights turn on by pressing the center. Others use a remote. If your pot is deep or the cutouts are small,
remote control is a blessing. If it’s a shallow pot with wide openings, push-on can work fine.
Pro comfort move: choose a puck light with a timer or auto-off so you don’t accidentally power it for eight hours
like a tiny lighthouse.
Step 3: Secure the puck light inside the pot
Flip the pot into its “sconce body” orientation and decide where the light should sit. Usually, you want the puck light
near the “back” so the glow washes the wall and the cutouts.
- Wipe the inside mounting area with rubbing alcohol and let it dry completely.
- Attach hook-and-loop dots (or strong tape) to the puck light and press it firmly into place.
- Make sure you can still access the battery compartmentor that the puck light can pop off easily for changes.
Step 4: Mount the pot on the wall
Here you choose your adventure: secure or super removable.
Option A (most secure): screws + anchors
If you want a sconce that stays put when someone presses the light, screws win.
- Mark your height and center point.
- Use two mounting points if possible to prevent twisting.
- Install anchors if you’re not going into a stud.
- Hang the pot using its existing hanger/holes (or add a small bracket inside the pot if needed).
Option B (renter-friendly): removable picture-hanging hooks/strips
If you’re renting (or you simply enjoy keeping your options open), removable hanging products can work well
as long as you respect weight ratings, surface type, and prep. Clean wall + correct strip + proper press time = better hold.
Step 5: Test the glow (and adjust)
Turn the puck light on. Step back. If the light feels too harsh, move the puck slightly deeper.
If it feels too dim, consider:
- Switching to a brighter puck light (higher lumen output)
- Choosing a warmer color temperature (often looks cozier even at lower brightness)
- Adding a simple diffuser (see below)
Design upgrades that make it look “expensive”
Add a diffuser for softer light
If your pot has large openings, you may see the puck light directly. To soften the look, add a diffuser:
a piece of frosted plastic (cut from a translucent folder), vellum paper, or a thin shade liner.
Keep it away from any heat sourcestick with LEDs only.
Paint it like a pro
A $6 pot can look like a $60 fixture with the right finish. Try matte black, aged brass, soft cream, or a color that matches your trim.
Lightly sand glossy areas, use a primer suitable for metal, and finish with thin coats.
Make it a matched pair (symmetry is free interior design)
Two matching sconces instantly read “intentional.” Put them on both sides of a mirror, bed, reading bench, or dresser.
The room will look styled even if your laundry is doing interpretive dance in a corner.
Go rechargeable to reduce battery fatigue
Battery swaps are easy at first and then mysteriously become your least favorite hobby.
Rechargeable puck lightsor rechargeable bulbs used in a fixture hackcan be a quality-of-life upgrade.
For daily use, dimmable + timer + rechargeable is the dream trio.
Lighting performance: what to realistically expect
These DIY cordless sconces are best as accent lighting and task-adjacent lighting
(like bedtime reading glow), not as your only light source in a room.
Think: cozy pool of light, not stadium floodlights.
Brightness tips
- Hallway / ambiance: warm white, medium brightness, timer helpful
- Bedside: dimmable is ideal; remote control prevents “wall slap” turning on the light
- Kids’ rooms: avoid anything heavy over beds; choose secure mounting and consider nightlight-level brightness
Color temperature: warm beats icy (usually)
Most people prefer warm white for bedrooms and cozy spaces. Cooler “daylight” tones can feel brighter,
but they can also feel clinical fast. If your puck light offers adjustable color temperature, start warm and only go cooler
if you’re using it for a task like reading or crafts.
Safety and “please don’t summon chaos” notes
- Use LED lights only. LEDs run far cooler than traditional incandescent options, which is important when light sits inside a small enclosure.
- Don’t hang anything heavy with wishful thinking. If someone will press the light on/off, mount the pot so it can’t shift.
- Avoid mounting over beds with removable adhesives. If it would ruin your week to have it fall, choose screws into studs or anchorsor pick a different placement.
- Prep the wall properly. Clean surfaces help adhesives perform the way they were designed to perform.
- Keep battery access in mind. Your future self will thank you when it’s time to swap/charge.
Where this hack looks best
- Reading nooks: one pot sconce + comfy chair = instant “main character” corner
- Above a bench: makes entryways feel designed, not accidental
- Flanking a mirror: creates balance and a softer glow than overhead lighting
- Kids’ rooms: as a gentle nightlight or story-time glow (mounted securely and thoughtfully)
- Stairs and landings: perfect for adding warmth where wiring is annoying
Frequently asked questions
Will it actually stay on the wall?
Yesif you match the mounting method to the weight and the wall surface. For the most secure setup, use screws and anchors.
For renter-friendly setups, removable hanging systems can work well on smooth, clean surfaces when installed correctly.
Is it bright enough to read by?
It depends on the puck light’s brightness and the pot design. A shallow pot with wide openings and a brighter, dimmable puck light
can work for reading. Many people use this hack as ambient lighting and pair it with another lamp for serious reading sessions.
What if I want it to look less like a plant pot?
Paint is your best friend. Also consider adding a diffuser inside so the light reads like a “real shade.”
Once it’s on the wall and glowing, most people won’t clock its former life as a planter.
Conclusion: cozy, cordless, and weirdly impressive
This IKEA-inspired plant pot wall lamp hack hits that sweet spot where “easy” meets “it looks like you tried.”
You get warm light, stylish shadow patterns, and the satisfaction of solving a design problem without opening a single wall.
Whether you’re decorating a rental, upgrading a kid’s room, or just adding ambiance to a neglected corner,
these cordless wall lamps are proof that the best home projects are sometimes the simplest: stick a light in a thing,
mount the thing, enjoy the glow, and pretend you planned it all along.
Real-life experience: what I learned after actually living with these cordless pot sconces
The first time I tried this hack, I was feeling extremely confidentthe kind of confident you get when a project looks easy and your coffee is hitting.
I mounted one above a little reading chair, turned it on, and honestly… it felt like cheating. The wall lit up with a delicate pattern, the corner looked
curated, and there were exactly zero cords snaking down to an outlet like sad little lightning bolts.
Then came the “living with it” phase, which is where the real wisdom happens. First: push-on puck lights are fine until they’re not.
If the sconce is placed where you have to reach awkwardly (like behind a pillow mountain or above a deep nightstand),
pressing the light can jiggle the whole setup. That’s when I became a remote-control evangelist. A remote lets you keep the lamp stable,
keep your wall paint intact, and keep your mood serene. Bonus: timers. I cannot stress timers enough. The number of times I’ve left accent lights on
“just for a minute” and discovered them still glowing at 2 a.m. is… personal.
Second: battery access is everything. The most annoying version of this project is the one where you mounted the puck light in a way that makes
battery replacement feel like a tiny escape room. After round one, I switched to hook-and-loop dots so I could pull the puck light out in two seconds,
swap batteries (or recharge), and pop it back. If your pot is narrow, practice removing the light before you mount the whole thing. It’s the DIY equivalent
of checking that your phone actually charges on the new cable before you leave for the airport.
Third: brightness is a game of expectations. These hacks are fantastic for ambiance and bedtime wind-down lighting. They’re also surprisingly great
for “I need just enough light to find my water bottle without waking the entire household.” But if you’re trying to flood a room with light, you’ll be disappointed.
What worked best for me was treating them like layered lighting: overhead for general brightness, pot sconces for glow and mood, and a task lamp when I need
real reading light. When I used them that way, I loved them. When I expected them to act like hardwired fixtures, I felt like my walls were gaslighting me.
Fourth: placement changes everything. In a hallway, the patterned light reads dramatic and elevated. Near a bed, it reads cozyespecially in warm white.
But in a high-traffic spot where people brush past it, you want it mounted more securely (or tucked out of shoulder range). And if kids are involved,
assume they will press the button seventeen times in a row because that is apparently what kids do for joy. That’s another reason remotes and sturdy mounting matter.
Finally: the most unexpectedly fun part was customizing the “fixture” look. One pot got spray-painted matte black and immediately looked modern.
Another got a soft antique-brass finish and looked like something I would have overpaid for in a fancy lighting aisle. Once I realized the pot is basically a blank canvas,
the hack became less about “making a cheap light” and more about “making a light that matches my space.” And that’s the point, right?
You’re not just saving moneyyou’re getting exactly the style you want, exactly where you want it, with no wiring and minimal chaos.