Table of Contents >> Show >> Hide
- What Is the Intercepts Method (and Why It Works)?
- Before You Start: Make the Equation “Intercept-Friendly”
- The Intercepts Method in 7 Steps
- Step 1: Write the equation clearly and check the format
- Step 2: Find the x-intercept by setting y = 0
- Step 3: Find the y-intercept by setting x = 0
- Step 4: Write the intercepts as two points
- Step 5: Plot both points on the coordinate plane
- Step 6: Draw the line through the two intercept points
- Step 7: Check your graph with a “third point” or quick substitution
- Worked Example 2 (Because One Example Is Never Enough)
- Special Cases: When Intercepts Get Weird (But You Don’t Have To)
- Common Mistakes (a.k.a. How Lines Go Off the Rails)
- Quick Practice Problems (With Answer Checks)
- Conclusion: Two Intercepts, One Confident Graph
- Real-Life Practice Experiences (to Make This Stick for Good)
Graphing a line doesn’t have to feel like trying to fold a fitted sheet. If you can find two points, you can graph a
linebecause a line is basically the universe’s way of saying, “Two points? Cool, I’ll take it from here.”
The intercepts method is one of the fastest ways to graph many linear equations, especially when they’re written in
standard form (like Ax + By = C). You’ll find where the line crosses the x-axis and y-axis, plot those
two points, and draw the line through them. Done. No drama. (Okay, maybe a tiny bit of drama if you forget a negative.)
What Is the Intercepts Method (and Why It Works)?
A linear equation represents a straight line on the coordinate plane. The intercepts method focuses on two special
points:
- x-intercept: where the line crosses the x-axis (so y = 0).
- y-intercept: where the line crosses the y-axis (so x = 0).
When you plug in y = 0, you’re finding the x-value that makes the equation true on the x-axis.
When you plug in x = 0, you’re finding the y-value that makes it true on the y-axis.
Those two points are real solutions to the equationso they must sit on the line.
This is a standard approach you’ll see across many U.S.-based math learning platforms and textbooks (think classroom
notes, online practice sites, and big-name tutoring resources). The steps below capture the method in a clean,
repeatable processwithout making you memorize a chant under a full moon.
Before You Start: Make the Equation “Intercept-Friendly”
The intercepts method works best when your equation is in standard form:
Ax + By = C. If your equation is already like that, you’re golden.
If it’s in another form, you can often rewrite it:
- Slope-intercept form: y = mx + b (still fineintercepts are easy to read/compute).
- Point-slope form: y – y1 = m(x – x1) (rewrite first if you want intercepts).
The Intercepts Method in 7 Steps
-
Step 1: Write the equation clearly and check the format
Copy the equation neatly (yes, really). Messy copying is how innocent negatives become villains.
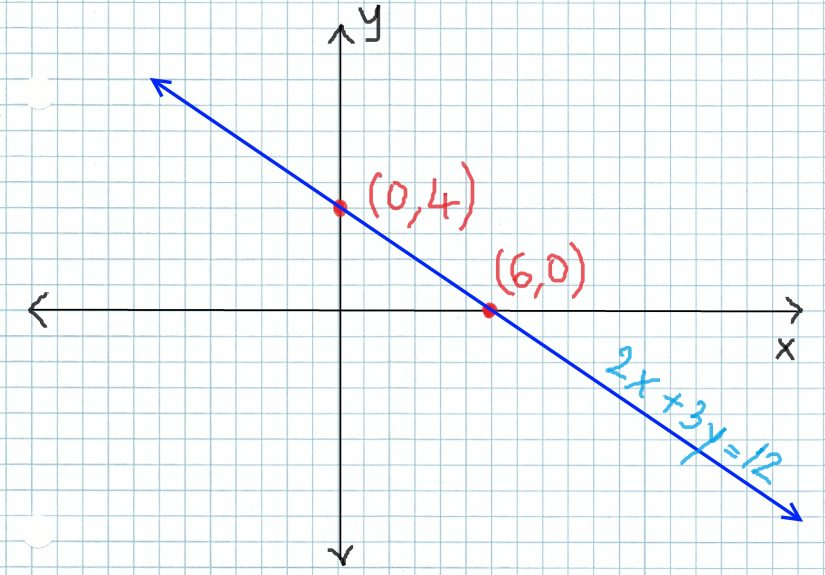
If possible, rewrite into Ax + By = C.Example equation (standard form):
3x + 2y = 6 -
Step 2: Find the x-intercept by setting y = 0
On the x-axis, y is always 0. Substitute y = 0 into the equation and solve for x.
For 3x + 2y = 6:
So the x-intercept is (2, 0).
-
Step 3: Find the y-intercept by setting x = 0
On the y-axis, x is always 0. Substitute x = 0 and solve for y.
For 3x + 2y = 6:
So the y-intercept is (0, 3).
-
Step 4: Write the intercepts as two points
This sounds obvious, but it’s where a lot of people slip: intercepts are coordinates.
Put them in ordered pair form.- x-intercept: (2, 0)
- y-intercept: (0, 3)
Two points = one line. You’re basically 95% done.
-
Step 5: Plot both points on the coordinate plane
Use the same scale on both axes (no “creative scaling” unless your teacher asked for abstract art).
Start at the origin, move along x, then up/down y.Plot (2, 0) on the x-axis and (0, 3) on the y-axis.
-
Step 6: Draw the line through the two intercept points
Use a ruler or straightedge. Draw a straight line passing through both points and extend it in both directions.
Add arrowheads to show it continues forever (like your math homework, emotionally).Label the line if needed, especially if you’re graphing more than one equation.
-
Step 7: Check your graph with a “third point” or quick substitution
A fast confidence boost: pick an easy x-value (like 0, 1, or 2), solve for y, and see if that point lands on your line.
Or plug one of your intercepts back into the original equation.Check (2, 0) in 3x + 2y = 6:
If it checks out, your line is behaving. If not, something went sidewaysusually a sign error or a plotting slip.
Worked Example 2 (Because One Example Is Never Enough)
Let’s graph: y = -2x + 4
You can still use intercepts:
Find the x-intercept (set y = 0)
x-intercept: (2, 0)
Find the y-intercept (set x = 0)
y-intercept: (0, 4)
Plot (2, 0) and (0, 4), draw the line through them, then do a quick check:
if x = 1, y should be 2 (because y = -2(1) + 4 = 2). That point (1, 2) should land right on the line.
Special Cases: When Intercepts Get Weird (But You Don’t Have To)
Sometimes a line refuses to cross one axis. That’s not your fault. That’s just the line being dramatic.
Vertical lines
Example: x = 5. This line crosses the x-axis at (5, 0) but never crosses the y-axis.
It’s a straight vertical line through x = 5.
Horizontal lines
Example: y = -2. This crosses the y-axis at (0, -2) but never crosses the x-axis.
It’s a straight horizontal line through y = -2.
Lines through the origin
If both intercepts are 0 (like y = 3x), your line passes through (0, 0).
You’ll need a second point (pick any x-value and compute y).
Common Mistakes (a.k.a. How Lines Go Off the Rails)
-
Mixing up which variable becomes 0:
x-intercept means y = 0; y-intercept means x = 0. -
Forgetting parentheses when substituting:
If you substitute a negative value later, wrap it. -
Plotting (2, 0) as (0, 2):
It happens. The coordinate plane forgives you, but your answer key won’t. -
Not extending the line:
A line is not a line segment unless your teacher specifically said “segment.” -
Scale chaos:
If each square is 1 on the x-axis but 2 on the y-axis (without telling anyone), your graph becomes a work of fiction.
Quick Practice Problems (With Answer Checks)
Try these using the 7 steps, then check your intercept points.
- 2x + y = 8
- x – 3y = 6
- 4x + 2y = -4
- y = 5 – x
- 3x = 9
Answer Key (Intercepts)
- 2x + y = 8: x-int (4, 0), y-int (0, 8)
- x – 3y = 6: x-int (6, 0), y-int (0, -2)
- 4x + 2y = -4: x-int (-1, 0), y-int (0, -2)
- y = 5 – x: x-int (5, 0), y-int (0, 5)
- 3x = 9: x-int (3, 0), no y-intercept (vertical line x = 3)
Conclusion: Two Intercepts, One Confident Graph
The intercepts method is a clean “no-fuss” way to graph linear equations: set y = 0 to get the
x-intercept, set x = 0 to get the y-intercept, plot two points, and draw the line. The final stepchecking
your workturns “I think this is right?” into “Yes, this is right.”
Once you’ve done a few, you’ll notice your brain starts spotting intercepts faster than your calculator can boot up.
And that’s when you know you’re officially a graphing adult.
Real-Life Practice Experiences (to Make This Stick for Good)
If you’ve ever stared at graph paper and thought, “This grid is judging me,” welcome to the club. The intercepts
method is popular not just because it works, but because it matches how people actually learn: fast wins, visible
results, and enough structure to keep you from wandering into Algebra’s wilderness.
One common experience is the “aha” moment when you realize that intercepts are just regular solutionsnothing
mystical. You’re not summoning points out of thin air; you’re simply asking, “What happens if I stand on the x-axis?”
(Answer: y becomes 0 and suddenly the equation gets way less chatty.) The same goes for the y-axis where x becomes 0.
Students often say that once they treat intercepts like a quick substitution game, the anxiety drops immediately.
Another real-world pattern: people get faster when they start choosing smart numbers for checks. After drawing the line
through the intercepts, it’s common to test a “nice” x-value (like 1 or 2) and see if the point lands on the line.
The first few times, you might do it slowlyplugging in carefully, double-checking arithmetic, maybe whispering “please
be right” under your breath. But eventually, checking becomes automatic, like buckling a seatbelt. It’s not extra work;
it’s how you stop one tiny sign mistake from wrecking the whole graph.
You might also notice how graphing changes depending on the equation’s personality. For example, equations like
3x = 9 feel “too easy” until you realize they create a vertical line. That’s a classic experience:
the moment you discover that not every line politely crosses both axes. The intercepts method still helps, because it
highlights what’s missingno y-intercept means your line never touches the y-axis. Instead of panicking, you learn to
interpret it: “Oh, it’s vertical. That’s why.”
Practice sessions also teach you something sneaky: most “graphing errors” aren’t math errorsthey’re plotting errors.
People often solve for intercepts correctly and then place (-2, 0) at (2, 0) because a
minus sign got lost in transit. A good habit that grows from experience is writing intercept points in a clear list
before you plot, then physically pointing to each coordinate as you move on the graph: “x is first, then y.” It sounds
simple, but it works like guardrails.
Finally, there’s the confidence boost that comes from seeing the same method work across different forms. Maybe you
start with standard form, then try slope-intercept form, then realize you can still find intercepts no matter how the
equation is written. That flexibility is what makes the intercepts method feel “real” over time: it’s not a one-off
trick. It’s a reliable approach you can use for homework, tests, quick sketches, and even checking answers in other
graphing methods. The more you practice, the more graphing becomes less like guessing and more like following a map
and the map only has two required stops: the x-intercept and the y-intercept.