Table of Contents >> Show >> Hide
- What Makes Red Velvet Sandwich Cookies So Good?
- Ingredients for the Best Red Velvet Sandwich Cookies Recipe
- Why These Ingredients Matter
- How to Make Red Velvet Sandwich Cookies
- Tips for Perfect Red Velvet Sandwich Cookies
- Flavor Variations to Try
- How to Store Red Velvet Sandwich Cookies
- When to Serve This Red Velvet Sandwich Cookies Recipe
- Common Mistakes to Avoid
- Why This Recipe Works for Home Bakers
- Experiences Baking and Sharing Red Velvet Sandwich Cookies
- Final Thoughts
Note: This article is formatted as clean, publish-ready HTML body content and stripped of unnecessary citation artifacts or extra markup.
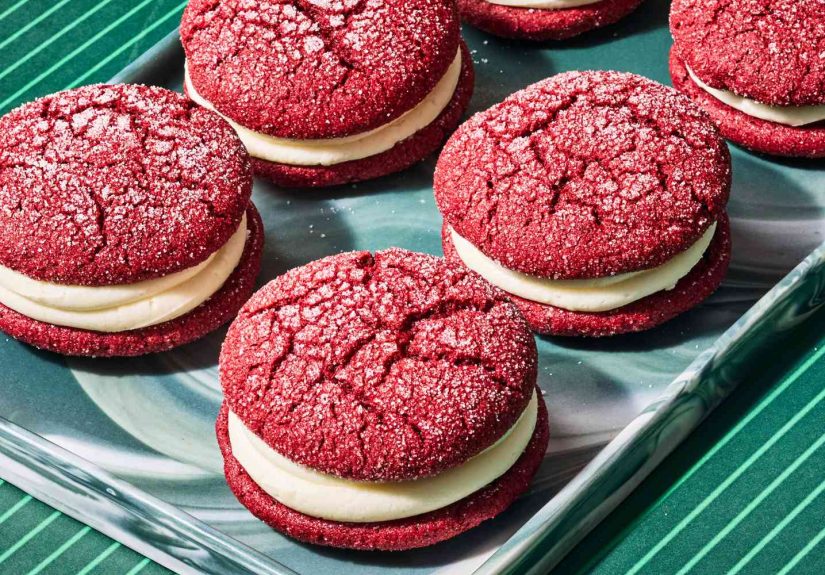
Some desserts whisper. Red velvet sandwich cookies absolutely do not. They strut into the room in a bright red coat, flash a creamy center, and somehow manage to look fancy and playful at the exact same time. They are part cookie, part cake, part “I made these from scratch, please clap.” If you love the classic flavor of red velvet cake but want something easier to stack, share, pack, and sneak from the kitchen counter, this red velvet sandwich cookies recipe deserves a permanent spot in your baking rotation.
The best version lands right in the sweet spot: soft but sturdy cookies, a hint of cocoa, gentle tang from buttermilk or cream cheese, and a smooth filling that doesn’t squish out like it’s trying to escape the relationship. In other words, we are not making dry red hockey pucks with sugary spackle in the middle. We are making rich, tender, bakery-style sandwich cookies with enough flavor to justify every extra napkin.
Below, you’ll find everything you need: what makes red velvet taste like red velvet, ingredient tips, a full recipe, common mistakes to avoid, storage advice, and a few fun twists. Then, because great cookies tend to come with great stories, there’s also an extra section at the end about real-life experiences baking and sharing them.
What Makes Red Velvet Sandwich Cookies So Good?
Red velvet is often mistaken for plain chocolate dyed red, but that description sells it short. The flavor is more nuanced than that. It has a mild cocoa note rather than a deep chocolate punch, balanced by vanilla and a little tang. That tang can come from buttermilk, vinegar, or a cream cheese-based filling. The result is a dessert that feels richer and more interesting than a basic sugar cookie, but not as intense as a dark chocolate cookie.
Turn that flavor profile into sandwich cookies, and the fun really starts. You get contrast in every bite: soft cookie edges, a creamy center, and the visual drama of that famous red-and-white combination. These are the kinds of cookies people assume came from a boutique bakery with a six-dollar latte nearby.
Ingredients for the Best Red Velvet Sandwich Cookies Recipe
For the cookies
- 2 1/4 cups all-purpose flour
- 2 tablespoons natural unsweetened cocoa powder
- 1 teaspoon baking soda
- 1/2 teaspoon baking powder
- 1/2 teaspoon fine salt
- 3/4 cup unsalted butter, softened
- 3/4 cup granulated sugar
- 1/4 cup light brown sugar
- 1 large egg
- 1 tablespoon buttermilk
- 1 teaspoon vanilla extract
- 1 teaspoon white vinegar
- 1 tablespoon red gel food coloring
For the cream cheese filling
- 8 ounces full-fat cream cheese, softened
- 1/4 cup unsalted butter, softened
- 2 1/2 to 3 cups powdered sugar
- 1 teaspoon vanilla extract
- Pinch of salt
Why These Ingredients Matter
Natural cocoa powder: This is one of the quiet heroes of red velvet baking. You do not need a lot of it. A small amount adds that classic subtle cocoa flavor without turning the cookies into full-on chocolate cookies. Natural cocoa is also a smart choice when you want the traditional red velvet character.
Buttermilk and vinegar: These bring the tang. They also help create a tender texture that feels more “velvet” than standard cookie dough. It sounds dramatic, but this little duo is basically the couple everyone at the baking party knows is going to make it.
Red gel food coloring: Gel coloring is useful because it gives bold color without thinning the dough too much. Liquid color can work, but gel is better when you want a vivid finish without changing texture.
Cream cheese filling: This is the classic pairing. It cuts through sweetness and makes the whole cookie taste more balanced. A vanilla buttercream works too, but cream cheese filling is the version that feels most true to the red velvet experience.
How to Make Red Velvet Sandwich Cookies
Step 1: Prep the baking sheets
Preheat your oven to 350°F. Line two baking sheets with parchment paper. This is not the moment to trust an old pan with “character.” Character in cookware usually means sticking.
Step 2: Mix the dry ingredients
In a medium bowl, whisk together the flour, cocoa powder, baking soda, baking powder, and salt. Set aside.
Step 3: Cream the butter and sugars
In a large bowl, beat the softened butter, granulated sugar, and brown sugar until light and fluffy, about 2 to 3 minutes. This step helps create a softer cookie texture, so do not rush it like you are late for a game show.
Step 4: Add the wet ingredients
Beat in the egg, then add the buttermilk, vanilla, vinegar, and red food coloring. Mix until smooth. The dough should already look very festive and slightly suspicious, which is normal for red velvet.
Step 5: Combine wet and dry
Add the dry ingredients to the wet ingredients and mix on low speed just until combined. Do not overmix. Once the flour disappears, stop. Overworked cookie dough can get tough, and these cookies should stay soft and tender.
Step 6: Scoop and bake
Scoop tablespoon-sized portions of dough and place them about 2 inches apart on the prepared baking sheets. Gently flatten each mound just a little. Bake for 9 to 11 minutes, or until the edges are set and the centers still look slightly soft.
Let the cookies cool on the baking sheet for 5 minutes, then transfer them to a wire rack to cool completely. Completely means completely. Warm cookies plus cream cheese filling equals a melted mess and a brief identity crisis.
Step 7: Make the filling
Beat the cream cheese and butter until smooth. Add vanilla, salt, and 2 1/2 cups powdered sugar. Beat until fluffy. Add more powdered sugar if needed to thicken the filling. You want it soft enough to spread or pipe, but firm enough to stay put when sandwiched.
Step 8: Assemble the sandwich cookies
Match cookies by size. Spread or pipe filling onto the flat side of one cookie, then top with another cookie. Press gently until the filling reaches the edges. That’s it. You have achieved cookie architecture.
Tips for Perfect Red Velvet Sandwich Cookies
1. Don’t overbake
This is the biggest rule. Red velvet sandwich cookies should be soft. Pull them when the edges are set and the centers still look slightly underdone. They will finish setting as they cool.
2. Use room-temperature dairy
Softened butter and cream cheese blend more smoothly, which means better texture and fewer annoying lumps. Nobody wants to bite into a surprise cream cheese boulder.
3. Cool before filling
This sounds obvious, yet many a hopeful baker has frosted too early and watched the filling slide like it was trying to leave town. Be patient.
4. Pair similar sizes together
Your finished cookies will look neater and feel easier to eat. Sandwich cookies are already dramatic enough. They do not need lopsided energy too.
5. Chill if needed
If your kitchen is warm or your filling feels soft, chill the assembled cookies for 15 to 20 minutes before serving. This helps them firm up beautifully.
Flavor Variations to Try
White chocolate red velvet sandwich cookies
Fold mini white chocolate chips into the dough or drizzle melted white chocolate over the assembled cookies. This adds sweetness and makes them look extra polished.
Cheesecake-style filling
For a tangier center, reduce the butter slightly and let the cream cheese flavor lead. This version feels a little richer and a little less sugary.
Holiday red velvet cookies
Add crushed peppermint on top of the filling edge for a Christmas look, or use heart-shaped cookies for Valentine’s Day. Red velvet is basically the extrovert of holiday baking.
Mini sandwich cookies
Make smaller cookies for parties, dessert trays, or bake sales. Mini versions are adorable and dangerous because people will say, “I’ll just have one more,” six times.
How to Store Red Velvet Sandwich Cookies
Because of the cream cheese filling, these cookies should be stored in an airtight container in the refrigerator. They’re usually best within 3 to 4 days. Let them sit at room temperature for about 10 to 15 minutes before serving so the filling softens slightly and the flavor comes through better.
You can also freeze them. Place the assembled cookies on a tray until firm, then transfer to a freezer-safe container with parchment between layers. Freeze for up to 2 months. Thaw in the refrigerator overnight.
When to Serve This Red Velvet Sandwich Cookies Recipe
These cookies fit almost any occasion. They feel fancy enough for holiday dessert boards and special enough for birthdays, bridal showers, Valentine’s Day, or baby showers. They also work for ordinary weekends when you want your kitchen to smell like a bakery and your family to suddenly become very interested in “helping.”
They make a strong case for themselves at cookie swaps because they stand out visually, travel well when chilled, and offer a nice break from plain sugar cookies or chocolate chip classics. They also photograph beautifully, which matters because in the modern dessert world, a cookie is only half baked until someone posts it.
Common Mistakes to Avoid
- Using too much cocoa powder: That pushes the flavor closer to chocolate cookies and away from true red velvet.
- Skipping the tangy ingredients: Buttermilk and vinegar help create the signature profile.
- Making the filling too loose: Add powdered sugar gradually until it holds shape.
- Sandwiching warm cookies: This leads directly to filling disaster.
- Overcrowding the baking sheet: Give the dough room to spread evenly.
Why This Recipe Works for Home Bakers
One reason this red velvet sandwich cookies recipe is such a keeper is that it gives you bakery-style results without requiring complicated techniques. There is no candy thermometer, no dramatic water bath, no whispered prayers over a soufflé. Just straightforward mixing, scooping, baking, and filling.
The finished cookies have enough elegance for gifting, but they are still relaxed and friendly. They look impressive, taste balanced, and invite customization. In other words, they are the kind of dessert that makes people think you have your life together, even if there is still flour on your shirt and one sink full of dishes glaring at you from across the room.
Experiences Baking and Sharing Red Velvet Sandwich Cookies
There is something delightfully theatrical about making red velvet sandwich cookies at home. The dough starts out like any ordinary cookie dough and then, with that burst of red color, suddenly becomes the center of attention. It feels like the baking version of someone entering a room wearing a velvet blazer and knowing exactly what they’re doing. Even before the cookies are filled, they already look like they have a personality.
One of the most memorable things about baking these cookies is how people react when they see the finished tray. Chocolate chip cookies get happy nods. Brownies get appreciation. But red velvet sandwich cookies get a full pause. People lean in. They ask questions. They assume they came from a bakery box with tissue paper and a logo sticker. That visual contrast between the rich red cookie and the creamy filling does a lot of heavy lifting before anyone even takes a bite.
They are also one of those desserts that feel different depending on the occasion. At holiday parties, they look festive without trying too hard. At Valentine’s Day gatherings, they become the obvious star of the table. At bake sales, they disappear quickly because they look special enough to justify buying “just one,” which usually turns into buying three. They have range, which is more than some people can say about their group chat personality.
In family kitchens, these cookies tend to create a very specific kind of chaos. Someone always wants to help assemble them. Someone else keeps “taste-testing” the filling. Another person insists the lopsided cookie is still perfectly good and should not go to waste. Before long, the kitchen becomes a small production line with flour, parchment, frosting bowls, and strong opinions about which cookie should be matched with which. Oddly enough, that is part of the appeal.
They also make excellent memory cookies. People remember the first time they had one that was really done right: soft centers, light cocoa flavor, tangy filling, and just enough sweetness to keep things interesting. That combination tends to stick with people. It feels nostalgic even when it is brand new. Maybe that is because red velvet already carries a kind of old-school dessert charm, and turning it into sandwich cookies makes it feel both classic and playful at once.
From a baker’s perspective, the experience is rewarding because the cookies look impressive without demanding professional-level skill. That is always a nice trick. You get the satisfaction of making something eye-catching and celebratory, but the process stays grounded in familiar home-baking steps. Cream the butter, mix the dough, bake the cookies, whip the filling, assemble the sandwiches, and suddenly you have a dessert that looks like it belongs behind glass in a boutique pastry case.
And yes, there is also the private joy of opening the refrigerator later, seeing one last cookie waiting in the container, and realizing the best part of being the baker is quality control. Very thorough quality control.
Final Thoughts
If you want a dessert that is colorful, crowd-pleasing, and just a little dramatic in the best possible way, this red velvet sandwich cookies recipe checks every box. It delivers the classic flavor people love, wraps it in a handheld format, and gives you plenty of room to add your own twist. Whether you serve them at a party, package them as gifts, or keep a batch in the fridge for personal “research,” these cookies know how to make an impression.
Bake them once, and there is a decent chance they will become your signature cookie. Or at least the dessert everyone starts requesting the second the calendar says holiday season. Honestly, that is how cookie fame begins.