Table of Contents >> Show >> Hide
- Before You Start: The 5-Minute Safety + Reality Check
- 1) Deep Clean and De-Gloss: Remove “Hand Gunk” Before You Upgrade Anything
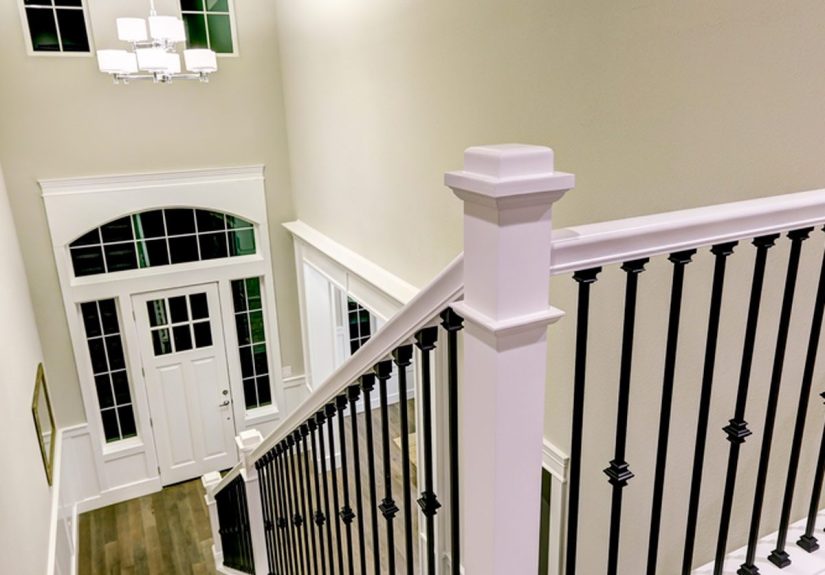
- 2) Two-Tone It: Paint the Balusters, Keep (or Restain) the Handrail
- 3) Paint the Whole ThingBut Use Sheen Like a Designer
- 4) Restain to a Modern Tone (Without Rebuilding the Staircase)
- 5) Swap the Balusters: The Fastest Way to Change the Vibe
- 6) Upgrade the Handrail Profile: Small Detail, Big Comfort
- 7) Give the Newel Posts a Makeover: Caps, Collars, or a “Chunkier” Swap
- 8) Add Architectural Details: Trim, Paneling, and “Built-In” Energy
- 9) Consider a Modern Infill: Cable or Glass (When It Makes Sense)
- 10) Add Lighting That Makes the Banister Look Like a Feature
- How to Pick the Right Banister Refresh for Your Home
- Conclusion: A Banister Glow-Up That Actually Pays Off
- Real-World Banister Makeover Stories (Lessons Homeowners Commonly Share)
- SEO Tags
An outdated banister is like a bad haircut in a class photo: you don’t notice it until you really notice itand then it’s all you can see.
The good news? Banisters (handrails, balusters/spindles, and newel posts) are one of the highest-impact, lowest-square-foot upgrades you can make.
You’re not remodeling a kitchen. You’re giving your staircase a glow-up… without taking out a second mortgage or moving into a hotel.
Below are 10 smart, style-forward ways to update tired stair railingsranging from “Saturday afternoon and a podcast” to “call a pro and let them do
the swearing.” Along the way, I’ll flag safety and building-code considerations, because a banister is not just décorit’s also the thing you grab when
your sock slips on the top step.
Before You Start: The 5-Minute Safety + Reality Check
Freshening up a banister is usually cosmetic, but stairs are a safety zone. Before you change anything, do a quick audit:
- Wobble test: If the handrail or newel post moves when you shake it, fix stability first (tighten fasteners, repair wood, or call a carpenter).
- Spacing check: If you have small kids (or frequent visiting nieces/nephews with Olympic-climber energy), confirm baluster spacing is safe and code-friendly.
- Height + grip comfort: A handrail should be easy to grasp and consistently placed along the runif it’s awkward, now’s your chance to improve it.
- Lead paint caution: If your home is older (especially pre-1978), treat sanding and paint removal seriouslyuse proper precautions and consider professional testing.
- Get a grown-up involved for risky parts: If you’re using ladders, strong chemical strippers, or power tools, this is an “adult supervision required” moment.
1) Deep Clean and De-Gloss: Remove “Hand Gunk” Before You Upgrade Anything
The fastest banister refresh is also the least glamorous: cleaning. Stair rails collect oils, lotion, pet dust, cooking residue that travels through open
floor plans, and whatever mystery substance appears when a surface gets touched a thousand times a week. Even if you plan to paint, stain, or wrap the rail,
cleaning and de-glossing gives your finish a fighting chance.
Best for
Banisters that look dingy, sticky, or unevenly shinybut aren’t structurally damaged.
Style payoff
A clean banister instantly looks newer, and de-glossing prevents that “paint peels when you look at it” situation.
2) Two-Tone It: Paint the Balusters, Keep (or Restain) the Handrail
Two-tone stair railings are popular for a reason: they’re classic, they work in traditional and modern homes, and they “correct” dated wood tones without
erasing warmth. The usual recipe is simple: paint the balusters and newels a clean trim color, and leave the handrail wood
(or restain it to a more current shade).
This approach is especially great for the Honey Oak Era™. You keep the wood grain where hands land (handrails take a beating), and you brighten the vertical
parts that visually “crowd” a stairwell.
Best for
Busy households that want a durable, timeless update that won’t feel trendy-tired next year.
Pro tip
If your floors are warm, choose a handrail stain that’s either a close match (cohesive) or intentionally darker (contrast). The “almost matches” middle zone
is where staircases go to look accidental.
3) Paint the Whole ThingBut Use Sheen Like a Designer
Painting is the budget MVP: it modernizes instantly, covers mismatched wood, and lets you coordinate with trim. The trick to making it look
expensive is sheen strategy. Many designers like a higher-gloss handrail paired with lower-sheen balusters,
which adds depth and makes the handrail feel intentionally “finished,” not just coated.
Color ideas that typically play well on stair railings: crisp black, soft charcoal, deep navy, warm greige, or a moody green. If your stairwell is dark,
lighter railings can keep it airy; if your stairwell is bland, darker rails create a strong architectural line.
Best for
Railings with blotchy stain, patched wood, or a mismatched mix of parts.
Don’t skip
Use products meant for trim/doors (durable enamel). Stair parts get touched constantlyregular wall paint is not built for that kind of daily abuse.
4) Restain to a Modern Tone (Without Rebuilding the Staircase)
If your stair rail is solid wood and you love the warmth of natural materials, restaining can make it look new while keeping the character.
Today’s popular directions include: neutral medium browns, espresso/dark walnut, or even a lighter “white oak” look
if the wood species cooperates.
The biggest win here is when the banister color clashes with nearby floorsrestaining lets you bring them into the same conversation. Think of it as
color correction for wood.
Best for
Homes with beautiful woodwork where paint would feel like hiding the good stuff.
Reality check
Restaining can be fussyespecially on railings with years of polyurethane. If you want “less sanding, more sanity,” look into methods designed for
refinishing (and consider hiring out if you hate prep work with the fire of a thousand suns).
5) Swap the Balusters: The Fastest Way to Change the Vibe
Balusters (spindles) are the “pattern” of your staircase. Change the pattern, and the whole staircase reads differentlyeven if the handrail stays.
Popular upgrades include:
- Iron balusters for a crisp, upgraded look (from traditional twists to clean square lines).
- Square wood balusters for modern farmhouse or transitional styles.
- Thicker, simpler profiles that feel custom instead of builder-basic.
This is also where spacing matters. Replacing balusters is not the time to “wing it.” Keep openings safe and code-friendly, and avoid
changes that create extra patchwork in treads and rails. If you’re unsure, a carpenter can usually handle this quickly.
Best for
1990s/2000s staircases with skinny spindles that visually date the entire entry.
6) Upgrade the Handrail Profile: Small Detail, Big Comfort
Some banisters look outdated because the shape is outdated: too bulky, too skinny, too flat, or oddly hard to grip. Swapping to a more
comfortable, code-appropriate handrail profile can make the staircase feel newer and safer at the same time.
A good handrail is easy to wrap your fingers aroundespecially for kids, older adults, or anyone carrying laundry while pretending gravity isn’t real.
If you’ve ever thought, “This rail feels awkward,” trust that instinct.
Best for
Homes where the handrail is the main eyesore (or the main discomfort).
7) Give the Newel Posts a Makeover: Caps, Collars, or a “Chunkier” Swap
Newel posts are the punctuation marks of a staircase. When they look dated, the whole stair feels dated. You don’t always need brand-new posts to get
a new look. Depending on your setup, you can:
- Replace the newel cap for a cleaner, more modern top.
- Add a newel collar/base trim to make the post look more substantial.
- Paint/stain the newels differently to make them intentional accents.
If the newels are flimsy or loose, treat that as a structural issue first. A gorgeous color on a wobbly post is still… a wobbly post.
Best for
Staircases where the newel post feels undersized or screams “builder grade.”
8) Add Architectural Details: Trim, Paneling, and “Built-In” Energy
Want a banister upgrade that looks custom? Add architectural detail around it. Depending on your stair design, you might add:
- Trim or molding along the stair stringer/skirt for a more finished edge.
- Wall paneling (like simple box trim) along the staircase wall to complement the railing.
- Decorative cutout or patterned elements if you’re going for a statement look (more “design moment,” less “standard issue”).
This method is sneaky-powerful because it distracts from an average railing and makes the entire stairwell feel intentionally designed.
Best for
Entryways where the staircase is visually prominent and needs to feel “finished,” not forgotten.
9) Consider a Modern Infill: Cable or Glass (When It Makes Sense)
If your goal is truly modern, changing what’s between the posts can transform the whole stair. Cable and glass are popular in contemporary homes
because they look clean and let light move through the stairwell.
This is usually the most code-sensitive category: opening sizes, stair geometry, and attachment methods matter. Translation: it’s a great “consult a pro”
option, especially if you’re converting from traditional spindles.
Best for
Open-concept homes, modern remodels, and staircases that block light.
Worth noting
Glass looks amazing, but it does require cleaning. If fingerprints are your household’s love language, plan accordingly.
10) Add Lighting That Makes the Banister Look Like a Feature
Lighting is an underrated staircase upgrade, and it pairs beautifully with a banister refresh. Options range from subtle to statement:
- Wall-mounted step lights along the stair run.
- Newel post lights or accent fixtures near the start of the staircase.
- LED accent lighting tucked where it won’t glare (the goal is glow, not interrogation-room brightness).
The practical benefit: safer stairs at night. The aesthetic benefit: your banister looks intentionallike you planned it, not like you inherited it.
Best for
Dark stairwells, nighttime traffic zones, and homes where the staircase is a focal point.
How to Pick the Right Banister Refresh for Your Home
If you’re torn between options, decide based on your goal (and your tolerance for prep work):
- Fastest visible change: Paint (especially a two-tone approach).
- Most “custom” look without rebuilding: Baluster swap or upgraded newel details.
- Best for keeping wood character: Restain the handrail and newels; paint only what needs brightening.
- Most modern outcome: New handrail profile + modern infill (often pro-installed).
- Most overlooked upgrade: Lighting and architectural detailing around the staircase.
Conclusion: A Banister Glow-Up That Actually Pays Off
Outdated banisters have a special talent: they make a whole house feel older than it is. The flip side is your advantageupgrading a staircase railing is
one of the most noticeable, design-forward changes you can make without remodeling an entire room.
Start with what matters most: safety and stability. Then choose your refresh levelclean, paint, stain, swap parts, or go modern. If you do it thoughtfully,
your staircase stops being “the thing you rush past” and becomes a feature you’re happy to see every day… even when you’re just going downstairs for snacks.
Real-World Banister Makeover Stories (Lessons Homeowners Commonly Share)
To make this feel less like a list and more like real life, here are a few situations homeowners commonly report when they tackle outdated banistersplus
what they learned the hard way (so you don’t have to).
Story #1: “We painted it black and suddenly the whole house looked updated.”
This is the classic “big impact, small area” moment. People often start with the entry staircase because it’s what guests see firstand what they see every
time they stumble in with groceries. A darker handrail (black, charcoal, deep brown) can create a clean architectural line that anchors the space. The most
common lesson here: the paint choice matters less than the prep. When the rail was cleaned, lightly de-glossed, and finished with a durable trim enamel, it
looked smooth and intentional. When prep was rushed, it looked fine for a month… and then started chipping at the high-touch corners.
Story #2: “Two-tone saved our sanity (and our wood grain).”
Many people want the staircase brighter but don’t want to bury all the wood. Two-tone became the compromise that felt like a win: painted balusters made the
stairwell lighter and more current, while the wood handrail kept warmth and hid daily wear better than paint on a constant-grab surface. The surprise lesson:
the handrail stain didn’t have to perfectly match the floorsit just had to feel related. Going slightly darker than the floor often looked more
intentional than trying to match it exactly.
Story #3: “Replacing the balusters changed everything more than we expected.”
Homeowners with skinny, dated spindles (especially from the late-90s/early-2000s era) often say a baluster swap was the moment the staircase finally looked
“right.” Iron balusters read as upgraded; square wood balusters read as fresh and transitional. The big takeaway: keep spacing safe and consistent, and
don’t create extra patchwork by changing layouts casually. People who planned the layout (or hired help) ended up with a crisp result. People who improvised
sometimes discovered that “simple swap” can snowball into tread repairs.
Story #4: “The newel post was the real problem.”
This one is sneaky. Some staircases look dated because the newel posts are undersized, oddly shaped, or visibly worn. Homeowners who updated caps, added
simple trim, or upgraded the post profile often said it made the staircase look more customeven when the rest stayed the same. The lesson: your eyes go to
the start of the stair. If the newel looks tired, everything looks tired. Fix the “punctuation mark,” and the whole sentence reads better.
Story #5: “We added lighting and now the staircase feels like a feature.”
In darker homes, the staircase can feel like a shadowy hallway with steps. Adding subtle lightingstep lights or gentle accent illumination near the railmade
the space feel safer and more high-end. The lesson: lighting doesn’t just help you see where you’re going; it makes your banister refresh look intentional,
like part of a larger design plan rather than a random weekend project.
The shared theme across all these stories is simple: banister upgrades work best when they’re treated like a small architectural project, not just a paint
task. Start with stability and code awareness, choose a finish that can handle daily touch, and make one or two design choices that feel deliberate
(two-tone, sheen contrast, modern balusters, upgraded newels, or lighting). That’s the difference between “we tried something” and “wow, this looks new.”