Table of Contents >> Show >> Hide
- What the One Hertz Challenge Really Tests
- TinynumberHat9 in Plain English: Tiny Board, Big Digits, Bigger Personality
- The Driver Chip Choice: Why HT16K33 Makes Sense
- Qwiic / STEMMA QT: The “Don’t Make Me Crimp JSTs” Upgrade
- Making 1 Hz Feel Good: Timing, Accuracy, and the Raspberry Pi Reality
- Display Modes: Turning Digits Into a Story
- Design Lessons Hidden in Plain Sight
- Why Hackaday Loved It: It’s Not Just a Timepiece, It’s a Display Resurrection
- Hands-On Experiences: What Building a 1 Hz Retro Pi Display Feels Like (500+ Words)
- Conclusion
There are two kinds of people in the world: those who hear “make something happen once per second” and think,
“Easyblink an LED,” and those who hear the same sentence and think, “What if I resurrected a 40-year-old numeric display,
wired it to a Raspberry Pi, added buttons, and made it look like a piece of lab gear that belongs in a Cold War spy movie?”
The RPI TinynumberHat9 lives proudly in the second categoryan eye-catching One Hertz Challenge entry that turns
one pulse per second into a retro-futuristic, nine-digit time machine.
At its core, TinynumberHat9 is a Raspberry Pi “hat”-style expansion board built to drive a set of vintage 7-segment LED digits
(the kind that look like they’ve been waiting decades for their encore). But the real charm is how it blends old and new:
nostalgic display hardware, modern I2C control, a Pi Zero-class host, and software that can flip between clock-like modes
without turning your desk into a wiring horror story.
What the One Hertz Challenge Really Tests
“Once per second” sounds simple until you try to make it meaningfully once per second. A sloppy second is easy: any microcontroller
can approximate a delay, and most computers can schedule a periodic task. But a clean, steady 1 Hz beat forces you to confront
timekeeping the way engineers dojitter, drift, temperature effects, oscillator accuracy, and the difference between “pretty close”
and “close enough to be proud of.”
Hackaday’s One Hertz Challenge is intentionally open-ended: the constraint is the frequency. Your output can be serious, absurd,
mechanical, digital, artistic, or delightfully annoyingso long as something happens at ~1 Hz. That’s why the contest produces
everything from precision timebases to playful subversions, and why a display-centric build like TinynumberHat9 fits so well:
it treats the one-second pulse as a design feature, not just a timer tick.
TinynumberHat9 in Plain English: Tiny Board, Big Digits, Bigger Personality
TinynumberHat9 is an expansion board for a Raspberry Pi Zero / Zero 2-class machine that drives nine vintage 7-segment digits through
a dedicated LED driver. Nine digits might sound oddly specific until you realize what it unlocks: longer timestamps, compact date formats,
and numeric displays that can feel “instrument-like” rather than “clock-radio-like.”
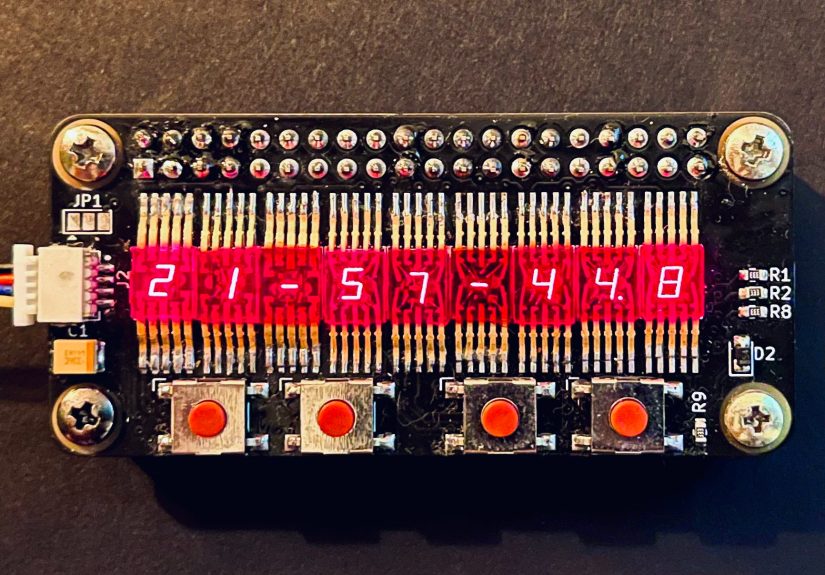
The signature hardware choice is the vintage display setSoviet-era 7-segment LED “chips” (encapsulated digits) with distinctive gold leads
and a jewel-like look. These displays aren’t just functional; they’re the whole vibe. The board doesn’t try to hide them behind a modern diffuser.
It puts them on stage and lets them glow like they waited all these years for applause.
Vintage Digits: AL304 / ALS314 and Why They’re So Appealing
The project highlights AL304 and ALS314-family 7-segment displays made in the 1970s–1980s era. Electrically, they behave like what you’d expect from
small LED segments: modest forward current and a forward voltage in the neighborhood of typical red/green LEDs. Practically, the challenge isn’t that
they’re exoticit’s that they’re rare, inconsistent in sourcing, and physically unlike modern through-hole or SMD digits. That uniqueness is exactly
why they’re interesting: they’re components with history, and history looks good in amber… or in resin-encapsulated numerals with gold legs.
For a builder, that rarity changes the mindset. You design with care: you don’t want “Version 3” of your PCB to require a part you can’t find again.
TinynumberHat9 acknowledges that reality by leaning on a flexible driver approach, keeping the control interface modern, and letting the digits be the star.
The Driver Chip Choice: Why HT16K33 Makes Sense
Driving multiple 7-segment digits directly from a Raspberry Pi’s GPIO is a great way to learn about multiplexingand an even better way to learn
why you should let a proper LED driver do that job instead. A Pi is a capable Linux machine, but it’s not a real-time microcontroller. You can absolutely
bit-bang a display, but you’ll also absolutely invent new swear words when your digits flicker during a background process.
TinynumberHat9 uses the HT16K33, a popular I2C LED controller that supports multiplexed segment driving and even key scanning.
That choice keeps the build clean: the Pi speaks I2C, the HT16K33 handles the timing and refresh, and the digits look steady instead of “mostly steady unless Wi-Fi sneezes.”
Why Not MAX7219?
MAX7219 is a classic for 7-seg and matrix displays, and it’s loved for a reason. But it typically uses SPI-like signaling and has its own ecosystem expectations.
HT16K33’s I2C approach pairs naturally with Raspberry Pi projects and modern plug-and-play connector ecosystems. When your goal is “retro display, modern usability,”
I2C is the shortest road between “idea” and “working demo.”
Buttons Without Drama
One underrated detail is that TinynumberHat9 includes four buttons to switch modes. This sounds simple until you realize what “simple” means
on a Pi hat: debounce, GPIO assignment, pull-ups, and making sure the whole thing still behaves nicely when you reboot, update, or accidentally unplug power
like a raccoon in a server room.
A driver chip with key-scan support and a bus-based architecture makes that integration less painful. You get a more appliance-like experience:
tap a button, see the display change, and feel like you’re operating a piece of equipmentnot a breadboard prototype held together by optimism.
Qwiic / STEMMA QT: The “Don’t Make Me Crimp JSTs” Upgrade
Another modern-friendly decision is the addition of a Qwiic/STEMMA QT I2C connector. That means TinynumberHat9 isn’t limited to being a Pi hat;
it can be treated like an I2C peripheral you can connect to other microcontrollers and boards in the same ecosystem. In other words:
the digits are vintage, but the workflow is very 2025plug cables, stack boards, prototype fast, and save your soldering patience for the parts that actually need it.
This is where the project quietly becomes more than a one-off display board. It hints at a reusable platform:
today it’s a clock and timestamp display, tomorrow it’s a bench counter, a sensor readout, a network status panel, or a weirdly satisfying scoreboard for how many times your build failed before it succeeded.
Making 1 Hz Feel Good: Timing, Accuracy, and the Raspberry Pi Reality
The “one hertz” requirement isn’t only about correctness. It’s also about feel. Humans are surprisingly sensitive to rhythm:
a jittery second looks wrong even if the average frequency is right. A stable, confident tick feels “professional,” like a metronome that went to finishing school.
On a Raspberry Pi, timing can be approached in layers:
1) The “Good Enough for a Demo” Layer
The simplest approach is a software loop that updates once per second, using the system time. For many builds, this is perfectly fine, especially if you’re displaying a clock that’s synced via network time.
The key is to avoid accumulating drift: instead of sleeping exactly one second repeatedly, you can schedule updates on the next whole second boundary. That reduces “creep” and makes the display look more intentional.
2) The “Better Than Your Laptop Clock” Layer
Add a real-time clock (RTC) chip with a 32.768 kHz crystal and a 1 Hz square-wave output. Many RTCs can output a stable 1 Hz tick derived from that crystal, which is the classic timekeeping frequency
because it divides cleanly down to one second. With this setup, the Pi can treat the RTC’s 1 Hz pulse like a heartbeat, triggering a display update from an interrupt or a polling loop.
3) The “Time Nerd’s Victory Lap” Layer
Sync to a precise external reference (GPS disciplined oscillator, radio time code, or a lab-grade reference) and keep your 1 Hz aligned to an absolute standard. This is where one hertz stops being “a second” and becomes
“the second,” with all the delightful pedantry that implies. It’s also where the contest becomes a playground for precision obsessivesand yes, that’s a compliment.
Display Modes: Turning Digits Into a Story
TinynumberHat9 isn’t only a “clock.” It’s a numeric display tool with multiple modes that make nine digits worth having:
- Clock – a straightforward time display, where the one-second update is the whole point.
- Date – a useful alternate view that makes the device feel like a real desk instrument.
- Timestamp – great for showing epoch-like counters or system timestamps, especially if you’re doing logging or experiments.
- Message – a fun mode that turns digits into a limited but charming text canvas (because if you have nine digits, you’ll try to make them say something cheeky at least once).
What makes these modes work is the combination of hardware steadiness (thanks, LED driver) and software simplicity (Python on a Pi is a comfortable place to iterate).
It’s the kind of project that encourages tinkering: add a new mode, change brightness behavior at night, or display a “heartbeat” animation on the least significant digit.
Design Lessons Hidden in Plain Sight
Lesson 1: Retro Aesthetics Need Modern Constraints
It’s tempting to romanticize vintage parts as if they’re magical. They’re not. They’re still LEDs, still need sane current, still need stable driving,
and still punish you for sloppy wiring. The win is that vintage parts have a visual language that modern parts often lack. TinynumberHat9 respects that language
while still engineering like it’s 2025: bus-based control, modular connectors, and a driver chip doing the time-sensitive work.
Lesson 2: I2C Keeps a Linux Host Honest
On a microcontroller, you can often “get away with” direct multiplexing. On a Linux SBC, you shouldn’t. Offloading refresh and scanning to a dedicated IC prevents
the most common “why is it flickering?” headaches and makes the device feel like an appliance instead of a science fair display.
Lesson 3: Nine Digits Changes the Conversation
Four digits is a clock. Six digits is a clock with ambition. Nine digits is a clock that’s considering a second career as a scientific instrument.
Once you have that many segments available, you stop thinking only about time-of-day and start thinking about information:
counters, IDs, status codes, sensor readouts, or even a “build score” that increments every time you resist the urge to hot-glue a loose connector.
Why Hackaday Loved It: It’s Not Just a Timepiece, It’s a Display Resurrection
TinynumberHat9 hits a sweet spot the maker community loves: it’s both a functional device and an act of preservation. It brings older display technology into modern use without turning it into a museum artifact.
The digits glow again, but they’re driven cleanly, integrated thoughtfully, and presented with style.
In the broader context of the 2025 One Hertz Challenge, projects like this show why the contest works. A 1 Hz constraint is just narrow enough to create a shared theme,
and just open enough to allow wildly different interpretations. Some entries chase accuracy; others chase creativity; TinynumberHat9 does something better: it makes the second look beautiful.
Hands-On Experiences: What Building a 1 Hz Retro Pi Display Feels Like (500+ Words)
If you’ve never built a project like TinynumberHat9part vintage hardware showcase, part modern embedded systemhere’s what the experience tends to be like, in the most honest,
maker-to-maker way possible.
First comes the romance phase: you see the old digits and immediately imagine them glowing on your desk like a prop from a 1980s engineering lab. This is the stage where you
convince yourself everything will be straightforward because “it’s just numbers.” Then reality shows up wearing steel-toed boots. Vintage display parts don’t politely conform to modern footprints.
Their pin spacing, mechanical tolerances, and packaging quirks are basically a practical joke aimed at your PCB layout. You measure twice, check a reference photo five times, and still have a moment where you think,
“Waitdid I mirror the digit orientation?” (Pro tip: you will ask this question more than once.)
Next comes the electrical sanity phase. Even when a vintage digit is “just LEDs,” you still have to treat it like a real component: segment current, forward voltage, total multiplexed load,
and brightness behavior. You learn quickly that brightness isn’t only “how much current,” but also duty cycle, scanning rate, and how your eyes perceive pulse-width-modulated light.
The fun part is dialing in a glow that looks rich and steady instead of harsh or anemic. The not-fun part is realizing that “steady” on a Linux computer can become “occasionally weird”
unless you offload the refresh to a dedicated driver. That’s why an I2C LED controller feels like cheatingin the best waybecause it turns a potential timing nightmare into a clean interface.
Then comes the software satisfaction phase. Writing the first “Hello, digits” output is weirdly thrilling. You’re not printing text on a screen; you’re commanding physical light.
The first time you map segments correctly and a number appears as an actual numeralnot as a cursed pattern of random barsyou feel like you solved an ancient puzzle.
From there, you start building “modes,” and this is where 1 Hz becomes a design tool. Updating once per second is a rhythm you can see. It pushes you to make choices:
Do you snap updates exactly on the second boundary? Do you animate a heartbeat dot? Do you dim at night? Do you add a button combo that displays a cheeky status message?
The best part is how quickly the project becomes personal. A simple clock is generic; a clock with vintage digits, a specific brightness curve, and a little mode that displays your favorite inside joke is unmistakably yours.
And once you have an I2C connector ecosystem available, you start imagining expansions: a temperature sensor display, a Wi-Fi strength indicator, a daily “build counter,” or a time-synced bench timer.
Suddenly the project isn’t a single contest entryit’s a platform for future experiments.
Finally comes the “this is why we do it” phase: you step back, the digits glow, the one-second beat is calm and confident, and the whole thing feels like a real device.
Not because it’s perfect, but because it’s cohesivevintage aesthetics, modern engineering, and a single constraint (1 Hz) that ties everything together.
That’s the magic of projects like TinynumberHat9: they make time visible, and they make it cool again.
Conclusion
The RPI TinynumberHat9 is a reminder that “once per second” doesn’t have to be boring. In the hands of a thoughtful builder, 1 Hz becomes a canvas:
a steady rhythm to show time, a heartbeat for a device, and a reason to resurrect hardware that deserves another life.
By pairing vintage Soviet-era 7-segment digits with an I2C LED driver, button-controlled modes, and modern connector ecosystems,
TinynumberHat9 turns the One Hertz Challenge into something more than a contest requirementit turns it into a design statement.