Table of Contents >> Show >> Hide
- What Is “Action” on an Acoustic Guitar?
- How Do You Know If Your Action Is Too High?
- Tools You’ll Need
- Step 1: Measure Your Current Setup
- Step 2: Adjust the Truss Rod (Relief First, Action Second)
- Step 3: Lower the Saddle (Where the Real Action Change Happens)
- Step 4: When (and When Not) to Touch the Nut
- Step 5: Test, Tweak, and Accept a Little Buzz (Maybe)
- Common Mistakes to Avoid
- Where to Use Pictures in Your Tutorial
- Real-World Experiences: What It’s Like to Lower Your Own Action
If your acoustic guitar feels like a medieval torture device every time you play a chord, your action is probably too high.
The good news? You don’t have to be a master luthier to make it more comfortable. With some patience, a few basic tools, and
a clear plan, you can safely lower the action at home and end up with a guitar that plays like butter instead of barbed wire.
In this guide, we’ll walk through what “action” actually is, how to measure it, and how to lower it step-by-step using your
truss rod, saddle, andif neededthe nut. We’ll also suggest where to place pictures or diagrams so your readers can follow
along visually. By the end, you’ll know how to dial in a low, comfortable action without turning your guitar into firewood.
What Is “Action” on an Acoustic Guitar?
“Action” is simply the distance between the bottom of the string and the top of the fret. High action makes the guitar harder
to press down, which can kill your speed and shred your fingertips. Low action makes playing feel easy and fast but can cause
annoying fret buzz if you go too low or your technique is heavy-handed.
On an acoustic guitar, you can change the action at three main places:
- The truss rod – controls neck relief (the slight forward bow of the neck).
- The nut – affects action near the first few frets.
- The saddle – controls action mostly around the middle and upper frets (like the 12th fret).
Most of the time, lowering action on an acoustic involves a combination of setting proper neck relief with the
truss rod and sanding down the saddle to bring the strings closer to the frets.
How Do You Know If Your Action Is Too High?
Before you grab a file and go wild, confirm that you actually need to lower the action. Common signs include:
- Your fingers hurt after just a few minutes of playing basic chords.
- You feel like you have to squeeze extra hard just to fret a clean note.
- Barre chords around the 5th–7th fret feel like a gym workout.
- The guitar plays in tune open, but notes go noticeably sharp when fretted (too much string stretch from high action).
You can also do the “eyeball test”: hold the guitar so you’re looking down the neck from the headstock to the bridge.
If the strings look like they’re sitting way above the frets, your action is probably higher than it needs to be.
Tools You’ll Need
You don’t need a full repair shop to do a good basic setup. Here’s a practical list:
- Capo
- Steel ruler or string action gauge marked in millimeters/64ths of an inch
- Feeler gauges (for precise neck relief measurement)
- Appropriate truss rod wrench or Allen key
- Masking tape and pencil (for marking saddle height)
- Fine sandpaper (220–400 grit) and a flat surface
- Tuner (clip-on or pedal)
- Optional: straightedge that spans several frets
Step 1: Measure Your Current Setup
Check Neck Relief
Neck relief is the slight forward bow that keeps the strings from buzzing when they vibrate. Too much bow raises your action;
too little bow (or backbow) can cause fret buzz. On acoustic guitars, typical neck relief is around .008–.010 inches
(0.20–0.25 mm).
- Put a capo on the 1st fret.
- With your picking hand, fret the low E string at the 12th or last fret.
- Use a feeler gauge to measure the gap between the bottom of the string and the top of the fret around the 7th–9th fret.
If you see a large gap, you’ve got too much relief. If the string is almost touching the frets (or actually touching) along
the middle of the neck, you may have too little relief.
Measure Action at the 12th Fret
Next, measure the string height at the 12th fret:
- Tune the guitar to pitch.
- Place your ruler or string action gauge on top of the 12th fret.
- Measure from the top of the fret to the bottom of the low E and high E strings.
A common target for acoustic guitars is roughly 2.0–2.5 mm on the low E and around 1.75–2.0 mm
on the high E at the 12th fret, though preferences vary by player and style.
Quick Nut Action Check
While you’re at it, do a simple nut check:
- Fret the low E string at the 3rd fret.
- Look at the gap between the string and the 1st fret.
There should be only a tiny gapjust enough that the string barely clears the fret. If the gap is huge, your nut
slots may be too high. If the nut is way off, it’s usually best to let a pro handle it,
since nut work is easy to mess up permanently.
Step 2: Adjust the Truss Rod (Relief First, Action Second)
Let’s get this out of the way: the truss rod’s main job is to set neck relief, not to be your primary action
control. Yes, adjusting it can change the action a little, but big action changes should come from the saddle and nut.
General rules for truss rod adjustments:
- Tighten (clockwise) to reduce relief or straighten the neck.
- Loosen (counterclockwise) to add relief (more forward bow).
Always move in small incrementsabout a quarter turn at a time at most. After each adjustment, retune the guitar,
let it settle for a few minutes, and recheck your relief.
Aim for that sweet spot: a little forward bow (.008–.010 inches of relief) so the strings can vibrate freely without
buzzing all over the place, but not so much that the action sky-rockets.
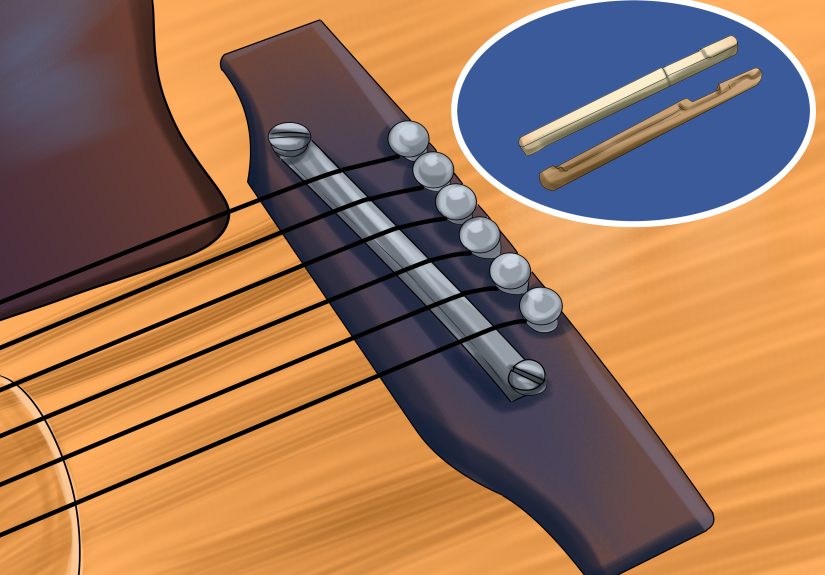
Step 3: Lower the Saddle (Where the Real Action Change Happens)
Once relief is set, if the action is still too high at the 12th fret, it’s time to work on the saddle. On most acoustics,
this is where you’ll make the biggest difference.
1. Remove and Mark the Saddle
- Loosen or remove the strings enough to lift out the saddle from the bridge slot.
- Place a strip of masking tape along the side of the saddle.
- Use a pencil to mark a line showing how much material you plan to remove.
A helpful rule of thumb: any change at the saddle equals about half that change at the 12th fret.
So, if you want to lower your action by 1 mm at the 12th fret, you need to sand about 2 mm off the bottom of the saddle.
2. Sand the Saddle Carefully
Place a piece of fine sandpaper on a flat surface (like a piece of glass or a flat board). Hold the saddle upright and
move it back and forth so you’re sanding the bottom evenly.
- Keep the bottom surface flatan uneven saddle can kill your tone or cause string volume imbalances.
- Sand slowly and check your progress frequently. It’s easier to remove more material than to add it back.
After sanding a bit, put the saddle back in, tune up, and remeasure the action at the 12th fret. Repeat until you hit your
target heights.
Step 4: When (and When Not) to Touch the Nut
If your action feels fine higher up the neck but very stiff around the first few frets, your nut may be too high.
In that case, carefully deepening the nut slots can help. However, nut work is easy to overdo, and once a slot is too low,
you’re looking at shims or a new nut.
For most DIY setups, it’s smart to:
- Focus on truss rod relief and saddle height first.
- Only attempt nut work if you have the proper files and feel confident.
- Otherwise, let a professional luthier handle nut adjustments; they can also check for other issues like worn frets.
Step 5: Test, Tweak, and Accept a Little Buzz (Maybe)
After adjusting relief and saddle height:
- Retune the guitar to pitch.
- Play single notes up and down the neck on each string.
- Strum open chords, barre chords, and some of your usual riffs.
A tiny bit of fret buzz can be normalespecially for players who like super-low action. Many guitar techs
consider a little buzz acceptable if it doesn’t come through the amp or overwhelm the acoustic tone.
If you’re an aggressive strummer, you may need slightly higher action and more neck relief than a gentle fingerstyle player.
The goal isn’t “zero buzz under any circumstances”it’s a comfortable, playable setup that fits your style.
Common Mistakes to Avoid
- Cranking the truss rod too much at once. This can damage the neck or truss rod threads.
- Using the truss rod as your main action tool. Relief comes first; big action changes belong at the saddle.
- Sanding the saddle unevenly. A crooked saddle can cause tuning and intonation problems.
- Over-lowering the action. Yes, low action feels great, but going too low can cause buzz everywhere and kill sustain.
- Ignoring humidity and temperature. Wood moves. Seasonal changes can affect action, so you may need minor touch-ups over time.
Where to Use Pictures in Your Tutorial
Since this article is aimed at “How to Lower the Action on an Acoustic Guitar (with Pictures),” here are some natural
photo or illustration spots:
- Photo 1: Overall side view of guitar neck showing high action.
- Photo 2: Measuring neck relief with a capo and feeler gauge at the 7th–9th fret.
- Photo 3: Close-up of measuring action at the 12th fret with a ruler.
- Photo 4: Removing the saddle from the bridge slot.
- Photo 5: Saddle with masking tape and pencil line marking material to remove.
- Photo 6: Sanding the saddle on a flat surface with sandpaper.
- Photo 7: Before/after comparison of action measurements at the 12th fret.
With clear step-by-step pictures, even nervous beginners can follow along without feeling like they’re defusing a bomb.
Real-World Experiences: What It’s Like to Lower Your Own Action
Lowering the action on an acoustic guitar is one of those “scary but satisfying” projects. The first time you do it, you’ll
probably double-check every turn of the wrench and every pass of the sandpaper. That’s actually a good thingguitars reward
patience.
Many players start this journey after buying an affordable acoustic that feels like it was built for slide guitar.
Out of the box, the action might be super high, especially around the 7th–12th frets. One common story goes like this:
A new player struggles through basic chords, fingers screaming, and assumes they just need to “toughen up.” Then they try a
friend’s well-set-up guitar and realize, “Oh… it doesn’t have to hurt!” That’s the moment when setup suddenly becomes really
interesting.
The first adjustment most people notice is the truss rod. Just seeing that little nut at the headstock or inside the soundhole
can be intimidating. But when you learn that you’re only turning it a quarter turn at a time and you understand what
you’re measuring, it becomes a controlled, predictable process. You turn a little, retune, remeasure. The numbers start to
make sense, and you feel more in control of how the guitar behaves.
The real “aha” moment often comes from the saddle. On many budget acoustics, the saddle is tall, almost like the builder
expected you to do the final fine-tuning yourself (or pay a tech to do it). The first time you pull the saddle out, mark it,
sand it carefully, and then see your 12th-fret action drop into that comfortable 2.0–2.5 mm range, it feels like magic.
The guitar suddenly responds better. Chords feel lighter. Barre chords that once felt impossible become manageable.
Along the way, you learn a lot about your own playing style. If you’re a heavy strummer, you quickly find that chasing
the absolute lowest action possible is not always realisticyou may need a bit more relief and slightly higher action to
keep the buzz under control. If you’re a fingerstyle player with a light touch, you can often run your action lower
without issues. You start to see why factory specs are just a starting point, not a rule carved in stone.
Another big lesson: you don’t have to get it perfect the first time. It’s common to slightly overshoot or undershoot
your ideal height. Sanded a hair too much off the saddle? You might live with a tiny bit more buzz, use a slightly lighter
touch, or eventually replace the saddle and try again with more confidence. Setup is an ongoing relationship between you
and your instrument, not a one-time event.
Over time, dialing in your own action becomes part of how you bond with your guitar. Instead of seeing it as a fragile object
that only a professional can touch, you start seeing it as a piece of precision woodwork that you can understand and care for.
That confidence makes you more likely to keep the guitar in good conditionchecking relief during seasonal changes,
monitoring fret wear, and recognizing when it’s time to invest in a pro setup or fretwork.
Most importantly, a well-set-up guitar makes you want to play more. When the action feels right, you stop thinking about how
hard you’re pressing and start focusing on timing, tone, and musical ideas. Instead of fighting the instrument, you’re
working with it. That alone can speed up your progress far more than another hour of painful practice on a badly set-up guitar.
So, if you’re nervous about lowering your action, remember: you don’t have to tackle everything at once. Start with small,
measurable changes. Learn how relief feels and looks. Experiment with saddle height in tiny steps. Take notes on what you
like. After one or two successful setups, you’ll wonder why you ever accepted that “factory high” action in the first place.