Table of Contents >> Show >> Hide
- Why a Vintage Window Frame Makes Epic Resin Ocean Art
- Materials and Tools
- Step-by-Step: Vintage Window Epoxy Resin Seascape DIY
- Step 1: Choose the Right Window (and Don’t Invite Chaos)
- Step 2: Clean, Stabilize, and Prep the Frame
- Step 3: Add a Backing Board (Your Leak Insurance Policy)
- Step 4: Seal Every Seam Like You’re Waterproofing a Tiny Boat
- Step 5: Plan Your Seascape (So You Don’t Panic-Pour)
- Step 6: Mix Resin Correctly (This Is Where Good Art Happens)
- Step 7: Pour a Thin “Seal Coat” Layer First
- Step 8: Create Ocean Depth With Layered Pours
- Step 9: Make the Waves (White Resin + Heat Gun Magic)
- Step 10: Handle Bubbles Without Setting Your Art on Fire
- Step 11: Add Texture (Optional, but Very Satisfying)
- Step 12: Cure (Hands Off!)
- Step 13: Finish the Frame and Hang It
- Troubleshooting: Common Resin Ocean Problems (and Fixes)
- FAQ: Vintage Window Resin Seascape DIY
- Final Thoughts
- Real-World Lessons From My Messy Workbench (The Extra Experience Section)
If you’ve ever looked at an old window frame and thought, “You’d make a gorgeous ocean,” congratulations: you are
exactly the kind of delightful weirdo this project was made for. A vintage window epoxy resin seascape turns
architectural salvage into coastal wall artcomplete with deep-water blues, frothy waves, and that glassy shine
that makes visitors ask, “Where did you buy that?” (Your response: a dramatic pause, then “I didn’t.”)
This guide walks you through the whole processfrom choosing and prepping a window frame (without angering the
Glass Gods), to pouring and layering resin like a calm, confident sea witch. Expect practical tips, safety notes,
and troubleshooting for when resin decides to express itself.
Why a Vintage Window Frame Makes Epic Resin Ocean Art
A window frame gives you built-in “panes” to work with. Each pane can be its own mini seascape, or you can treat
the whole window as one big ocean view. The frame adds instant character: chipped paint, old wood grain, and
those slightly imperfect lines that scream “vintage” instead of “mass-produced.”
Resin also loves the window concept because it naturally looks like water when it curesclear, glossy, and deep.
Layer tinted resin for depth, push white resin to create wave “lacing,” and you’ve got a shoreline that feels
alive.
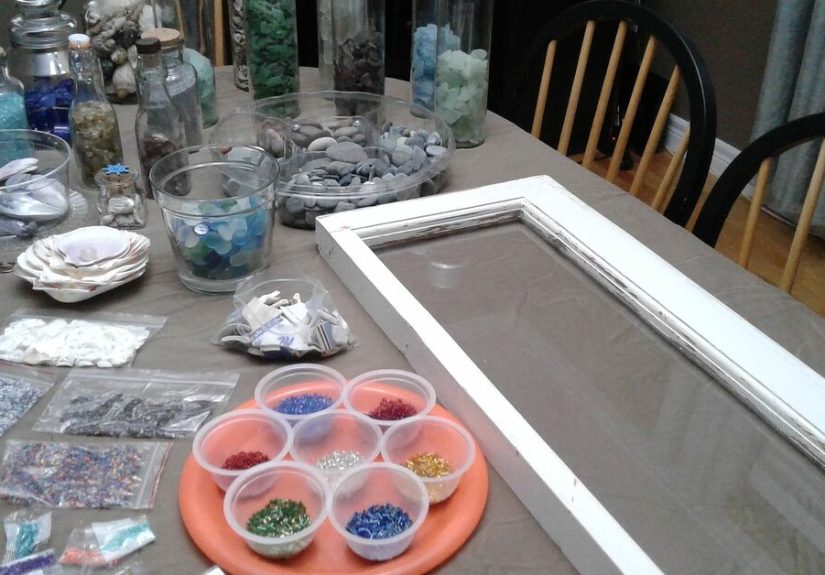
Materials and Tools
The Window + Backing
- Vintage window frame (real glass optionalmore on that in a second)
- Backing board (painted plywood, MDF, or foam board cut to fit the back of the window)
- Screws or brad nails (to secure backing)
- Weatherstripping foam tape or thin gasket tape (helps prevent leaks)
Resin + Color
- Art/tabletop epoxy resin (choose one meant for thin pours and clear finishes)
- Pigments: mica powders, resin pigments, alcohol inks (epoxy-compatible)
- White colorant (opaque white pigment or white-tinted resin mix)
- Optional texture: fine sand, crushed glass “sea glass,” tiny shells, pebbles
Application Tools
- Mixing cups (graduated), stir sticks, silicone spatula
- Nitrile gloves, safety glasses
- Painter’s tape and plastic drop cloth
- Level (seriouslyresin is a law-abiding liquid and will obey gravity)
- Heat gun (for waves/cells) and/or small torch (for bubbles)
- Caulk gun + 100% silicone (for sealing edges)
- Sandpaper (80–220 grit), tack cloth
- Optional: small artist brush for moving resin in corners
Safety Setup (Non-Negotiable)
- Work in a well-ventilated area
- Wear gloves and eye protection
- Keep heat tools moving; keep flammables away
- Read your resin’s label/SDS and follow it like it’s the recipe to your favorite cookies
Step-by-Step: Vintage Window Epoxy Resin Seascape DIY
Step 1: Choose the Right Window (and Don’t Invite Chaos)
Look for a frame that’s sturdy, mostly square, and not actively shedding splinters like a stressed-out porcupine.
Minor chips and patina are charming. Major rot is not.
About the glass: you can keep existing panes, replace them, or remove them entirely and pour on a backing board.
Many DIYers prefer a backing board because it’s easier to seal, safer to handle, and gives you a solid “canvas.”
If you keep old glass, inspect it for cracks and make sure it’s firmly seated.
Important: If your window is truly old, the paint may contain lead. Don’t dry-sand or scrape
aggressively. If you suspect lead paint, use lead-safe practices or skip sanding entirely and simply clean and
seal the surface.
Step 2: Clean, Stabilize, and Prep the Frame
- Clean: Use mild soap and water. Let it dry fully.
- Stabilize: Tighten loose joints. Wood glue + clamps help if the frame wiggles.
-
Light prep: If you’re repainting, scuff-sand lightly (againonly if you’re sure there’s no lead
paint issue). Wipe off dust. - Seal the wood: Brush on a clear sealer or primer where resin might touch wood.
Why seal? Porous wood can release trapped air into resin, creating bubbles that appear like your ocean has
developed a sudden case of carbonation.
Step 3: Add a Backing Board (Your Leak Insurance Policy)
Flip the window face-down. Cut a backing board to fit the back opening. Paint the backing board if you want a
“clean” background behind translucent watersoft tan for sand, pale blue for shallow water, or even a gradient.
Apply foam tape along the frame edges where the backing board will sit. Then screw or nail the backing board in
place. You want it snugno gaps.
Step 4: Seal Every Seam Like You’re Waterproofing a Tiny Boat
Run a bead of 100% silicone along all interior seams where backing meets frame, and around pane dividers if
you’re pouring in multiple sections. Smooth with a gloved finger or a silicone tool.
Let silicone cure fully (check the tubeoften 24 hours). Uncured silicone and epoxy resin are not friends; they’re
the kind of “friends” who start a group chat and then block each other.
Step 5: Plan Your Seascape (So You Don’t Panic-Pour)
Decide where the shoreline goes. A classic layout:
- Deep water: darker blues/teals near one edge
- Shallow water: lighter turquoise moving toward the “shore”
- Beach: sand tone or clear resin with real sand
- Wave line: white resin pushed over clear/turquoise
If your window has multiple panes, make each pane a slightly different “moment”one calmer, one stormier, one with
extra foamy waves. It looks intentional and artsy, like you planned it and not like you were experimenting in real
time (even if you were).
Step 6: Mix Resin Correctly (This Is Where Good Art Happens)
Most art/tabletop epoxies are a two-part system. Measure accurately (by volume or weightwhatever your resin
requires). Mix slowly, scraping sides and bottom, then pour into a second cup and mix again (the “double-cup”
method). This reduces soft spots caused by unmixed resin clinging to the first cup.
Pro tip: Warm resin bottles in a warm-water bath before mixing (sealed bottles only). Warmer resin
flows better and can release bubbles more easilyjust don’t overheat it.
Step 7: Pour a Thin “Seal Coat” Layer First
For best results on wood or porous surfaces, start with a thin clear coat. Spread it into corners. This coat
helps block air release and improves clarity. Pop surface bubbles with a quick pass of a heat tool (keep moving;
do not hover like a curious hummingbird).
Let it get tacky (or fully cure, depending on your resin’s instructions) before the main pour.
Step 8: Create Ocean Depth With Layered Pours
Now the fun part: the actual ocean.
- Deep water pour: Tint resin with a darker blue/teal. Pour in the deep-water zone.
- Mid-tone pour: Mix a lighter blue and pour next to it, letting edges meet and blend softly.
- Shallow water pour: Use turquoise or a translucent sea-glass tone closer to the shoreline.
-
Beach zone: Either paint the backing board sand-color, or sprinkle fine sand into a thin clear
resin area. If using real sand, make sure it’s dry.
Use a stir stick or silicone tool to gently feather transitions. Aim for “natural gradient,” not “tie-dye T-shirt
from 2006.” Unless that’s your vibe. No judgment.
Step 9: Make the Waves (White Resin + Heat Gun Magic)
Mix a small amount of resin tinted opaque white. Pour a thin line of white resin where water meets shore. Then:
- Set your heat gun on low.
- Hold it at an angle, pushing the white resin gently over the clear/turquoise resin.
- Keep it moving. Overheating can distort the pour or cause yellowing.
-
If you want cells/lacing (that frothy, airy look), experiment with the amount of white resin and the heat
direction. More white usually = more foam.
Want more drama? Create two wave lines: a main shoreline break and a second smaller wave behind it. Oceans rarely
stop at one wave just because we’re tired.
Step 10: Handle Bubbles Without Setting Your Art on Fire
For surface bubbles, a torch can be very effectiveif you use it responsibly. One or two quick passes,
flame several inches away, never lingering. A heat gun also helps bubbles rise, but can push resin around.
If bubbles keep appearing, they may be coming from wood or trapped texture materials. That’s why the seal coat and
dry sand/shells matter.
Step 11: Add Texture (Optional, but Very Satisfying)
You can add:
- Sand: sprinkle lightly and seal with a thin resin coat
- Shells/pebbles: place them where “waves” would realistically wash them
- Crushed glass/sea glass: use sparingly for sparkle
Keep heavier items away from the thinnest resin areas or they may sink like tiny, beautiful anchors.
Step 12: Cure (Hands Off!)
Cover the piece to protect it from dust (a plastic bin lid works welldon’t let it touch the resin). Cure times
vary by product, room temperature, and pour thickness. Most pieces need at least 24 hours before handling and
several days to reach full hardness.
Step 13: Finish the Frame and Hang It
Once cured:
- Remove drips on the back with a chisel or sandpaper.
- Touch up paint or stain on the frame.
- Add hanging hardware rated for the weight (resin + wood can be surprisingly heavy).
If this will hang in direct sunlight, choose a resin with good UV resistance and consider a location that won’t
bake it daily. Ocean art is best enjoyed without turning into “vintage amber ocean art.”
Troubleshooting: Common Resin Ocean Problems (and Fixes)
Problem: Sticky or soft spots
Usually inaccurate measuring or incomplete mixing. Unfortunately, soft resin often needs to be scraped out and
re-poured. Next time: measure carefully, mix thoroughly, and use the double-cup method.
Problem: Too many bubbles
Causes include cold resin, fast mixing, porous wood, or damp add-ins. Warm the resin bottles, mix slowly, seal
porous surfaces, and make sure sand/shells are bone-dry.
Problem: Waves look muddy
This happens when white resin blends too much into the blue. Use a more opaque white, wait a little longer so the
base resin thickens slightly, then push the white with gentler heat.
Problem: Leaks (a.k.a. Resin Escaping Like a Tiny Criminal)
Stop the flow with additional silicone or hot glue (from the outside if possible), then reassess your sealing
strategy. For future pours, seal seams, use foam tape, and test with water before resin.
Problem: Dull finish
Dust contamination, improper cure conditions, or sanding marks can dull resin. A thin final flood coat often
restores a glossy finishafter proper surface prep per your resin system.
FAQ: Vintage Window Resin Seascape DIY
Do I have to keep the original glass panes?
Nope. Many makers remove or bypass old glass and pour on a backing board for easier sealing and safer handling.
If you keep glass, make sure it’s stable and clean, and be careful with heat tools near old glazing.
What resin is best for ocean waves?
Look for a resin made for art or tabletop/flood coatsclear, self-leveling, and intended for thin pours. For wave
effects, a slightly thicker viscosity resin can be easier to control. Always follow the manufacturer’s depth and
cure guidelines.
Can I do this in humid weather?
You can, but humidity can increase the odds of surface issues and slow curing depending on the resin. If your
resin system is prone to surface film or blush, keep conditions stable and follow the product’s surface prep
recommendations between coats.
How do I keep it from yellowing?
Choose a resin marketed as UV-resistant, avoid excessive heat, and keep it out of intense direct sunlight. A
little warmth is fine. A sunbaked windowsill in July is not a kindness.
Final Thoughts
A vintage window epoxy resin seascape is one of those rare DIYs that’s both deeply satisfying and wildly
forgivingbecause the ocean isn’t perfect either. With careful prep, accurate measuring, and a little heat-gun
finesse, you can turn an old frame into coastal wall decor that looks custom, expensive, and suspiciously
professional.
And if your first wave looks like spilled milk on a blue countertop? Congratulations again: you’re officially a
resin artist. The second one will be better. The third one will be a masterpiece. The fourth one will be
mysterious and moody “on purpose.”
Real-World Lessons From My Messy Workbench (The Extra Experience Section)
The first time I attempted an epoxy resin seascape in a vintage window frame, I learned an important truth:
resin is an emotional substance. Not in a “it has feelings” waymore in a “it reacts dramatically to everything you
do” way. I had prepped the frame, taped things up, leveled the table, and felt like the responsible adult in a
home improvement commercial. Then I poured, and the resin immediately found a microscopic gap I didn’t know
existed. It dripped off the back like it was late for an appointment. The ocean, apparently, wanted to travel.
That leak taught me my favorite habit for this project: run a “water test” before you ever mix epoxy. It feels
sillylike you’re giving your window a bathbut it’s the easiest way to spot trouble seams. Dry thoroughly, reseal
with silicone, and you’ll save yourself from doing that panicked thing where you’re holding a frame in one hand and
a roll of tape in the other while whispering, “Please stop. Please. I’m begging you.”
My second lesson came from waves. I wanted those crisp, foamy shoreline cellsthe kind that makes people stare a
little too long because they swear it’s moving. I poured my white line, grabbed the heat gun, and blasted it like I
was stripping paint off a spaceship. The result was… abstract. The white mixed into the blue, turned cloudy, and my
shoreline looked like a latte accident. The fix was surprisingly simple: lower heat, more patience, and a lighter
touch. Holding the heat gun at an angle and “pushing” the white across the surface (instead of aiming straight down)
made the foam travel without instantly blending into the water.
I also learned that “more pigment” is not always better. Early on, I dumped in color like I was seasoning soup.
Pretty at first, but too much pigment can dull clarity and make the ocean look flat. These days, I build depth with
translucent layers: a darker transparent base, a mid-tone layer, and then a brighter shallow-water tint near shore.
When light hits it, you get that real ocean illusionlike there’s distance under the surface.
Finally, I learned the most important resin skill of all: walking away. Resin needs time to self-level, release
bubbles, and cure. Your job is to set it up for success and then stop hovering. I used to check my pieces every ten
minutes, like a nervous parent at a school play. Now I cover them, leave the room, and do literally anything else
(including staring at photos of beaches to feel productive). When I come back the next day, the piece usually looks
dramatically better than it did during the “wet and weird” stage.
If you’re new to epoxy resin ocean art, here’s the big takeaway from my experience: treat prep like 70% of the job.
A well-sealed frame, a level surface, accurate mixing, and controlled heat will make you look like you’ve been doing
resin seascapes for years. And when something goes sidewaysbecause sometimes it willremember: the ocean is allowed
to be wild. That’s kind of the point.