Table of Contents >> Show >> Hide
- Why Before & After Outdoor Projects Are So Addictive
- What Gardenista “Before & After” Gets Right (So You Can Steal It)
- 7 Outdoor Projects That Deliver the Biggest “After” (Gardenista-Style)
- Project 1: The Courtyard Glow-Up (a.k.a. “This Used to Be Trash Bins”)
- Project 2: The “Remove the Pool, Gain a Garden” Transformation
- Project 3: The Patio Base Upgrade (So Your “After” Doesn’t Sink)
- Project 4: The Covered Dining / Outdoor Living Room Addition
- Project 5: The Balcony / Micro-Patio Makeover (Tiny Space, Big Flex)
- Project 6: Privacy Without the Fortress
- Project 7: Nighttime Lighting That Feels Like a Movie Set (Not a Parking Lot)
- Budget Moves That Feel Like Cheating (But Are Just Smart)
- The Not-So-Pretty Planning Checklist (That Protects Your “After”)
- Common Mistakes That Ruin the After Photo (and the Space)
- How to Get Your Own Before & After (Without Losing a Summer)
- The 500-Word Part: What a Before & After Outdoor Project Actually Feels Like
- Conclusion: The Best “After” Is a Strategy, Not a Shopping List
There are few things in modern life more satisfying than a good outdoor “before & after.” It’s the HGTV version of a dopamine hit:
one moment you’re looking at a sad slab of concrete (plus a mystery puddle that never dries), and the next you’re staring at a courtyard
that makes you want to sip something sparkly and say, “We should host more.” (You won’t. But you could, and that’s the point.)
Gardenista’s Before & After stories are especially addictive because they’re not fantasy gardens built on celebrity budgets.
They’re real spaces with constraintstight footprints, awkward sightlines, neighbors who can definitely hear your Spotify choicesand they still
end up feeling calm, functional, and quietly impressive. Below is a Gardenista-inspired playbook, cross-checked with trusted U.S. home-and-garden
experts, for the outdoor projects that create the biggest “after” with the least regret.
Why Before & After Outdoor Projects Are So Addictive
A good outdoor transformation doesn’t just improve a yard; it changes behavior. Suddenly you’re outside more. You cook with the door open.
You read in daylight. You become the kind of person who owns a watering can that isn’t cracked. The reason “before & after” works as a format
is simple: it shows cause and effect. Not “buy this, buy that,” but “make this one smart move and the whole space starts cooperating.”
And the best makeovers share a pattern: they upgrade the bones (layout, drainage, surfaces, circulation) and then add the
beauty (planting, lighting, texture). Do it in reverse and you’ll spend the summer replanting the same fern like it’s a
recurring villain in a horror franchise.
What Gardenista “Before & After” Gets Right (So You Can Steal It)
1) They fix function first: level ground, good drainage, and paths that make sense
If you want an “after” that lasts, start with boring things: grade, slope, and a solid base under anything you walk on. Patios and paver areas,
for example, need a foundation that resists settling and shifting, plus a slope that moves water away instead of pooling it right where you place
your “cozy” outdoor rug (RIP, rug).
Quick pro reality check: many paver installs call for inches of compacted base material plus a bedding layer before the pavers go down. Skipping
this is how you end up with a patio that looks like it’s slowly trying to become a wave pool.
2) They blur indoors and out (without forcing it)
Gardenista projects often succeed because the garden feels like an extension of the house: doors open easily, surfaces relate to interior materials,
and the layout supports everyday routines (coffee outside, dinner outside, “I’m hiding from everyone” outside). One Austin backyard redesign, for
instance, leaned into a covered dining area and simple, durable hardscape so the yard worked like another roomuseful, not fussy.
3) They treat planting like architecture
The most memorable “after” photos aren’t just about new pavers. They’re about structure: layered planting that frames views, softens edges,
and creates privacy without making your yard feel like a fenced-in storage unit.
A recurring Gardenista lesson: in small gardens, planting can make the space feel bigger by pulling your attention to texture, height, and focal
pointsrather than the fact that your neighbors’ windows are two arm-lengths away.
4) They embrace constraints (instead of fighting them)
Tight space? Greatdesign a courtyard. North-facing? Greatlean woodland. Busy street? Greatuse a grade change, tall planters, and dense planting
for privacy. The “after” isn’t a denial of reality; it’s a negotiation with it.
7 Outdoor Projects That Deliver the Biggest “After” (Gardenista-Style)
Project 1: The Courtyard Glow-Up (a.k.a. “This Used to Be Trash Bins”)
The courtyard makeover is a Gardenista classic because it’s compact, contained, and wildly photogenic. The best ones rely on a few moves:
a clean surface underfoot (gravel, brick, pavers), a perimeter of planters or beds, and one focal point (a bench, a small table, a sculptural pot,
a single statement tree).
- Before: dead corner, clutter, hard-to-use space.
- After: defined “outdoor room” with seating, planting, and an intentional path.
- Steal this move: define the patio edge with tall potted plants instead of building a wallinstant enclosure, lower cost, and easy to adjust.
Project 2: The “Remove the Pool, Gain a Garden” Transformation
This is the boldest kind of before-and-after: trading a high-maintenance feature for usable space. One Gardenista case study in Long Beach replaced
a too-close-to-the-house pool with a sunken gardena clever way to reuse the grade change left by demolition, add privacy, and create
zones for dining, cooking, and lounging. The redesigned yard used airy trees and a compact lawn area so the space felt soft, not overbuilt.
- Before: the pool dominates the yard and limits how you can use the space.
- After: multiple functional zones (fire pit, small lawn, outdoor kitchen/dining) plus more privacy.
- Steal this move: use a subtle grade change (even a small “step down”) to create separation and privacy without tall fencing.
Project 3: The Patio Base Upgrade (So Your “After” Doesn’t Sink)
If your dream “after” includes a paver patio, borrow from the pros: plan for slope, excavate to depth, build a compacted base, use edge restraints,
then finish with joint sand. It’s not glamorous, but it’s the difference between “European courtyard vibes” and “Why is this paver doing its own thing?”
- Before: cracked slab, uneven stepping stones, muddy traffic paths.
- After: stable surface that drains properly and stays level.
- Steal this move: choose an affordable surface like gravel when appropriateGardenista notes it’s often the least expensive patio paving option.
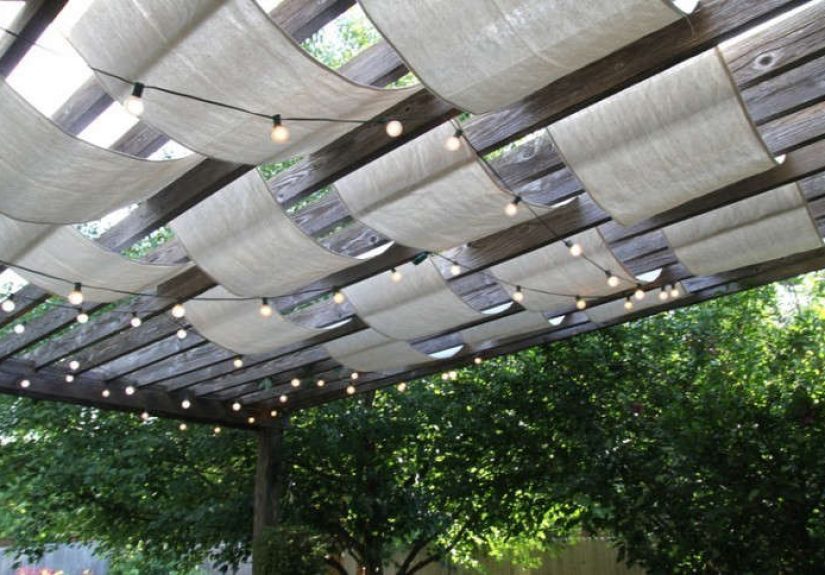
Project 4: The Covered Dining / Outdoor Living Room Addition
Many “after” spaces feel luxurious for one reason: shade. Add a pergola, extend an overhang, or create a covered dining spot and your
yard becomes usable for more hours of the day (and more months of the year). The most successful designs position dining close to the house for easy
movement of food, power, and lightbecause nobody wants to sprint across wet grass carrying a platter like they’re in an obstacle course.
- Before: sunny lawn you rarely use in peak heat.
- After: a “room” outdoors that supports meals, work, and hanging out.
- Steal this move: work around existing mature treesthey can provide shade like a structure (without the build cost).
Project 5: The Balcony / Micro-Patio Makeover (Tiny Space, Big Flex)
Small-space “after” photos have their own special magic because the transformation feels achievable. The formula is simple:
scale-appropriate furniture (bistro set or slim bench), soft layer (outdoor runner or deck tiles), vertical planting, and lighting.
You’ll see this across smart balcony advice and budget-friendly patio redos: once the floor and seating are solved, everything else gets easier.
- Before: bare concrete, one sad chair, maybe a forgotten broom.
- After: a usable nook with plants, privacy, and cozy lighting.
- Steal this move: go verticaltrellises, wall planters, or a DIY screen give privacy without eating floor space.
Project 6: Privacy Without the Fortress
Privacy is one of the fastest ways to make an outdoor area feel “finished.” The trick is avoiding the prison-yard look. Instead, combine layers:
evergreen screens, flowering vines on trellises, tall grasses, and grouped planters. Many experts recommend choosing plants that match your climate
and growing zone, and using a mix of heights so the screen looks natural instead of like a hedge haircut gone wrong.
- Before: you can see the neighbor’s TV, and they can see your “outside pajamas.”
- After: a softer, greener boundary that still feels open.
- Steal this move: if you need quick coverage, choose fast-growing evergreens thoughtfully (and avoid invasive options).
Project 7: Nighttime Lighting That Feels Like a Movie Set (Not a Parking Lot)
Lighting is the sneaky hero of the “after” photoespecially those twilight shots where everything looks like a boutique hotel. The goal is layered,
warm, practical light: paths and steps for safety, gentle uplighting for trees or focal plants, and ambient glow where people sit. The best guidance
is consistent across experts: avoid harsh glare, think in layers, and prioritize where you actually walk.
- Before: one blinding floodlight that turns moths into frequent flyers.
- After: multiple gentle light sources that make the yard usable after sunset.
- Steal this move: start with path and step lighting, then add mood (string lights, lanterns, sconces) where you linger.
Budget Moves That Feel Like Cheating (But Are Just Smart)
Gardenista’s money-saving advice is refreshingly practical: pick a level location, site patios near the house (utilities cost money), and reuse what
you already have. Then sprinkle in high-impact tricks that don’t require a second mortgage.
- Build in phases: do the grading and base work once, expand the patio later.
- Mix materials: combine existing concrete with new gravel or decking for texture and savings.
- Buy off-season: plan ahead for materials when demand is lower.
- Invest in structure: prioritize the “bones” (surfaces, trees, core layout) so you’re not fixing mistakes later.
- Buy plants small: smaller sizes cost less and often establish quickly with proper care.
The Not-So-Pretty Planning Checklist (That Protects Your “After”)
Use this checklist before you spend a dime:
- Sun & shade map: morning, midday, late afternoon. (Yes, it changes everything.)
- Drainage reality: where does water go now, and where should it go?
- Circulation: how do you move from door to grill to table without stepping on plants?
- Sightlines: what do you see from inside the house? Aim your “best view” there.
- Maintenance level: be honestare you a weekly gardener or a “spray-and-pray” gardener?
- Comfort: seating depth, shade, wind protection, and lighting for after-dark use.
Common Mistakes That Ruin the After Photo (and the Space)
- Skipping the base: pavers and patios fail when the foundation is rushed.
- Ignoring slope: if water pools, the space won’t feel invitingno matter how cute the furniture is.
- Over-hardscaping: too much paving makes a yard hotter and less comfortable; planting cools and softens.
- Buying the wrong scale: oversized furniture in a small yard eats the entire “room.”
- Lighting like a stadium: harsh brightness kills ambiance (and your neighborly relationships).
- Planting without a plan: random purchases rarely add up to a cohesive “after.”
How to Get Your Own Before & After (Without Losing a Summer)
The simplest way to start is to choose a single “anchor upgrade” and build around it:
- Anchor upgrade options: a defined patio surface, a shade structure, or a privacy layer.
- Then add: seating, planting, and lightingin that order.
- Finally: accessories (pillows, pots, outdoor art). Accessories are dessert, not dinner.
The 500-Word Part: What a Before & After Outdoor Project Actually Feels Like
Here’s the emotional timeline most people don’t put in the glossy after photos.
First comes the delusional optimism. You stand outside with a coffee, squinting at your yard like you’re a visionary. You say things like,
“We’ll knock this out in a weekend,” which is the outdoor-project equivalent of whispering “Beetlejuice” three times.
Then comes the moment you touch the ground. You start moving thingsplanters, chairs, that decorative rock you inherited from the previous owner
and you realize your “simple refresh” involves dirt. So much dirt. There’s dirt under the dirt. There are ancient layers of mystery gravel. You briefly consider
paving the entire yard and moving to a condo.
Next is the messy middle, where the “before” gets worse before it gets better. This is normal. The patio looks like a construction site. The plants
you were excited about are still in nursery pots, judging you silently. You discover that the sun hits one corner like a laser beam, and your original plan to put
a chair there would have turned you into a rotisserie chicken by 2 p.m.
Then, almost out of nowhere, you hit the first real win. Maybe it’s the moment the surface goes downgravel spread and raked, pavers set level, a
clean edge installed. Or it’s when the first layer of planting goes in and the space stops looking flat. You step back and think, “Oh. That’s… actually nice.”
That tiny moment is dangerously motivating.
After that comes the comfort phase, where you start testing the space like a new pair of shoes. You sit in three different places. You notice a
sightline you didn’t plan forlike the neighbor’s bright blue recycling binthat suddenly matters because you now have a nice place to look from. You move a pot.
You move it again. You move it a third time and decide the pot is the problem, not you. (It is you. It’s okay.)
Finally, you reach the quiet satisfaction stage. Not the “perfect catalog patio” fantasysomething better. Your yard starts working for your real life.
You walk outside barefoot without stepping into mud. You have a place to eat that doesn’t require balancing a plate on your lap. At dusk, the lighting turns on and
the space feels intentional. And the best part? The “after” keeps improving as plants grow, surfaces settle in, and the whole place becomes yours.
Conclusion: The Best “After” Is a Strategy, Not a Shopping List
If Gardenista’s before-and-after projects teach one lasting lesson, it’s this: you don’t need the biggest budgetyou need the clearest priorities.
Fix the function first. Create one strong outdoor “room.” Use planting as structure. Add lighting that makes you want to stay outside. Do those things,
and the after photo will take care of itself (even if there’s a garden hose photobombing the cornerbecause honestly, that’s realism).