Table of Contents >> Show >> Hide
- Why Rain Barrels Are Worth It (Even If You’re Not “A Garden Person”)
- How Much Rain Water Can You Actually Collect?
- Choosing the Right Rain Barrel Setup
- Step-by-Step: How To Install a Rain Barrel
- Tools & Materials Checklist
- 1) Pick the Best Location
- 2) Build a Strong, Level Base
- 3) Install (or Cut) a Downspout Diverter
- 4) Add a Screened Inlet That Mosquitoes Can’t Outsmart
- 5) Install the Spigot (If It’s Not Pre-Installed)
- 6) Install the Overflow Outlet
- 7) Test With a Hose Before the Next Storm
- 8) Use the Water Smartly
- Safety First: Mosquito Control, Water Quality, and Backflow
- How To Use Collected Rain Water Like a Pro
- Maintenance and Seasonal Care (Because Nature Doesn’t Do “Set It and Forget It”)
- Common Rain Barrel Mistakes (So You Don’t Have To Learn the Hard Way)
- Quick FAQ
- Real-World Experiences: The Stuff No One Mentions (An Extra of Honest Rain Barrel Life)
- Conclusion
Imagine paying for water… while perfectly good water is falling from the sky and politely bouncing off your roof like,
“Hello, I’m free.” A rain barrel is basically your way of saying, “Yes, I would like to accept this generous offer.”
It’s a simple rainwater collection system that captures runoff from your roof (via gutters and a downspout) and stores it
for laterusually for outdoor jobs like watering plants, washing muddy boots, or pretending you’re the CEO of Water Conservation.
Done right, rainwater harvesting with a rain barrel can cut down on outdoor water use, reduce stormwater runoff that can overwhelm
drains, and give your garden a backup plan when the hose is busy or watering restrictions show up uninvited. Done wrong, it can become
a mosquito nightclub with a side of algae soup. The good news: avoiding the weird stuff is not hard. Let’s build a rain barrel setup
that’s safe, effective, and surprisingly satisfying.
Why Rain Barrels Are Worth It (Even If You’re Not “A Garden Person”)
Rain barrels aren’t just for people who name their tomato plants. They’re practical for anyone with a roof, gutters, and at least one
outdoor thing that gets thirsty. Here’s what you gain:
- Lower outdoor water use: Landscape irrigation is a big chunk of household water consumption in many areas, especially in summer.
- Stormwater control: Capturing rooftop runoff helps slow the “mini flash flood” effect that can send pollutants into local waterways.
- Healthier plants: Many gardeners like rainwater because it’s typically free of added salts found in some municipal supplies.
- Convenience: A barrel near your garden bed beats dragging 100 feet of hose like you’re training for a tug-of-war.
How Much Rain Water Can You Actually Collect?
The fun (and mildly shocking) part is the math. A common rule of thumb is that 1 inch of rain on a 1,000 sq ft roof can yield about 623 gallons.
That’s not a typo. Your roof is basically a giant collection tray you’ve been ignoring.
The Simple Formula
Use this quick equation to estimate rooftop runoff:
Gallons collected = Roof area (sq ft) × Rainfall (inches) × 0.623
Example: Let’s say your roof area feeding one downspout is about 400 sq ft and you get 0.5 inches of rain.
400 × 0.5 × 0.623 = 124.6 gallons
That means a standard 50–55 gallon barrel can fill fastsometimes in a single decent storm. Translation: plan for overflow, or your gutters
will do the dramatic “backup and spill right next to your foundation” thing.
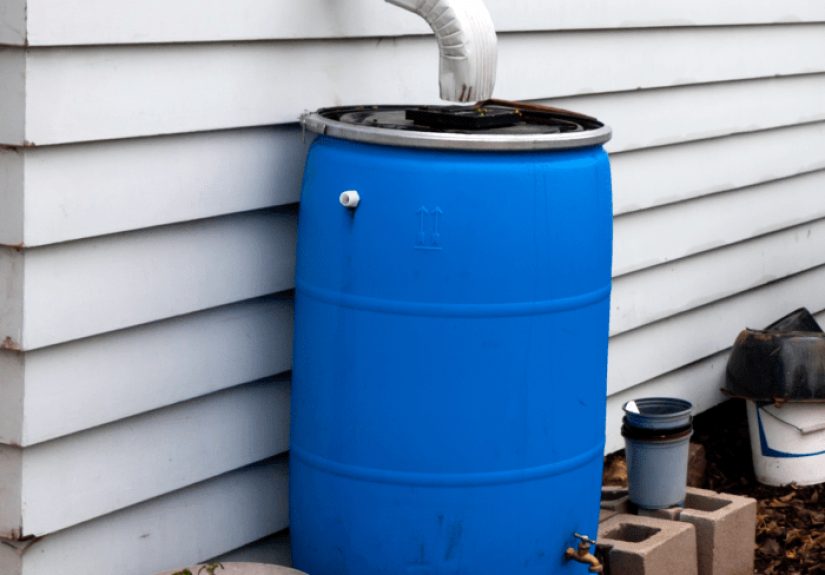
Choosing the Right Rain Barrel Setup
You can buy a ready-to-go rain barrel kit or build your own. Either way, focus on features that keep the system functional and pest-free.
Think of your rain barrel like a tiny outdoor appliance: it needs the right parts to behave.
What to Look For in a Good Barrel
- Capacity: 50–55 gallons is common; larger systems may use multiple linked barrels or a cistern.
- Opaque material: Dark, non-see-through barrels help reduce algae growth by blocking sunlight.
- Secure lid + screened inlet: Keeps out debris and mosquitoes.
- Spigot (hose-ready): A threaded spigot makes filling a watering can or attaching a hose easier.
- Overflow outlet: Non-negotiable. You need a controlled path for extra water once the barrel fills.
- Food-grade (ideally): If you’re repurposing a barrel, make sure it never held anything toxic. “Mystery barrel” is not a vibe.
Single Barrel vs. Linked Barrels
A single barrel is the easiest entry point. If you want more storage, you can link multiple barrels (often with a connector hose near the
bottom or a manifold setup). Just remember: the first barrel in line still needs a rock-solid overflow plan, and your base needs to support the full weight.
Water is heavyabout 8.34 pounds per gallon. A full 55-gallon barrel can weigh roughly 460+ pounds before you even count the barrel itself.
Step-by-Step: How To Install a Rain Barrel
Tools & Materials Checklist
- Rain barrel (or clean repurposed barrel)
- Downspout diverter kit or a plan to cut and redirect the downspout
- Fine mesh screen (for the inlet)
- Spigot and watertight fittings (often included with store-bought barrels)
- Overflow fitting + hose (to direct overflow away from your foundation)
- Stable base materials (pavers, concrete blocks, or a purpose-built stand)
- Level, tape measure, marker, drill with hole saw (if DIY modifications needed)
1) Pick the Best Location
Choose a downspout that’s close to where you’ll use the water (garden beds, planters, a thirsty hydrangea that acts like it pays rent).
Keep the barrel on a flat, stable surface, and allow room to access the spigot and remove the lid/screen for cleaning.
Position it so overflow can be directed away from your home’s foundation.
2) Build a Strong, Level Base
Elevation helps gravity do its job. A raised barrel gives you space to fit a watering can under the spigot and slightly improves flow.
Use pavers or concrete blocks on compacted ground. Make it levelif the barrel leans, it can stress fittings and become a wobbly water hazard.
3) Install (or Cut) a Downspout Diverter
A diverter is the cleanest way: it sends rainwater into the barrel and can redirect flow back down the downspout when the barrel is full.
If you’re doing a simpler cut-and-route method, measure carefully and cut the downspout so water drops into the screened inlet.
Either way, include a screened opening and keep the connection tidy to reduce debris and pests.
4) Add a Screened Inlet That Mosquitoes Can’t Outsmart
Your inlet should be covered with fine mesh screening that’s secured tightly. If you’re cutting an opening on top of a DIY barrel,
use a sturdy grate plus mesh. Mosquitoes only need a tiny gap to RSVP. Don’t give them one.
5) Install the Spigot (If It’s Not Pre-Installed)
Place the spigot a few inches above the bottom so sediment can settle below it. Use watertight fittings and washers.
Pro tip: If you want to fill watering cans easily, consider a second spigot higher up for cans and keep the lower one for hoses.
Rain barrels are typically gravity-fed, so don’t expect fire-hydrant pressure without a pump.
6) Install the Overflow Outlet
This is where most “my barrel betrayed me” stories begin. Install an overflow outlet near the top and attach a hose to direct overflow
to a safe placelike a rain garden area, a grassy slope, or a drain designed to handle it. If overflow backs up into your gutters,
you’ve basically reinvented “water damage” with extra steps.
7) Test With a Hose Before the Next Storm
Run water through the system (a garden hose works) to check for leaks around fittings, confirm the diverter routes water properly,
and verify overflow drains where you want it. Adjust now, not during a thunderstorm while you’re wearing flip-flops and regret.
8) Use the Water Smartly
Use collected rainwater for non-potable outdoor purposes: watering lawns, ornamentals, and many gardens; cleaning tools; rinsing muddy gear.
For edible gardens, read the safety section below and choose the most conservative application method.
Safety First: Mosquito Control, Water Quality, and Backflow
Rain barrel water is generally considered non-potable unless it’s treated and managed with a system designed for potable use.
Roof runoff can pick up contaminants (think dust, bird droppings, and whatever your roof has been collecting like a scrapbook of airborne chaos).
So: don’t drink it, don’t cook with it, and don’t use it for indoor plumbing unless you’ve built a code-compliant rainwater harvesting system
with appropriate treatment and backflow protection.
Mosquito-Proofing That Actually Works
- Screen every opening: Inlet, overflow, and any access ports should be screened or sealed.
- Maintain an air gap where appropriate: Avoid direct hose/downspout insertion that bypasses screening and creates hidden entry points.
- Drain regularly: Don’t let water sit forever. Stagnant water is an open invitation for algae and pests.
- Consider Bti “dunks”: Many mosquito control agencies recommend biological larvicides (Bti) for standing water in outdoor containers.
Should You Use Rain Barrel Water on Vegetables?
Guidance varies, and the cautious approach is safest: avoid spraying edible portions and use rain barrel water to irrigate the soil
(drip or soaker hose) rather than misting leaves or fruits. Some extensions advise avoiding use on edibles or taking extra precautions because
runoff can contain pathogens or chemicals depending on roof materials and conditions. If you choose to use it on food gardens, keep the water off the harvestable parts,
wash produce with potable water, and wash hands after handling barrel water. Also be cautious with certain roof types or components (for example, older or treated materials
and some metal roofing situations) that may increase contamination risks.
First Flush Diverters: A Simple Upgrade for Cleaner Water
A first flush diverter routes the first bit of runoff (which can contain higher concentrations of roof debris after dry periods)
away from your barrel. It’s not a magic filter, but it can help reduce the “first rinse” load. If water quality is a priorityespecially for gardensthis is a smart add-on.
How To Use Collected Rain Water Like a Pro
Rain barrel water is best when you match the delivery method to what your plants actually need.
A few tips that save water and plant drama:
- Water early: Morning watering reduces evaporation and gives plants time to dry.
- Water the root zone: Aim for soil, not leaves. Your plants drink from the roots, not from a leaf spa day.
- Use a soaker hose or drip line: Gravity-fed flow can work for short, low-pressure setups if the barrel is raised.
- Plan for pressure limits: For longer hose runs or drip systems with emitters, you may need a small pump.
- Rotate usage: Don’t “save” rainwater for a special occasion. Use it regularly to keep it fresh.
Maintenance and Seasonal Care (Because Nature Doesn’t Do “Set It and Forget It”)
Monthly (or After Big Storms)
- Clear debris from the inlet screen and gutters.
- Check fittings and spigots for drips.
- Confirm overflow hose is unobstructed and draining correctly.
Mid-Season Troubleshooting
Smell or slime: Usually stagnation + sunlight + organic debris. Use opaque barrels, keep screens clean, and cycle water more often.
Slow flow: Sediment can clog the spigot screen/fitting. Flush the barrel and consider a small inline filter for hoses.
Overflow chaos: Fix routing immediately. Overflow should never back up into gutters or pool at your foundation.
Winterizing (If You Live Where Water Turns Into Sidewalk Sabotage)
In freezing climates, winterize before the first hard freeze: drain the barrel, disconnect it from the downspout/diverter, and leave the spigot open
so trapped water doesn’t crack fittings. Store it upside down or in a protected spot if possible. Reconnect in spring like a responsible adult who definitely didn’t forget last year.
Common Rain Barrel Mistakes (So You Don’t Have To Learn the Hard Way)
- No overflow plan: This is the #1 rookie move. Overflow is not optional.
- Unstable base: A full barrel is heavy. A bad stand is a physics lesson with consequences.
- No screening: Congratulations, you built a mosquito resort.
- Expecting high pressure: Gravity-fed systems are gentle. If you need pressure, add a pump designed for rainwater harvesting.
- Ignoring local rules: Some areas have restrictions or HOA requirements. Check before installing a whole barrel parade.
Quick FAQ
Do rain barrels save money?
They can, especially if you use the water consistently for gardens and landscaping. One barrel won’t replace all outdoor watering,
but it can offset a meaningful chunk during wet seasons and reduce reliance on municipal water during dry spells.
How many rain barrels do I need?
Start with one. Once you see how fast it fills, you’ll know whether linking barrels makes sense. Use your roof runoff math and your garden’s thirst as the deciding factors.
Can I connect a rain barrel to my house plumbing?
Not with a basic barrel setup. Indoor use typically requires a properly designed system with treatment and backflow prevention, and it must meet local codes.
For most homeowners, rain barrels are best kept as an outdoor, non-potable system.
Real-World Experiences: The Stuff No One Mentions (An Extra of Honest Rain Barrel Life)
People usually picture rain barrels as quietly heroicjust sitting there, collecting water like a polite little utility. In real life, the barrel is more like a pet:
mostly helpful, occasionally demanding, and absolutely capable of making a mess if you ignore it. Here are some common experiences homeowners run into once the “install” excitement wears off.
First: the surprise fill-up. Many folks set up a barrel thinking it’ll take weeks to collect enough water to matter. Then a single storm rolls through,
and suddenly the barrel is full, the overflow is working overtime, and you’re doing impromptu water-management strategy at 11 p.m. in the rain.
The lesson is always the same: if you only remember one thing, remember overflow. Direct it away from the foundation, and preferably toward something that appreciates water
(like a rain garden bed or a grassy area), not a basement wall.
Second: gravity is both a gift and a limitation. People often expect a rain barrel spigot to blast water like an outdoor faucet. It won’t.
The flow is gentle, which is perfect for filling a watering can or feeding a short soaker hoseespecially if the barrel is elevated. But if you’re dreaming of running a long hose uphill,
the barrel will respond by… not doing that. Some homeowners end up adding a small pump, while others keep it simple: watering cans, short hoses, and strategic plant placement near the barrel.
Either approach is fine. The “best” setup is the one you’ll actually use on a normal Tuesday.
Third: mosquito anxiety is real, and it’s justified. Even people who love the idea of rainwater harvesting don’t love the idea of raising tiny vampires.
The good news is that proper screening and sealing solves most issues. The more annoying truth is that one tiny gapone loose screen corner, one unprotected overflowcan undo your good work.
A lot of experienced rain barrel users do a quick “mosquito audit” after big storms: check screens, confirm the lid is tight, and make sure overflow is protected too.
In warmer climates, some also use Bti dunks as an extra line of defense.
Fourth: water quality surprises. Rainwater looks clean, but barrels can develop a “pond” smell if water sits too long or if sunlight hits it.
This is why opaque barrels are popular and why using the water regularly helps. Some people also add a simple first flush diverter or clean their gutters more often
to reduce debris. And yesgardeners debate using barrel water on edible plants like it’s a sport. The most conservative real-world approach is pretty consistent:
keep barrel water off the parts you eat, irrigate the soil, wash produce with potable water, and keep hands clean after handling.
Finally: winterizing is the task everyone forgets once. If you’re in a freezing climate, the first year is often optimistic: “It’ll be fine.”
Then spring arrives and you discover a cracked fitting, split barrel, or leaky spigot because water expanded when it froze. After that, winterizing becomes a ritual:
drain, disconnect, open the spigot, store if possible, and sleep peacefully knowing you didn’t accidentally turn your barrel into a plastic sculpture.
It’s five minutes of effort that saves a lot of “why is this wet?” energy later.
The consistent theme in these experiences is that rain barrels work best when they’re treated like a simple system you check occasionallynot a magical object you install and never think about again.
Do the small maintenance, plan for overflow, keep mosquitoes out, and use the water regularly. Then your rain barrel really does become what it was supposed to be:
free water on tap, minus the drama.
Conclusion
A rain barrel is one of the simplest ways to collect rain water at homeand one of the easiest upgrades to make your yard more resilient.
If you focus on the fundamentals (stable base, screened inlet, reliable overflow, and basic maintenance), you’ll capture water safely and put it to work where it matters most:
keeping plants happy, reducing runoff, and making your outdoor watering routine a little less expensive and a lot more satisfying.
Start with one barrel, learn how your roof behaves in a storm, and expand only if your garden (and your patience) asks for it.