Table of Contents >> Show >> Hide
- What Is Upholstery Piping (Welting)?
- Tools and Materials You’ll Need
- How to Make Upholstery Piping: 13 Steps
- Step 1: Decide Where the Piping Will Go
- Step 2: Choose Your Piping Cord Size
- Step 3: Measure the Project Perimeter and Add Extra Length
- Step 4: Choose Fabric and Decide Bias-Cut vs. Straight-Cut
- Step 5: Calculate and Mark Your Fabric Strip Width
- Step 6: Cut the Fabric Strips
- Step 7: Join the Strips into One Long Strip
- Step 8: Press and Trim the Joined Seams
- Step 9: Wrap the Cord and Sew the Piping Closed
- Step 10: Baste the Piping to the First Fabric Piece
- Step 11: Handle Corners and Curves the Right Way
- Step 12: Join the Piping Ends for a Clean Finish
- Step 13: Sew the Final Seam and Inspect Your Work
- Common Upholstery Piping Mistakes (And How to Avoid Them)
- Pro Tips for Better-Looking Upholstery Welting
- Where to Use Upholstery Piping
- Experience Notes From Real DIY Upholstery Scenarios (Extended 500+ Words)
- Conclusion
If you’ve ever looked at a custom cushion and thought, “Wow, that edge looks expensive,” chances are you were admiring upholstery piping (also called welting). The good news: that crisp, tailored finish is not reserved for professional upholsterers, mysterious sewing wizards, or people who own twelve specialty presser feet and speak fluent “seam allowance.”
You can make your own upholstery piping at home with a sewing machine, fabric, cording, and a zipper foot. And yes, you can absolutely do it without turning your project into a fabric octopus. In this guide, I’ll walk you through 13 clear steps to make upholstery piping that looks clean, professional, and ready for cushions, pillows, bench seats, and furniture projects.
Along the way, we’ll cover when to cut on the bias, how to handle corners and curves, how to join the ends neatly, and what mistakes make piping look lumpy (so you can avoid them like mystery glitter in the craft drawer).
What Is Upholstery Piping (Welting)?
Upholstery piping is a strip of fabric wrapped around a cord, then sewn into a seam to create a raised decorative edge. It adds structure, contrast, and a polished finish to upholstery projects. You can make it from the same fabric for a seamless look or use a contrasting fabric for a bold design detail.
In practical terms, it also helps visually define edges and can make DIY cushions look much more “custom shop” and much less “I made this at 11:48 p.m. and hoped for the best.”
Tools and Materials You’ll Need
- Upholstery fabric (or medium/heavy home décor fabric)
- Piping cord / welting cord (choose size based on desired look)
- Sewing machine
- Zipper foot (or piping/welting foot if you have one)
- Matching thread
- Scissors or rotary cutter
- Ruler or measuring tape
- Pins or clips
- Iron and ironing board
- Marking tool (optional)
How to Make Upholstery Piping: 13 Steps
Step 1: Decide Where the Piping Will Go
Before cutting anything, decide exactly where the piping will be used: around a cushion, along a box cushion edge, around a pillow front, or on furniture seams. This affects how much piping you need and whether your piping must go around tight corners, soft curves, or mostly straight runs.
If your project has rounded corners or curved shapes, plan on bias-cut piping. If it’s mostly straight and you’re matching stripes, straight-cut piping may be the smarter move.
Step 2: Choose Your Piping Cord Size
Piping cord comes in different diameters, and size changes the final look dramatically. Smaller cord gives a subtle tailored edge; larger cord makes a bolder statement. For pillows and many cushions, a medium cord is common. For furniture upholstery, people often go a little heavier.
Pick your cord based on the style you want, then make all your fabric-strip calculations from that cord size. This is one of those “measure twice, cut once” moments. Ignore it, and your piping may end up too tight, too loose, or weirdly crunchy.
Step 3: Measure the Project Perimeter and Add Extra Length
Measure the full edge where the piping will be inserted. Then add extra length for:
- Joining ends neatly (at least a few extra inches)
- Turning corners and handling curves
- Oops moments (because they happen)
A simple rule: always cut more piping than you think you need. Running out two inches before the finish line is a special kind of sewing heartbreak.
Step 4: Choose Fabric and Decide Bias-Cut vs. Straight-Cut
This is where upholstery piping gets strategic. In many projects, fabric strips are cut on the bias (45-degree angle) because bias has more stretch and bends smoothly around corners and curves. That extra flexibility helps the piping sit cleanly instead of fighting the shape.
However, straight-cut piping can be ideal when you’re using striped fabric and want the stripes on the piping to match the upholstery direction. It can also work well for projects with mostly straight edges or certain stretch fabrics.
Translation: bias is the all-around MVP, but straight-cut has a few very cool party tricks.
Step 5: Calculate and Mark Your Fabric Strip Width
Your strip width depends on:
- The thickness of your piping cord
- Your seam allowance
- A little extra room for stitching comfortably
To calculate, wrap a tape measure around the cording and include the seam allowance you plan to use, then add a bit of working room. The goal is a strip wide enough to wrap the cord and still let you sew close to it without starving the seam allowance.
If you’re using a heavier fabric, give yourself a little more width. Thick fabrics are less forgiving and can create bulky seams if cut too narrow.
Step 6: Cut the Fabric Strips
Cut enough strips to cover the total piping length you measured. If cutting on the bias, mark a 45-degree angle and keep your strips consistent in width. Consistency matters: uneven strips can make the finished piping look wobbly.
For upholstery projects, accuracy is not just a “nice to have.” It’s the difference between sleek piping and a trim line that looks like it had three cups of coffee.
Step 7: Join the Strips into One Long Strip
Most projects need multiple strips joined together. Join strip ends to create one long continuous strip. For bias strips, a diagonal join (rather than a straight-across join) helps reduce bulk and makes the seam less noticeable in the finished piping.
After stitching the joins, check the total length again before moving on. It is much easier to add another strip now than after the cord is already wrapped and sewn.
Step 8: Press and Trim the Joined Seams
Press the seam allowances after joining strips. This helps the strip feed more smoothly through the machine and reduces lumps. If you are using thick upholstery fabric, trim or grade seam allowances so you don’t create a bulky bump inside the piping.
Tiny step, huge payoff. Pressing is the vegetable of sewing: not always exciting, absolutely useful, and future-you will be grateful.
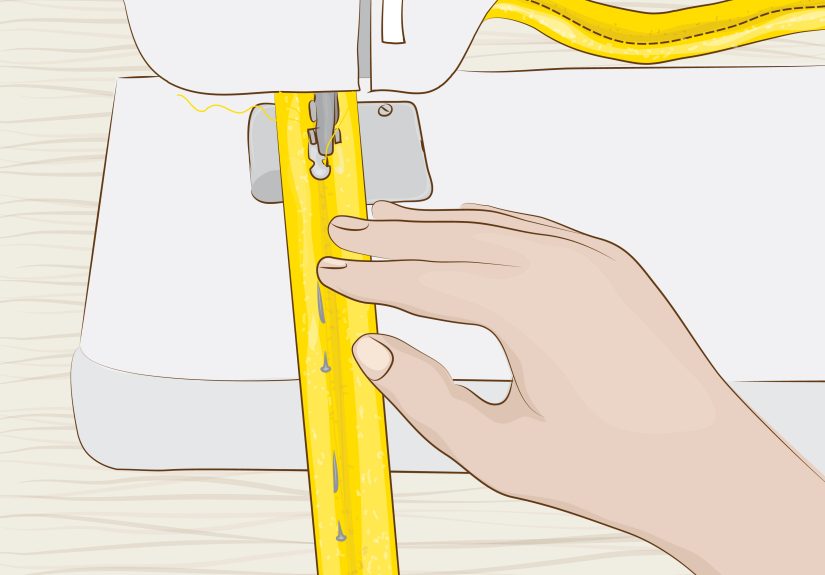
Step 9: Wrap the Cord and Sew the Piping Closed
Place the piping cord in the center of the strip and fold the fabric over it with the raw edges aligned. Install your zipper foot (or piping foot) and sew as close to the cord as possible without stitching into the cord itself.
Keep a steady pace and let the machine feed the fabric. Don’t pull hard. Tugging can stretch bias strips unevenly and create ripples later. If helpful, leave a little cording exposed at each end so it’s easier to handle while sewing.
At this point, congratulations: you have made custom upholstery piping. Please accept this invisible trophy.
Step 10: Baste the Piping to the First Fabric Piece
Before you sandwich everything together, baste the piping to one layer first (for example, the top cushion panel or pillow front). Align the raw edges of the piping with the raw edge of the fabric.
Start in an inconspicuous area (like the back edge of a cushion) so the piping join is less visible. Use clips or pins and sew with the zipper foot close to the cord. Basting first gives you more control and makes the final assembly cleaner.
Step 11: Handle Corners and Curves the Right Way
This is where beginners become “people who suddenly give piping advice at family gatherings.”
For corners and curves, clip the seam allowance on the piping so it can bend smoothly. On curves, you may notice waviness after stitching; that’s often your sign the seam allowance needs clipping or notching. For outer curves, small V-shaped notches can reduce bulk and help the piping lay flat.
Clip carefully up to the stitching line, but not through it. One accidental snip through the seam line can turn a polished edge into a repair project.
Step 12: Join the Piping Ends for a Clean Finish
The finish point matters. A messy join can stand out even if the rest of the piping is perfect.
There are two common approaches:
- Overlap method: Faster and easier, often fine for casual projects.
- Continuous join method: More polished and commonly preferred for a professional look.
For a neat join, trim the cording so the ends butt together (instead of stacking on top of each other), then fold under the fabric tail to cover the raw edge before stitching the final section. This reduces bulk and keeps the piping line visually continuous.
Step 13: Sew the Final Seam and Inspect Your Work
Place the second fabric layer right sides together with the piped panel, sandwiching the piping between layers. Sew along the previous stitching line (or just barely inside it) so the basting stitches don’t show on the finished project.
Turn the piece right side out and inspect:
- Is the piping evenly visible?
- Do corners look smooth?
- Are there any puckers or skipped spots?
- Did you accidentally sew into the cord anywhere?
Press gently if appropriate for the fabric. Then stand back and admire your work like a person in a home décor montage.
Common Upholstery Piping Mistakes (And How to Avoid Them)
1) Cutting strips too narrow
This causes seam allowance problems and makes it hard to stitch close to the cord. Always test with a scrap strip first.
2) Forgetting extra length
Piping needs extra inches for joining and handling. Do not cut it exactly to perimeter length unless you enjoy preventable frustration.
3) Skipping clipping on curves
If the piping won’t lie flat around a curve, clipping/notching is usually the fix.
4) Using the wrong foot
A zipper foot (or piping/welting foot) makes it much easier to sew close to the cord. A standard foot can work, but it’s tougher to get a crisp result.
5) Sewing into the cord
If you stitch through the cord, the piping can look pinched and the seam may be harder to turn. Guide the fabric by feel and keep the needle close, not on top of the cord.
Pro Tips for Better-Looking Upholstery Welting
- Test first: Make a short practice piece using the same fabric and cord.
- Match thread smartly: Matching thread hides tiny wobbles better than contrast thread.
- Use clips on thick fabric: Pins can distort layers or poke your fingers (and your dignity).
- Start at the least visible area: Hide joins on the back or bottom edge.
- Baste before final sewing: It improves accuracy, especially on cushions and box corners.
- Mind stripe direction: Straight-cut piping may help align striped fabric for a cleaner visual finish.
Where to Use Upholstery Piping
Once you learn this technique, you’ll start seeing opportunities everywhere:
- Throw pillows and bolster pillows
- Box cushions and bench cushions
- Dining chair pads
- Slipcovers
- Ottomans and upholstered headboards
- Accent details on bags and home décor sewing projects
Fair warning: piping is a little addictive. You make one crisp cushion edge, and suddenly you’re eyeing every flat surface in your house like, “Could this use welting?”
Experience Notes From Real DIY Upholstery Scenarios (Extended 500+ Words)
The most useful lessons about making upholstery piping usually show up after the first “real” project, not during the neat little practice strip. In workshop-style DIY scenarios, beginners often do great while making the piping itself, then get surprised when attaching it to a cushion. Why? Because a straight sample behaves politely. A box cushion with corners, layers, and bulky fabric behaves like it has opinions.
A common example is the bench cushion project. People measure the foam correctly, cut beautiful panels, and make piping that looks fantastic on the table. Then they pin the piping around the top panel and everything looks slightly off at the corners. Usually, the issue is not “bad sewing skills.” It’s that the piping seam allowance wasn’t clipped enough to bend around the turn, or the corners on the fabric panel were not marked clearly. The fix is simple but important: mark corner points, baste slowly, and stop with the needle down when pivoting.
Another frequent experience comes from using thick home décor fabric or outdoor fabric. These materials can produce excellent-looking welting, but they also create bulk fast. DIYers often notice a lump where two strip joins meet inside the piping, especially if the seam allowances were left untrimmed. Pressing and grading the seam allowances usually solves the problem. This tiny “prep” step feels skippable until you see the bump from across the room. Suddenly, pressing becomes a spiritual practice.
Stripe matching is another real-world pain point that turns into a major style win when done right. In striped fabric projects, many DIYers learn that straight-cut piping can make the finished result look dramatically more intentional. Bias-cut stripes often create a candy-cane effect (which can be beautiful), but if the goal is clean alignment with the cushion panels, straight-cut strips are easier to control. This design decision alone can change the vibe from “cute handmade” to “custom upholstery shop.”
There’s also the “I can’t see the cord while sewing” stage, especially when attaching piping between layers. This is incredibly normal. Many people improve by guiding with their fingertips and sewing a bit slower, rather than staring harder at the needle and hoping for a miracle. A zipper foot helps a lot here, and basting the piping to one panel first makes the final seam less stressful. In practical terms, it turns one complex seam into two simpler seams.
One more experience pattern: people underestimate how much extra piping length they need. On paper, the perimeter might say 72 inches. In reality, you need more for turning, easing, and joining. The experienced DIY approach is to make extra piping on purpose. Leftover piping is not waste; it’s future trim, practice material, or insurance. Running short, on the other hand, is a mood.
Finally, confidence grows fast after the first success. Once someone makes one piped cushion, the next project usually goes better because they already know where the tricky moments live: corners, joins, and bulky layers. The biggest shift is mental. Piping stops feeling like an advanced upholstery technique and starts feeling like a repeatable process: measure, cut, wrap, stitch, baste, clip, join, finish. That’s when the fun startsbecause now you’re not just sewing edges, you’re designing them.
Conclusion
Learning how to make upholstery piping is one of the best upgrades for DIY sewing and upholstery work. It gives cushions, pillows, and furniture edges a custom finish, and once you understand the systemcord size, strip width, bias vs. straight cut, clipping, and clean joinsit becomes a repeatable skill.
Start with a pillow or simple cushion, practice your corner clipping and end joins, and don’t worry if your first attempt isn’t perfect. Even slightly imperfect custom piping often looks better than no piping at all. And by your second or third project, you’ll be adding welting like it’s part of your personality.