Table of Contents >> Show >> Hide
- Before You Start: Quick Reality Check
- 1) Find the Culprit in Task Manager (Don’t GuessMeasure)
- 2) Restart Once, Then Trim Startup Apps (The “Stop Bringing a Crowd to Boot-Up” Fix)
- 3) Perform a Clean Boot to Catch Software Conflicts
- 4) Tame SysMain (Superfetch) If It’s Thrashing an HDD
- 5) Fix Windows Search Indexing (Rebuild, Limit, or Test-Disable)
- 6) Check Windows Update + Delivery Optimization (Background Downloads Can Be Sneaky)
- 7) Run a Malware Scan (Because Sometimes It’s Actually the Bad Guys)
- 8) Repair Disk Errors with CHKDSK (File System Damage = Extra Work for the Drive)
- 9) Repair Windows System Files with DISM + SFC
- 10) Update Storage Drivers/Firmwareand Fix the StorAHCI MSI-Mode “False 100%” Bug
- Bonus Tips That Prevent the Problem from Coming Back
- Hands-On Experiences: What Usually Works (and What Doesn’t)
- Conclusion
When Windows 10 decides your disk should run a marathon at 100%even though you’re just trying to open a browser tab and live your lifeit can make your PC feel like it’s moving through peanut butter. The good news: “100% disk usage” is usually a symptom, not a life sentence.
This guide walks you through 10 practical fixes (from “two-click easy” to “okay, we’re putting on gloves”) with clear steps and real-world context. The goal isn’t to blindly disable half of Windows. The goal is to identify what’s hammering your drive, stop the nonsense, and keep your system stable.
Before You Start: Quick Reality Check
- Is it a hard drive (HDD) or SSD? HDDs hit 100% more easily during background work. SSDs can too, but it’s less common.
- Does it happen only after boot? Some “100%” spikes are normal for a few minutes after startupupdates, indexing, antivirus scans, etc.
- Is your PC low on RAM (4–8GB)? If memory runs tight, Windows relies more on the page file, which can spike disk activity.
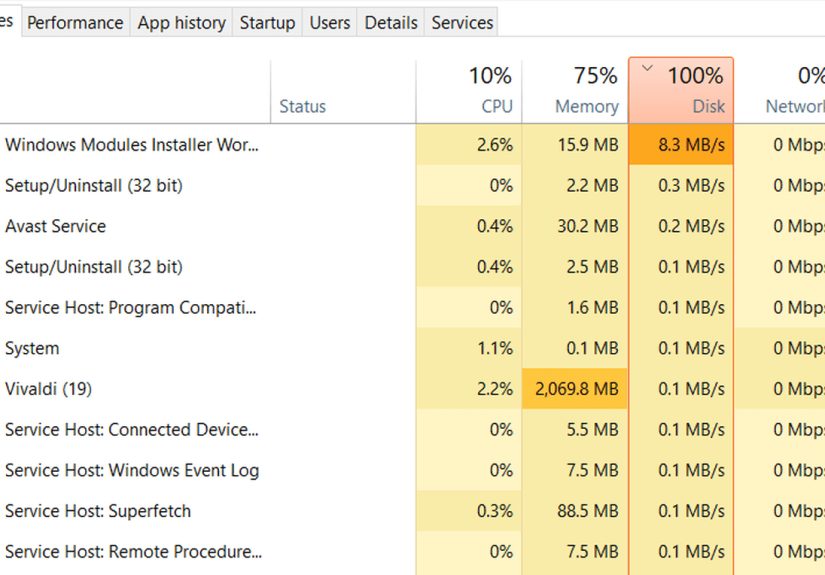
1) Find the Culprit in Task Manager (Don’t GuessMeasure)
The fastest path to fixing high disk usage is figuring out what’s actually using the disk. “System” might be the label, but it’s not a confession.
Steps
- Press Ctrl + Shift + Esc to open Task Manager.
- Click the Processes tab.
- Click the Disk column header to sort by disk usage.
- Note the top 1–3 offenders (apps or services).
- If it’s unclear, open Resource Monitor: Task Manager → Performance → Open Resource Monitor → Disk tab.
Example: If you see “Antimalware Service Executable” at the top, you’re likely dealing with a security scan. If you see “Service Host: SysMain” or “Windows Search,” you’re dealing with background services that can be tuned.
2) Restart Once, Then Trim Startup Apps (The “Stop Bringing a Crowd to Boot-Up” Fix)
A restart can clear stuck processes. If disk usage returns every time you sign in, startup apps may be dogpiling your drive the moment Windows wakes up.
Steps
- Restart your PC.
- Open Task Manager → Startup apps.
- Disable non-essential items (think: chat apps, game launchers, “helper” utilities you never asked for).
- Restart again and see if disk usage calms down.
Tip: If you’re unsure what something is, leave it enabled. Disabling random driver or hardware utilities can cause new problems that feel like a magic trick (and not the fun kind).
3) Perform a Clean Boot to Catch Software Conflicts
If disk usage is constantly pegged and you can’t identify a clear app culprit, a clean boot helps determine whether a third-party service is causing the thrash.
Steps
- Press Windows + R, type msconfig, press Enter.
- Go to the Services tab.
- Check Hide all Microsoft services.
- Click Disable all (this disables third-party services only).
- Go to Startup tab → Open Task Manager → disable startup items.
- Restart and test disk behavior.
If the disk usage drops dramatically in clean boot mode, re-enable services/startup items gradually until you find the offender. Yes, it’s annoying. But it’s effective annoyinglike flossing.
4) Tame SysMain (Superfetch) If It’s Thrashing an HDD
SysMain (formerly Superfetch) tries to speed up app launching by learning your usage patterns. On some systemsespecially older HDD-based machinesit can backfire and cause sustained disk activity.
Steps
- Press Windows + R, type services.msc, press Enter.
- Find SysMain.
- Right-click → Stop.
- Right-click → Properties → set Startup type to Disabled (or Manual as a safer test).
- Restart and monitor disk usage.
Important: If disabling SysMain helps, that’s useful informationbut don’t assume SysMain was the “root cause.” It may be exposing underlying bottlenecks (slow drive, low RAM, heavy background tasks).
5) Fix Windows Search Indexing (Rebuild, Limit, or Test-Disable)
Windows Search indexing can cause heavy disk reads/writes, particularly right after updates, profile changes, or large file reorganizations. You don’t always need to kill ityou often just need to rebuild or reduce scope.
Option A: Rebuild the Index (Recommended First)
- Open Settings → search for Indexing Options (or Search settings).
- Open Advanced.
- Click Rebuild.
- Give it timeindexing can take hours depending on file volume.
Option B: Reduce Indexed Locations
If you index your entire drive (especially with big media folders), consider limiting indexing to Documents/Desktop and excluding bulky folders that don’t need instant search.
Option C: Temporary Test-Disable
- Open services.msc.
- Find Windows Search.
- Stop it and set Startup type to Disabled to test.
If disabling Windows Search instantly drops disk usage from 100% to normal, you’ve found a major contributor. You can then decide whether to keep it off or rebuild and tune it instead.
6) Check Windows Update + Delivery Optimization (Background Downloads Can Be Sneaky)
Windows Update can spike disk usage during downloading, installing, and post-update cleanup. Delivery Optimization can also contribute by downloading/uploading update parts to other PCs (depending on settings).
Steps
- Go to Settings → Windows Update and check if updates are running.
- Go to Delivery Optimization settings and turn off Allow downloads from other PCs if you don’t want peer-to-peer behavior.
- Restart after updates finish installing.
Specific example: If disk usage goes wild and you notice “Service Host: Delivery Optimization,” turning off peer downloads can reduce background churnespecially on slower drives.
7) Run a Malware Scan (Because Sometimes It’s Actually the Bad Guys)
High disk usage can come from malware, adware, or unwanted background tools mining your system resources like it’s 1849. Even legit apps can behave maliciously when misconfigured.
Steps
- Open Windows Security → Virus & threat protection.
- Run a Full scan.
- If you suspect stubborn malware, run Microsoft Defender Offline scan (it reboots and scans outside normal Windows session).
Note: Security scans themselves can temporarily cause high disk usage. The key difference is whether it eventually finishes and returns to normal.
8) Repair Disk Errors with CHKDSK (File System Damage = Extra Work for the Drive)
File system issues can cause repeated retries and slowdowns. CHKDSK checks disk structure and can fix logical errors.
Steps
- Right-click Start → Windows PowerShell (Admin) or Command Prompt (Admin).
- Run:
- If prompted to schedule at next restart, type Y and reboot.
For HDDs: After errors are fixed, consider running Optimize Drives (defrag) for HDD performance. (Do not obsessively defrag SSDsWindows typically handles SSD optimization appropriately.)
9) Repair Windows System Files with DISM + SFC
Corrupted system files can cause odd behavior, including services looping and hammering the disk. The classic repair combo is DISM (repairs the Windows image) followed by SFC (repairs system files).
Steps
- Open an elevated command prompt.
- Run:
- After DISM completes, run:
- Restart when finished.
What to expect: SFC may report it found and repaired files, found issues it couldn’t repair, or found no integrity violations. Any of those results are useful signals.
10) Update Storage Drivers/Firmwareand Fix the StorAHCI MSI-Mode “False 100%” Bug
If disk usage is pegged but transfers seem oddly low (or Task Manager feels “wrong”), you may be dealing with a storage driver issue rather than pure load. Certain systems can show 100% disk utilization due to an MSI (Message Signaled Interrupt) mode behavior with storage drivers/controllers.
Start with the safe stuff
- Update Windows 10 fully.
- Update chipset/storage drivers from your PC manufacturer (Dell/HP/Lenovo) or motherboard vendor.
- Check your drive manufacturer for SSD firmware updates (firmware bugs can cause stalls).
If you suspect StorAHCI MSI-mode issues
This fix is more advanced and can involve registry changes based on your AHCI controller device instance path. If you’re not comfortable in the registry, pause here and do the driver/firmware updates first.
Practical rule: If you’ve tried the earlier fixes and the PC still acts like it’s dragging a piano through mudespecially on an older HDDupgrading to an SSD is the single biggest real-world performance improvement you can make.
Bonus Tips That Prevent the Problem from Coming Back
- Use “Best performance” power mode if you’re plugged in and need responsiveness.
- Keep free space available (Windows needs breathing room for updates, temp files, and paging).
- Don’t install “PC booster” apps that promise miraclesmany add background services and make disk usage worse.
- Check your browser extensions if Chrome/Edge seems to cause constant disk churn.
Hands-On Experiences: What Usually Works (and What Doesn’t)
After dealing with enough “my disk is stuck at 100%” cases, you start noticing patterns. The first pattern is that people often treat 100% disk usage like it’s a mysterious disease. In reality, it’s more like a smoke alarm: it’s loud, it’s annoying, and it’s trying to tell you something specific is happeningsometimes normal, sometimes not.
One of the most common real-world scenarios is an older laptop with a mechanical hard drive and 4GB of RAM. On paper, Windows 10 “runs” on that setup. In practice, it runs the way a shopping cart runs with one wheel doing interpretive dance. You boot up, Windows starts indexing, updating, scanning, and preloading, then the page file kicks in because RAM is tight. The disk gets hammered by many small read/write operationsexactly what HDDs hate. In these cases, disabling SysMain and reducing Search indexing can help a lot, but it’s often a temporary peace treaty, not a permanent solution.
Another pattern: security software. Sometimes Microsoft Defender is doing a scan at the worst possible time (like when you’re trying to present on a Zoom call). Sometimes third-party antivirus decides your idle PC is the perfect time to do a “deep optimization” that turns your drive into a busy restaurant kitchen. When Task Manager shows a security tool as the top disk user, the trick isn’t always to uninstall it. Often, it’s to schedule scans, reduce background tasks, or run one clean, thorough scan (including offline scan if needed) to rule out actual infection.
Clean boot testing is a hero move that people skip because it feels “too technical.” But it’s one of the fastest ways to stop the blame game. If disk usage is normal in a clean boot environment, you immediately know the problem isn’t “Windows being Windows”it’s a third-party service fighting for attention. I’ve seen printer utilities, cloud sync tools, game launchers, and “helpful” OEM assistants all trigger constant disk churn. Re-enabling items one by one feels slow, but it’s the kind of slow that saves you hours later.
Then there’s the “Task Manager says 100%, but nothing makes sense” situation. Transfers look low, but the meter is screaming. That’s when storage drivers, controller settings, or firmware issues become more likely. Updating chipset/storage drivers and checking SSD firmware can fix weird stalls that no amount of service-disabling will touch. It’s also why I always recommend starting with observation (Task Manager/Resource Monitor) instead of immediately flipping switches.
Finally, the hard truth: on HDD systems, sometimes the “fix” is hardware. If you’ve done the sane software stepsstartup cleanup, indexing tuning, disk checks, system file repair, malware scanand the machine still spends its life at 90–100% disk just opening File Explorer, an SSD upgrade is the closest thing to a real-life cheat code. It doesn’t just lower disk usage; it changes the entire feel of the computer. The best part? It also makes Windows background tasks less painful, because SSDs handle lots of small random reads/writes far better than spinning disks.
Conclusion
Fixing 100% disk usage in Windows 10 is rarely about one magic switch. It’s usually about identifying the real culprit, reducing unnecessary background load, repairing underlying system/disk issues, andwhen neededupgrading the bottleneck hardware. Start with measurement, make one change at a time, and you’ll get your PC back from “frozen statue” mode to “usable human computer.”