Table of Contents >> Show >> Hide
- Before You Upgrade: What to Know First
- How to Upgrade to Windows 10: 11 Steps
- Step 1: Check whether your PC meets the system requirements
- Step 2: Back up everything you care about
- Step 3: Update your current version of Windows first
- Step 4: Confirm your activation method
- Step 5: Free up disk space
- Step 6: Disconnect unnecessary accessories
- Step 7: Download the official Windows 10 installation tool
- Step 8: Choose “Upgrade this PC now”
- Step 9: Decide what you want to keep
- Step 10: Let the installation finish without interruption
- Step 11: Check drivers, updates, and activation after the upgrade
- Common Problems During a Windows 10 Upgrade
- Should You Upgrade to Windows 10 in 2026?
- Real-World Experience: What Upgrading to Windows 10 Actually Feels Like
- Conclusion
If your old PC is still chugging along like a heroic toaster with Wi-Fi, upgrading to Windows 10 can feel like giving it a decent cup of coffee. The process is not especially mysterious, but it does reward people who prepare first and panic later. In this guide, you’ll learn how to upgrade to Windows 10 in 11 practical steps, what to check before you begin, what mistakes to avoid, and how to make the whole thing less “tech support nightmare” and more “mildly satisfying afternoon project.”
One important reality check before we start: Windows 10 is no longer the shiny new operating system in the room. It is now the seasoned veteran. That means upgrading to Windows 10 today mostly makes sense for legacy software, older hardware, test machines, or users who are not ready for Windows 11 yet. Still, if your device supports Windows 10 and you have a valid license, the upgrade path can be straightforward.
Before You Upgrade: What to Know First
Before you click anything dramatic, make sure your computer can actually handle the upgrade. A Windows upgrade is a little like inviting a new roommate into your house. You need enough space, compatible habits, and a basic understanding of who is moving in.
Basic checklist
- A compatible PC running a qualifying version of Windows
- A stable internet connection
- Enough free storage for the installer and temporary files
- A backup of your important documents, photos, passwords, and app settings
- Your Windows product key or digital license situation sorted out
If you are upgrading from an older system, compatibility matters more than optimism. Some older apps, drivers, printers, and specialty programs may need updates or replacements. That is especially true for business software, ancient printers that still somehow refuse to die, and any program that came on a CD you have not seen since middle school.
How to Upgrade to Windows 10: 11 Steps
Step 1: Check whether your PC meets the system requirements
Start with the boring but necessary part. Confirm that your computer has a suitable processor, enough RAM, and enough drive space. This step is not glamorous, but it can save you from the classic “Why is my computer screaming at me?” moment halfway through installation.
As a rule, a machine that runs a late version of Windows 7 or Windows 8.1 reasonably well may be able to run Windows 10. Still, “able to run” and “pleasant to use” are not always the same thing. A laptop with minimal RAM and a nearly full hard drive might technically qualify, but it could move with all the urgency of a sleepy turtle.
Step 2: Back up everything you care about
Do not skip this. Yes, even if you are “pretty sure it’ll be fine.” Upgrades usually work. “Usually” is not the same as “always.” Copy your important files to an external drive, cloud storage, or both. Back up family photos, work documents, browser bookmarks, saved game files, tax records, and anything else that would ruin your day if it vanished.
A smart backup plan also includes a list of your installed apps and login credentials. If you use a password manager, confirm you can sign back into it from another device. If you use software tied to a license key, find that key before the upgrade, not after you are locked out and muttering at the screen.
Step 3: Update your current version of Windows first
If your current operating system has pending updates, install them before moving to Windows 10. This reduces compatibility issues and helps the installer work more smoothly. It is the digital version of cleaning your kitchen before hosting guests. Nobody loves doing it, but everyone appreciates the results.
If you are on Windows 7, make sure service packs and important patches are installed. If you are on Windows 8.1, confirm you are fully updated there too. An outdated system can cause the upgrade assistant to complain, stall, or throw cryptic messages that sound more philosophical than helpful.
Step 4: Confirm your activation method
Before upgrading, figure out whether your Windows activation is tied to a product key or a digital license. This matters because activation after installation is much less stressful when you know what proof of legitimacy you actually have.
If you already upgraded this device to Windows 10 in the past and are reinstalling it, activation may happen automatically once the machine goes online. If this is a first-time move to Windows 10, make sure you have a valid license path. Think of it as bringing your ticket before boarding the train, not after it leaves the station.
Step 5: Free up disk space
Windows upgrades need room to breathe. Delete temporary files, empty the Recycle Bin, move large videos off your main drive, and uninstall apps you do not use. This helps the upgrade process and gives your system a better chance of running smoothly afterward.
Good candidates for deletion include duplicate downloads, installer files from ancient software, and mystery folders named something like “New Folder (2)” that nobody has opened since 2019. If your device uses a small SSD, this step can make a major difference.
Step 6: Disconnect unnecessary accessories
Before upgrading, unplug devices you do not need. That includes extra USB drives, printers, scanners, webcams, old dongles, and random adapters that live in your laptop bag for emotional support. Keeping only your keyboard, mouse, display, and internet connection can reduce driver conflicts during setup.
This is a small step, but it is one of those practical tricks that experienced PC users swear by. The fewer moving parts, the fewer weird surprises.
Step 7: Download the official Windows 10 installation tool
Use Microsoft’s official Windows 10 download page and media creation method. Avoid suspicious third-party downloads promising “faster installs” or “special editions.” Those are the internet equivalent of a stranger in a parking lot selling mystery electronics out of a van.
The official installer is the safest route. It helps verify the right version, architecture, and setup options. It also lowers your chances of downloading outdated files or something malicious disguised as a helpful shortcut.
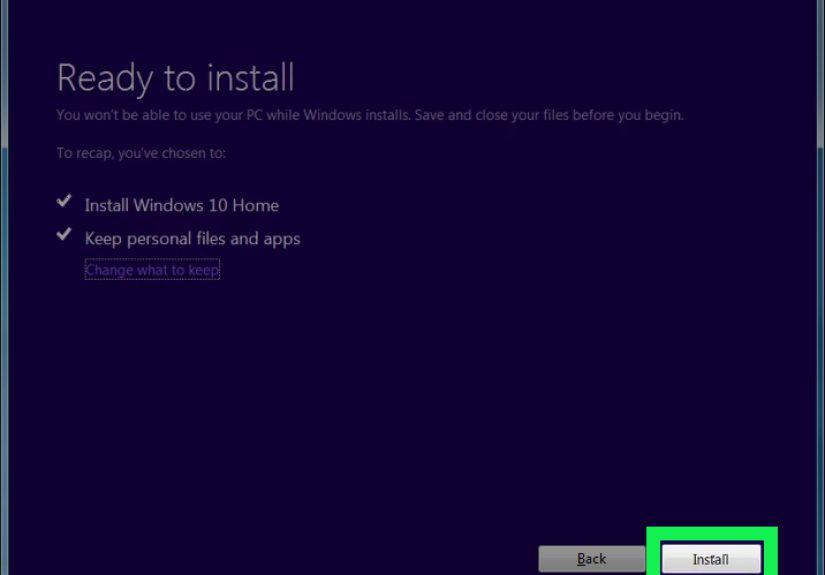
Step 8: Choose “Upgrade this PC now”
When the installation tool launches, select the option to upgrade the current PC. This is the easiest path if you want to keep your files and applications. The installer will download the necessary files, perform checks, and guide you through the process.
At this stage, read the screens instead of speed-clicking through them like you are escaping a pop quiz. The installer may show warnings about incompatible apps, unsupported drivers, or settings that need attention first. That information is useful, even if it ruins your momentum.
Step 9: Decide what you want to keep
During setup, Windows typically lets you choose whether to keep personal files and apps, keep only personal files, or perform a cleaner installation. For most home users, keeping files and apps is the most convenient choice. For older, cluttered systems, keeping only files or starting fresh can sometimes lead to better performance.
Ask yourself one simple question: is this PC organized enough to preserve, or chaotic enough to reboot emotionally and digitally? If it has years of junk software, browser toolbars, startup clutter, and games you forgot installing, a cleaner approach may be healthier.
Step 10: Let the installation finish without interruption
Once the installer begins the real work, leave the computer alone. It will restart multiple times. This is normal. Do not power it off because “it seems stuck” unless it has been frozen for an extremely long time and you have no other choice.
Laptops should be plugged in during the entire process. Desktops should ideally be on a reliable power source. An interrupted upgrade can lead to corrupted files, failed rollbacks, or a very unfun troubleshooting session.
Step 11: Check drivers, updates, and activation after the upgrade
Once Windows 10 boots successfully, your job is not quite done. Open Settings and check for activation, run Windows Update, confirm your drivers are working, and test key hardware like sound, Wi-Fi, Bluetooth, printers, webcams, and external monitors.
Then launch the apps you use most. Open your browser, office software, creative apps, and any specialty programs. If something fails, visit the manufacturer’s support page for the latest Windows 10-compatible version or driver. This final step turns a successful install into a usable, stable machine.
Common Problems During a Windows 10 Upgrade
The installer says your PC is incompatible
This usually means a hardware, firmware, or driver issue is getting in the way. Update your BIOS only if necessary and only if you are comfortable doing it. More often, the fix is simpler: free space, remove incompatible software, disconnect peripherals, or update drivers first.
You run into activation errors
Activation trouble is common when licenses are unclear, hardware has changed, or the installed edition does not match the license. For example, a Windows Home key will not activate Windows Pro. Double-check the edition and your license type before assuming the universe is against you personally.
Your PC feels slower after the upgrade
This can happen right after installation because Windows is indexing files, finishing updates, syncing settings, and settling in. Give it some time. If it remains sluggish after a day or two, review startup programs, storage space, RAM usage, and driver status.
Should You Upgrade to Windows 10 in 2026?
This is the honest question behind the whole topic. For many users, Windows 11 is now the more future-proof choice. But there are still reasons to upgrade to Windows 10. Maybe your hardware does not support Windows 11. Maybe a legacy app behaves better in Windows 10. Maybe you are maintaining an older office workstation or a spare family laptop.
That said, you should go in with realistic expectations. Windows 10 is no longer in mainstream support. That means it is best treated as a practical platform for existing workflows, not a long-term investment for brand-new setups. If security, future updates, and long-term compatibility are your priorities, Windows 11 deserves a serious look.
Real-World Experience: What Upgrading to Windows 10 Actually Feels Like
Here is the part people rarely mention in neat technical guides: a Windows 10 upgrade is usually not difficult, but it is weirdly emotional. You begin feeling organized and powerful. Then, halfway through, you find yourself staring at a progress circle for 23 minutes wondering whether you have angered the computer gods.
I have seen this process play out on all kinds of machines. On a relatively clean laptop with decent storage and updated drivers, the upgrade can feel impressively smooth. You download the tool, click through the prompts, wait through a few restarts, and suddenly the desktop appears looking fresher and more modern. It is almost suspiciously easy. You spend ten whole minutes waiting for a problem that never arrives, like someone who packed an umbrella, poncho, and inflatable raft for a drizzle.
Older machines tell a different story. They often have the digital equivalent of junk drawers: duplicate antivirus tools, printer software from three owners ago, half-removed utilities, mystery startup apps, and enough temporary files to build a small village. On those systems, upgrading to Windows 10 can still work, but preparation changes everything. The people who have the best experience are usually the ones who do the boring grown-up tasks first. They back up files. They uninstall ancient software. They check activation. They make peace with the possibility that the old scanner may never work again.
One of the most common surprises is how much better a computer can feel after the upgrade when paired with a few simple improvements. A cheap hard drive upgrade to an SSD, a little extra RAM, and a clean Windows 10 install can make an old laptop feel less like a museum exhibit and more like a genuinely useful backup machine. It will not become a gaming monster or a video-editing powerhouse, but it may return to being perfectly solid for email, web browsing, documents, and streaming.
There is also the opposite scenario: the computer technically upgrades, but emotionally, spiritually, and performance-wise, it is not thrilled about it. Maybe the fan runs nonstop. Maybe an old touchpad driver starts acting dramatic. Maybe sleep mode becomes an abstract concept. These are the moments that remind you an operating system upgrade is not just a software event. It is a relationship test between Windows and your hardware.
For families, Windows 10 upgrades often become accidental archaeology. You back up files and discover vacation photos from 2014, homework folders, forgotten resumes, a desktop full of screenshots, and exactly nine PDFs named “final.” In that sense, upgrading to Windows 10 is not just maintenance. It is a cleanup ritual. A reset button. A gentle intervention staged by technology.
My biggest practical takeaway is simple: patience matters more than cleverness. Most upgrade disasters do not happen because the user lacked technical brilliance. They happen because someone skipped the backup, ignored the warnings, upgraded on a nearly full drive, or forced a shutdown because the spinning circle hurt their feelings. Slow and careful beats fast and heroic almost every time.
So if you are planning to upgrade to Windows 10, treat it like a small project, not a casual click. Set aside time. Charge the laptop. Back up your files. Confirm your license. Read the prompts. And keep your expectations realistic. When it goes well, it feels like rescuing an old machine from retirement. When it goes badly, it becomes a very persuasive argument for backups and snacks.
Conclusion
Upgrading to Windows 10 is still possible for the right machine and the right reason. The smartest path is simple: confirm compatibility, back up everything important, use official installation tools, choose the right upgrade options, and check activation and drivers once the setup is complete. Follow these 11 steps, and the process becomes far less intimidating. Your PC may not write you a thank-you note, but it will probably complain less.