Table of Contents >> Show >> Hide
- Step 0: Pick the Tree and the Mood
- Gather Your Decorating Kit (So You Don’t Make 19 Trips)
- Fluff First, Always
- Lights: The Make-or-Break Layer
- Ribbon and Garland: The Tree’s Belt and Suspenders
- Ornaments: Build a Tree With Depth (Not Clumps)
- Fillers, Picks, and “Sparkle Insurance”
- Topper, Collar/Skirt, and the Base Situation
- Decorating Styles That Always Work
- Safety and Sanity Checklist
- Quick Troubleshooting: When Your Tree Isn’t “Tree-ing”
- of Real-Life Christmas Tree Decorating Experiences
- Conclusion
Decorating a Christmas tree is basically interior design… but with glitter, nostalgia, and a tiny bit of chaos.
One minute you’re calmly fluffing branches; the next you’re untangling lights that appear to have trained as
competitive rock climbers in the off-season. The good news: there is a reliable order of operations that
makes your tree look fuller, brighter, and intentionally styled (even if you’re working with a hand-me-down box
of ornaments from three different decades).
This guide walks you from “bare tree” to “photo-ready centerpiece,” with pro-level tricks that work whether
your style is classic red-and-green, minimalist and modern, or “my kid made it at school and it’s going front and center.”
Step 0: Pick the Tree and the Mood
Choose the right size for your space (and your patience)
Before you decorate, decide where the tree will live. Measure the ceiling height and subtract at least 6–12 inches
for a topper. If your room is tight, a pencil or slim tree gives you the sparkle without turning your walkway into an
obstacle course. If your tree sits in a corner, plan to decorate the “front” more heavily and keep the back simpler.
Real vs. faux: decorate accordingly
Faux trees are consistent (and they don’t drop needles like they’re trying to win a shedding contest). Real trees
bring unbeatable scent and cozy vibes, but they need daily watering and smart placement away from heat sources.
If you’re doing a real tree, set it up early so it can settle before you start styling.
Pick a “north star” for your design
A theme doesn’t have to be complicated. It can be as simple as:
“Warm white lights + gold ornaments + velvet ribbon,” or “Colorful ornaments + candy-cane stripes + maximum cheer.”
Your theme is what keeps the final look from feeling like a yard sale exploded on a pine tree (a vibe some of us have
accidentally perfected).
Gather Your Decorating Kit (So You Don’t Make 19 Trips)
Having everything nearby is the difference between a fun holiday moment and a slow-motion spiral. Here’s what helps:
- Lights (plus spare fuses/bulbs if using traditional strands)
- Extension cord and/or smart plug for easy on/off
- Ornament hooks (and a few paper clips in a pinch)
- Ribbon (wired ribbon is the easiest for shape and fullness)
- Garland (beaded, felt, tinsel-style, or greenery)
- Filler picks (sprays, berries, faux florals, pinecones) to hide gaps
- Step stool or small ladder
- Tree skirt or collar
- Optional: a rotating tree stand for easier decorating
Fluff First, Always
If you skip fluffing, your decorations will never look quite rightbecause the “tree foundation” is still wearing
sweatpants. Fluffing means spreading branches, opening tips, and shaping the silhouette so it looks full and balanced.
- Start near the trunk and work outwardinner branches matter for depth.
- Step back every few minutes to check shape and symmetry.
- For faux trees, bend some branches slightly upward and some downward for a natural look.
Lights: The Make-or-Break Layer
Pick a light style that matches your vibe
Warm white reads classic and cozy. Cool white feels icy and modern. Multicolor screams “party at the North Pole.”
LED lights run cooler and are energy-efficient, which is great for long winter evenings when you want your tree glowing
from dinner through movie night.
How many lights do you need?
A common rule of thumb is about 100 lights per foot of tree height for a balanced look, and more if you
love serious sparkle. If your tree is very full, or you want that “lit-from-within” effect, plan for extra strands.
Method A: The “wrap the branches” approach (maximum glow)
This gives the richest, most professional-looking result:
- Plug in the lights first (so you’re not decorating blind).
- Start at the base near the trunk.
- Wrap each major branch from trunk to tip and back toward the trunk.
- Keep some lights deep inside and some near the outer tips for dimension.
Method B: The vertical sections approach (fast and surprisingly pretty)
If you want speed and easy takedown, divide your tree into 3–6 vertical “panels.” Drape lights up and down each section
in a gentle zig-zag, tucking wires inward so bulbs are visible on the surface and slightly inside.
This method avoids the classic “spiral stripe” effect and helps fill dark gaps.
Quick light fixes
- Patchy spots: move a strand inward, not just outwarddepth matters.
- Visible wires: tuck connectors closer to the trunk and behind branches.
- Too harsh: switch to warm white or add a dimmer/smart plug if compatible.
Ribbon and Garland: The Tree’s Belt and Suspenders
Ribbon makes a tree look “styled” fast
Wired ribbon is your best friend because it holds shape like it’s auditioning for a holiday window display.
You can do ribbon two main ways:
Option 1: The tucked-and-looped method (full and fancy)
- Cut ribbon into manageable lengths (often 2–4 feet, depending on tree size).
- Starting near the top, tuck the end deep into the branches.
- Create a loose loop, then tuck again a few inches lower and deeper.
- Repeat, spacing loops around the tree so ribbon travels in and out for depth.
Option 2: The cascading method (elegant and modern)
Attach ribbon near the top and let it “waterfall” down in vertical drapes, tucking it lightly as you go.
Vary the lengths so it looks intentional, not like the ribbon slipped.
Garland: use it to guide the eye
Garland can be delicate (beaded strands) or bold (chunky felt balls). Add garland after lights and before most ornaments.
Drape it in a relaxed curvetight wrapping can look stiff. If you’re using multiple garlands, vary thickness and texture:
for example, one beaded strand plus one greenery strand.
Ornaments: Build a Tree With Depth (Not Clumps)
Start with big ornamentsyes, even if you’re nervous
Bigger ornaments create structure and drama. A practical styling trick is to mix in a portion of oversized pieces with your
standard ornaments so the tree has visual rhythm. Place larger ornaments lower and deeper into branches to anchor the look.
Use the “inside-and-outside” rule
A tree looks expensive when it has depth. Hang some ornaments closer to the trunk and some near the tips.
The inside ornaments create shadow, shine, and that layered “designer tree” feel.
Cluster for impact
Instead of spacing everything evenly like you’re graphing a math problem, group ornaments in small clusters (two or three
together) in a few spots. Clusters create focal points and help a themed Christmas tree feel curated.
Balance color and texture
If you’re using a palette (say, champagne + white + gold), include multiple finishes: matte, shiny, glitter, and glass-like.
The variety keeps the tree from looking flat, even if your colors are neutral.
Make room for sentimental ornaments
Your theme can coexist with keepsakes. A simple trick: give sentimental pieces a “gallery wall” zonefront-facing and clustered
togetherso they read as purposeful rather than random.
Fillers, Picks, and “Sparkle Insurance”
Picks (berries, frosted branches, faux flowers, metallic sprays) are what stylists use to make a tree look lush in photos.
They fill holes, add height variation, and repeat your color story.
- Place picks near gaps first, then distribute them so they don’t all sit at the same height.
- Angle some upward and some outward for movement.
- Use them sparingly if your ornaments are already busythis is seasoning, not the main course.
Topper, Collar/Skirt, and the Base Situation
Choose a topper that matches your scale
A topper should feel proportional. On tall trees, a petite star can look like it’s apologizing for existing.
If your tree is slim, a huge bow can overwhelm it. You can also do a bow “topper” with wired ribbon for a soft, dramatic finish.
Finish the bottom like you meant to
A tree skirt or collar hides the stand and makes the whole setup feel complete. If your gifts are part of the décor, match wrapping paper
to your tree palette for a pulled-together look (even if the gifts are mostly socks and chargersno judgment).
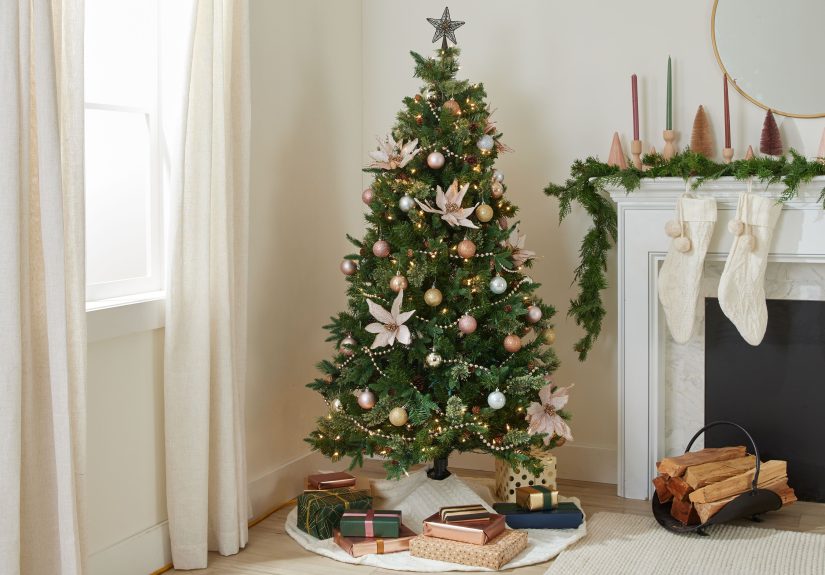
Decorating Styles That Always Work
1) Classic Cozy
Warm white lights, red-and-green ornaments, gold accents, a traditional topper, and maybe a plaid ribbon. It’s timeless, cheerful, and basically
smells like cinnamon even if nothing is baking.
2) Modern Minimal
White lights, a limited palette (white + metallics or black + gold), and fewer ornaments with strong shapes. Let the tree’s silhouette shine.
A simple collar at the base makes it feel architectural.
3) Vintage Eclectic
Mix heirloom ornaments, shiny brights, and playful textures. Keep it cohesive by repeating two or three colors across the tree.
Add a strand of beads for old-school charm.
4) Kid-Friendly (a.k.a. Unbreakable Joy)
Use shatterproof ornaments, felt garland, and a soft topper. Place delicate pieces higher up and keep favorite kid-made ornaments front and center.
The goal here is delight, not perfection.
Safety and Sanity Checklist
- For real trees: keep the stand filled with water daily. A common guideline is about one quart of water per inch of trunk diameter.
- Placement: keep the tree at least a few feet away from fireplaces, radiators, space heaters, and candles.
- Lights: replace damaged strands and avoid overloading outlets. Don’t connect too many incandescent strands together.
- Night routine: turn off tree lights before bed or leaving the house (smart plugs make this effortless).
- Pets and toddlers: anchor the tree if needed, skip edible-looking ornaments, and avoid tinsel if it becomes a chewing temptation.
Quick Troubleshooting: When Your Tree Isn’t “Tree-ing”
“It looks flat.”
Add depth: push some ornaments and lights inward. Add a few picks to create layers.
“It looks chaotic.”
Pull back and edit. Remove 10–15% of ornaments, then re-add strategically in clusters. Repeat your main colors more consistently.
“The ribbon looks sad.”
Use wired ribbon, make bigger loops, and tuck deeper. Ribbon needs structure, not wishful thinking.
“The lights disappear once ornaments go on.”
You likely need more lights, or you need to distribute them closer to the branch tips as well as inside the tree.
of Real-Life Christmas Tree Decorating Experiences
If you’ve ever decorated a Christmas tree and thought, “Why does this look amazing in other people’s houses and mildly confused in mine?”
you’re not alone. Most real-life tree decorating happens in three phases: optimism, mild chaos, and sudden perfection right before you quit out of fatigue.
One common scenario: the “memory box” tree. You open the ornament bin and it’s a time capsulehandmade macaroni ornaments, a glittery snowman from 2008,
a random flamingo (no one knows why), and a tiny photo frame ornament featuring a pet who absolutely believed the tree was installed for their personal entertainment.
The magic of this kind of tree is that it tells a story, but it can feel visually messy. The easiest upgrade is to pick two unifying elementslike warm white lights
and one ribbon colorand let the nostalgia ornaments live happily within that framework. Suddenly, the tree looks intentional without losing its personality.
Another real-world moment: ribbon regret. You buy gorgeous ribbon, stand back after five minutes, and realize you’ve created what can only be described as
“a decorative accident.” The fix is almost always the same: cut the ribbon into shorter lengths and tuck-and-loop it instead of wrapping one endless strand.
Short segments give you control. They also prevent the dreaded “one slip and the whole ribbon slides down like a sad scarf.”
Then there’s the lighting debatehorizontal versus vertical. People who grew up wrapping lights around the tree often feel loyal to the spiral method,
like it’s a family tradition written into the laws of December. But the first time you try vertical sections and realize you can remove the lights in half the time,
you may convert on the spot. Either method can look great, but the real difference-maker is placing some lights deeper near the trunk. That’s the step that makes
the tree glow instead of merely sparkle on the surface.
And yes, pets. If you’ve ever decorated the lower branches beautifully only to find your cat has re-styled the tree overnight into “minimalist sadness,”
you learn fast: put shatterproof ornaments at the bottom, skip anything that dangles like a toy, and anchor the tree if it wobbles. Some households even create a “pet decoy”
ornament zonesoft, unbreakable items low downso the tree stays safer and everyone’s blood pressure stays festive.
The best part of real-life decorating is the moment it finally clicks. You add the topper, smooth the skirt, turn on the lights, and suddenly the room feels warmer.
Even if the ornaments aren’t perfectly spaced and the ribbon has one loop that looks a little too enthusiastic, the tree becomes a glowing landmark of the season.
And that’s the point: not perfectionjust a home that feels bright, welcoming, and a little bit magical.
Conclusion
A beautiful Christmas tree isn’t about owning the fanciest ornamentsit’s about building layers in the right order: fluff, lights, ribbon/garland, ornaments, fillers,
then a strong finish with a topper and a tidy base. Start with a simple theme, add depth by decorating inside and out, and don’t be afraid to edit as you go.
When in doubt, step back, squint a little, and remember: the tree is supposed to bring joy, not a final exam.