Table of Contents >> Show >> Hide
- Quick Recipe Snapshot
- Ingredients
- Tools You’ll Want (So This Feels Easy)
- Step-by-Step: Mini Cherry Pies in a Muffin Tin
- Cherry Choices (And How They Change the Filling)
- Flavor Boosts That Make These Taste Bakery-Level
- Easy Variations (Because Mini Pies Love Costume Changes)
- Troubleshooting: Fix the Most Common Mini Pie Problems
- Make-Ahead, Storage, and Freezing
- Serving Ideas (A.K.A. How to Make People Think You’re a Dessert Genius)
- Experience Notes: The 500-Word “What You Learn After Making These” Section
- Conclusion
Big pie energy… in a snack-size package. Mini cherry pies are the kind of dessert that makes people say,
“I’ll just have one,” and then mysteriously appear later holding a second one like it was always part of the plan.
They’re flaky, jammy, portable, and basically built for parties, bake sales, lunchboxes, or a “just because it’s Tuesday”
moment.
This recipe walks you through a classic muffin-tin version with a thick, glossy cherry filling (no sad soup puddles),
plus shortcuts if you’re in a hurry and variations if you’re feeling fancy. You’ll also get troubleshooting tips, make-ahead
options, and a longer “real-life” section at the end with experience-based lessons that save you from the most common mini-pie drama.
Quick Recipe Snapshot
- Makes: 12 mini pies (standard 12-cup muffin tin)
- Time: ~25 minutes prep, ~20 minutes bake, plus cooling
- Skill level: Beginner-friendly (especially with store-bought crust)
- Best for: Parties, holidays, picnics, “I want pie but not commitment” situations
Ingredients
For the crust (choose one)
- Shortcut: 2 refrigerated pie crusts (enough for bottoms + tops if you cut efficiently)
- Homemade: 1 batch double-crust pie dough (chilled)
For the cherry filling (choose one)
-
Option A (Homemade, thick & glossy):
- 3 cups pitted cherries (fresh or frozen)
- 2/3 cup granulated sugar (adjust to taste; see notes)
- 2 1/2 tablespoons cornstarch
- 1 tablespoon lemon juice
- 1 teaspoon vanilla extract
- 1/4 to 1/2 teaspoon almond extract (optional but excellent)
- Pinch of salt
- 2 tablespoons water (only if needed to get things started)
- Option B (Fastest): 1 can (about 21 oz) cherry pie filling
For finishing
- 1 egg + 1 tablespoon water (egg wash)
- 1–2 tablespoons coarse or sanding sugar (optional, but gives sparkle and crunch)
- Butter or nonstick spray for the muffin tin
Tools You’ll Want (So This Feels Easy)
- Standard 12-cup muffin tin
- Round cutter (about 3 1/2 to 4 inches) for the bottoms (a wide glass works)
- Smaller cutter (about 2 1/2 to 3 inches) for tops, or a knife/pizza cutter for strips
- Small saucepan (if making homemade filling)
- Pastry brush (or a clean spoon + patience)
- Cooling rack
Step-by-Step: Mini Cherry Pies in a Muffin Tin
Step 1: Prep your oven and pan
- Preheat oven to 400°F.
- Grease your muffin tin well (mini pies love to cling to metal like it’s their job).
-
Optional crisp-bottom upgrade: Place a metal baking sheet in the oven while it preheats.
Later, set the muffin tin on that hot sheet for better bottom browning.
Step 2: Make the filling (skip if using canned)
The goal is thick filling that sets up like jam. Fresh cherries release liquid as they bake, and mini pies have less room
for “extra juice” before it becomes a leak situationso this quick stovetop method gives you control.
-
In a saucepan, combine cherries, sugar, lemon juice, vanilla, almond extract (if using), and salt.
Add 2 tablespoons water only if the pan seems dry (usually more helpful with fresh cherries). - Cook over medium heat 5–8 minutes, stirring often, until cherries soften and release juices.
-
Sprinkle in cornstarch and stir constantly for 1–2 minutes as the filling thickens.
(If you prefer, whisk cornstarch with 1 tablespoon cold water first, then stir inless clumping.) - Remove from heat when glossy and thick. Cool 10–15 minutes so it’s not lava-hot during assembly.
Step 3: Cut and shape the crust
-
Roll chilled dough on a lightly floured surface to about 1/8-inch thick.
If using refrigerated crust, let it sit at room temp for a few minutes so it doesn’t crack. -
Cut 12 larger circles (3 1/2–4 inches). Gently press each into a muffin cup, forming a little pie “bowl.”
Don’t stretch the dough too hard or it may shrink. -
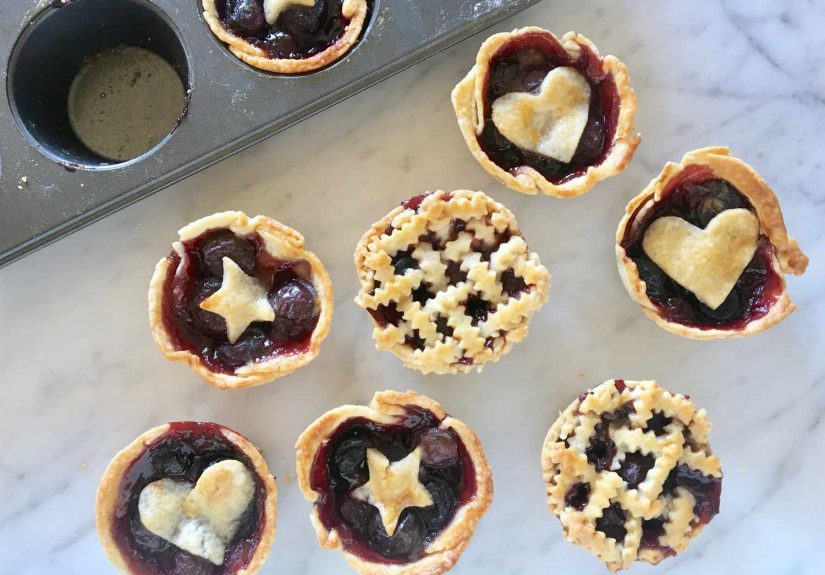
Cut 12 smaller circles (2 1/2–3 inches) for toppers, or cut strips for a mini lattice, or cut cute shapes
(hearts, stars, leaves) to let steam vent.
Step 4: Fill (not to the brimmini pies are dramatic)
-
Spoon filling into each crust-lined cup. Aim for about 2 to 3 tablespoons per pie.
Keep it below the top edge of the crust to reduce boil-over. -
Optional anti-soggy trick: Sprinkle a tiny pinch of finely crushed graham crackers or cookie crumbs in the bottom crust
before adding filling. It helps absorb excess juice without tasting “crumbly.”
Step 5: Top, seal, and shine
- Add your top crust (circle, lattice, or shapes). If using a full circle, cut a small slit or two for venting.
- Press edges lightly to adhere. You can crimp with a fork, or simply press with your fingertips.
- Whisk egg and water. Brush over tops. Sprinkle coarse sugar if using.
Step 6: Bake
-
Bake at 400°F for 18–22 minutes, or until the crust is golden and the filling looks bubbly.
(If your oven runs hot, check at 16–18 minutes.) -
Cool in the pan for 10–15 minutes. Then gently twist a butter knife around the edge and lift out.
Cool on a rack until warm (or completely cool for the cleanest texture).
Cherry Choices (And How They Change the Filling)
Fresh cherries
Fresh cherries taste bright and “real,” but they vary in sweetness and juiciness. If they’re super sweet, reduce sugar a bit.
If they’re tart (or you’re mixing tart and sweet), keep the sugar as written and lean into the lemon + almond combo.
Frozen cherries
Frozen cherries are the MVP when it’s not cherry season. Thaw them and drain off excess liquid, or you’ll need a touch more
thickener. The flavor is still great, and the convenience is honestly suspicious (in a good way).
Canned cherry pie filling
It’s fast, it’s consistent, and it’s practically impossible to mess up. If you want a more “homemade” vibe, stir in a squeeze
of lemon juice and a tiny splash of vanilla or almond extract before filling your crusts.
Flavor Boosts That Make These Taste Bakery-Level
- Lemon juice: Brightens cherry flavor so it doesn’t taste flat or overly sweet.
- Almond extract: Classic with cherries. Start small; it’s powerful.
- Pinch of salt: The secret handshake of good desserts.
- Coarse sugar on top: Adds sparkle and crunchlike edible confetti.
Easy Variations (Because Mini Pies Love Costume Changes)
1) Streusel-top mini cherry pies
Swap the top crust for a quick crumble: mix 1/3 cup flour + 1/3 cup brown sugar + 3 tablespoons melted butter until crumbly.
Sprinkle over filling and bake until golden.
2) Cherry-almond crumble
Add 2 tablespoons sliced almonds to the streusel. It tastes like a cozy bakery display case.
3) Lattice tops
Cut thin strips and weave a simple lattice. It looks impressive and also vents well (beauty + brains).
4) Chocolate-cherry minis
Add a few mini chocolate chips to each crust before filling. You’ll get pockets of chocolate that feel like a bonus level.
Troubleshooting: Fix the Most Common Mini Pie Problems
“My filling leaked everywhere.”
- Don’t overfillleave headroom for bubbling.
- Make sure your filling is thick before baking (especially for fresh/frozen fruit).
- Use venting on top crusts so steam has an exit plan.
“My bottoms are pale.”
- Place the muffin tin on a preheated baking sheet.
- Use metal pans (they brown better than silicone).
- Don’t crowd the oven with multiple trays blocking heat flow.
“My crust is tough.”
- Keep dough cold and handle it gently.
- Don’t overwork scrapsre-rolled dough gets firmer each time.
- Let store-bought crust warm slightly so it doesn’t crack and force you to press hard.
“They’re stuck in the pan.”
- Grease the tin thoroughly.
- Cool 10–15 minutes before removing (too hot = fragile; too cold = sticky caramel glue).
- Run a thin knife around the edge and lift carefully.
Make-Ahead, Storage, and Freezing
Make-ahead options
- Filling: Make up to 3 days ahead and refrigerate.
- Dough: Refrigerate 2–3 days or freeze longer; thaw overnight in the fridge.
- Assembled (unbaked): Freeze on a tray until firm, then store in a freezer bag. Bake from frozen, adding a few extra minutes.
Storing baked mini pies
- Room temp: Best within a day if your kitchen isn’t hot.
- Fridge: Keep 3–4 days, then rewarm briefly for best texture.
- Reheat: 300°F for 8–10 minutes or until warmed through (microwave works, but crust softens).
Serving Ideas (A.K.A. How to Make People Think You’re a Dessert Genius)
- Serve warm with vanilla ice cream (classic for a reason).
- Add whipped cream and a few fresh cherries for a “bistro dessert” look.
- Dust with powdered sugar for instant elegance.
- Pair with coffee, black tea, or hot chocolate for peak cozy.
Experience Notes: The 500-Word “What You Learn After Making These” Section
Mini cherry pies are one of those recipes that teach you a lotmostly because they’re tiny, adorable, and not afraid to reveal
every little mistake. A full-size pie can sometimes hide issues under a heroic top crust. Mini pies? They are honest. Brutally honest.
And that’s actually great, because once you learn the rhythm, they become nearly foolproof.
The first thing most bakers discover is that overfilling is the fastest route to chaos. It’s tempting to pile in extra cherries
because you want that generous, bakery-style look. But in the oven, fruit expands, sugar liquefies, and the filling bubbles up like it’s
auditioning for a science fair volcano. Keeping the filling just below the crust edge is the difference between “cute handheld pies”
and “my muffin tin now lives in the sink.”
The next lesson: thickness matters more than you think. With mini pies, there’s less crust surface area to absorb excess juice.
If the filling is even slightly loose going in, it usually turns into a sticky seep that glues pies to the pan and softens the bottom crust.
That’s why quick-stovetop thickening is such a game changer. You’re not cooking the filling into candy; you’re simply making sure it behaves.
Think of it as teaching the cherries some manners before they go to the party.
You’ll also notice that tiny crusts brown fast. Egg wash is helpful, but it’s also a speed boost for browning. If your oven tends to run hot,
check early, and don’t be shy about rotating the pan halfway through. And if you ever end up with pale bottoms, the preheated baking sheet trick
feels almost unfairlike you unlocked a cheat code for crispness.
Another surprise: simple flavors read louder in small desserts. A whisper of almond extract can make the cherries taste deeper and more “cherry.”
But go too heavy and your pies will taste like a candle store. Start with 1/4 teaspoon and see how your crowd reacts. The same goes for lemon:
it doesn’t make the filling lemony; it makes the cherry flavor pop so the sweetness feels intentional instead of one-note.
Finally, mini pies are secretly a hosting superpower. They cool faster than full pies, they portion themselves (no awkward “who wants the tiny slice?”),
and they travel well. People also love the feeling of getting their own pielike a personalized dessert gift. Set out a tray of mini cherry pies
with a bowl of whipped cream and a small scoop of ice cream, and suddenly you’re the kind of person who “does dessert spreads.”
You don’t have to tell anyone it was made in a muffin tin. That can be your delicious little secret.
Conclusion
Mini cherry pies deliver everything you love about classic cherry pieflaky crust, bright fruit flavor, and that cozy “just baked” vibewithout
the slicing, serving, or full-pie commitment. Make them from scratch when you want the full experience, or use the shortcut version when you want
dessert on the table fast. Either way, they’re a guaranteed crowd-pleaser… and an equally guaranteed “I’ll just take one more” situation.