Table of Contents >> Show >> Hide
- What sports bars get right (and how you can beat them)
- The Wing Blueprint: the 10-minute prep that changes everything
- The “Better-Than-Bar” Dry Brine (crispy skin insurance)
- Method A: Ultra-Crispy Oven Wings (the “why would I order wings again?” method)
- Method B: Air Fryer Wings (fast, loud, and dangerously snackable)
- Sauce Like a Sports Bar (without turning wings into wet napkins)
- The Double-Sauce Move (how bars get big flavor without instant sog)
- Common Wing Mistakes (and the quick fixes)
- Party Math: How many wings per person?
- Conclusion: Your house can be the best wing spot in town
- Experience Section : The “Wing Night” Reality, Minus the Regret
Sports bar wings are good. Crispy skin, juicy meat, sauce that somehow tastes better when eaten over a basket liner with a team logo on it. But here’s the secret: bars win on equipment (big fryers, blazing heat, constant batches), not on wizardry.
At home, you can win on technique: better seasoning, better crisp, better sauce timing, and wings that hit the table at peak crunchwithout the “my shirt smells like fryer oil” aftertaste. Let’s build wings so good your friends will accuse you of “having a wing guy.”
What sports bars get right (and how you can beat them)
- They dry the surface. Crispiness is a moisture problem first, a heat problem second.
- They render fat. Wings have lots of skin and fat; rendering is how you get that shattery bite.
- They manage airflow. Hot air (or hot oil) needs access to every nook of the wing.
- They sauce at the right moment. Sauce too early = soggy regret.
So your mission is simple: dry + render + airflow + smart saucing. Do those four things, and “better than the bar” stops being trash talk and becomes dinner.
The Wing Blueprint: the 10-minute prep that changes everything
1) Buy wings like you mean it
Look for wings that are similar in size so they cook evenly. If you’re feeding a crowd, buying “party wings” (already separated into drumettes and flats) saves time. If you buy whole wings, separate them at the joints and save tips for stockfuture-you will feel extremely accomplished.
2) Dry them aggressively (politely, but firmly)
Pat wings dry with paper towels. Moisture on the skin turns into steam, and steam is the sworn enemy of crisp. If you only do one thing from this article, do this.
3) Use a rack (airflow is a cheat code)
Set a wire rack inside a rimmed sheet pan. Wings crisp better when hot air can circulate underneath instead of the skin sweating against the pan like it’s stuck to a vinyl booth seat.
The “Better-Than-Bar” Dry Brine (crispy skin insurance)
This step is why home wings can taste cleaner and crunchier than bar wings. You’re going to season the wings, then let them rest uncovered in the fridge so the skin dries out and the seasoning penetrates.
Dry Brine Mix (for about 2 pounds of wings)
- 2 teaspoons kosher salt
- 2 teaspoons baking powder (NOT baking soda)
- 1 teaspoon garlic powder
- 1 teaspoon smoked paprika (optional, but delicious)
- 1/2 teaspoon black pepper
How to do it: Toss wings with the mix until evenly coated. Arrange on your rack in a single layer. Refrigerate at least 4 hours, ideally overnight, uncovered.
Why it works: Salt seasons deeper and helps the skin dry. Baking powder changes the surface chemistry (hello, browning and blistering) and supports crispness without needing a deep fryer.
Method A: Ultra-Crispy Oven Wings (the “why would I order wings again?” method)
This approach is built for maximum crisp with minimal chaos. It’s also the safest “big batch” method for a teen kitchen, because there’s no pot of bubbling oil trying to audition for a disaster movie.
Step-by-step
- Preheat the oven to 250°F. (Yes, low at first. Trust the process.)
- Bake low and slow for 30 minutes to render fat and gently dry the skin.
- Crank the heat to 450°F.
- Bake 40–50 minutes more until deeply golden and crisp. Flip once halfway if your oven has hot spots.
- Check doneness: Wings must reach 165°F in the thickest part. (Many people prefer wings a little higher for the best bitejust don’t go lower than safe.)
How to get “sports bar crunch” at home
- Leave space. Crowded wings steam each other. Give them breathing room.
- Don’t skip the rack. Direct pan contact can soften the underside.
- Finish with a quick blast (optional). If you want extra blistery skin, hit them with 2–3 minutes of broilwatch closely.
Method B: Air Fryer Wings (fast, loud, and dangerously snackable)
Air fryers are basically tiny convection furnaces. Great for crisp wings fastespecially if you’re not cooking for a whole stadium section.
Step-by-step
- Preheat to 400°F for 3–5 minutes (if your model calls for it).
- Pat wings dry (againyes, this matters every time).
- Cook in a single layer at 400°F for 20–25 minutes, shaking or flipping halfway.
- Check 165°F internal temp.
- Batch cook if needed; overcrowding kills crisp.
Air fryer pro tip: If your air fryer basket has a nonstick coating, avoid aerosol cooking sprays that can leave residue and wear the surface. A light brush of oil (or a refillable mister) is usually kinder.
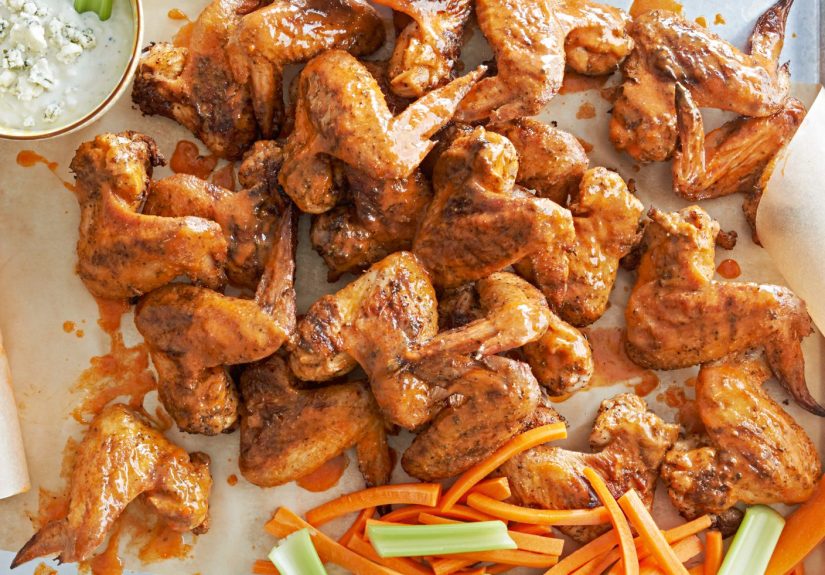
Sauce Like a Sports Bar (without turning wings into wet napkins)
Here’s the rule: crisp first, sauce second. Want maximum crunch? Serve sauce on the side. Want classic “tossed wings” energy? Toss quickly, serve immediately, and don’t drown them like you’re putting out a fire.
Classic Buffalo (bright, buttery, addictive)
- 1/2 cup hot sauce (Frank’s-style)
- 4 tablespoons unsalted butter
- 1 teaspoon white vinegar (optional, adds pop)
- Garlic powder or a pinch of cayenne (optional)
Melt butter, whisk in hot sauce, keep warm. Toss wings in a big bowl (bigger than you think), then serve immediately with celery and blue cheese or ranch.
Honey Garlic (sticky, glossy, crowd-pleaser)
- 1/3 cup honey
- 2 tablespoons soy sauce
- 2–3 cloves garlic (minced) or 1 teaspoon garlic paste
- 1 tablespoon rice vinegar or lemon juice
- Optional: chili flakes for heat
Simmer 2–3 minutes until slightly thick. Toss wings lightly. If you want them extra crisp, put sauced wings back in the oven/air fryer for 2 minutes to “set” the glaze.
Garlic Parmesan (the “dry-ish” sauce that keeps crunch)
- 3 tablespoons melted butter
- 1–2 teaspoons garlic powder (or roasted garlic paste)
- 1/3 cup finely grated Parmesan
- 1 tablespoon chopped parsley
- Black pepper to taste
Toss wings with butter/garlic first, then sprinkle Parmesan and parsley. This one stays crisp because it’s not a wet sauce avalanche.
Lemon Pepper (sports bar classic, best as a dry finish)
- 2 teaspoons lemon pepper seasoning
- 1/2 teaspoon salt (optionaltaste your blend first)
- 2 tablespoons melted butter (optional for “wet lemon pepper” style)
For maximum crunch: dry toss right after baking. For “wet” style: toss with a little butter, then dust with seasoning.
The Double-Sauce Move (how bars get big flavor without instant sog)
If you love saucy wings but hate limp skin, do this:
- Light toss (just enough sauce to coat).
- Return to heat for 2 minutes (oven or air fryer) to set the sauce.
- Second toss with a smaller splash of warm sauce right before serving.
This gets you bold flavor with a fighting chance at crunch.
Common Wing Mistakes (and the quick fixes)
Mistake: “My wings are pale and rubbery.”
- Fix: Dry brine longer, use a rack, and don’t overcrowd. Make sure the final heat is high enough to brown.
Mistake: “They’re crispy… for like 45 seconds.”
- Fix: Sauce less, or sauce later. Consider serving sauce on the side for dipping.
Mistake: “They taste weird and metallic.”
- Fix: Don’t overdo baking powder and make sure it’s evenly distributed (no thick patches). Also: confirm you didn’t accidentally use baking soda.
Mistake: “Some wings are done, some aren’t.”
- Fix: Sort by size, rotate the pan, and check temperature with a thermometer.
Party Math: How many wings per person?
For a main meal, plan 6–10 wings per person depending on appetites and sides. For a snack table, 4–6 wings per person is usually safe. If your friend group is the type to treat wings like a competitive sport, round up. Always round up.
Conclusion: Your house can be the best wing spot in town
To beat a sports bar, you don’t need a fryeryou need a plan. Dry brine for flavor and crispness, use a rack for airflow, cook in two stages to render fat and blister the skin, and sauce like a professional: fast, warm, and at the end. Do it once, and “Should we order wings?” becomes “Are you making your wings?”
Experience Section : The “Wing Night” Reality, Minus the Regret
There’s a very specific moment on wing night when you realize you’re either about to be a hero… or you’re about to serve a tray of chicken-flavored sadness. It usually happens right after you open the oven and see the wings looking a little too… normal. Not golden. Not crackly. Just kind of there, like they’re waiting for instructions. That’s when most people panic and start doing random things: turning the oven up to “volcano,” squirting mystery sprays, flipping wings every 90 seconds like they’re day-trading crispness.
But the best wing nights are weirdly calmbecause you already handled the hard part earlier. The dry brine is the quiet MVP. When you pull that rack of wings from the fridge after an overnight rest, the skin feels drier and slightly tacky, like it’s ready to crisp instead of steam. It’s not glamorous prep. Nobody takes a selfie with “raw poultry, uncovered, chilling.” Still: that’s the difference between “pretty good” and “why does this taste like a restaurant?”
Then there’s the two-stage bake, which feels backwards until you watch it work. The low temp stage is like wing therapy: it helps the fat slowly render without scorching the skin. When you crank the heat later, the wings don’t have to fight through a layer of trapped moisture and fatthey’re already halfway to crisp. The first time you do it right, you’ll hear it: that faint sizzle and pop as the skin tightens and browns. That sound is basically the national anthem of Better Wing Decisions.
The funniest “experience” lesson is how much bowls matter. Use a bowl that’s too small and you’ll either (a) slosh sauce onto the counter like you’re painting your kitchen “Buffalo Orange,” or (b) break half the crispy skin trying to stir. A big bowl lets you toss gentlymore like folding laundry than mixing concrete. And if you warm the bowl for a minute (or use a bowl that isn’t ice-cold), your sauce clings better instead of seizing up into buttery streaks.
Also: sauce timing is a personality test. Some people love fully tossed wings and accept that crunch fades fast. Others want maximum crisp and keep sauce on the side like it’s a protected resource. If you’re serving friends with different “wing identities,” do both: toss half lightly in Buffalo, leave half dry-rubbed (lemon pepper or garlic parm), and put a couple sauces out for dipping. Suddenly your kitchen looks like a wing place with optionswithout the sticky menus.
Finally, the most relatable wing-night win is the moment you set down the first batch and someone grabs one “just to taste.” That person is not tasting. They are scouting. If the wing is truly great, they will immediately pretend they’re doing you a favor by “helping you test,” and then they will keep helping until you move the tray out of reach. That’s why the best wing cooks always bake a few “chef wings.” Not because they’re selfishbecause they’re realistic.
Do this a couple times and you’ll develop your own house style: maybe extra-crispy with sauce on the side, maybe double-sauced with a quick set in the oven, maybe honey garlic with a little heat. Either way, you won’t be chasing sports bar wings anymore. You’ll be the place people compare them to.