Table of Contents >> Show >> Hide
- What Are Chocolate Cups (and Why Are They Always a Good Idea)?
- Ingredients and Tools
- Choosing the Right Chocolate
- Chocolate Cups Recipe (Base Method)
- Optional: How to Temper Chocolate (Simple Seeding Overview)
- 3 Delicious Fillings for Your Chocolate Cups
- Flavor Variations (So You Don’t Get Bored on Cup #9)
- Troubleshooting: When Chocolate Has Opinions
- Storage and Make-Ahead Tips
- Serving Ideas That Make People Think You’re Fancy
- FAQ: Chocolate Cups Recipe Questions
- Kitchen Stories & Chocolate Cup Adventures (Extra “Experience” Notes)
- Conclusion
Chocolate cups are the dessert world’s greatest magic trick: you hand someone a fancy, edible container and they immediately assume you went to culinary school.
(You didn’t. You just melted chocolate and acted confident.) Whether you’re filling them with peanut butter, salted caramel, mousse, berries, or “whatever was in the pantry at 11:42 p.m.,”
homemade chocolate cups turn simple ingredients into a show-off dessertwithout turning your kitchen into a crime scene.
This guide walks you through a foolproof Chocolate Cups Recipe using either muffin liners or silicone molds, plus optional tempering for that glossy snap.
You’ll also get three crowd-pleasing fillings, troubleshooting tips, storage advice, and fun variations so you can make chocolate dessert cups that look bakery-level and taste even better.
What Are Chocolate Cups (and Why Are They Always a Good Idea)?
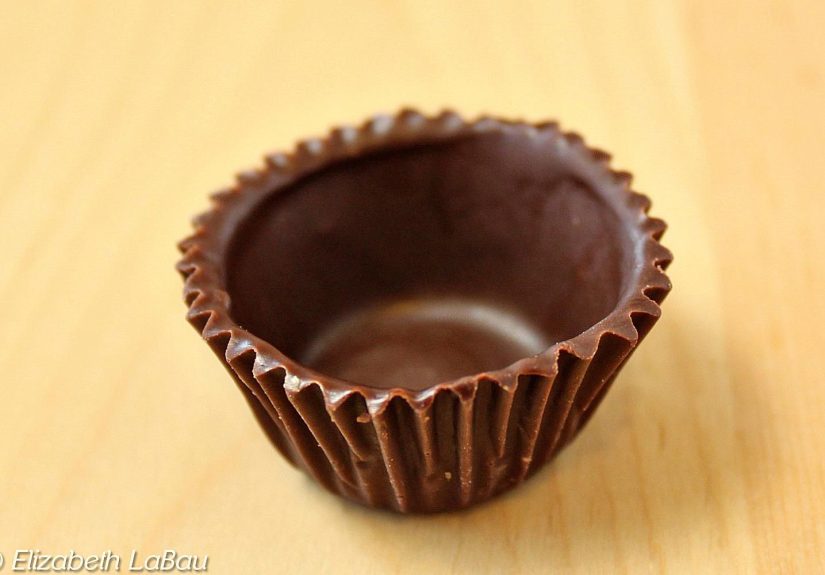
Chocolate cups are thin shells of chocolate shaped like mini cups. Think of them as edible ramekins: they hold fillings, toppings, and dreams.
They’re perfect for parties because they’re portion-friendly, no cutting required, and they make even a “quick dessert” look intentional.
Best ways to use chocolate cups
- Classic candy-style cups: peanut butter, caramel, almond butter, or ganache fillings
- Dessert cups: chocolate mousse, whipped cream, pudding, or ice cream
- Fruit-forward bites: berries + cream, orange zest mousse, banana slices + nut butter
- Crunchy layers: crushed pretzels, toasted nuts, cookie crumbs, crispy rice
Ingredients and Tools
Ingredients (base chocolate cups)
- 10–12 oz chocolate (dark, milk, or semi-sweet) chopped or good-quality chips
- Optional (for smoother dipping/painting): 1–2 tsp neutral oil or coconut oil (use sparingly)
- Optional flavor boost: pinch of flaky sea salt, espresso powder, or orange zest (add to fillings, not the melted chocolate unless using oil-based flavoring)
Tools you’ll want
- Mini muffin tin (or standard muffin tin for larger cups)
- Paper liners or silicone molds/liners
- Microwave-safe bowl (or a double boiler setup)
- Spoon and/or small pastry brush
- Small offset spatula (helpful, not required)
- Optional but excellent: instant-read thermometer (for tempering)
Choosing the Right Chocolate
For the best homemade chocolate cups, pick chocolate based on your goal:
easy and forgiving, or shiny and snappy.
Option A: Regular chocolate (easy + delicious)
Chocolate chips or chopped bars work great for most home bakers. Chips are convenient, but they can be thicker when melted because they’re designed to hold shape.
Chopped bars often melt smoother because they contain more cocoa butteraka the stuff that makes chocolate flow like it’s wearing silk pajamas.
Option B: Candy melts (ultra-easy + stable)
Candy melts (candy coating) set easily, don’t require tempering, and are great for beginners or colorful party cups.
The tradeoff: the flavor can be less “real chocolate,” depending on the brand.
Option C: Tempered chocolate (glossy snap + pro finish)
Tempering aligns cocoa butter crystals so the chocolate sets shiny, firm, and stable at room temperature.
If you want that “store-bought candy bar” snap, tempering is your upgrade.
If you want happiness by bedtime, skip it and chill the cupsboth paths lead to chocolate.
Chocolate Cups Recipe (Base Method)
This is the core method for chocolate dessert cups using paper liners in a mini muffin tin.
You’ll create a thin shell by coating the bottom and sides, then set it, then (optionally) add a second coat for strength.
Step 1: Prep the pan
- Place mini muffin liners in a mini muffin tin.
- Optional: Trim liners to about half height for classic candy-style cups (this makes them easier to unmold and prettier on a platter).
- Keep a small plate or sheet pan ready in the fridge/freezer to set the cups quickly.
Step 2: Melt the chocolate (microwave method)
- Add chopped chocolate to a dry, microwave-safe bowl.
- Microwave at medium power in short bursts (15–30 seconds), stirring well each time.
- Stop when it’s mostly melted; stir until fully smooth. Chocolate holds heat and finishes melting as you stir.
Important: Keep water away from chocolate. Even a tiny drip can seize it into a grainy, stubborn blob that refuses to cooperatelike a toddler who missed nap time.
Step 3: Form the chocolate shells
- Spoon about 1–2 teaspoons of melted chocolate into each liner.
- Use the back of a spoon or a small pastry brush to draw the chocolate up the sides until coated evenly.
- Chill 10–15 minutes (refrigerator) or 5–8 minutes (freezer) until firm.
Step 4: Add a second coat (highly recommended)
- Repeat: add a little more melted chocolate and coat any thin spots, especially near the rim.
- Chill again until fully set.
Two thin coats are better than one thick coat: you get cleaner edges and fewer cracks when you peel away the liner.
Step 5: Unmold and fill
- Once fully firm, peel away the paper liner gently.
- Fill as desired (see the fillings below) and top with a drizzle, salt, or crunchy bits.
Optional: How to Temper Chocolate (Simple Seeding Overview)
If you want a shiny finish that sets well at room temperature, tempering is the move.
Here’s the home-friendly overview using the seeding method:
- Melt chocolate until warm and fully fluid (for dark chocolate, often around the 110–115°F range).
- Add unmelted “seed” chocolate a bit at a time, stirring to cool it down and encourage stable crystals.
- Gently rewarm to a workable temperature (commonly high 80s°F for dark chocolate) and keep it there while you work.
- Test: dip a spoon; it should set shiny within a few minutes at cool room temperature.
Tempering is easiest in a cool, dry kitchen. Humidity and heat are the villains. Chocolate is dramatic like that.
3 Delicious Fillings for Your Chocolate Cups
You can fill your cups with anything spoonable, sliceable, or secretly-hoarded-in-the-fridge.
Here are three reliable favorites that cover the full “sweet tooth spectrum.”
1) Classic Peanut Butter Filling (candy-style)
This tastes like a homemade peanut butter cup: creamy, sweet-salty, and impossible to eat just one.
- 1 cup creamy peanut butter
- 1/2 cup powdered sugar
- Pinch of salt
- Optional: 1–2 tbsp softened butter for extra smoothness
- Optional: crushed graham crackers or pretzels for texture
- Mix until thick and scoopable.
- Spoon into set chocolate shells (don’t overfill; leave room for a top layer if you want).
- Top with a thin layer of melted chocolate and chill to set.
2) Salted Date-Caramel (chewy, “healthy-ish” energy)
Date caramel brings a deep, toffee-like sweetness. It’s sticky in the best waylike caramel that went to yoga once and now talks about “balance.”
- 1 cup pitted Medjool dates
- 2–4 tbsp warm water (as needed)
- 1–2 tbsp nut butter (optional, for richness)
- 1/2 tsp vanilla
- 1/2 tsp flaky sea salt (or to taste)
- Blend dates with warm water until smooth and thick.
- Stir in vanilla and salt. Add nut butter if you want a creamier caramel vibe.
- Spoon into chocolate cups and top with chopped nuts or a pinch of flaky salt.
3) Quick Chocolate Mousse-Style Filling (whipped ganache shortcut)
Want something soft and fancy without raw eggs or complicated steps? Whipped ganache gives you a mousse-like texture with big chocolate flavor.
- 4 oz chopped chocolate
- 1/2 cup heavy cream (divided)
- Pinch of salt
- Optional: espresso powder or orange zest
- Heat 1/4 cup cream until just steaming (not boiling). Pour over chocolate.
- Let sit 1 minute, then stir until smooth. Add salt and optional flavoring.
- Chill until thick but not hard (about 20–40 minutes, depending on your fridge).
- Whip the remaining 1/4 cup cream to soft peaks, then fold into the cooled ganache.
- Spoon into chocolate cups and chill briefly to set.
Flavor Variations (So You Don’t Get Bored on Cup #9)
Easy mix-ins and toppings
- Crunch: toasted almonds, pistachios, crushed pretzels, crispy rice, cookie crumbs
- Bright notes: orange zest, freeze-dried raspberry dust, mint (use sparingly)
- Grown-up energy: a splash of coffee flavor in ganache, or a boozy note in fillings
- Salt makes it pop: flaky sea salt on top right after filling
Diet-friendly swaps (without sad dessert energy)
- Dairy-free: use dairy-free chocolate and coconut cream for ganache/whipping
- Vegan: dark chocolate + date caramel + nut butter is a winning combo
- Gluten-free: the cups are naturally GF; just choose GF crunchy add-ins
- Lower sugar: use high-cocoa dark chocolate and a date-based filling
Troubleshooting: When Chocolate Has Opinions
My melted chocolate is thick and gloopy
- Chocolate chips can melt thicker than chopped bars. Stir longer before adding anything.
- Heat gently: overheating makes chocolate seize or turn pasty.
- If you must thin it, add a tiny amount of neutral oil (start with 1/2 teaspoon). Don’t overdo ittoo much can make shells softer.
My chocolate looks dull or streaky
- If you didn’t temper, some dullness is normal after chilling. It’ll still taste great.
- Streaks can also come from temperature swings (fridge in, fridge out, repeat).
- For a glossy finish at room temp, temper your chocolate.
My shells crack when I unmold
- Make a second coat (thin spots crack easily).
- Let cups sit 2–3 minutes at room temp before peeling liners (cold chocolate can be brittle).
- Peel slowly and support the cup with your fingers as you remove the liner.
My chocolate seized (grainy, stiff, hopeless-looking)
- Usually caused by moisture. Keep bowls and utensils bone-dry.
- If it’s only slightly seized, try stirring in a small amount of warm cream and turn it into ganache (different mission, still delicious).
Storage and Make-Ahead Tips
- Unfilled shells: store in a cool, dry place in an airtight container. If your kitchen is warm, refrigerate.
- Filled cups: refrigerate if the filling contains dairy or cream. Serve slightly cool for best texture.
- Freezer-friendly: unfilled cups freeze well. Keep them protected from odors (chocolate is basically a sponge with standards).
Serving Ideas That Make People Think You’re Fancy
- Set up a “fill-your-own” bar: peanut butter, mousse, berries, nuts, sprinkles, flaky salt.
- Top each cup differently and call it a “tasting flight.” Suddenly it’s an event.
- Serve with coffee or espressochocolate loves caffeine like best friends love gossip.
FAQ: Chocolate Cups Recipe Questions
Do I need molds to make chocolate cups?
Nope. Muffin liners + a spoon (or brush) work beautifully. Silicone molds are convenient and give cleaner edges, but they’re optional.
Can I use chocolate chips?
Yes. Chips are convenient and widely used for homemade chocolate cups. Just melt gently and stir often to avoid scorching or thick texture.
How thick should the chocolate shell be?
Aim for a thin but sturdy shellabout the thickness of a couple of stacked credit cards. Two coats usually nails it.
How do I keep the edges neat?
Don’t overfill the liner with chocolate, and rotate the cup while you draw chocolate up the sides. A second coat fixes “patchy walls.”
Kitchen Stories & Chocolate Cup Adventures (Extra “Experience” Notes)
Let’s talk about the real-life experience of making chocolate cupsthe part recipe cards don’t always confess. The first thing most people learn is that
chocolate has a personality. Sometimes it’s cooperative and glossy. Sometimes it’s moody, thick, and acting like it got a text from an ex.
The good news? You don’t need to “win” every round. You just need to end up with cups you can fill and eat.
A common first-time move is blasting chocolate in the microwave like you’re trying to launch it into orbit. We’ve all seen it: the top looks fine,
the bottom is secretly scorched, and the whole bowl smells like regret. The better experience is slower and calmermedium power, short bursts, stir often.
Stirring feels pointless until it isn’t, and then suddenly everything turns smooth and shiny. That moment? That’s the chocolate equivalent of your computer finally restarting.
Next comes “wall building,” aka drawing chocolate up the sides of each liner. This is where you discover your personal relationship with patience.
The first cup looks great. The second cup looks like it survived a minor landslide. By cup five you’ve developed a technique,
and by cup twelve you’re basically an edible architecture firm. The trick is accepting that the first coat can look imperfect.
Your second coat is the glow-up montage.
Another classic experience: you peel the liner too soon. The cup cracks, and you stare at it like it betrayed you. Here’s the reframe:
cracked cups are still cups. Fill them with mousse, add whipped cream on top, and call it “rustic.” People love rustic.
If anyone questions it, just say, “It’s intentionally artisanal,” and then walk away with confidence.
When it comes to fillings, the most surprising lesson is that “simple” wins. Peanut butter filling takes two minutes and tastes like childhood happiness.
Date caramel feels fancy but is basically a blender situation. Whipped ganache looks like it belongs in a restaurant, yet it’s just chocolate + cream + a little chill time.
The experience of letting guests choose fillings is also wildly entertaining: someone will build a masterpiece with berries and pistachios, and someone else will dump
crushed pretzels into everything like they’re paid by Big Pretzel. Both people are correct.
Finally, you’ll learn that chocolate cups are a confidence dessert. The more you make them, the less you fuss, and the better they get.
You’ll start keeping a stash of unmolded shells “just in case,” which is adult code for “snack infrastructure.”
And if you ever have a batch that’s not picture-perfect? Congratulationsyou’ve created the chef’s bonus pile.
The kitchen always deserves a tip.
Conclusion
A great Chocolate Cups Recipe is equal parts technique and playful experimenting. Start with simple shells (liners or molds),
melt chocolate gently, build strength with two coats, and choose a filling that matches your moodpeanut butter for nostalgia, date caramel for chewy richness,
or whipped ganache for “I totally meant to be fancy.” Once you’ve made them once, you’ll realize chocolate cups aren’t hardthey just like a little attention,
like a cat wearing a tuxedo.