Table of Contents >> Show >> Hide
- Why These Bars Work (A Quick, Delicious Breakdown)
- Quick Recipe Snapshot
- Ingredients
- Equipment You’ll Want
- Step-by-Step Instructions
- Pro Tips for Next-Level Bars
- Easy Variations (Because You Deserve Options)
- Make-Ahead, Storage, and Freezing
- How to Serve (Without Losing Half the Pan to “Taste Testing”)
- Troubleshooting FAQ
- Conclusion: The No-Campfire S’more You’ll Make on Repeat
- Real-Life Baking Experiences: What Making These Bars Feels Like (And What You’ll Learn)
S’mores are great until you remember you don’t actually own a campfire, a cabin, or a life where you casually roast marshmallows while looking mysterious in a flannel shirt.
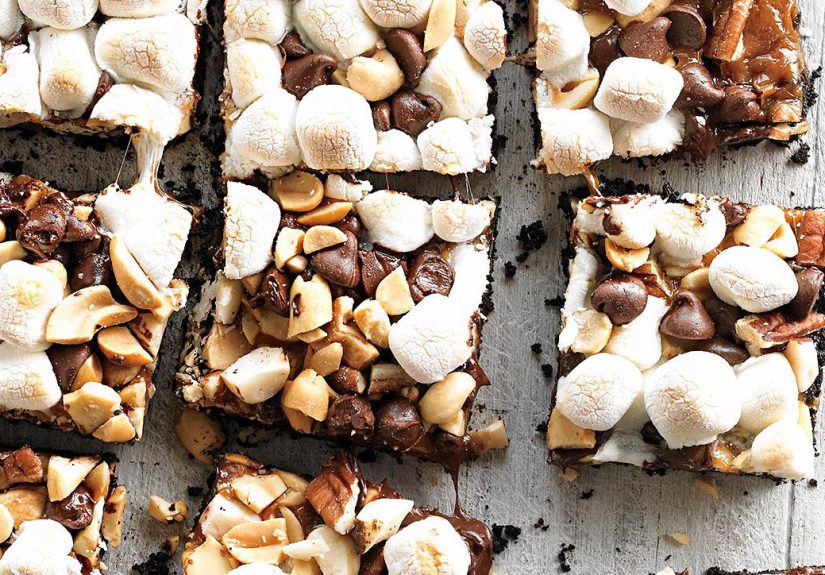
Enter: Chocolaty Caramel-Nut S’more Barsall the gooey, crunchy, melty joy of classic s’mores, baked neatly in a pan like the responsible dessert they are.
These bars stack up in layers: a chocolatey cookie crust, a creamy caramel blanket, and a chaotic-but-beautiful pile of mini marshmallows, nuts, and chocolate.
The oven does the “toasting” work, and you do the important part: cutting “just one more” bar until half the pan mysteriously disappears.
Why These Bars Work (A Quick, Delicious Breakdown)
A good bar dessert is basically edible architecture. Here’s why this one holds together (most of the time) and tastes like a backyard bonfire decided to go glam:
- Chocolate cookie crust adds deep cocoa flavor and keeps the base crisp instead of soggy.
- Caramel + cream melts into a smooth layer that acts like dessert gluebinding toppings and adding chew.
- Mini marshmallows toast faster than big ones and spread more evenly, giving you golden peaks instead of one giant marshmallow lava dome.
- Nuts bring crunch and a little saltiness, so the bars don’t taste like straight-up sugar fireworks (still fireworks… just with better balance).
- Chocolate pieces melt into pockets, so every bite gets a little “surprise, it’s chocolate again.”
Quick Recipe Snapshot
- Prep time: about 30 minutes
- Bake time: about 27 minutes (two short bakes)
- Total time: under 1 hour, plus cooling
- Yield: about 24 bars (depending on how “generous” your cuts are)
- Difficulty: Easy (the oven does the heavy lifting)
Ingredients
The classic version uses just a handful of pantry-friendly ingredients. Use what you love and swap what you don’tthis recipe is flexible like that friend who says,
“Sure, I’ll help you move,” and actually shows up.
For the Chocolate Cookie Crust
- 2 cups finely crushed chocolate wafer cookies (about 36 wafers)
- 1/2 cup butter, melted (1 stick)
For the Caramel Layer
- 1 (11-ounce) package caramel baking bits
- 1/4 cup heavy whipping cream
Caramel backup plan: If you can’t find caramel baking bits, use 14 ounces of vanilla caramels (unwrapped) and increase the cream to
1/3 cup.
For the S’more Topping
- 2 cups mini marshmallows (tiny marshmallows)
- 1 1/2 cups coarsely chopped nuts (mixed nuts, cashews, or cocktail peanuts all work)
- 1 cup semisweet chocolate chips (or chopped semisweet chocolate)
Optional (But Highly Encouraged)
- 1/2 teaspoon flaky sea salt for the top (sweet + salty = magic)
- 1/2 teaspoon vanilla extract stirred into the caramel (for extra “bakery” vibes)
- 1/2 cup crushed graham crackers sprinkled on top for classic campfire flavor
Equipment You’ll Want
- 13×9-inch baking pan
- Foil or parchment paper (for an easy “lift-out” sling)
- Mixing bowls
- Small heavy saucepan (or microwave-safe bowl)
- Spatula and measuring cups
- Wire rack (cooling mattersmore than you think)
Step-by-Step Instructions
-
Prep the pan and oven.
Preheat your oven to 325°F. Line a 13×9-inch pan with foil or parchment so it overhangs the sides (hello, easy removal).
Lightly grease the lining. -
Make the crust.
In a large bowl, mix the cookie crumbs with melted butter until the crumbs look evenly moistenedlike wet sand that clearly has dessert goals.
Press firmly and evenly into the bottom of the pan. -
First bake (set the base).
Bake the crust for about 15 minutes. Let it cool in the pan for 5 minutes.
This short rest helps the crust firm up so the caramel doesn’t sink into it like it’s quicksand. -
Melt the caramel.
In a small heavy saucepan over low heat, warm the caramel bits with the cream, stirring until smooth.
(Microwave method: heat in short bursts, stirring often, until glossy and fully melted.) -
Pour and spread.
Pour the caramel evenly over the warm crust. Use a spatula to nudge it into the cornerscaramel likes to play hard to get. -
Add the topping.
In a medium bowl, toss together marshmallows, chopped nuts, and chocolate chips.
Sprinkle the mixture evenly over the caramel and press down lightly so the topping sticks. -
Second bake (toast and set).
Bake for about 12 minutes, or until the marshmallows are just turning golden.
If you want a more dramatic toasted top, you can briefly broil at the endbut watch like a hawk, because marshmallows go from “golden” to “campfire tragedy” fast. -
Cool completely, then cut.
Cool the bars in the pan on a wire rack until fully set. Lift out using the foil/parchment “handles,” then slice into bars.
For cleaner cuts, chill the slab for 20–30 minutes and use a warm knife wiped between slices.
Pro Tips for Next-Level Bars
1) Don’t rush the cooling
Warm caramel is basically delicious syrup. If you cut too soon, you’ll get “abstract dessert,” which is funjust not portable.
Cooling gives the caramel time to set so the bars slice instead of slump.
2) Caramel texture: smooth, not stiff
If your caramel seizes or looks thick and stubborn, it usually needs a little more gentle heat (and patience).
Low and slow winshigh heat can scorch caramel and make it grainy.
3) Better marshmallow browning
Marshmallows toast faster when their surface is slightly drier. If you’re chasing that golden top, letting marshmallows sit out briefly can help them brown more evenly.
(Not mandatorybut it’s a neat trick if you’re the kind of person who enjoys tiny baking experiments.)
4) Choose your nuts like a dessert strategist
- Cashews: buttery, mild, and extra snackable.
- Peanuts: classic salty crunch (very “candy bar energy”).
- Pecans or walnuts: deeper, toastier flavorgreat if you like “grown-up” dessert notes.
Easy Variations (Because You Deserve Options)
Salted Caramel S’more Bars
Add 1/2 teaspoon flaky sea salt over the top right after baking. Sweet + salty turns these into “I can’t stop eating this” bars.
Peanut Butter Candy-Bar Version
Sprinkle 1/2 cup peanut butter chips with the chocolate chips, or drizzle melted peanut butter over the cooled bars.
It’s basically a s’more that got accepted into a fancy candy bar club.
Classic Campfire Vibes
Swap the chocolate wafer crust for a graham cracker crust (same method: crumbs + butter, press, bake).
Add a handful of crushed graham crackers on top for extra crunch.
Nut-Free (School-Friendly-ish)
Replace nuts with crushed pretzels or toasted sunflower seeds. You still get crunchwithout triggering nut allergies.
Always check labels for shared facilities if allergies are a concern.
Make-Ahead, Storage, and Freezing
These bars are party-friendly because you can make them ahead and stash them like dessert treasure.
Store them in an airtight container with layers separated by wax paper or parchment.
- Refrigerator: Up to 3 days for best texture and freshness.
- Freezer: Wrap well and freeze up to 3 months for best quality.
Food-safety pros generally recommend keeping your refrigerator at 40°F or below and your freezer at 0°F to help slow spoilage and keep foods safe.
Frozen foods can remain safe at 0°F, though quality can decline over timeso airtight wrapping matters.
How to Serve (Without Losing Half the Pan to “Taste Testing”)
- Potlucks: Cut into smaller squarespeople love “two-bite” desserts.
- Cookie boxes: Freeze first, then pack (less smearing, more dignity).
- Weeknight treat: Microwave a bar for 8–10 seconds for a gooier bite.
- Ice cream night: Warm bar + vanilla ice cream = instant “restaurant dessert” energy.
Troubleshooting FAQ
Why did my caramel layer turn hard?
Caramel can stiffen if it’s overheated or if the ratio of cream to caramel is a little off. Keep the heat low and stir constantly.
If using wrapped caramels, be sure you used enough cream so the mixture stays pourable.
Why did my marshmallows melt into one layer?
Marshmallows meltthis is their job. If you want more visible “pillows,” avoid overbaking and consider using a quick broil at the end for color instead of extra bake time.
Why are my bars messy to cut?
Warm caramel and melted chocolate need time to set. Cool completely, then chill before slicing.
Use a warm knife and wipe between cuts for cleaner edges.
Can I double this recipe?
Yesjust use a larger rimmed baking sheet and keep layers even. Watch baking time closely; thicker layers may need a few extra minutes.
Conclusion: The No-Campfire S’more You’ll Make on Repeat
Chocolaty Caramel-Nut S’more Bars are the perfect “anytime s’more”: no flames, no smoke in your hair, and no awkward moment where someone sets a marshmallow on fire and calls it “toasted.”
You get a crisp chocolate crust, a smooth caramel layer, gooey marshmallows, crunchy nuts, and chocolate in every bitelike summer nostalgia, but with better logistics.
Real-Life Baking Experiences: What Making These Bars Feels Like (And What You’ll Learn)
Making Chocolaty Caramel-Nut S’more Bars is one of those kitchen projects that starts out calmjust crumbs and butter, nothing dramaticand ends with you standing in front of the oven door
like it’s a fireplace in a holiday movie. First, there’s the crust phase: you press chocolate cookie crumbs into the pan and realize there are two kinds of people in the worldthose who
gently pat the crust down and those who treat the spatula like a construction tool. The second group usually gets the sturdier crust, but the first group gets to feel emotionally balanced,
so it evens out.
Then comes caramel, which instantly makes the kitchen smell like a candy shop. It’s also the moment where many bakers discover that caramel has a personality: it can be silky and cooperative,
or it can cling to the saucepan like it pays rent. Stirring patiently over low heat is basically a mindfulness exerciseexcept the reward is caramel, not inner peace. Once it’s poured over the
crust, you’ll probably catch yourself smoothing it “perfectly,” even though you’re about to dump toppings on it like a delicious avalanche. That’s normal.
The topping step is where the fun chaos lives. Mini marshmallows bounce everywhere, nuts try to roll off the cutting board, and chocolate chips behave like they’re auditioning for a role in
a snack mix commercial. Mixing everything together before sprinkling helps distribute the chocolate and nuts so you don’t end up with one corner that’s all marshmallows and another corner that’s
basically trail mix. And yes, you will eat “just a few” chocolate chips while you work. This is not a mistake. This is kitchen tax.
As the bars bake, the marshmallows puff and begin to toast. This is the part that feels like s’mores magic: the top turns golden in spots, the chocolate softens, and the nuts look glossy and
slightly roasted. It’s also the point where timing matters. If you walk away “for one second,” you may return to marshmallows that have gone from golden to deeply enthusiastic. Many bakers learn
quickly that broiling is powerful and should be supervised like a toddler holding markers.
Cooling is the hardest “experience” of all because the bars look ready long before they actually behave. Cutting too early produces sticky, delicious rubblestill edible, just not photogenic.
Cutting after chilling produces neat squares that travel well to parties, school events, and family gatherings. People tend to react to these bars like you did something complicated, even though
you mostly layered ingredients and let the oven do the work. That’s one of the best parts: the payoff feels big. You bring a pan of these to a get-together, and suddenly you’re “the dessert
person,” which is an excellent reputation to have.
Over time, most bakers develop their own signature twistextra salt, a particular nut, a darker chocolate, a graham cracker sprinkle, or a slightly thicker caramel layer for maximum chew.
And because the bars freeze well, they become the kind of treat you can keep on standby for “surprise company,” “bad day,” or “I just want something sweet that tastes like nostalgia.”
The overall experience is simple but satisfying: a low-stress bake that delivers high-impact flavor, a little kitchen drama (in the best way), and a dessert that disappears faster than you can
say, “Waitdid anyone save me one?”