Table of Contents >> Show >> Hide
- What Is a Boa Pouf (a.k.a. Donut Chair)?
- Why Make Your Own DIY Boa Pouf Dupe?
- Supplies You’ll Need for a DIY Donut Chair
- Step-by-Step: How to Make a Cute Donut Chair
- Styling Ideas for Your DIY Donut Chair
- Common Mistakes and How to Avoid Them
- 500-Word Real-Life Experiences: Lessons from DIY Donut Chair Projects
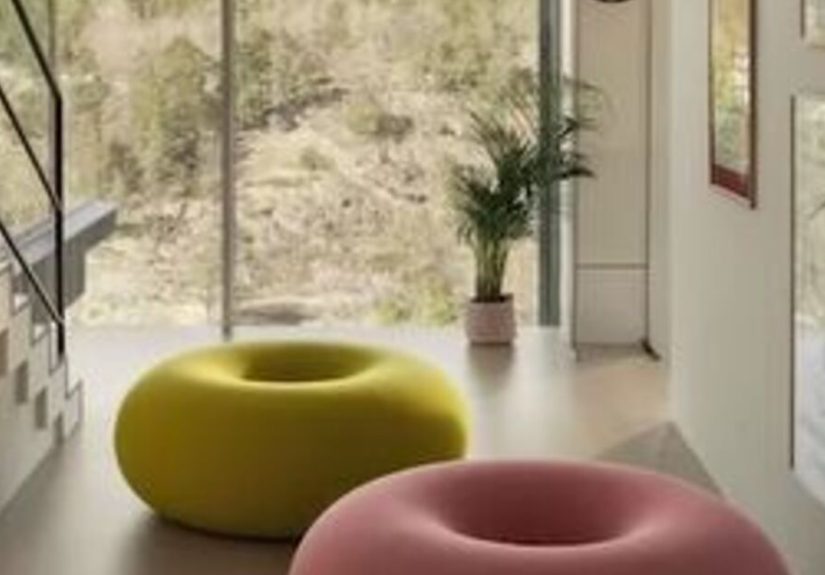
The original Boa Pouf is one of those dreamy designer pieces that show up in pastel-perfect living rooms on Instagram and then you check the price tag and quietly close the tab. This donut-shaped beauty by designer Sabine Marcelis is sculptural, plush, and, frankly, way out of most people’s budgets. Why cry over an expensive donut when you can make your own?
Enter the DIY boa pouf dupe: a fluffy, donut-style chair made from an old tire, some foam, and gloriously ridiculous boas or faux fur. It’s budget-friendly, surprisingly comfy, and a fantastic way to upcycle something that would otherwise sit in a landfill. If you can use a glue gun, a staple gun, or a basic sewing machine, you can absolutely pull this off.
What Is a Boa Pouf (a.k.a. Donut Chair)?
The designer Boa Pouf is basically a giant, thick donut you can sit or lounge on. It’s round, low to the ground, and covered in a seamless, cushy fabric that makes it look like a piece of modern art and a pillow had a very stylish baby. The look is bold, graphic, and sculptural, but the function is simple: extra seating that doubles as a footrest and a statement piece.
Your DIY version keeps the same vibe soft, squishy, circular but swaps out high-tech knit textiles and pricey foam cores for things you can find at the hardware store, thrift shop, or your garage. Think: old tire, scrap plywood, high-density foam, batting, and a mountain of fluffy boas or faux fur. The result is a donut chair that looks luxe but costs more like a weekend craft project.
Why Make Your Own DIY Boa Pouf Dupe?
- Save serious money: Designer donut poufs can run into hundreds or even thousands of dollars. Your DIY version can be done for a fraction of that.
- Upcycle an old tire: Instead of sending it to the dump, you’re turning it into cozy seating. Eco points unlocked.
- Customize everything: Choose your own colors, textures, and size. Go neutral and chic or cotton-candy pink and unapologetically extra.
- Surprisingly sturdy: Tires are built to hold up cars. They can handle your snack-filled movie nights just fine.
Supplies You’ll Need for a DIY Donut Chair
Before you unleash your inner furniture designer, gather your materials. You can tweak this list depending on what you already have at home.
Base Structure
- 1 clean car tire (standard passenger car size works well)
- 2 round plywood circles (slightly larger than the inner opening of the tire)
- Wood screws and drill
- Optional: short furniture feet or casters if you want extra height
Cushioning & Shape
- High-density foam (to wrap around the tire and cover the top)
- Quilt batting or an old duvet/comforter
- Spray adhesive or strong fabric glue for foam
Cover & Fluff
- Sturdy base fabric (canvas, upholstery fabric, or thick cotton) for the main cover
- Faux fur boas, feather boas, or faux fur yardage cut into strips
- Heavy-duty thread if sewing; hot glue sticks if gluing boas
Tools
- Drill and screws
- Staple gun and staples
- Scissors and utility knife
- Measuring tape and marker
- Optional: sewing machine and zipper if you want a removable cover
Safety note: Make sure the tire is clean, dry, and free of wires or sharp edges. If it was used on a vehicle, scrub it with soap and water and let it fully dry. If the rubber smells strong, let it air out outside for a few days.
Step-by-Step: How to Make a Cute Donut Chair
Step 1: Prep and Seal the Tire
- Give the tire a deep clean with soap, water, and a stiff brush. Let it dry completely.
- If you’re concerned about dirt or off-gassing, you can brush on a coat of clear sealer or primer made for rubber. Let it cure according to the product instructions.
Think of this step as giving your donut a clean baking pan. You’re not going to see the tire once everything is covered, but you want a safe, stable base.
Step 2: Attach the Plywood Circles
- Place one plywood circle on top of the tire and one on the bottom, centering them over the opening.
- Use a drill to pre-drill holes through the wood and into the tire in several spots around the circle.
- Secure the wood to the tire with wood screws. Repeat on the other side.
This sandwiches the tire between two sturdy platforms and gives you something solid to sit on and staple into later. If you’re adding feet or casters, screw their mounting plates into the bottom plywood circle now.
Step 3: Wrap the Tire in Foam
- Measure the circumference and height of the tire.
- Cut strips of foam to match the height and wrap them around the tire’s outer edge, using spray adhesive or strong glue to secure.
- Cover the top of the upper plywood circle with a layer or two of foam so you don’t feel the wood through the seat.
- Optional: Add a little foam on the inner rim of the tire opening to soften the inner circle and enhance the donut look.
This is where the “donut” starts looking like something you’d actually sit on instead of something you’d rotate at the tire shop.
Step 4: Add Batting for a Soft, Rounded Shape
- Wrap the entire foam-covered tire in quilt batting or an old duvet, smoothing as you go.
- Pull the batting snug and staple it to the underside of the bottom plywood circle.
- On the top, pull batting over the edge of the foam and staple it to the underside of the top plywood circle as well, keeping the center opening visible.
Batting softens the foam edges and helps hide little bumps so your final cover looks smooth and puffy. If your donut looks a little lumpy now, don’t panic boas are forgiving and fluffy.
Step 5: Create and Attach the Base Fabric Cover
You have two options here: a stapled-on, permanent cover, or a removable, washable one with a zipper. If this is your first rodeo, the permanent version is easier.
Permanent Cover (Stapled)
- Cut a wide fabric strip long enough to wrap around the circumference of the pouf plus a couple inches of overlap.
- Wrap it around the sides of the pouf, pulling snug, and staple the edges to the top and bottom plywood circles on the underside.
- For the top, cut a fabric circle slightly larger than the foam-covered top. Lay it over the top foam, pull the edges under, and staple underneath.
- Cut a smaller circle for the inner donut opening if you want that covered as well, and staple or glue the edges inside the opening.
Removable Cover (Sewn)
If you’re comfortable sewing, you can make a slipcover with a zipper:
- Cut a long rectangle for the sides and two circles for the top and bottom.
- Sew one long edge of the side to the top circle.
- Add a zipper along part of the seam between the side piece and the bottom circle or along the side seam.
- Sew the remaining seams to form a fabric “donut sleeve” you can slip over the foam-wrapped tire.
A removable cover is great if you have kids, pets, or are prone to dramatic snack spills during movie night.
Step 6: Add the Boa (or Faux Fur) Fluff
This is the fun, slightly ridiculous part where your DIY donut finally looks like the designer inspiration.
- Starting at the inner circle, hot-glue one end of a boa or faux fur strip to the fabric.
- Slowly spiral the boa around the donut, gluing as you go. Keep the coils snug so there are no obvious gaps.
- When you reach the outer edge, secure the end of the boa underneath where it won’t be visible.
- Repeat with more boas or fur strips until the entire top and sides are lush and fluffy.
Feather boas tend to shed, so work in a well-ventilated room and have a vacuum or lint roller ready. Faux fur strips shed less and can be more durable long-term, especially in homes with pets or kids.
Step 7: Final Touches and Safety Check
- Flip the donut chair over and make sure all staples and screws are secure.
- Check that no sharp edges, wire bits, or screw tips are exposed.
- If you added feet, test stability by gently rocking the pouf while pressing down on the top.
- Sit, bounce lightly, and rotate to be sure everything feels solid.
Once it passes the “wiggle test,” your DIY Boa Pouf Dupe is officially open for lounging.
Styling Ideas for Your DIY Donut Chair
- Candy-shop palette: Use pink, lilac, or mint boas for a playful, dessert-inspired look that’s perfect for kids’ rooms or whimsical living spaces.
- Neutral and chic: Choose cream, beige, or oatmeal tones to mimic the designer poufs and blend into minimalist or Scandinavian interiors.
- Bold statement: Electric blue, emerald green, or mustard yellow makes your pouf a focal point in a neutral room.
- Textured mix: Combine smooth base fabric with long-pile faux fur for a high-contrast, tactile finish.
You can also use your donut chair as a low coffee table by placing a sturdy tray in the center. Just… maybe don’t put a full teapot on a feather boa. Nobody wins that battle.
Common Mistakes and How to Avoid Them
1. The Donut Is Too Low or Too High
Tires come in different heights, and foam adds extra inches. Before committing, stack your foam around the tire and sit on it to test the height. Add furniture feet if it feels too low, or use thinner foam if it’s too tall.
2. Visible Lumps Under the Fabric
If you can see bumps and ridges, add another layer of batting and stretch your base fabric more firmly before stapling. Boas and faux fur hide minor imperfections, but obvious lumps can show through in smoother fabrics.
3. Boas Falling Off
Use a high-temperature hot glue gun or strong fabric adhesive, and press each section firmly for a few seconds while it cools. In high-use homes, consider tacking the boas with a few hand stitches in key stress areas, especially along the edges.
4. Overwhelming Shedding
With feather boas, some shedding is normal. Shake them out outside before attaching and vacuum the pouf after you’re done. If you want minimal shedding, faux fur strips cut from yardage fabric are often a better choice.
500-Word Real-Life Experiences: Lessons from DIY Donut Chair Projects
The first thing most DIYers discover about a boa pouf dupe is that it looks way more intimidating than it actually is. On paper, “upcycling an old tire into sculptural seating” sounds like something you’d need a design degree for. In reality, the process is closer to making an oversized soft pretzel with foam and hot glue.
One common experience people share is underestimating just how many boas or how much faux fur they’ll need. When you look at the tire, it seems small. Then you start spiraling around the donut and realize this thing has a lot of surface area. Plan on buying more fluff than you think you need. It’s much easier to return an extra boa than to discover you’re one coil short at 10 p.m. when the craft stores are closed.
Another very real moment: the “this looks terrible” phase. Almost every DIY project has one, and the donut chair is no exception. When the tire is wrapped in foam and batting but not yet covered, it can look a little tragic lumpy and questionable. Don’t bail at this point. Once the base fabric goes on and the fluff is added, the whole thing transforms. Several crafters who’ve made floor poufs and ottomans report that the final 20% of the work delivers 80% of the visual payoff, and that absolutely applies here.
Durability is another area where experience helps. People who treat their donut chair like a normal ottoman feet, occasional sitting, throwing a blanket over it usually find it holds up well. Folks who let kids treat it like a launching pad… not so much. If your home is essentially a low-key trampoline park, consider reinforcing stress areas with extra staples, stitches, or even a second layer of base fabric before adding boas.
There’s also the pet factor. Cats, in particular, seem convinced that fluffy poufs exist solely for them. Some DIYers have noticed that long feather boas are irresistible to cats who like to knead and pluck, which can shorten your pouf’s lifespan. If you live with tiny house pumas, faux fur yardage stitched firmly in place is usually more resilient than loose feather boas. A removable slipcover can also be a lifesaver for cleaning up fur and the occasional hairball incident (it happens).
On the positive side, almost everyone who’s made a DIY donut pouf mentions how often it gets used. It quickly becomes the unofficial “favorite seat” in the room the place someone sits to tie shoes, the kids’ reading spot, or the pet’s throne. Because it’s low and soft, it’s especially handy in spaces where you want extra seating that doesn’t visually clutter the room, like small apartments or playrooms.
Finally, there’s the bragging-rights payoff. When guests inevitably ask, “Where did you get that?” you get to say, “Oh, that? I made it from an old tire.” The reactions range from impressed to mildly confused in the best way. For a relatively simple weekend project, that’s a solid return: you get custom furniture, eco-friendly upcycling, and a conversation starter that looks like it rolled in from a high-end design showroom without the high-end price.
If you take anything away from the collective experience of DIYers who’ve ventured into donut-chair territory, it’s this: don’t be afraid of big, bold projects. The key is breaking them into simple steps, embracing a little mess, and trusting that the fluffy reveal at the end will make it all worth it.
SEO JSON