Table of Contents >> Show >> Hide
- Before You Build: The Unsexy Stuff That Saves You Later
- Design Choices: Pick the Staircase That Matches Your Reality
- Materials & Tools: What You Actually Need (Not What You’ll Buy Anyway)
- Stair Math Without Tears: Rise, Run, and the “Comfort Rule”
- How to Build Wood Deck/Porch Stairs (Step-by-Step)
- 1) Plan the bottom landing first
- 2) Decide: pre-cut stringers or custom stringers?
- 3) Lay out a custom stringer
- 4) How many stringers do you need?
- 5) Attach stringers at the top (securely, not “optimistically”)
- 6) Support the bottom of the stairs
- 7) Install risers (optional) and treads (mandatory)
- 8) Add handrails and guards (and don’t make them wobbly)
- Composite Deck Stairs: The “Read the Instructions” Chapter
- DIY Concrete Steps: Solid, Stable, and Slightly Intimidating
- Landscape Steps & Retaining Wall Stairs: Drainage Is the Main Character
- Safety & Comfort Details That Make Your Stairs Feel “Pro”
- Common DIY Outdoor Staircase Mistakes (So You Can Skip Them)
- Cost, Time, and “How Hard Is This, Really?”
- Final Walk-Through Checklist
- Real-World Lessons & DIY “Experience Notes” (The Extra You’ll Be Glad You Read)
Building a DIY outdoor staircase is one of those projects that looks innocent on paper:
“It’s just steps.” Then you grab a tape measure, realize your yard slopes like a ski jump, and suddenly you’re
googling words like stringer and nosing while your neighbor silently judges your life choices from their patio.
The good news: outdoor stairs are absolutely doable for a careful DIYer, and the payoff is hugesafer access to
a deck, porch, or garden path, better curb appeal, and the satisfying feeling that you have conquered gravity
with lumber (or concrete, or stone, or sheer determination).
This guide walks you through planning, layout math, materials, and step-by-step construction optionswood/deck
stairs, concrete steps, and landscape block/stone stairsplus the details that separate “nice stairs” from
“stairs that try to hurt your guests.”
Before You Build: The Unsexy Stuff That Saves You Later
1) Check local codes and permits (yes, even for stairs)
Outdoor stairs often fall under residential building codes, especially if they connect to a deck or doorway.
Many areas base requirements on the IRC, but local amendments are common. A quick call (or website check) with
your building department can prevent a tearful conversation with an inspector later.
2) Measure the site like you’re being paid for it
Your entire staircase design depends on two measurements:
- Total rise: vertical height from the finished top landing (deck/porch) to the finished bottom landing (grade/pad).
- Total run: horizontal distance available for the steps to travel outward.
Pro tip: measure to the finished surfaces. If you plan a concrete pad or pavers at the bottom, include that thickness.
If you’ll add decking boards at the top landing, include those too. Stairs don’t care about your intentions.
3) Decide where the stairs “land” (and make that spot behave)
A common DIY mistake is treating the bottom of stairs like it can just sit on dirt and vibe. Dirt is not a stable
building material. It’s a mood. Your options:
- Concrete landing/pad (most durable and stable)
- Compacted gravel base with pavers (good for landscape settings)
- Footings/posts if the stairs need structural support independent of the deck
Design Choices: Pick the Staircase That Matches Your Reality
Wood deck/porch stairs (the classic)
Best for decks, porches, and entries. You’ll typically build with pressure-treated lumber for structure and
choose treads in wood or composite. If you want the most “standard” DIY path, this is it.
Concrete steps (low maintenance, high commitment)
Concrete stairs are sturdy, weather-resistant, and great for long-term durability. The tradeoff is formwork,
mixing/pouring, and the fact that concrete will happily immortalize every mistake you make.
Landscape block/stone steps (for yards that slope like a thriller plot)
If you’re navigating a hill, retaining wall steps and landscape stair systems can look fantastic and handle
grade changes gracefully. The critical ingredient here is base prep and drainagebecause water will always
find your weak spot.
Materials & Tools: What You Actually Need (Not What You’ll Buy Anyway)
Common materials for a DIY outdoor staircase
- Stringers: typically 2×12 (cut on site) or pre-cut stair stringers for short runs
- Treads: 2×6, 5/4 decking, or composite boards/stair treads
- Risers (optional): 1×8 or 2x material (closed stairs feel more “finished”)
- Fasteners: exterior-rated structural screws/bolts; corrosion-resistant hardware
- Connectors: stringer connectors/hangers as needed; post bases if using posts
- Footings: concrete, forms/tubes, gravel, rebar (depending on design)
- Handrails/guards: posts, rails, balusters or cable systems (code-dependent)
Tool shortlist
- Tape measure, level, speed square or framing square (with stair gauges)
- Circular saw + handsaw/recip saw for finishing cuts
- Drill/driver, bits, clamps
- String line, stakes, shovel (and a tamper if doing pavers/gravel)
- Safety gear (eyes, ears, dust mask; your future self will thank you)
Stair Math Without Tears: Rise, Run, and the “Comfort Rule”
Comfortable stairs are predictable stairs. The goal is consistent riser height and
adequate tread depth. A tiny variation between steps is a classic trip hazard.
Step 1: Calculate number of risers
Divide your total rise by a target riser height (many builders aim around 7 inches for outdoor stairs).
Round to a whole number, then recalculate the exact riser height:
- Number of risers = total rise ÷ target riser height (rounded)
- Actual riser height = total rise ÷ number of risers
Step 2: Choose tread depth (run)
A deeper tread feels safer outdoorsespecially when wet, icy, or when someone is carrying a tray of burgers like a hero.
Plan for a tread depth that’s comfortable and matches your material (decking boards, composite treads, or lumber).
Step 3: Total run check
Multiply tread depth by number of treads (usually number of risers minus one) to estimate how far the staircase projects.
If you don’t have enough space, consider:
- Adding a landing and turning the stairs
- Reducing tread depth (within safe limits)
- Regrading the landing area
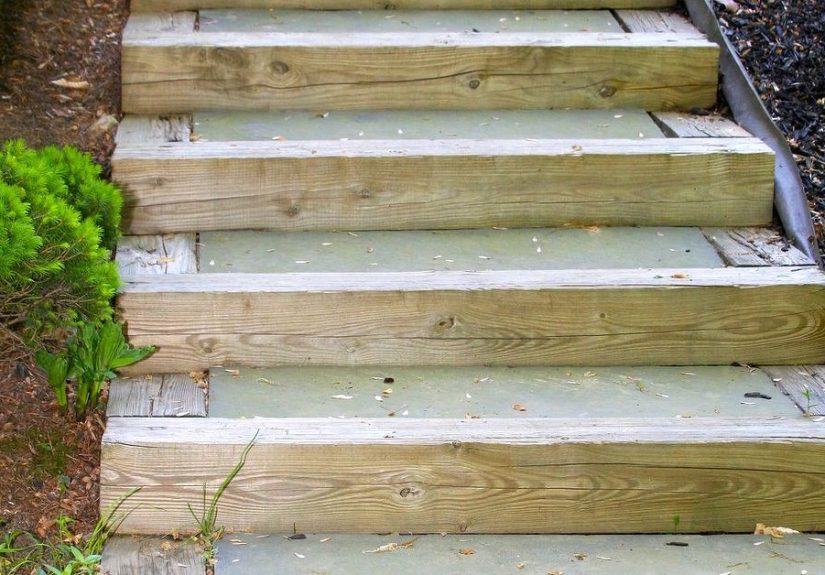
How to Build Wood Deck/Porch Stairs (Step-by-Step)
This is the most common “DIY outdoor staircase” scenario: stairs from a deck/porch down to grade.
You’ll build or buy stringers, attach them securely at the top, provide a stable bottom landing,
then install treads/risers and rails.
1) Plan the bottom landing first
If you’re pouring a pad: excavate, add compacted base (as needed), form it, and pour. If you’re doing pavers:
excavate to proper depth, add compacted base material, level bedding layer, then set pavers with edging to keep
them from wandering off like toddlers in a candy store.
2) Decide: pre-cut stringers or custom stringers?
Pre-cut stringers can be great for short staircases with standard rise/run.
Custom cut stringers are better when your measurements don’t match “standard,” or when you want
tighter tolerances and a nicer fit.
3) Lay out a custom stringer
Use a framing square with stair gauges set to your riser height and tread depth. Mark each step on a 2×12.
Don’t forget adjustments:
- Top cut so the stringer meets the deck framing correctly (often against a rim joist or header)
- Bottom cut so the tread sits at finished grade/landing height
- Tread thickness (especially if you’re aiming for exact riser heights)
Cut the stringer with a circular saw, stopping before inside corners, then finish with a handsaw to avoid overcuts.
Overcuts weaken stringers and make inspectors frown in that special, personal way.
4) How many stringers do you need?
Stringer spacing depends on tread material and load. As a practical DIY baseline, many builders place stringers
closer together for thinner decking or composites and can space wider for thicker treads. Always follow your tread
manufacturer’s guidance for stair applicationscomposite stair treads often require tighter support than wood.
5) Attach stringers at the top (securely, not “optimistically”)
The top connection is critical. Depending on your design, you might:
- Fasten stringers to a stair header or rim board with approved connectors
- Use adjustable stair-stringer connectors designed for concealed, sloped attachment
- Through-bolt or use structural fasteners where required
The goal is a connection that resists downward load and outward “kick.” If you’ve ever felt a staircase bounce,
you’ve met the consequences of underbuilt attachments.
6) Support the bottom of the stairs
Avoid burying wood in soil. Use a concrete landing/pad, post bases, or hardware that keeps wood off wet ground.
Water is patient. Rot is inevitable when wood sits in damp soil long enough.
7) Install risers (optional) and treads (mandatory)
Closed risers look finished and can reduce the “open” feel, but they also trap debris.
Open risers shed leaves and snow better (your broom will approve), but they may be restricted by code.
For wood treads, consider using two boards per step to reduce cupping/warping and to improve drainage.
For composite treads, follow spacing guidance for expansion and debris shedding.
8) Add handrails and guards (and don’t make them wobbly)
If your staircase meets the threshold for requiring a handrail or guard, build it like you expect adults to lean on it
after saying, “Wow, nice stairs.” Posts should be anchored securely to framing (not just to a thin fascia board),
and rails should be continuous and comfortable to grip.
Composite Deck Stairs: The “Read the Instructions” Chapter
Composite stairs can look sharp and reduce maintenance, but they’re less forgiving about support.
Composite treads often require:
- Tighter stringer spacing than typical wood decking
- Specific fasteners and attachment patterns
- Consistent gaps for expansion/contraction and drainage
The easiest way to avoid squeaks, sag, or that spongy “trampoline step” feeling is to follow the manufacturer’s stair
guidelines and overbuild support rather than underbuild it.
DIY Concrete Steps: Solid, Stable, and Slightly Intimidating
Concrete steps are fantastic when you want durability and a clean look. They’re also a formwork project first and a
concrete project second. If your forms are crooked, your stairs will be crookedforever.
Concrete steps overview
- Layout and excavation: dig to stable soil; plan a compacted base where needed
- Build forms: use sturdy lumber/plywood, brace well, and check square/level
- Fill low areas: use gravel or clean fill to reduce concrete volume and support forms
- Pour and finish: place concrete, consolidate, screed, float, edge, and add slip-resistant texture
- Cure properly: curing matters more than most DIYers want to admit
Outdoor concrete benefits from a broom finish or anti-slip additive on treads. If you live in freeze-thaw climates,
proper curing and sealing can reduce scaling and surface wear.
Landscape Steps & Retaining Wall Stairs: Drainage Is the Main Character
For a sloped backyard, you can create a beautiful outdoor staircase using retaining wall blocks, caps, pavers, or stone.
These systems can curve, terrace, and blend into landscaping better than a straight deck stair run.
Core principles for block/stone outdoor steps
- Excavate and compact: a well-compacted base prevents settling
- Use appropriate base material: compacted aggregate is your friend
- Plan tread materials: capstones, pavers, or poured treadskeep dimensions consistent
- Control water: drainage aggregate behind walls/risers helps prevent movement
- Secure treads: construction adhesive is commonly used for caps/treads (where recommended)
If your design includes retaining walls alongside stairs, treat it as a system: base, backfill, drainage, and compaction
all work together. The prettiest block in the world won’t fix a soggy base.
Safety & Comfort Details That Make Your Stairs Feel “Pro”
Uniform steps (your ankles will notice)
Humans are weirdly good at climbing stairs on autopilotuntil a single riser is off and someone trips.
Aim for consistent riser height and tread depth across the entire run.
Traction for wet weather
Outdoor stairs get rain, frost, pollen, and “mystery slick stuff” from trees. Consider:
- Grooved or textured treads
- Anti-slip strips or coatings on high-traffic stairs
- Good drainage gaps between boards
Lighting that prevents the “one last step” surprise
Stair lighting isn’t just aesthetics. Add step lights, post-cap lights, or a properly placed fixture so the entire run
is visible at night. Bonus: it makes your outdoor staircase look expensive.
Handrails that feel solid
If a handrail moves when you grab it, it’s not a handrailit’s a confidence test. Anchor posts to framing properly
and use exterior-rated hardware. For pressure-treated structures, choose compatible fasteners/hardware so corrosion
doesn’t become a surprise renovation.
Common DIY Outdoor Staircase Mistakes (So You Can Skip Them)
- Building to rough grade instead of finished grade (then wondering why the last step is weird)
- Inconsistent risers from forgetting tread thickness or landing height
- Too few stringers, especially under composite treads
- Weak top attachment that causes bounce or outward movement
- Wood touching soil (rot speedrun)
- Ignoring drainage on landscape stairs (settling, heaving, heartbreak)
Cost, Time, and “How Hard Is This, Really?”
Costs vary wildly based on materials and complexity. As a practical way to think about it:
- Basic wood stairs: often the most budget-friendly, especially if you already own tools
- Composite stairs: higher materials cost, often more structure/support required
- Concrete steps: materials can be reasonable, but forms and labor are substantial
- Block/stone landscape steps: cost depends on system choice and the amount of excavation/base work
Time-wise, a simple set of deck stairs can be a weekend project. Add landings, rails, lighting, or hardscape steps,
and it can become a multi-weekend saga. The trick is to plan like a pessimist and build like an optimist.
Final Walk-Through Checklist
- All risers consistent; no weird “bonus step” at the bottom
- Treads secure, level, and provide drainage
- Stair structure well supported at top and bottom
- Fasteners and connectors rated for exterior and compatible with treated wood
- Handrails/guards solid and placed appropriately
- Landing areas stable, drained, and non-muddy
- Lighting planned (even if you install it later)
Real-World Lessons & DIY “Experience Notes” (The Extra You’ll Be Glad You Read)
Let’s talk about the part nobody brags about on social media: the little moments that decide whether your
DIY outdoor staircase feels effortless… or feels like it was assembled during a power outage
by someone who learned carpentry exclusively from pirate movies.
First: stairs reveal sloppy measuring faster than almost anything else. With a deck, you can hide minor
imperfections under trim, furniture, and strategic lighting. Stairs? They are a public performance. If one riser is off,
your feet will detect it instantly. So will your guests. Your dog will judge you. A simple habit helps: write your
critical measurements down, then re-measure them on a different day (or at least after a snack). When people say
“measure twice,” they really mean “measure once, then measure again when you’re less confident.”
Second: the bottom landing is where many DIY stair projects succeed or fail. A staircase can be perfectly built,
but if it lands on soft soil or a sloppy paver base, it will shift. That shift becomes squeaks, then rocking, then
a slow-motion horror film called Why Is My Handrail Crooked Now? If you’re doing pavers, treat base preparation like
it’s the main event: excavate enough, compact in layers, keep things level. This is not the glamorous part,
but it’s the part that keeps your stairs feeling “new” five years from now.
Third: overbuild the support under the treads, especially if you’re using composite decking.
Composite looks amazing, but it can feel springy if the structure below is too sparse. The cost of one extra stringer
is usually far less than the cost of future regret. And if you’re thinking, “It’ll probably be fine,” remember:
outdoor stairs get stomped on, dragged across, and occasionally used as a stage for someone’s dramatic entrance.
They live a harder life than your living-room floor.
Fourth: water management is not optional. Outdoor stairs collect water the way toddlers collect stickers.
Add drainage gaps, slope landings appropriately, avoid trapping moisture with tight details, and keep wood off the soil.
If you live where it freezes, standing water becomes ice, ice becomes slips, and slips become the kind of phone calls
you don’t want.
Fifth: your first “final” assembly won’t be final. Expect to dry-fit pieces, check for square,
adjust, then install for real. Pros don’t get perfect on the first try because they’re magicalthey get perfect because
they assume they’ll need to tweak. Give yourself permission to do the same. Dry-fitting isn’t “wasted time.” It’s
buying future calm.
Lastly: make the stairs pleasant to use. Add lighting. Make the handrail comfortable to grip.
Choose tread surfaces that aren’t slick. These details don’t just improve safetythey make your home feel welcoming.
And nothing beats that first moment when you walk down your finished outdoor steps and think, “Yep. That’s solid.”
Gravity still wins, but now it works for you.