Table of Contents >> Show >> Hide
- What You’ll Learn
- Materials & Tools: The “Please Don’t Nail Your Thumb” Shopping List
- Design Choices That Make Your State String Art Look Custom (Not Chaotic)
- DIY State String Art: Step-by-Step Tutorial
- Stringing Patterns That Look Fancy (Even If You’re Winging It)
- Pro Tips for a Clean, Gift-Worthy Finish
- Common Mistakes & Quick Fixes (Because Everyone Has “That Nail”)
- Extra : Real-World DIY State String Art Experiences (So You Don’t Learn the Hard Way)
- Conclusion: Your State, Your Story, Your Tiny Nail Collection
There are two kinds of people in this world: those who think nails belong in a toolbox,
and those who think nails belong in a piece of wall art shaped like Ohio. If you’re here,
congratulationsyou’re in the fun camp.
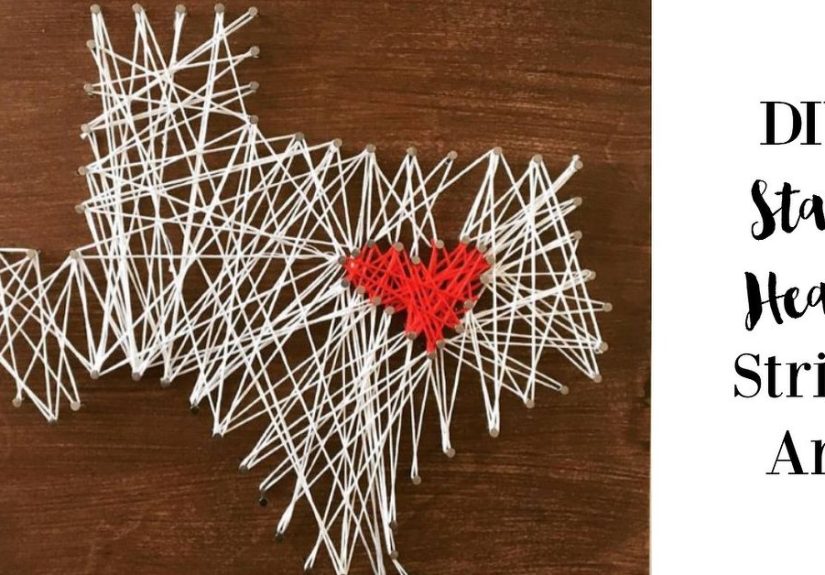
DIY state string art is a surprisingly simple project that turns a plain wooden board into a personalized
“this is where my heart lives” statement piece. It’s part craft, part geometry, part stress relief…
and part “how did I end up owning 200 tiny nails?”
Materials & Tools: The “Please Don’t Nail Your Thumb” Shopping List
Base & finish
- Wood board (8×10, 9×12, or 12×16 inches are beginner-friendly). Pine is easy to nail; plywood is stable.
- Paint or stain (optional) + a clear sealer if you want a polished, wipe-clean finish.
- Hanging hardware (sawtooth hanger, D-rings + wire, or command strips for lighter boards).
Nails & string
- Small nails or brads (typically 5/8″ to 1″). The “tiny but mighty” kind that won’t overpower your outline.
- Embroidery floss, cotton string, or thin craft cord. Floss is easiest: smooth, colorful, and forgiving.
- Optional accent string (metallic thread, baker’s twine, or a contrasting color for highlights).
Tools you probably already have
- Hammer (a small one gives more control).
- Masking or painter’s tape to hold your template in place.
- Scissors for cutting floss cleanly.
- Pliers (helpful for straightening “oops” nails or holding tiny nails while you start them).
- Glue (a glue stick for templates, and a tiny dab of craft glue or hot glue to lock knots).
- Optional: awl or small drill bit for pilot holes (highly recommended if your wood splits easily).
Design Choices That Make Your State String Art Look Custom (Not Chaotic)
Pick your state outline
The outline is your foundation. Choose a clean silhouette with enough space for nails.
Tiny, detailed coastlines can look amazingbut they can also turn into a nail maze if your board is small.
If your state has lots of wiggles (looking at you, Michigan and Louisiana), consider scaling up.
Choose your “story” element
The magic of state string art is personalization. You can keep it minimalist or add a focal point that tells a story:
- Classic heart where you live, grew up, or fell in love with your favorite pizza place.
- Star, dot, or mini-outline for your hometown.
- City-to-city line (e.g., “where I’m from” to “where I am now”).
- Initials + date for weddings, anniversaries, graduations, or military moves.
Pick a style
- Outline only: clean, modern, quick.
- Outline + fill: dense, bold, “gallery wall centerpiece.”
- Heart-to-border spokes: the classic lookeasy and instantly recognizable.
- Geometric weave: crisp lines that look complicated (but aren’t).
DIY State String Art: Step-by-Step Tutorial
Step 1: Prep your board
Sand any rough edges (splinters are not a design feature). If painting or staining, do it now and let it dry fully.
Pro tip: a matte finish hides tiny scuffs better than glossy.
Step 2: Print and size your state template
Print a state outline that fits your board with at least an inch of margin around it.
If your template is too large, resize before printing. If it’s too small, your nails will be crowded and your stringing will feel like threading a needle while riding a roller coaster.
Step 3: Attach the template securely
Tape the paper template to the board so it doesn’t shift. Use tape on multiple sides, not just two sad little corners.
If you’re adding a heart or marker, draw it on the template now.
Step 4: Plan nail spacing
Spacing is the difference between “polished” and “porcupine.” A good beginner range is roughly 1/4″ to 1/2″ apart,
depending on board size and detail. Tight corners and curves can be slightly closer; long straight edges can be slightly wider.
Step 5: Hammer nails along the outline
Hammer nails around the state outline, keeping the depth consistent (you want enough nail head exposed to wrap string easily).
If your wood is prone to splitting, pre-poke tiny pilot holes.
Add nails around your heart or marker shape too, if you’re using one. Consistency matters more than perfectionstring forgives a lot,
unlike that one friend who remembers you still owe them $7 from 2021.
Step 6: Remove the paper template
Carefully tear away the template. Tweezers help remove little paper bits caught under nail heads.
What you should have now: a clean nail silhouette of your state.
Step 7: Anchor your string
Tie a tight knot around a nail (most people start at an outer nail). Double-knot it, trim the tail,
and add a tiny dab of glue if you want extra security.
Step 8: Start stringing (keep tension steady)
Wrap the string around nail heads as you move from point to point. Keep a steady, gentle tensiontight enough to look crisp,
not so tight you bend nails or snap thread. Think “firm handshake,” not “wrestling match.”
Step 9: Finish and seal
When it looks full enough, tie off with a double knot and add a small dab of glue. If desired, seal the board (avoid soaking the string).
Attach hanging hardware and admire your work like it belongs in a boutiquebecause it does.
Stringing Patterns That Look Fancy (Even If You’re Winging It)
1) The clean outline wrap
This is the easiest: go nail-to-nail around the perimeter, wrapping each nail once or twice.
It creates a crisp border and is perfect for modern decor.
2) The classic “heart-to-border spokes”
Anchor your string at the heart (or marker), then travel out to an outer nail, wrap once,
return to the heart, wrap once, then move to the next outer nail. Repeat around the state.
The result looks intentional, symmetrical, and emotionally responsible.
3) The geometric “across and one over” weave
Want a pattern that looks like math class finally paid off? Pick a starting nail, go to the nail roughly across the shape,
then shift “one nail over” each time you cross. Keep repeating until the center fills with crisscross lines.
This works beautifully for states with broader interiors (like Ohio, Tennessee, or Colorado).
4) The “random web” fill
This is controlled chaos: bounce across the interior at different angles. The trick is to avoid clustering too much in one spot.
If a section looks thin, deliberately target nails around that area for a few passes.
5) Layered color (ombre or two-tone)
Do a base layer with one color, then switch to a lighter or brighter shade for a second layerespecially around the heart or
along the border. It adds depth without changing your method.
Pro Tips for a Clean, Gift-Worthy Finish
Keep nail height consistent
Uneven nail height makes wrapping harder and can create lumpy lines. If a nail sits too high, tap it down gently.
If it’s too low, use pliers to wiggle it up slightly (carefullyno one wants “string art surgery”).
Prevent wood splitting
- Use softer woods (pine) or a thicker board if you’re new.
- Pre-poke pilot holes for tight curves or edges.
- Don’t hammer nails right on the board edgeleave a little breathing room.
Keep tension steady
Most messy string art isn’t “bad design,” it’s inconsistent tension. Pull the string snug, wrap cleanly, then move on.
If you notice slack, backtrack a few wraps and tighten as you go.
Use the right number of wraps
One wrap can slip on smooth nails; two wraps usually stay put. For your anchor and tie-off nails, use two to three wraps plus a knot.
Make tricky states easier
- States with islands (Hawaii): choose one island silhouette or create a clustered mini-archipelago.
- States with lots of coastline detail: scale up your template or simplify the outline slightly.
- States with skinny sections: reduce nail density there and focus fill patterns in wider areas.
Common Mistakes & Quick Fixes (Because Everyone Has “That Nail”)
“My nails are crooked.”
Totally normal. Use pliers to straighten gently. Once string is on, small imperfections become invisible.
String art is basically the craft version of “good lighting.”
“My thread keeps fraying or snapping.”
Switch to embroidery floss, reduce tension, and avoid dragging thread across rough wood.
If your nails have burrs, swap them outyour string deserves better.
“The outline looks jagged.”
Add a second outline pass: go around the perimeter again, wrapping each nail once. That extra layer smooths corners fast.
“The center looks empty.”
Fill strategically. Pick nails on opposite sides and crisscross through the blank area until it looks balanced.
The goal isn’t “maximum string.” The goal is “pleasantly full.”
“The back is a mess.”
You have two options: (1) trim and glue ends as you go, or (2) embrace the fact that the wall will never judge you.
If gifting, consider backing the piece with felt or thin cardboard.
Extra : Real-World DIY State String Art Experiences (So You Don’t Learn the Hard Way)
The first time I made state string art, I assumed it would be “a quick little craft.” That was adorable. I also assumed
I could eyeball nail spacing like some kind of nail-spacing wizard. Spoiler: I could not. The outline still looked fine
(string is very forgiving), but I learned fast that the setup is where your final piece is decided. Now I treat
the template step like it’s the blueprint for a tiny house: tape it down like you mean it, mark corners carefully,
and don’t rush the curves.
Next lesson: wood choice matters more than people admit. A thin board can warp, and a super-hard board can make nails bend
like they’re auditioning for a circus act. Pine became my go-to because it’s easy to work with, and if a nail goes in slightly
crooked, you can fix it without a full emotional breakdown. I also learned to keep a small pair of pliers nearby at all times,
because at some point you will meet That Nailthe one that refuses to cooperateuntil you politely escort it out.
Then there’s thread tension. It’s tempting to pull string tight like you’re trying to tow a car, but that’s how you end up bending nails
and snapping floss at the worst possible moment (usually after you’ve made it look perfect). The sweet spot is steady and snug.
I like to pause every few minutes and look at the piece from a few feet away. Up close, you’ll obsess over tiny details.
From normal viewing distance, you’ll see what actually needs adjustingusually a thin area that just needs a few more passes.
Personalization is where the project becomes a keeper. I once made a two-state piece with a line connecting where someone grew up
to where they moved for work. It was simplejust a clean outline, one bright connecting strand, and a small heart at each end
but it hit harder than a complicated pattern. Another time, I used school colors for a college graduation gift, and suddenly the craft
wasn’t “decor,” it was a memory you could hang on a wall. Those are the pieces people keep when they move.
My biggest surprise? The “mistakes” often make the piece look more handmade in a good way. A slightly uneven weave can add texture.
A denser corner can create a natural shadow effect. When something looks off, I don’t rip everything out anymoreI adjust by adding
a second outline pass or layering a lighter color on top. It’s like adding seasoning: you can always add more. (Removing it is where
things get dramatic.)
Final experience-based tip: if you’re gifting state string art, do the boring finishing touches. Glue the knots, trim the tails cleanly,
and add solid hanging hardware. Nothing ruins a heartfelt “home state” gift like it sliding off the wall because the hanger was an afterthought.
Also, take a photo before you wrap it. People love seeing the progressand you’ll want proof that you, a normal human, made something that looks
like it came from a cozy little shop with candles and suspiciously perfect lighting.
Conclusion: Your State, Your Story, Your Tiny Nail Collection
DIY state string art is one of those projects that feels personal without being complicated. Once you’ve got the outline nailed down (literally),
the stringing is where creativity takes overclassic heart spokes, geometric crisscross, moody monochrome, bright team colors, or a simple
minimalist border that screams “I have my life together” (even if you don’t).
Start simple, keep your spacing consistent, don’t overthink the weave, and remember: string covers many sins. Your final piece will look custom,
meaningful, and 100% youwhether it celebrates a hometown, a new chapter, or just your deep love for the shape of Texas.