Table of Contents >> Show >> Hide
- Why a Mountain Pine Mural Works So Well
- Supplies You’ll Need
- Pick the Right Wall Before You Pick the Paint
- Choose a Color Palette That Looks Like You Meant It
- Prep the Wall Like a Pro
- Step-by-Step Tutorial: How to Paint a Mountain Pine Mural
- Optional Details That Make It Look Extra Good
- Common Mistakes to Avoid
- Where This Mural Looks Best
- What the Experience of Painting One Is Really Like
- Final Thoughts
- SEO Tags
If your walls are currently giving “plain yogurt with no toppings,” a mountain pine mural may be the makeover they’ve been quietly begging for. The good news: you do not need to be a trained artist, a wilderness poet, or the kind of person who owns twelve mysterious paintbrushes in a ceramic mug. You just need a plan, a few supplies, and the willingness to trust a pencil line that may look mildly alarming before the paint goes on.
A mountain pine mural is one of the easiest large-scale wall designs to DIY because nature is wonderfully forgiving. Mountains are not supposed to be perfectly symmetrical. Pine trees are not meant to look like they were cut out by a laser. A little variation actually makes the mural feel more natural, more custom, and more charming. In other words, this is a home project that rewards personality instead of punishing it.
In this tutorial, you’ll learn how to create a clean, layered mural with soft mountain ridges and simple evergreen silhouettes. The result can work in a nursery, bedroom, home office, reading nook, playroom, or even a cozy guest room that wants to whisper, “Yes, I do own a chunky knit throw.”
Why a Mountain Pine Mural Works So Well
There’s a reason mountain murals keep showing up in beautifully styled bedrooms and creative accent-wall makeovers: they add depth without making a room feel busy. A layered mountain design tricks the eye into seeing distance, which can make a wall feel wider and a small room feel less boxed in. Add pine trees in the foreground, and suddenly the whole space has a calm, outdoorsy mood that feels stylish without trying too hard.
This kind of mural also plays nicely with a wide range of decor styles. Use misty grays and blue-greens for a peaceful Scandinavian-inspired look. Go with sandy taupes, olive tones, and charcoal for something moodier and more rustic. Want a kid-friendly version? Use dusty blues, sage, and soft green for a mural that feels playful without turning the room into a cartoon forest ambush.
Supplies You’ll Need
- Interior wall paint in 3 to 5 colors
- Primer, if your wall needs it
- Painter’s tape
- Drop cloths or plastic sheeting
- Pencil
- Ruler, level, or yardstick
- Small angled brush for edges and tree details
- Medium brush or mini roller for filling larger areas
- Paint tray
- Spackle and putty knife for wall repairs
- Fine-grit sandpaper or sanding sponge
- Damp cloth or sponge for cleanup
- Step stool or ladder
For most mountain pine mural ideas, matte or eggshell interior paint works beautifully. Matte gives you a soft, modern look with very little glare, while eggshell offers a touch more durability and is easier to wipe down later. If this mural is going in a kid’s room or high-traffic area, eggshell is often the sweet spot.
Pick the Right Wall Before You Pick the Paint
Not every wall wants to become a mural, and that’s okay. The best wall is usually one that acts as a natural focal point, such as the wall behind a bed, crib, sofa, desk, or reading bench. Try not to choose a wall that is interrupted by too many doors, large windows, or oddly placed vents unless you’re prepared to work around them as part of the design.
Stand back and think about how the room is used. If the wall already has a lot going on, keep the mural simple. If the room is quiet and minimal, you can go slightly bolder with layered peaks and tree placement. The goal is to make the mural feel intentional, not like the room accidentally wandered into a national park brochure.
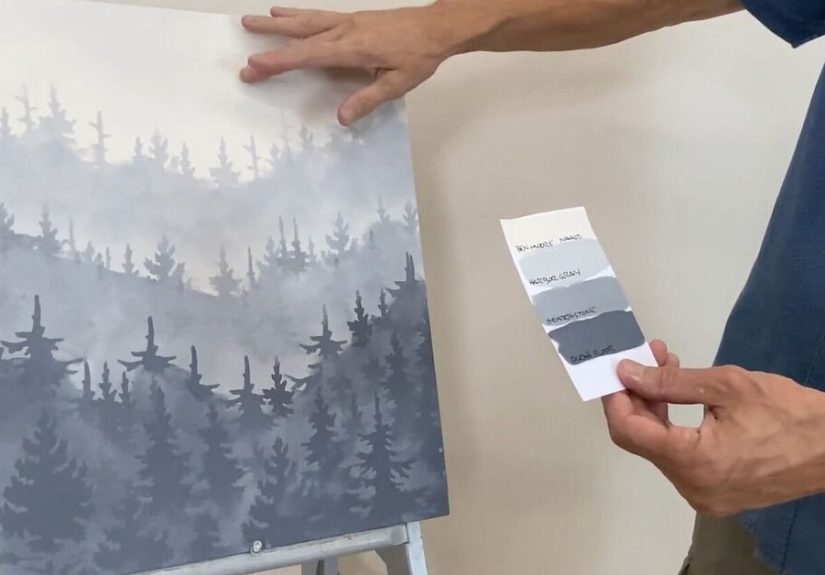
Choose a Color Palette That Looks Like You Meant It
The easiest color strategy is to move from lighter shades in the back to darker shades in the front. This creates depth and makes the mural look more polished. Think of distant mountains in hazy air: they’re lighter, softer, and less defined. Foreground ridges and pine trees should be darker and crisper.
A simple palette could look like this:
- Sky or background wall: warm white, pale gray, or soft blue
- Distant mountain layer: light gray-blue or pale sage
- Middle mountain layer: muted slate blue, green-gray, or taupe
- Front mountain layer: charcoal, forest green, or deep blue-gray
- Pine trees: the darkest tone in the palette
Before you commit, test swatches on the wall and view them in both daylight and lamplight. Paint colors have a sneaky habit of looking angelic in the store and dramatically different at home.
Prep the Wall Like a Pro
If you want the mural to look crisp instead of cranky, wall prep matters. Start by removing outlet covers, switch plates, nails, and anything else hanging on the wall. Lay down drop cloths and protect nearby trim with tape if needed.
Next, inspect the surface. Patch nail holes and dents with spackle, let them dry, and sand the area smooth. If the wall has greasy residue, dust, or mysterious fingerprints from a small human or a very curious dog, wash it gently and let it dry completely. If there’s glossy old paint, light sanding helps the new paint grip better. If the wall has stains, repairs, or a dramatic color underneath, use primer for a more even finish.
Yes, prep is the least glamorous part of the project. It is also the difference between “custom mural” and “why is that bump shaped like a potato under my mountain?”
Step-by-Step Tutorial: How to Paint a Mountain Pine Mural
Step 1: Paint the Base Color
If your current wall color is not the background you want, paint the entire wall first. This will become your sky or atmosphere layer. Let it dry fully before you start sketching mountains on top. Rushing this step is how you end up accidentally inventing abstract mud tones.
Step 2: Sketch the Mountain Layers
Using a pencil, lightly draw your top mountain ridge across the wall. Keep the line uneven and organic. Think long peaks, gentle slopes, and natural variation rather than cartoon triangles. Then draw a second ridge below it, followed by a third if you want extra depth. Leave enough height between layers so each color reads clearly from across the room.
If freehand drawing makes you nervous, sketch the design on paper first. You can also use a ruler or level for guidance, but don’t overdo it. Mountains that are too perfectly measured start to look suspiciously geometric.
Step 3: Start With the Lightest Mountain
Use a small angled brush to cut along the top pencil line for your farthest mountain layer. Then fill in the rest with a mini roller or wider brush. Two thin coats usually look better than one thick, gloopy coat. Let it dry completely before moving to the next layer.
Working from light to dark makes the whole mural easier to control. It also helps minor overlap disappear instead of turning into a paint wrestling match.
Step 4: Add the Middle and Foreground Ridges
Repeat the process for each mountain layer, going progressively darker as you move down the wall. Keep the edges soft but intentional. If one ridge feels too similar to the layer behind it, adjust the contrast before everything dries. A mural needs visual separation, not a polite color disagreement that nobody can see.
Step 5: Add Pine Trees for the Finishing Touch
Once the mountain shapes are dry, use the darkest color to add pine trees along the lower ridge or near the mural’s base. Start with a vertical trunk line, then add short, angled branches that get wider toward the bottom. Pine trees look best when they’re slightly imperfect. Vary the height, spacing, and shape so they feel like a real treeline instead of a row of identical little soldiers.
If you’re nervous, practice two or three trees on cardboard or scrap paper first. After that, you’ll realize pine trees are mostly a confidence game with bristles.
Step 6: Use Tape Only Where It Helps
Painter’s tape can be useful around trim, corners, ceilings, and sharply defined sections, but you do not need to tape every mountain line. In fact, hand-painted mountain edges often look warmer and more custom. If you do use tape, press the edges down firmly and remove it while the paint is still slightly wet for the cleanest line.
Step 7: Touch Up and Balance the Design
Stand back and look at the wall from different angles. Does one side feel too heavy? Add a few more trees. Is one ridge line too busy? Simplify it. Do the darkest areas pull the eye down too much? Lighten the lower section with spacing or a slightly softer tree density. A mural almost always looks better after one thoughtful round of touch-ups.
Optional Details That Make It Look Extra Good
- Add tiny white caps or dry-brush highlights to mountain peaks for a snowy effect
- Use a sponge very lightly to soften distant ridges
- Fade the base of the mural into the wall color for a misty look
- Paint only two-thirds of the wall height for a modern, graphic accent wall
- Extend a few pine trees beyond the ridge line for more movement
Just remember: the charm of this mural is its simplicity. You’re creating a scene, not auditioning to repaint the ceiling of a cathedral.
Common Mistakes to Avoid
Using colors that are too similar
If your layers blend together from across the room, the mural will lose its depth. Keep enough contrast between each mountain shape.
Skipping prep
Dust, grease, dents, and glossy residue can ruin your finish faster than bad lighting ruins online shopping decisions.
Overcomplicating the design
Simple is elegant here. Too many ridges, colors, or fussy details can make the wall feel crowded.
Painting the trees too evenly
Nature is messy. Let your pine trees lean, vary, and breathe.
Ignoring ventilation
Open windows when possible and keep air moving while you paint and as the wall cures. A fan exhausting air outward can make the project more comfortable and help manage paint odor.
Where This Mural Looks Best
A mountain pine mural is especially effective in bedrooms, nurseries, reading corners, and home offices because it has a calming, grounded feel. It can also work in an entryway if you want a dramatic first impression that says, “Yes, I have taste,” without screaming it from the coat hooks.
For grown-up spaces, pair the mural with warm wood furniture, textured bedding, linen curtains, and soft lighting. For kids’ rooms, keep the accessories minimal so the wall remains the star. Throw in a plaid pillow, a forest-green lamp, or a woven basket, and suddenly the room feels styled on purpose instead of decorated by chance.
What the Experience of Painting One Is Really Like
If you’ve never painted a mountain pine mural before, the experience usually begins with excitement, followed almost immediately by a brief emotional dip known as, “Why did I draw that line so weird?” This is normal. In fact, it may be one of the most universal parts of the process. The sketch stage almost always looks underwhelming at first. Pencil lines seem awkward, empty wall space looks too large, and your carefully chosen paint swatches can appear oddly dramatic when the lid first comes off. Then the first layer goes on, and suddenly the whole thing starts making sense.
One of the most satisfying parts of the project is how quickly the room begins to transform. Unlike tiny crafts that take forever to produce something the size of a postage stamp, a mural changes the atmosphere fast. Even the first painted ridge adds movement and personality. By the second layer, the wall no longer looks like a wall. It looks like a place. That shift is surprisingly energizing, especially in bedrooms or workspaces that have felt visually flat for too long.
There is also something oddly relaxing about painting mountain shapes. Because the lines are organic, you are not chasing perfection every second. You’re following the general flow of a landscape, adjusting as you go, and letting your hand create a little natural variation. For people who get nervous around precise DIY projects, this can feel wonderfully freeing. It’s less like assembling a puzzle and more like styling a room with a paintbrush.
The tree stage is where many people discover a hidden pocket of confidence. At first, painting a pine tree can feel intimidating. Then you make one. Then another. Then suddenly you’re adding a whole cluster and debating whether one tiny tree should be moved half an inch to the left like a miniature art director in hiking boots. It becomes fun. Not fake-fun. Actual fun.
There’s also a practical kind of joy in the final reveal. When furniture goes back in and the room is styled again, the mural tends to look far more expensive and custom than it actually was. It can create that “Where did you buy this wall?” reaction from guests, which is deeply satisfying and only mildly ridiculous. Best of all, the mural feels personal. You chose the colors, the peak shapes, the spacing, and the mood. No one else has your exact version.
And maybe that’s why this project sticks with people. A mountain pine mural is not just paint on drywall. It’s one of those rare home updates that feels creative, approachable, and transformative all at once. You finish with a room that has more depth, more character, and a little more soul. Plus, every time you look at it, you get the smug little thrill of knowing you made it yourself.
Final Thoughts
If you’ve been craving a DIY project that delivers big visual payoff without requiring elite artistic talent, this is it. A mountain pine mural is approachable, affordable, and surprisingly flexible. With smart prep, a calm color palette, and simple layered shapes, you can turn a blank wall into a custom feature that feels equal parts cozy and impressive.
So pick your wall, line up your paint, and start with one ridge at a time. Worst-case scenario, you repaint a wall. Best-case scenario, you create your favorite corner in the house. Those are pretty good odds.


