Table of Contents >> Show >> Hide
- What Are Granola Cups (and Why Are They Suddenly Everywhere)?
- Baked vs. No-Bake Granola Cups
- Key Ingredients and Why They Matter
- Granola Cups with Yogurt and Fruit: The Recipe
- How to Keep Granola Cups Crunchy (and Not Tragically Soggy)
- Flavor Variations That Taste Like You Meal-Prepped on Purpose
- Make-Ahead and Storage Tips
- A Quick Nutrition Strategy (Without Turning Breakfast into Homework)
- Troubleshooting: When Granola Cups Get Dramatic
- Experiences Related to Granola Cups with Yogurt and Fruit (500+ Words)
- Conclusion
If yogurt parfaits are the classic “I have my life together” breakfast, granola cups are the same thingbut wearing sunglasses and carrying a tiny briefcase. They’re crunchy, handheld, and basically built for mornings when your schedule is doing parkour. These little muffin-tin wonders turn oats, sweetener, and a few pantry staples into edible bowls you can fill with creamy yogurt and whatever fruit looks happiest in your fridge.
This guide gives you an in-depth, reliable recipe (plus smart options for allergies, meal prep, and texture control), all written for real kitchens not the magical ones where nobody ever burns coconut or forgets to grease the pan. You’ll learn how to make granola cups that hold their shape, stay crisp, and taste like “breakfast,” not “cardboard auditioning for a role.”
What Are Granola Cups (and Why Are They Suddenly Everywhere)?
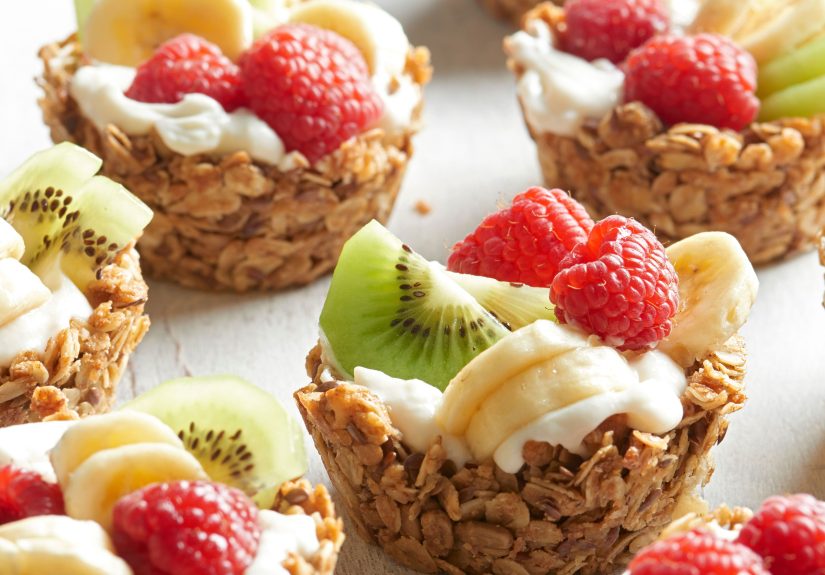
Granola cups are baked (or chilled) oat “shells” shaped in a muffin tin. Once they cool, you fill them with yogurt and top with fruit. The magic is the contrast: crunchy edges + creamy center + juicy fruit. It’s the same flavor logic as a parfait, but with better portability and fewer sad, soggy granola crumbs floating in yogurt like tiny life regrets.
They also solve a very specific modern problem: you want a wholesome breakfast, but you also want to eat it while answering emails, locating your keys, and wondering why your calendar is attacking you. Granola cups don’t judge.
Baked vs. No-Bake Granola Cups
Baked granola cups
Baked cups are the classic: oats + binder + flavor add-ins, pressed into a muffin tin, then baked until golden. They come out crisp and sturdy, and they store well when kept unfilled. If you want a true “cup” that can survive a commute, baked is your friend.
No-bake granola cups
No-bake versions usually rely on sticky binders like nut butter and honey/maple syrup, then chill or freeze to set. They’re fast and great for hot weather, but they tend to be softer and more dessert-likestill delicious, just a different vibe.
This recipe focuses on the baked method because it delivers the best crunch-to-creamy ratio and the most reliable structure. (A close second: the method where you buy a bakery tart shell and pretend you made it. We won’t tell.)
Key Ingredients and Why They Matter
For the granola cups
- Old-fashioned rolled oats: The backbone. They bake into a sturdy shell with a satisfying chew-crunch balance.
- A sweet binder (honey or pure maple syrup): Helps the oats stick together and encourages golden edges.
- A little fat (melted coconut oil, neutral oil, or butter): Improves browning and helps the cups crisp.
- Flavor builders: Cinnamon, vanilla, a pinch of saltsmall amounts, big difference.
- Optional structure boosters: Chia seeds (adds “glue” when hydrated), egg white (adds sturdiness), or a spoonful of nut butter.
- Mix-ins: Unsweetened coconut, chopped nuts, flax, sunflower seedschoose 1–3 so you get texture without turning the cups into a granola landslide.
For filling and topping
- Thick yogurt (Greek yogurt, skyr, or a thick plant-based yogurt): Thicker yogurt won’t seep into the cup as quickly.
- Fruit: Berries, mango, peaches, kiwi, bananasfresh is best for texture. If using frozen fruit, thaw and drain well.
- Optional “extra credit” toppings: Lemon zest, toasted nuts, cocoa nibs, a drizzle of honey, or a spoon of chia jam.
Granola Cups with Yogurt and Fruit: The Recipe
Yield: 12 granola cups (standard muffin tin)
Total time: ~35–50 minutes (includes cooling; hands-on is quick)
Ingredients
- 1 1/2 cups old-fashioned rolled oats
- 1/4 cup chia seeds (or ground flaxseed)
- 1/2 cup unsweetened shredded coconut (optional but very snackable)
- 1 teaspoon ground cinnamon
- 1/2 teaspoon fine salt
- 1/2 cup honey or pure maple syrup
- 2 tablespoons melted coconut oil (or neutral oil, or melted butter)
- 1 teaspoon vanilla extract
- Optional for extra structure: 1 egg white (lightly whisked) or 2 tablespoons nut butter
- For serving: 1 1/2 to 2 cups thick yogurt + 2 to 3 cups fresh fruit
Instructions
- Heat the oven and prep the pan.
Preheat your oven to 350°F. Generously grease a standard 12-cup muffin tin (don’t be shyoats are clingy). If you prefer, use muffin liners lightly sprayed with oil. - Mix the dry ingredients.
In a medium bowl, combine oats, chia seeds, coconut (if using), cinnamon, and salt. Stir until evenly mixed. - Add the binder.
Add honey (or maple syrup), melted oil/butter, and vanilla. If using the egg white or nut butter, add it now. Stir until everything looks evenly coated and a bit sticky. - Rest (briefly) for better “cup integrity.”
Let the mixture sit for 5 minutes so chia/flax can hydrate. This helps the cups hold together instead of auditioning to become granola rubble. - Shape the cups.
Divide mixture evenly among muffin cups (about 2 heaping tablespoons each). With slightly damp hands, press firmly into the bottom and up the sides. Pack it in like you mean itstructure comes from compression. - Bake until golden.
Bake 12–18 minutes, or until the edges are golden and the cups look set. If the centers puff up while baking, gently press the middle down with the back of a spoon or a small glass while they’re still warm. - Cool (this part is not optional).
Cool in the pan for 15–30 minutes. Then run a thin knife around the edges and carefully lift each cup out. Let them finish cooling on a rackcrispness improves as they cool. - Fill and top right before serving.
Spoon yogurt into each cup and add fruit. Eat immediately for maximum crunch. (If you’re meal-prepping, keep cups unfilled and assemble when you’re ready to eat.)
How to Keep Granola Cups Crunchy (and Not Tragically Soggy)
Crunch is a choiceand it starts with timing. Granola cups stay crisp longest when you store them unfilled and assemble just before eating. Thick yogurt helps, too. If you fill the cups hours in advance, yogurt will slowly migrate into the shell, and the shell will respond by getting soft and whispering, “I tried.”
If you must assemble ahead (because mornings are chaos), do this:
- Create a barrier: Spread a thin layer of nut butter inside the cup before adding yogurt.
- Use thicker yogurt: Greek yogurt or skyr tends to seep less.
- Keep fruit dry: Pat berries dry; drain thawed fruit well.
Flavor Variations That Taste Like You Meal-Prepped on Purpose
PB&J Breakfast Cups
Add 2 tablespoons peanut butter to the oat mixture. Fill with plain Greek yogurt, swirl in berry jam or chia jam, and top with strawberries. It tastes like childhood, but with protein.
Tropical Vacation (No PTO Required)
Use shredded coconut in the base. Fill with coconut or vanilla yogurt. Top with mango, pineapple, and lime zest. Optional: a tiny umbrella, emotionally.
Apple Pie Energy Cups
Add extra cinnamon and a pinch of nutmeg. Fill with vanilla yogurt. Top with diced apples sautéed briefly with a little cinnamon (or use thin apple slices if you’re feeling minimalist).
Chocolate-Banana “I’m an Adult” Cups
Stir cocoa nibs or mini dark chocolate chips into the base. Fill with yogurt and top with banana slices. A drizzle of honey makes it dessert-adjacent, which is still breakfast if you eat it before noon.
Make-Ahead and Storage Tips
Granola cups are happiest when stored unfilled. Once baked and fully cooled, keep them in an airtight container at room temperature for several days. If you want longer storage, freeze the unfilled cups and thaw as needed. Fill with yogurt and fruit only when you’re ready to serve.
- Room temperature: Store unfilled cups in an airtight container for up to 5–7 days (texture is best in the first few days).
- Freezer: Freeze unfilled cups up to about 3 months; thaw before filling.
- Filled cups: Best eaten soon after filling; they lose crispness as they sit.
A Quick Nutrition Strategy (Without Turning Breakfast into Homework)
If you want these granola cups to keep you full (not just happy), think in three parts: protein (yogurt), fiber (oats, seeds, fruit), and a bit of fat (nuts or nut butter). This balance can make a surprisingly satisfying breakfast or snack.
One simple, sensible way to portion a yogurt-and-granola style breakfast is to start with a solid base of plain yogurt, add a moderate amount of granola, include fruit, and finish with seeds or nuts for extra staying power. If you prefer sweeter flavors, sweeten lightly yourself (a drizzle of honey, cinnamon, or vanilla) rather than relying on heavily sweetened yogurt or candy-like granola.
Troubleshooting: When Granola Cups Get Dramatic
“My cups fell apart.”
- Press harder: Compression is structure. Pack the mixture firmly into the tin.
- Let them cool: Warm cups are fragile. Cool fully before removing.
- Add a helper: Chia/flax, a bit of nut butter, or an egg white can improve binding.
“They stuck to the pan.”
- Grease more: Generously grease the tin (and re-grease if your pan is older).
- Loosen smartly: Run a thin knife around the edges before lifting them out.
- Try liners: Lightly greased liners can make life easier.
“They’re not crunchy.”
- Cool on a rack: Air circulation helps crisp them up.
- Bake a touch longer: Ovens varyaim for golden edges, not pale sadness.
- Don’t fill too early: Assemble just before eating whenever possible.
Experiences Related to Granola Cups with Yogurt and Fruit (500+ Words)
Here’s what people usually experience the first few times they make granola cupsand why that’s actually part of the fun. The first moment is optimism: you mix oats with honey (or maple syrup), the whole bowl smells like “I am someone who owns matching containers,” and you’re convinced this will be the week you meal-prep like a wellness influencer. Then reality arrives in a muffin tin.
Experience #1: The Pressing Phase. Everyone starts out gently pressing the mixture into the cups like they’re tucking it in for a nap. Five minutes later, you realize granola cups need the energy of a firm handshake. The difference between “cute cup” and “crumbly tragedy” is how well you pack that mixture against the sides. A lot of home cooks discover a weirdly satisfying rhythm here: scoop, press, rotate, press again. It’s basically edible pottery. Bonus: slightly damp hands make the job easier, and you’ll feel like you’ve unlocked a secret level of breakfast.
Experience #2: The Puff. You open the oven and notice some centers have puffed up. It’s not a failurethis is just your granola cups doing a small celebratory stretch. The usual move is to press the center back down while everything is still warm. People often grab the back of a spoon, a shot glass, or the bottom of a small measuring cup and gently reshape the wells. After you do this once, you’ll start feeling confident enough to say things like “I prefer a deeper well for yogurt-to-fruit ratio.” That’s how the granola cup lifestyle gets you.
Experience #3: The Cooling Impatience. The aroma is unfairwarm oats, honey, vanilla, cinnamonso you try to pop one out early. It breaks. You learn (sometimes loudly) that cooling is structural. The cups firm up as they cool, and they crisp as moisture escapes. The second batch is always better because you finally let them sit. Many people end up using that first “broken” cup as a chef’s snack, topped with yogurt right then and there, standing at the counter like a victorious raccoon.
Experience #4: The Soggy Surprise. Someone inevitably tries to pre-fill all twelve cups the night before, imagining a peaceful morning. By breakfast, the cups are softer. Still tasty, but less crunchy. This is where people develop their personal “system.” Some keep cups in one container, yogurt in another, fruit in a thirdlike breakfast mise en place. Others spread a thin layer of nut butter inside as a barrier. A few decide softness is fine, because at least they’re eating fruit and not a donut the size of their face. (No judgment. Donuts have feelings too.)
Experience #5: The Flavor Spiral. Once you nail the basic recipe, you start experimenting. You add coconut and call it “tropical.” You add chopped almonds and call it “high-protein.” You drizzle chocolate and call it “self-care.” Granola cups are incredibly forgiving, so they become a safe place for creativity. People often discover new favorite comboslike lemon zest with blueberries, or vanilla yogurt with sliced peaches and a pinch of cinnamon. It’s also common to start setting up a “topping bar” for kids (or adults who behave like kids around sprinkles), because assembling the cups feels like a tiny breakfast party.
And that’s the real experience: granola cups turn breakfast into something interactive. They’re practical, yes, but they’re also a small moment of “I made this,” which is surprisingly powerful on a Tuesday morning. You don’t need perfectionjust a good press, a golden edge, and a yogurt swirl that makes you feel like you’ve got at least one thing figured out today.
Conclusion
Granola cups with yogurt and fruit are the kind of recipe that feels fancy but behaves like a weekday workhorse. Make a batch, keep them unfilled, and you can assemble quick breakfasts and snacks that hit the sweet spot: crunchy, creamy, fresh, and satisfying. Once you’ve mastered the basic methodpress firmly, bake to golden, cool completelyyou can remix flavors endlessly without getting bored.
Whether you’re building a grab-and-go breakfast, hosting a brunch topping bar, or just trying to convince yourself that fruit counts if it’s sitting on yogurt, these granola cups are here for you. And unlike your alarm clock, they’re actually pleasant.