Table of Contents >> Show >> Hide
- The Quick Answer: Most Carved Pumpkins Last 3–5 Days
- Why Carved Pumpkins Rot So Fast (The “Science, But Make It Spooky” Version)
- What Affects How Long Your Carved Pumpkin Will Last?
- A Realistic “Day-by-Day” Timeline for Carved Pumpkins
- How to Make a Carved Pumpkin Last Longer (Without Selling Your Soul)
- Step 1: Start With the Right Pumpkin
- Step 2: Carve Later Than You Think
- Step 3: Clean Like You Mean It
- Step 4: Disinfect the Surface (Bleach or Vinegar Options)
- Step 5: Seal the Cut Edges (The Moisturizing Trick)
- Step 6: Keep It Cool (Pumpkins Love Chill Vibes)
- Step 7: Ditch the Real Candle
- Step 8: Daily Maintenance (Two Minutes That Matter)
- Common Mistakes That Speed Up Pumpkin Rot
- How to Tell If a Carved Pumpkin Has Gone Bad
- FAQ: Carved Pumpkin Longevity Questions People Actually Ask
- Bonus: Don’t Let Your Pumpkin Become Landfill “Pumpkin Pollution”
- of Real-World Pumpkin Experiences (Because Theory Is Cute, But Porches Are Honest)
- Conclusion: Plan for 3–5 Days, Then Use Strategy to Buy More Time
Carving a jack-o’-lantern is basically giving your pumpkin an “open-air spa day” where the treatment is oxygen, bacteria, mold spores, and whatever weird thing lives under your porch. Fun! Festive! Also… not great for shelf life.
If you’ve ever spent an hour carving the perfect spooky grin only to watch it slump into a sad orange puddle by Thursday, you’re not alone. Let’s talk about how long carved pumpkins actually last, why they rot so fast, and what you can do to keep your masterpiece looking sharp through Halloween (or at least through the weekend).
The Quick Answer: Most Carved Pumpkins Last 3–5 Days
In typical fall conditions, a carved pumpkin usually looks “photo-ready” for about 3 to 5 days. If it’s cool and dry, you might get up to a week (sometimes a bit longer with great care). If it’s warm, humid, sunny, or you used a real candle like it’s 1897, you could be looking at 1–3 days.
Think of this like produce rules: the moment you cut it open, the countdown starts. A whole pumpkin is basically a tough little orange vault. A carved pumpkin is an unlocked vault with the door propped open and a neon sign that says “FREE SNACKS.”
Why Carved Pumpkins Rot So Fast (The “Science, But Make It Spooky” Version)
A pumpkin’s rind is its natural armor. Once you carve, you expose moist flesh to:
- Microbes (bacteria and fungi) that start breaking down the soft interior
- Dehydration as cut edges lose moisture and shrivel
- Insects (hello, fruit flies) that treat pumpkin guts like an all-you-can-eat buffet
- Heat from sunlight or candles that accelerates decay
The result is a predictable horror movie arc: first it dries, then it shrinks, then it molds, then it collapses. In the end, your jack-o’-lantern becomes modern art titled “Entropy.”
What Affects How Long Your Carved Pumpkin Will Last?
Not all jack-o’-lanterns are doomed at the same speed. Here are the biggest factors that change the timeline:
1) Weather (Temperature + Humidity)
Cool, dry air slows microbial growth and moisture loss. Warm, humid air is basically a VIP lounge for mold. If your porch feels like soup, your pumpkin will not be thriving.
2) Sunlight Exposure
Direct sun heats the pumpkin (even on chilly days) and dries it out faster. Shade helps. A covered porch helps. A pumpkin lounging under a blazing afternoon sun? That’s pumpkin speed-running decomposition.
3) Pumpkin Quality (Start Strong or Start Sorry)
Choose a pumpkin that’s firm, heavy for its size, and free of soft spots, cracks, bruises, or mold. A damaged pumpkin is already halfway through its villain origin story.
4) How You Carve
More cut surface area = faster drying and more entry points for microbes. Intricate lace patterns look amazing but also behave like they’re on an accelerated timeline.
5) Cleanliness (Yes, Your Pumpkin Cares About Hygiene)
Leaving stringy pulp inside is like leaving wet laundry in a gym bag. It will become a science experiment. Thorough scraping makes a difference.
6) Lighting Choice
Real candles raise interior temperature and can speed up rot. Battery LEDs keep the vibe without cooking the pumpkin from the inside out.
A Realistic “Day-by-Day” Timeline for Carved Pumpkins
Here’s what most people see when a pumpkin is carved and displayed outdoors:
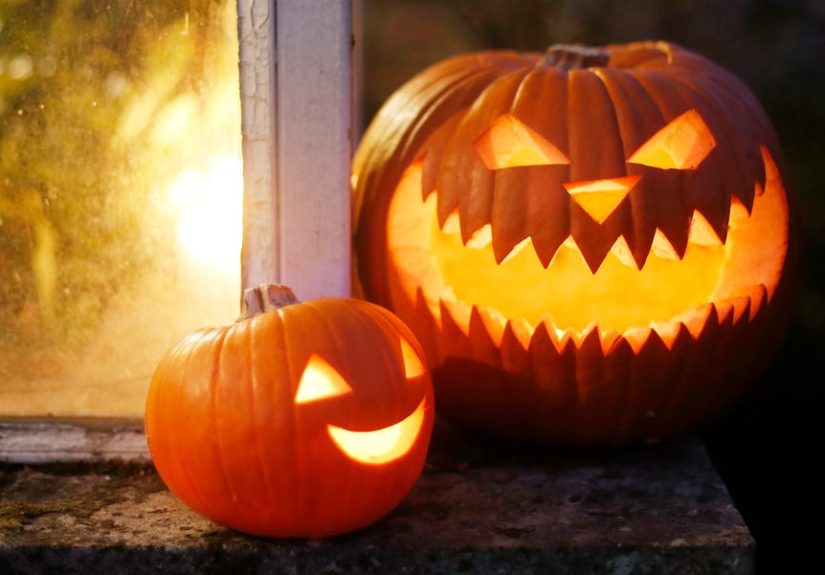
Day 0 (Carving Day)
Peak beauty. The pumpkin is crisp, bright, and proud. Take photos now. This is the pumpkin’s red-carpet moment.
Days 1–2
Still looking great. Minor drying at the edges might start if conditions are warm or windy.
Days 3–5
Many pumpkins start showing wear: slight shriveling, dullness, softening around thin cuts, or the first spots of mold in humid climates.
Days 6–7
In cool weather (and with care), you might still be okay. In warm weather, this is often the “collapse era.” Sagging walls, droopy features, and that unmistakable fermented-pumpkin smell can appear.
After a Week
Some pumpkins survive, but most look like they’ve seen things. If you need your lantern to look good longer, you’ll want preservation tactics (below) or a strategic plan (also below: “carve later”).
How to Make a Carved Pumpkin Last Longer (Without Selling Your Soul)
The goal is to slow three enemies: microbes, dehydration, and heat. Here’s a practical approach that balances effectiveness with “I still want to enjoy my weekend.”
Step 1: Start With the Right Pumpkin
- Pick a pumpkin that’s firm with no soft spots.
- Look for a solid stem (not wobbly or leaking).
- Avoid any pumpkin with cuts, cracks, or bruises.
- Store it cool and dry until carving day (not in a hot car trunk like it’s on a road trip).
Step 2: Carve Later Than You Think
If you want the best-looking pumpkin on Halloween night, carve it as close to Halloween as possible. For many homes, 1–2 days before is the sweet spot.
Want a compromise? Consider etching (scraping the skin to create a design) instead of cutting all the way through. Less exposure often means more longevity.
Step 3: Clean Like You Mean It
Scoop out the seeds and stringy pulp, then scrape the inside walls until they feel smoother. The less wet, stringy material left behind, the fewer places mold can set up camp.
Step 4: Disinfect the Surface (Bleach or Vinegar Options)
This is where many “my pumpkin lasted longer!” stories begin. The idea is to reduce microbes on the cut surfaces. Two common approaches:
- Diluted bleach rinse/soak: Many home-and-garden guides recommend using a very small amount of household bleach in water (often described around 1 teaspoon per gallon). You can briefly dunk the pumpkin or spray inside and out. Let it dry completely.
- Vinegar spray: A common recipe is 10 parts water to 1 part vinegar sprayed on the inside and cut edges. It’s a gentler alternative that can still discourage some microbial growth.
Safety note: Never eat a pumpkin that’s been treated with bleach or other cleaners. If you’re placing it where pets or wildlife can nibble, choose the vinegar route and keep it out of reach anyway. (Pumpkins are decorations, not open-air snacks.)
Step 5: Seal the Cut Edges (The Moisturizing Trick)
Dehydration makes your pumpkin shrivel. To slow that, apply a thin layer of petroleum jelly (or a light coating of cooking oil) to the cut edges. Think of it like chapstick for your jack-o’-lantern.
This won’t make it immortal, but it can help keep edges from drying as quicklyespecially in windy or dry climates.
Step 6: Keep It Cool (Pumpkins Love Chill Vibes)
- Shade it: Put it out of direct sun.
- Bring it in at night if the day is warm and your indoor space is cooler.
- Refrigerate overnight if you can spare the fridge space (move the leftovers; the pumpkin is the main character now).
- Quick ice bath: If it’s starting to shrivel, soaking it in cold water for a short time can help rehydrate it.
Step 7: Ditch the Real Candle
Real flames create heat, and heat accelerates rot. Use battery-powered LED tealights or a small LED string. You get the glow without turning your pumpkin into a slow cooker.
Step 8: Daily Maintenance (Two Minutes That Matter)
If you want the longest life, do a quick daily check:
- Wipe away any moisture pooling inside.
- Lightly re-spray with vinegar solution (or your chosen safe method).
- Check for soft spots and keep it dry and shaded.
Common Mistakes That Speed Up Pumpkin Rot
- Leaving lots of pulp inside: it molds faster.
- Carving too early: your pumpkin peaks before the party.
- Putting it in direct sun: porch “aesthetics” aren’t worth the meltdown.
- Using a real candle: heat is rot’s best friend.
- Setting it directly on soil or wet surfaces: moisture + microbes = faster decay.
- Cutting a lid around the stem: some carving pros recommend avoiding this and cutting from the bottom or side/back instead.
How to Tell If a Carved Pumpkin Has Gone Bad
Your nose and your eyes are reliable here. Signs it’s time to retire the lantern:
- Mold growth (fuzzy white/green/black spots)
- Slimy texture inside or around the cuts
- Soft, collapsing walls or sagging facial features
- Strong rotten smell (it’s not “autumnal,” it’s “compost-core”)
- Leaking liquid and pooling gunk
FAQ: Carved Pumpkin Longevity Questions People Actually Ask
When should I carve my pumpkin for Halloween?
For best appearance on Halloween night, carve it 1–2 days before. If you’re doing an event earlier (like a party), carve accordingly and use preservation steps.
Do small pumpkins last longer?
Not automatically. Small pumpkins can dry out faster because there’s less mass, but they can also be easier to keep cool. Condition and care matter more than size.
Will spraying water on it help?
Hydration helps with shriveling, but excess moisture can encourage mold. Light misting plus keeping it cool and dry is the balance. If it’s humid outside, focus more on shade and airflow than constant spraying.
Can I compost a carved pumpkin?
In most places, yesif it hasn’t been treated with bleach or chemicals. If you used vinegar only, composting is usually fine. Check local compost rules, and remove candles, lights, and any non-organic decorations first.
What’s better: carving or no-carve decorating?
If you want longevity, no-carve wins. Painting, using stickers, adding accessories, or making a pumpkin “vase” arrangement can keep pumpkins looking good much longer than carving.
Bonus: Don’t Let Your Pumpkin Become Landfill “Pumpkin Pollution”
Once your jack-o’-lantern is done, consider a better ending than the trash. Organic waste in landfills can generate methane, and pumpkins are famously abundant after Halloween. If composting isn’t an option, look for local pumpkin drop-offs, community compost programs, or creative reuse (like cooking edible, untreated pumpkins).
of Real-World Pumpkin Experiences (Because Theory Is Cute, But Porches Are Honest)
Here’s what pumpkin life tends to look like in the wildaka “outside someone’s front door”based on the kinds of scenarios people regularly run into every Halloween season.
Experience #1: The Cool-Weather Champion
In a crisp, cool climate, a carved pumpkin can feel almost invincible. You carve on a Thursday, it looks fantastic through the weekend, and by the following Wednesday it’s still holding its shapemaybe a little dry around the eyes, but still proudly spooky. The key detail in this scenario is that the pumpkin sits in shade, the nights are chilly, and nobody puts a candle inside like they’re trying to roast marshmallows. This is when people say, “Wow, mine lasted a week!” and they’re not exaggerating.
Experience #2: The Warm-and-Humid Speedrun
In warmer, more humid areas, the pumpkin timeline can feel unfair. You carve, you place it outside, you take a photo… and two days later it looks like it’s melting from emotional distress. In this scenario, mold shows up early, and the pumpkin can soften fastespecially if there’s afternoon sun or rain. People often assume they carved “wrong,” but it’s mostly the environment working overtime. This is where refrigeration overnight, vinegar spray, and keeping it off wet surfaces can make the difference between “cute lantern” and “orange regret.”
Experience #3: The Apartment Balcony Plot Twist
Balconies are sneaky. They feel cool, but reflective building surfaces can turn them into sun traps. A pumpkin that gets direct light for even an hour or two may dry out faster, and the cut edges can start curling. Balcony folks also run into wind: your pumpkin may not rot immediately, but it can dehydrate and shrivel like it’s auditioning for a raisin commercial. A thin layer of petroleum jelly on the cut edges and a shady corner often helps a lot here.
Experience #4: The “Candle Inside” Instant Aging Filter
Many people learn this lesson once: the candle creates heat, the heat accelerates decay, and suddenly the pumpkin looks older than it should. Even if it doesn’t rot right away, the interior can dry and soften unevenly. The pumpkin may also develop a stronger smell fasterkind of like “pumpkin bread,” if pumpkin bread had a moral failing. Swap the candle for LEDs and you often gain extra days of decent looks.
Experience #5: The Emergency Rehydration Rescue
A classic Halloween move: it’s October 31, your pumpkin is starting to shrivel, and you need it to look good for trick-or-treaters. People often do an “ice bath” or cold-water soak to perk it up. It’s not magic, but it can temporarily restore some firmness by rehydrating the flesh. Think of it as a pumpkin caffeine shot. Pair that with cool placement and you can often get a respectable Halloween-night gloweven if the pumpkin plans to collapse dramatically afterward like a theater kid taking a final bow.
Conclusion: Plan for 3–5 Days, Then Use Strategy to Buy More Time
Most carved pumpkins last 3–5 days looking their best, but you can push that window by carving later, keeping the pumpkin clean, reducing microbes, sealing cut edges, and (most importantly) keeping it cool and out of sun.
The real secret is this: your pumpkin is a perishable food pretending to be home décor. Treat it like produce, not plastic, and it’ll reward you with extra days of spooky greatness.