Table of Contents >> Show >> Hide
- Before You Start: Know What You’re Changing
- Quick Way #1: Change Built-In Notification Sounds in Settings
- Quick Way #2: Use a Custom Sound (Your Own Tone) and Set It as an Alert
- Troubleshooting: “I Changed the Sound, But I Still Don’t Hear Anything”
- How to Pick a Notification Sound You’ll Actually Notice
- Real-World Experiences: What Changes When You Finally Fix Your iPhone Notification Sounds (500+ Words)
- Conclusion
Your iPhone has exactly two moods: “I will politely whisper a notification and you will miss it” and
“I will scream an alert the moment you step into a quiet room.” If your phone’s current sound falls into
the first category, you’re not doomed to a life of missed texts and mysterious “sorry I didn’t see this”
replies.
Below are two quick, reliable ways to change notification sounds on iPhoneone using Apple’s built-in
menus (fastest), and one using a custom sound (most fun). Along the way, you’ll learn what “Default Alerts”
actually changes, why some apps refuse to let you pick a unique sound, and how to make sure your new tone is
something you’ll actually hear in the real world (aka: outside your silent living room).
Before You Start: Know What You’re Changing
iPhone sounds aren’t one big “notification sound” blob. Apple splits them into categories so you can customize
the important stuff without turning your phone into a slot machine.
- Ringtone: calls
- Text Tone: SMS/iMessage alerts (and sometimes other message-style alerts)
- Default Alerts: the “general” alert sound many apps use when they don’t have their own special category
- Mail/Calendar/Reminders: separate, customizable categories
- Per-app sounds: some apps let you choose a sound in Settings; others only let you toggle sound on/off
Quick version check: If you want to change Default Alerts, make sure your iPhone is running a modern iOS version
that includes that option (it appeared in iOS 17.2 and later). Go to Settings > General > About to confirm.
Quick Way #1: Change Built-In Notification Sounds in Settings
This is the “two-minute fix” for most people. Apple gives you a central control panel for common alert categories,
plus (in many cases) a per-app sound picker under Notifications.
Step 1: Pick a Better Default Alert Sound (The One Many Apps Use)
- Open Settings.
- Tap Sounds & Haptics.
- Tap Default Alerts.
- Select a tone you can actually hear. (No judgment if you go straight for a classic loud one.)
What “Default Alerts” changes: It affects notifications that rely on the system default alert soundoften
third-party apps and general system alerts that aren’t already assigned to Text Tone, Mail, Calendar, or Reminders.
If an app uses its own custom alert sound (or only provides a sound toggle), your Default Alerts choice may not override it.
Pro tip: If you miss the old-school, unmistakable iPhone tones, look for a Classic section in the tone lists.
That’s where older favorites like “Tri-tone” often live.
Step 2: Customize Apple’s Main Alert Categories (Text, Mail, Calendar, Reminders)
Still in Settings > Sounds & Haptics, you can tap and change several built-in alert categories, such as:
- Ringtone (calls)
- Text Tone (texts/iMessage)
- New Mail (mail notifications)
- Sent Mail (yes, your phone can celebrate your productivity)
- Calendar Alerts and Reminder Alerts
- AirDrop
To change one, tap the category, preview tones, then pick one. Your iPhone will play a sample so you can tell
whether it’s “audible” or “a gentle suggestion that a notification might exist somewhere in the universe.”
Step 3: Try Changing a Sound for a Specific App
Here’s the path that surprises people because it’s hiding in plain sight:
- Go to Settings > Notifications.
- Tap the app you want (for example: Messages, Mail, or another app that supports sound selection).
- Look for Sounds.
- If it’s there, tap it and choose your preferred tone.
If you don’t see “Sounds” (or you only see a sound on/off switch): that usually means the app doesn’t support
choosing a custom iOS sound from Settings. In that case, you may need to look inside the app’s own notification settings.
Many messaging apps (like WhatsApp or Telegram) offer their own sound menus inside the app, but the available tones
are typically limited to what the developer provides.
Bonus: Give One Person Their Own Sound (So You Know Who It Is Without Looking)
If you want your best friend, your boss, or your group project partner to have a unique alert:
- Open Contacts (or open the Phone app and go to Contacts).
- Select the person.
- Tap Edit.
- Choose Ringtone and/or Text Tone, then pick a sound.
- Tap Done.
That’s one of the best “quality of life” upgrades you can makebecause it turns your phone into a tiny sound-based
assistant that whispers, “This is important,” without you touching the screen.
Quick Way #2: Use a Custom Sound (Your Own Tone) and Set It as an Alert
Want something more personal than Apple’s built-in tones? You can create a custom ringtone/alert tone and use it for
calls, texts, and (in many cases) default alertsespecially if you’ve added the tone properly so it appears in your sound lists.
Option A (Fast + Free): Make a Custom Tone with GarageBand on iPhone
This is Apple’s “officially supported” DIY route. You’ll use GarageBand to trim audio and export it as a ringtone.
Then you can assign it immediately.
- Install GarageBand from the App Store (if you don’t already have it).
- Open GarageBand and create a new audio recording or project.
- Import an audio file (from Files/iCloud) or a song that’s downloaded and not protected.
- Trim the audio to the part you want. Ringtones are limited to about 30 seconds, so pick the good part.
- Save it to My Songs.
- Press and hold the project, then choose Share > Ringtone.
- Name it, tap Export, then choose how to use it:
- Standard Ringtone
- Standard Text Tone
- Assign to contact
After export, your custom tone should show up in your iPhone’s tone lists (like Ringtone or Text Tone), which means
you can select it just like any built-in option. If you want it for general app notifications, check whether it appears
under Settings > Sounds & Haptics > Default Alerts as well.
Option B (More Control): Add a Custom Tone from a Computer
If you prefer editing audio on a bigger screen, you can create a ringtone file on a Mac or PC, then sync it to your iPhone.
This route is useful if you want cleaner edits (fade in/out, precise trimming) or you’re working with a lot of tones.
The general idea looks like this:
- Edit the audio so it’s short and recognizable (again, keep it around 30 seconds).
- Convert it to a ringtone-friendly format and add it to your phone via sync/transfer.
- Once it’s on your iPhone, pick it in Sounds & Haptics just like any other tone.
If you’re doing this, aim for a clean, punchy snippetnot a quiet intro that takes 12 seconds to get interesting.
Notification sounds are tiny deadlines. Don’t make them wait.
Troubleshooting: “I Changed the Sound, But I Still Don’t Hear Anything”
If your iPhone is ignoring your carefully selected tone, it’s usually one of these settings playing defense:
1) Check Silent Mode and Focus
- Silent Mode: If your iPhone is set to silent, many alerts won’t make noise (but may vibrate).
- Focus / Do Not Disturb: A Focus mode can silence notifications entirely or allow only certain people/apps.
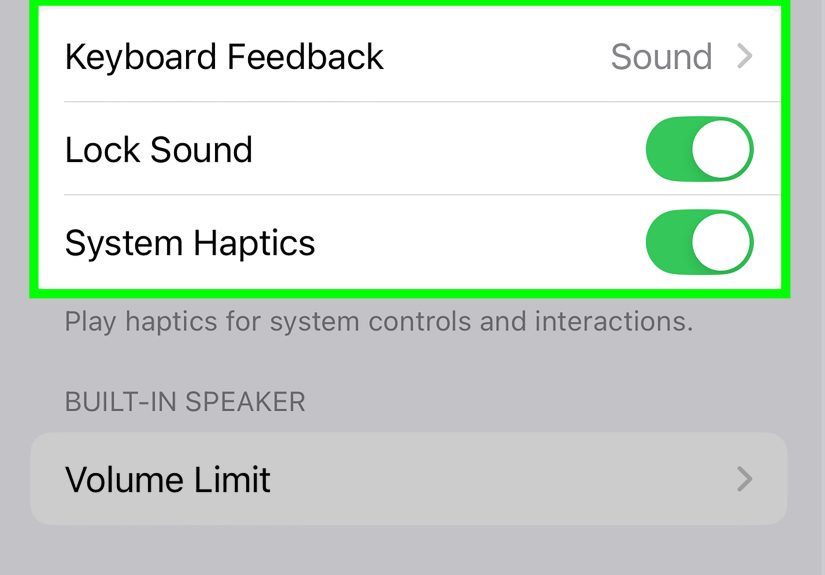
2) Turn Up “Ringtone and Alerts” Volume
Go to Settings > Sounds & Haptics and drag the Ringtone and Alerts slider up.
Also consider turning on Change with Buttons if you want your volume buttons to control alert volume (not just media).
3) Make Sure Notifications Are Allowed for That App
Go to Settings > Notifications, tap the app, and confirm Allow Notifications is on.
Then confirm Sounds is enabled (and selectable, if available).
4) Watch Out for Bluetooth (Your Phone Might Be Whispering to Your Headphones)
If you’re connected to AirPods, a car stereo, or a speaker, notification sounds may route there. Quick test: turn off Bluetooth
temporarily and trigger a notification.
5) Remember: Some Alerts Intentionally Break the Rules
Certain emergency/government alerts can be configured to play sound even when iPhone is in silent mode (depending on region and settings).
That’s by designbecause the point is to get your attention, not to politely respect your vibes.
How to Pick a Notification Sound You’ll Actually Notice
A “good” notification sound is less about taste and more about survival. Here’s how to choose one that works:
- Choose a tone with a strong opening: quick, bright, and recognizable in the first half-second.
- Test it in noisy places: fans, traffic, a coffee shop, or while music is playing.
- Pair sound with haptics: in Sounds & Haptics, you can adjust vibration behavior so you still notice alerts when it’s quiet-mode time.
- Use different categories strategically: make texts one sound, calendar another, reminders another. Your brain will learn the “audio labels.”
Real-World Experiences: What Changes When You Finally Fix Your iPhone Notification Sounds (500+ Words)
Once you change your iPhone notification sounds, you start noticing how often your day is run by tiny audio cues you barely
registered before. People usually don’t realize how much they’ve trained themselves to ignore a sound until they swap it for something
clearerthen suddenly they’re responding faster, missing fewer time-sensitive alerts, and wondering why they tolerated “barely audible”
for so long.
One common experience is the “group chat paradox.” A quiet default alert sound can feel like peace… until you miss the one message that
actually mattered: “Practice moved to 5,” “Meeting starts early,” or “Your ride is here.” After switching Default Alerts to a louder,
more distinct tone (and keeping text tones separate), a lot of people report that they can let notifications run without constantly
checking their phone “just in case.” The sound becomes informative again instead of being background noise.
Another real-life scenario: notifications in motion. When you’re walking outside, on public transit, or in a busy hallway, subtle tones
disappear. That’s where pairing a stronger alert with a noticeable haptic pattern becomes a game-changer. The sound is the headline, the
vibration is the backup singer, and together they make sure you actually notice the momentwithout needing your phone on maximum volume.
There’s also the “two important people” problem: you want your phone calm most of the time, but you need to instantly recognize a message
from a parent/guardian, a coach, or a teammate coordinating something time-sensitive. Assigning a specific ringtone/text tone to a contact
is one of those changes that feels small but has a big payoff. You don’t even need to look at your screen to know whether it’s urgent or
ignorable. That reduces stress because you’re not reacting to every buzz like it might be critical.
People who rely on reminders (meds, assignments, appointments, or just “take the laundry out before it becomes a science experiment”)
often discover that the default reminder alert is either too gentle or too similar to other sounds. Changing Reminder Alerts
to a tone that’s distinctand not used anywhere elsehelps prevent that “I heard something… was that a notification or just life happening?”
moment. In practice, the best reminder sound is one that feels slightly out of place: it grabs attention because it’s different, not because
it’s obnoxiously loud.
Then there’s the classic: “I changed it, but nothing changed.” Usually, that’s Focus mode, silent mode, or Bluetooth routing audio
somewhere unexpected. It’s a surprisingly common experience to realize your phone has been faithfully playing notifications into your car’s
audio system… while you’re nowhere near your car. Once people check those settings, the new tones suddenly work exactly as expectedand it
feels like getting your phone back from a mischievous gremlin.
The biggest takeaway from these everyday stories is simple: the best notification setup isn’t about having the coolest sound. It’s about
making sure your alerts match your life. Loud enough to hear when you need them, categorized enough to be meaningful, and customized enough
that your phone helps yourather than training you to ignore it.
Conclusion
If you want the fastest fix, use Quick Way #1: go to Settings > Sounds & Haptics, change
Default Alerts, then customize categories like Text Tone, Mail, Calendar,
and Reminders. If you want a truly personal sound, use Quick Way #2: create or add a custom tone
(GarageBand is the simplest) and select it in your sound menus.
Do those two things, and you’ll stop living in the chaos of “Was that my phone?” and start living in the calm confidence of “Yup, that was
my calendar alert, and Future Me is grateful.”


