Table of Contents >> Show >> Hide
- Before You Charge Anything, Figure Out What Battery You Actually Have
- What You Need
- How to Charge a Lawn Mower Battery With a Charger
- How to Charge a Lawn Mower Battery With a Car
- How Long Should a Lawn Mower Battery Take to Charge?
- Common Mistakes That Kill Mower Batteries Early
- How to Tell Whether the Battery Is Bad
- Battery Care Tips That Save Money
- Final Thoughts
- Practical Experiences: What Real-World Lawn Mower Battery Charging Usually Looks Like
- SEO Tags
A dead lawn mower battery has a special talent: it waits until the grass is knee-high and the neighbors are outside judging your life choices. The good news is that charging a lawn mower battery is usually simple. The even better news is that you can often do it with tools you already have. The catch? You need to do it the right way, because batteries are one of those garage items that look harmless right up until they spark, leak, or quietly die because they were charged like a maniac.
This guide explains exactly how to charge a lawn mower battery with a charger, how to use a car battery as a temporary backup, and when to stop trying to revive the thing and just replace it. We’ll also cover the differences between riding mower starter batteries and removable lithium packs on cordless mowers, because not every “mower battery” is the same animal.
Before You Charge Anything, Figure Out What Battery You Actually Have
If you own a riding mower or lawn tractor, you’re usually dealing with a small 12-volt lead-acid battery. Some older models may use a 6-volt battery, but 12-volt systems are more common on modern equipment. These batteries may be conventional flooded lead-acid or sealed AGM style. Both need the correct voltage, the correct charging method, and a little patience.
If you own a cordless walk-behind mower, that is a different story. Those machines usually use a removable lithium-ion battery pack. In that case, do not get creative with a car battery, jumper cables, or some mystery charger from the back shelf. Use the charger specified by the manufacturer. A cordless mower battery is not a lawn tractor starter battery wearing a cooler outfit.
Also check your owner’s manual before you begin. Some brands say you can charge the battery while it remains in the mower. Others recommend removing it first. When manuals disagree, the manual for your machine wins.
What You Need
- A compatible battery charger or maintainer
- Safety glasses and gloves
- A clean, well-ventilated workspace
- A rag or wire brush for dirty terminals
- Distilled water only if you have a serviceable flooded battery and the manual allows it
- Jumper cables only if you are using a car as a temporary starting source
For most riding mowers, a smart charger or battery maintainer is the safest choice. A low-amp charger is slower, but it is gentler on the battery and less likely to overcook it. That is exactly what you want. Your mower battery is small. It is not trying out for the Indy 500.
How to Charge a Lawn Mower Battery With a Charger
Step 1: Park Safely and Shut Everything Off
Turn off the mower, remove the key, set the parking brake, and let the machine cool down. Charge the battery in an open, well-ventilated area away from sparks, open flames, cigarettes, and fuel vapors. Batteries can release explosive gases while charging, which is a very dramatic way for a Saturday to go sideways.
Step 2: Access the Battery
On many riding mowers, the battery sits under the seat or under the hood. Open the compartment and inspect the battery case, terminals, and cables. If the case is cracked, frozen, badly swollen, or leaking, do not charge it. Replace it.
If the terminals are crusty with corrosion, clean them before charging. Dirty terminals can make a healthy battery act dead and can stop a charger from doing its job. A soft wire brush or battery-terminal brush usually works well.
Step 3: Check Voltage and Charger Settings
Match the charger to the battery voltage. In most cases that means 12 volts, but verify before you connect anything. Using the wrong voltage is one of the fastest ways to ruin a battery or damage the mower’s electrical system.
As for amperage, lower is usually safer for a small mower battery. Many DIY instructions recommend keeping charger output at 10 amps or less, and some brands suggest even gentler charging rates. A 1- to 3-amp smart charger is a great everyday choice if you are not in a rush. A 4- to 10-amp setting can work on many tractors when the manufacturer allows it, but faster charging needs more supervision.
Step 4: Connect the Charger in the Right Order
Make sure the charger is unplugged from the wall before connecting the clamps. Then:
- Connect the red clamp to the positive (+) battery terminal.
- Connect the black clamp to the negative (-) terminal, or to the grounding point specified in your manual.
- Select the proper battery setting if your charger has one, such as flooded, AGM, 6V, or 12V.
- Plug the charger into the outlet and begin charging.
Simple? Yes. Worth rushing? No. Battery charging is one of those jobs where “close enough” can become “why does the garage smell like burnt regret?”
Step 5: Let It Charge Fully
Charge time depends on battery size, battery condition, and charger output. A small smart charger may take several hours. A higher-amp charger may do the job faster, but the battery should not get excessively hot and the charger should not be left unattended if it is a manual unit.
If your battery is a serviceable flooded type, check the electrolyte only as your manual directs. Never add acid. If the plates are exposed, add only enough distilled water to cover them before charging. Then, once the battery is fully charged, top off to the proper level if needed. Never overfill.
Step 6: Disconnect in Reverse Order
When the battery is fully charged, unplug the charger from the outlet first. Then disconnect the black clamp, followed by the red clamp. If you removed the battery from the mower, reinstall it and reconnect the mower cables in the order specified by your manual. Many tractors are reconnected positive first, negative second.
How to Charge a Lawn Mower Battery With a Car
Now for the part everyone asks about. Can you use a car to charge a lawn mower battery? Sort of, but here is the important distinction: a car is best used as a temporary jump-start source, not as a proper battery charger.
If your mower battery is low and you need to get the machine started, a car battery can sometimes help. But after the mower starts, you should fully recharge the mower battery with the correct charger as soon as possible. Think of the car as a first-aid kit, not a long-term treatment plan.
When a Car Can Help
Using jumper cables from a car or a fully charged 12-volt source can get a riding mower started when the battery is weak. Some mower support resources allow this only under specific conditions. Others are more cautious and recommend a proper charger or jump pack instead. That means you should always check your mower’s manual first.
How to Jump-Start a Riding Mower From a Car
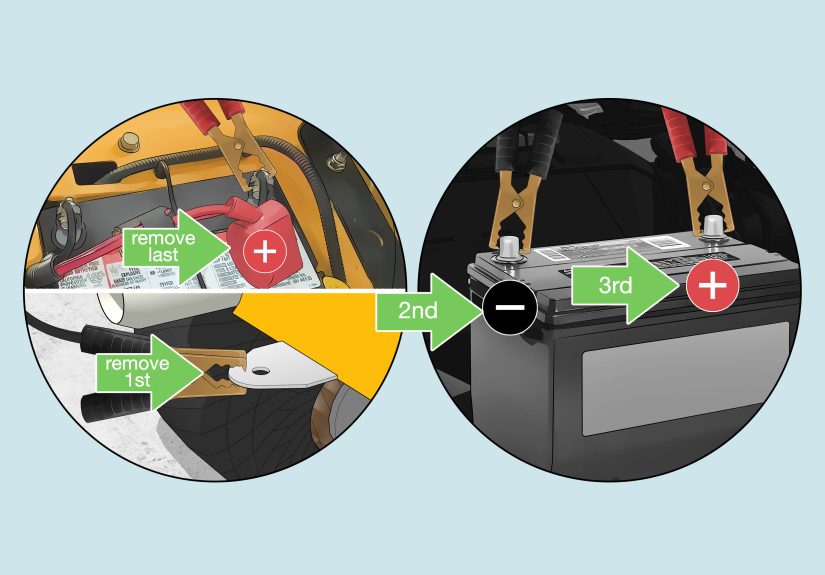
- Park the car close enough for the cables to reach, but do not let the vehicles touch.
- Shut off the car’s engine. This matters. Do not jump a mower from a running vehicle.
- Open the mower battery compartment and the car hood.
- Connect one red clamp to the mower battery’s positive terminal.
- Connect the other red clamp to the car battery’s positive terminal.
- Connect one black clamp to the car battery’s negative terminal.
- Connect the other black clamp to a bare metal part of the mower frame away from the battery and fuel tank, if your equipment guidance calls for a frame ground.
- Start the mower.
- Once the mower starts, remove the cables in reverse order.
That reverse order matters too: black from mower frame first, black from car battery second, red from car battery third, red from mower battery last. Afterward, give the mower battery a real recharge with the proper charger.
Important Warnings About Using a Car
- Do not use a car with the engine running.
- Do not assume every mower manufacturer approves jumping from an installed vehicle battery.
- Do not use a high-output boost charger or start booster unless your mower manufacturer specifically allows it.
- Do not use this method on removable lithium mower batteries.
If your mower repeatedly needs a jump, the battery may be failing, the alternator may not be charging, or the cables may be loose or corroded. Repeated jump-starting is a clue, not a maintenance plan.
How Long Should a Lawn Mower Battery Take to Charge?
There is no single magic number because charger settings and battery size vary. In general, a low-amp charger may take several hours, while a higher setting may cut that down. A 10-amp charger may recharge some mower batteries in around an hour, while a 1- to 3-amp maintainer can take much longer but is easier on the battery.
What matters most is not winning a race. It is finishing with a battery that still has a future. Slow, controlled charging is usually better than blasting a small battery with more current than it was built to handle.
Common Mistakes That Kill Mower Batteries Early
Using the Wrong Charger
A charger set to the wrong voltage, or a charger meant for a different battery chemistry, can shorten battery life fast. AGM, flooded lead-acid, and lithium packs do not all want the same treatment.
Overcharging a Manual Charger
Manual chargers can keep pushing current even after the battery is full. That can overheat the battery, boil off electrolyte, and leave you with a weaker battery than the one you started with.
Ignoring Corrosion
Crusty terminals create resistance. Resistance creates poor charging and poor starting. Clean terminals are not glamorous, but neither is pushing a riding mower across the yard.
Letting the Battery Sit Discharged
A mower that sits for weeks or months with a weak battery is more likely to come back cranky or not come back at all. Off-season storage is hard on neglected batteries.
Treating a Jump-Start Like a Full Recharge
A successful jump-start only proves the starter turned. It does not prove the battery is healthy, fully charged, or ready for another week of use.
How to Tell Whether the Battery Is Bad
Sometimes the battery is just discharged. Sometimes it is done with this relationship.
Signs the battery may need replacement include:
- The mower only clicks or groans when you turn the key
- The battery will not fully charge after hours on the charger
- The battery charges but loses power again very quickly
- The case is swollen, cracked, leaking, or badly corroded
- The mower needs repeated jump-starts
If the battery charges fully but drains again while sitting, the issue may also be a charging-system problem. On key-start mowers, the alternator and charging circuit are supposed to keep the battery topped up while the engine runs. If that system fails, a brand-new battery can still act tired.
Battery Care Tips That Save Money
- Use a smart maintainer during winter storage.
- Keep terminals clean and cable connections tight.
- Store the mower or battery in a dry place away from severe temperature swings.
- Check vent openings on serviceable batteries and keep them clear.
- Do not let a flooded battery run low on water.
- Recharge the battery before it sits for long periods.
If your mower lives a seasonal life, a battery maintainer is one of the cheapest ways to avoid springtime drama. It keeps the battery from slowly flattening out while your mower enjoys its winter vacation.
Final Thoughts
If you want the safest, most reliable method, use a proper lawn mower battery charger or a smart maintainer. That is the best way to charge a riding mower battery without stressing the battery or the mower’s electrical system. If you need a quick emergency start, using a car battery can work on some riding mowers, but only as a temporary jump-start method and only when done carefully.
The big takeaway is simple: match the voltage, use the right charger, keep the current reasonable, and do not confuse “got it started” with “fixed the problem.” A mower battery is small, but it has a long memory. Treat it well, and it will reward you with boringly reliable starts, which is exactly what you want from outdoor power equipment.
Practical Experiences: What Real-World Lawn Mower Battery Charging Usually Looks Like
In real garage life, charging a lawn mower battery is rarely the neat, cinematic moment you imagine. It is usually you, a dusty charger, one missing glove, and a mower that suddenly pretends it has never met electricity before. The first thing experience teaches is that most “dead” batteries are not completely dead. Many are just undercharged after sitting too long, especially over winter. A slow smart charger often brings them back without any drama. That alone surprises a lot of people who assume a mower that will not crank automatically needs a brand-new battery.
The second lesson is that corrosion fools people all the time. A mower battery can have enough charge, but if the terminals are fuzzy and the cable ends are dirty, the mower acts like it is offended by the key. Clean the terminals, tighten the connections, and suddenly the machine starts like it has rediscovered purpose. That is why experienced DIYers check the simple stuff before spending money.
Another common experience is learning that faster is not always better. People get impatient, grab a high-output charger, and try to “blast” the battery back to life. Sometimes that works in the short term. Sometimes it shortens the battery’s lifespan or creates enough heat to make everyone nervous. Slow charging tends to be less exciting, but that is exactly the point. Boring charging is good charging.
Using a car is where experience gets even more interesting. Yes, plenty of homeowners have jump-started a riding mower from a car and gone on with their day. But the people who have done it more than once usually say the same thing: it should be a rescue move, not your regular system. The moment a mower needs repeated jumps, that is your clue to stop improvising and diagnose the actual problem. It could be a tired battery. It could be a charging-system issue. It could just be a mower that has been sitting for months like a hibernating bear with flat tires.
Seasonal storage is another area where experience beats theory. Batteries hate neglect more than hard work. A mower used every week in summer can be fine, then fail after one lazy winter in the corner of the shed. Owners who use a maintainer tend to avoid that spring surprise. Owners who do not often spend the first warm Saturday muttering at jumper cables.
And finally, real-world experience teaches one humble truth: the owner’s manual is annoyingly useful. Different brands really do have different charging instructions. Some allow in-place charging. Some prefer battery removal. Some are fine with moderate charging rates. Others are pickier. Reading the manual is not glamorous, but it beats frying a small electrical system because you treated your mower like a pickup truck.
In other words, the practical experience around mower batteries is simple: go slow, stay safe, keep things clean, and do not wait until the grass is winning.