Table of Contents >> Show >> Hide
- Why Dryer Vent Cleaning Matters (Yes, Even If You “Always Clean the Lint Screen”)
- How Often Should You Clean a Dryer Vent?
- Warning Signs Your Dryer Vent Needs Cleaning
- Tools and Supplies You’ll Want
- Before You Start: Safety Setup (Two Minutes That Matter)
- How to Clean a Dryer Vent Indoors (Behind the Dryer)
- Step 1: Clean the lint screen (and the lint-trap slot)
- Step 2: Disconnect the duct from the dryer
- Step 3: Vacuum lint from the dryer exhaust outlet and surrounding area
- Step 4: Clean the duct line from the indoor side
- Step 5: Inspect your ductwork (this is where most “dryer problems” are born)
- Step 6: Reconnect the duct and seal properly
- Step 7: Quick test
- How to Clean a Dryer Vent Outside (At the Vent Hood/Cap)
- Troubleshooting: If Your Dryer Still Takes Forever
- When to Call a Professional Dryer Vent Cleaner
- Quick Habits That Keep Lint From Taking Over
- FAQ: Dryer Vent Cleaning, Answered Without the Fluff (Okay, Minimal Fluff)
- Real-World Experiences and Lessons Learned (Extra )
- SEO Tags
Dryer vents are the plumbing of the laundry world: nobody thinks about them until something backs up, starts smelling weird, or takes
three business days to dry a towel. The good news? Cleaning a dryer vent is one of the highest “effort-to-reward” home maintenance
jobs you can do. It helps your dryer run faster, wastes less energy, andmost importantlyreduces the risk of lint-fueled overheating.
This guide walks you through how to clean a dryer vent indoors (behind the dryer and inside the duct) and
outside (at the vent hood or cap). You’ll also learn the warning signs of a clog, how often to clean, what tools actually
help, and when it’s smarter to call a pro instead of turning your Saturday into a lint-themed escape room.
Why Dryer Vent Cleaning Matters (Yes, Even If You “Always Clean the Lint Screen”)
1) Lint is flammable and loves to collect where you can’t see it
The lint screen catches a lot, but not all. Fine fibers can slide past the screen, stick to the inside of the duct, and build up over
timeespecially in long vent runs or ducts with multiple bends. Reduced airflow can lead to excessive heat buildup. Translation:
the vent can become a slow-moving, fuzzy traffic jam that your dryer keeps trying to push hot air through.
2) A clean vent saves time, energy, and dryer wear-and-tear
When the vent is clogged, your dryer has to work harder and run longer to move moist air out of the drum. That can mean higher energy
bills, damp clothes at the end of a cycle, and more strain on parts that weren’t designed to fight a lint monster every week.
How Often Should You Clean a Dryer Vent?
A solid baseline for most homes is a thorough vent cleaning about once a year. But the “right” frequency depends on your
setup and laundry habits. Clean more often if:
- You do lots of laundry (big family, sports uniforms, constant towels, etc.).
- You have pets (pet hair + lint = deluxe clog combo).
- Your vent run is long, has several elbows, or vents through a roof.
- You dry lint-heavy items (fleece, flannel, new towels, throw blankets).
Also: you should clean the lint screen every load, and periodically deep-clean the lint screen and lint-trap slot if residue
from fabric softener or detergents builds up and reduces airflow.
Warning Signs Your Dryer Vent Needs Cleaning
If any of these sound familiar, your vent is probably asking for help:
- Drying takes longer than usual (especially towels and jeans).
- Clothes feel extra hot at the end of a normal cycle.
- Outside vent flap barely opens (or doesn’t open) while the dryer runs.
- A musty or “hot” smell shows up during drying.
- More lint than normal around the dryer, behind it, or in the laundry room.
- Humidity rises in the laundry area (moist air isn’t leaving the house properly).
Tools and Supplies You’ll Want
You don’t need a NASA toolkit. You need a few basics that actually reach into the duct.
- Vacuum with hose + crevice tool (shop vac is great, but a strong home vacuum works for many setups).
- Dryer vent brush kit (long, flexible brush made for ducts).
- Screwdriver (often a Phillips or flathead for clamps/vent covers).
- Work gloves (sheet metal edges are not your friends).
- Flashlight (lint hides in the shadows like it pays rent).
- Foil HVAC tape or new metal clamps (for re-sealing connections; skip cloth “duct tape”).
- Optional: microfiber cloth, small nylon brush for lint screen residue, and a mask if you’re lint-sensitive.
Before You Start: Safety Setup (Two Minutes That Matter)
- Turn the dryer off and let it cool if it was recently running.
- Unplug the dryer from the outlet.
-
If you have a gas dryer, shut off the gas supply valve before moving the appliance. If you’re not comfortable with gas
connections, this is a great moment to call a professional. - Pull the dryer away from the wall carefully so you don’t crush or kink the duct.
How to Clean a Dryer Vent Indoors (Behind the Dryer)
Step 1: Clean the lint screen (and the lint-trap slot)
Start with the obvious: remove lint from the screen. Then give the lint-trap slot some attentionlint can fall into the slot and restrict
airflow. Use a vacuum crevice tool or a lint brush to clean inside the slot.
If your lint screen looks “waxy” or seems to repel water, it may have residue from fabric softener or detergent. That residue can block
airflow. A periodic scrub with a nylon brush and soap/water (then fully drying the screen) can restore performance.
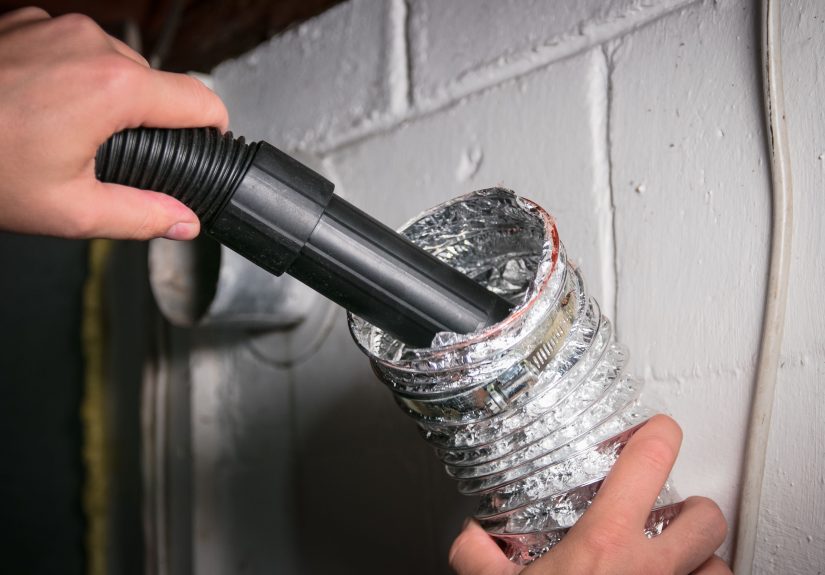
Step 2: Disconnect the duct from the dryer
Look at the back of the dryer where the duct attaches. Most ducts are secured with a clamp. Loosen the clamp and gently remove the duct.
If you see piles of lint right at the connection, congratulationsyou found your dryer’s secret hobby.
Step 3: Vacuum lint from the dryer exhaust outlet and surrounding area
Use your vacuum to remove lint around the exhaust outlet on the dryer itself. Be gentledon’t push lint deeper into the machine. You’re
trying to remove it, not help it relocate.
Step 4: Clean the duct line from the indoor side
Now focus on the duct that runs from the dryer toward the wall. You can:
- Brush: Feed a dryer vent brush into the duct, rotating and pulling it back to collect lint.
- Vacuum: Use the hose/crevice tool to remove loosened lint near the opening.
Work slowly. If your vent has bends, don’t force the brush like you’re trying to win a sword fight with your house. If the brush jams,
pull back slightly, rotate, and try again. For very long runs, you’ll do additional cleaning from the outside too (and sometimes the middle
is best handled by a professional).
Step 5: Inspect your ductwork (this is where most “dryer problems” are born)
Before reconnecting, take a good look at the vent duct:
- Is it crushed, kinked, or sagging? Poor airflow often starts right here.
- Is it the right material? Smooth metal ducting generally performs better than flimsy accordion-style options that trap lint.
- Are joints secure? Vibrations can loosen connections over time.
- Is it excessively long or full of sharp turns? That can increase lint buildup and drying time.
If you can improve the duct route (shorter, straighter, fewer elbows), you usually get better airflow and less lint accumulation. If you
can’t change the route, you can still clean it more regularly.
Step 6: Reconnect the duct and seal properly
Reattach the duct to the dryer outlet, tighten the clamp, and ensure the connection is snug. If you use tape, use
foil HVAC tape designed for ductingnot standard cloth duct tape, which can fail in hot environments.
Step 7: Quick test
Plug the dryer back in (and turn the gas valve back on if applicable). Run the dryer for 10–15 minutes on an empty cycle. You’re listening
for odd rattles, checking that the dryer isn’t vibrating the duct loose, and confirming airflow outside (we’ll cover that next).
How to Clean a Dryer Vent Outside (At the Vent Hood/Cap)
Step 1: Find the exterior vent termination
Dryer vents typically exit through an exterior wall (sometimes low near the ground) or through the roof. If it’s on a wall, you’ll usually
see a vent hood with a flap that opens when the dryer runs.
Step 2: Remove the vent cover (carefully)
Unscrew or unclip the exterior cover. Check for lint, stuck flaps, and signs of damage. Also look for “surprises” like leaves, nesting
material, or debris that can block airflow.
Step 3: Brush and vacuum the outside opening
Use your vent brush to loosen lint inside the opening. Then vacuum it out. Repeat until you’re not pulling out lint. Wipe the cover clean,
make sure the flap moves freely, and reinstall the cover securely.
Step 4: Confirm airflow
With the dryer running, go outside and check the vent flap. It should open and push air out steadily. If it barely opens, the vent may
still be restricted deeper in the runor the duct route may be too long/complex for DIY cleaning alone.
Roof vent? Consider your safety first
If your dryer vents through the roof, cleaning the exterior cap can involve ladder work and roof access. If you’re not comfortable with
heights, footing, or roof pitch, hire a professional. Falling is a terrible way to save money.
Troubleshooting: If Your Dryer Still Takes Forever
If you cleaned the vent and drying is still slow, here are common culprits:
- Residue on the lint screen reducing airflow (deep clean the screen as described above).
- Crushed or overly long ducting behind the dryer.
- Too many elbows or a long run through walls/ceilings that still has buildup.
- Blocked exterior flap or damaged vent hood.
- Overloading the dryer (air needs room to move through the drum).
If the vent path is long, hidden, or vents through the roof, a professional cleaning may be the most practical and thorough solution.
When to Call a Professional Dryer Vent Cleaner
DIY vent cleaning is very doable for short, accessible vents. But call a pro if:
- The vent run is long, hard to access, or routed through ceilings/roof.
- You can’t move the dryer safely (tight space, stacked units, heavy appliances).
- You have a gas dryer and aren’t confident shutting off/restarting safely.
- You keep getting poor airflow signs even after cleaning.
- You suspect the duct is damaged, disconnected, or improperly installed inside the wall.
Quick Habits That Keep Lint From Taking Over
- Clean the lint screen every load (make it part of the “start dryer” ritual).
- Don’t ignore longer drying timesthey’re your early warning system.
- Keep the area behind the dryer clean so lint doesn’t accumulate around the machine.
- Check the outside vent flap occasionally to confirm it opens freely.
- Be cautious with lint-heavy laundry (new towels, fleece)they can speed up buildup.
FAQ: Dryer Vent Cleaning, Answered Without the Fluff (Okay, Minimal Fluff)
Can I clean a dryer vent without moving the dryer?
Sometimes. If your dryer is difficult to move, you can clean from the exterior side by removing the vent cover and using a brush/vacuum to
clear lint. However, cleaning behind the dryer is still important because lint often accumulates right where the duct connects.
Is it normal to find lint even if I clean the lint trap?
Yes. The lint trap catches most lint, but fine fibers can still pass through and stick to duct wallsespecially in ducts with ridges,
bends, or long runs.
Should a dryer vent have a screen on the outside?
Many exterior covers include a flap to prevent pests, but fine screens can trap lint and clog faster. If your cover has a screen that
constantly clogs, consider replacing it with a design that protects against pests without acting like a lint net.
What’s the single biggest mistake homeowners make?
Treating the lint screen as the only maintenance task. It’s important, but it’s not the whole system. The duct line and exterior hood need
attention too.
Real-World Experiences and Lessons Learned (Extra )
If you’ve never cleaned a dryer vent before, the first time can feel like opening a mystery novel where the villain is… beige. Lots of
homeowners report the same “how did this happen?” moment when they pull the dryer away from the wall and discover a thick halo of lint on
the floor, on the baseboards, and somehow on surfaces that seem physically impossible. Lint has a special talent: it behaves like glitter,
except it’s less festive and more likely to ruin your weekend.
One common experience is realizing the dryer duct is quietly suffering. The duct behind the dryer often gets crushed when the
appliance is pushed back too tightly, especially in smaller laundry closets. The dryer may still run, but drying times slowly creep up
45 minutes becomes 60, then 75, then you’re doing “two cycles and a prayer” for towels. After cleaning and re-positioning the duct so it
isn’t kinked, many people notice an immediate difference: clothes come out dry sooner, and the laundry room doesn’t feel like a humid
tropical exhibit.
Another frequent surprise is how much lint collects at elbows. Every turn in the duct is a place where airflow slows down and fibers can
settle. People with longer vent runsespecially those that travel up and out through a roofoften describe pulling out lint in stages:
first a handful (encouraging), then a dense mat (alarming), then a compact “lint burrito” that makes you question all your life choices.
This is also where DIY cleaning can hit a wall (sometimes literally). If your brush can’t navigate the bends, or if you suspect buildup
deep inside a hidden run, that’s not a personal failureit’s a sign the setup may need professional equipment for a full clean-out.
Pet owners have their own chapter in the dryer vent saga. Pet hair mixes with lint and can create thick, felt-like clumps that stick to
duct walls. Homes with multiple shedding animals often find they need to clean more than once a year, particularly if they dry blankets,
pet beds, or throws frequently. The “tell” is usually the lint screen filling up faster than normal and the outside vent flap opening less
enthusiastically over time.
People also learn that not all “dryer problems” are dryer problems. A vent cover outside might be stuck shut with paint, jammed with damp
lint, blocked by landscaping debris, or even partially obstructed by nesting material. When that flap can’t open freely, the dryer is
trying to push air out through a door that won’t budgeso the hot, moist air has nowhere to go. Cleaning the exterior hood and confirming
that the flap swings easily is one of those small tasks that can save you from bigger headaches (and bigger repair bills).
Finally, there’s the satisfaction factor. Dryer vent cleaning is one of those rare maintenance jobs where the results are obvious: shorter
dry times, better airflow, less heat buildup, and fewer “why is the laundry room so steamy?” moments. It’s not glamorous, but it’s the kind
of practical home skill that pays you back every weeklike meal prepping, but with fewer containers and more lint.