Table of Contents >> Show >> Hide
- Why Log Snowmen Work So Well (Even If You’re Not “Crafty”)
- Main Keyword + LSI Keywords to Keep in Mind
- Materials and Tools
- Choosing the Right Logs (So Your Snowman Doesn’t Crack Like a Bad Joke)
- Prep Work: The Not-So-Glamorous Step That Makes Everything Look Better
- How to Build Your Log Snowman: 3 Popular Styles
- Painting Tips That Make Your Snowman Look Crisp (Not Streaky)
- Sealing and Weatherproofing (Especially for Outdoor Log Snowmen)
- Design Ideas: From Rustic Cabin to Modern Minimal
- Troubleshooting: Common Problems (and Easy Fixes)
- Time and Cost Estimate
- Safety Notes (Quick but Important)
- Conclusion: Your No-Melt Winter Decor Win
- of Real-World Experience: What I Learned Making Log Snowmen
Want snowmen that don’t melt, don’t drip, and don’t turn into a sad puddle the moment your weather app changes its mind?
Log snowmen are the low-maintenance winter roommates you’ve been waiting for: rustic, sturdy, and totally okay living on a porch
without demanding hot cocoa every 12 minutes.
In this guide, you’ll learn how to turn ordinary logs into charming DIY snowman decor using beginner-friendly tools and
techniques that hold upwhether your “winter wonderland” is a snowy driveway or a front step in a place where winter is mostly
a vibe. We’ll cover wood selection, prep, painting, sealing, styling, and the little details that make your snowman look
delightfully handmade (not “kindergarten art project left in the rain”).
Why Log Snowmen Work So Well (Even If You’re Not “Crafty”)
Log snowmen hit the sweet spot between “Pinterest-worthy” and “actually doable.” The shapes are forgiving, the materials are
affordable (sometimes free), and the finished decor looks like it came from a cozy cabin gift shop. Plus, logs naturally bring
texturegrain, knots, bark edgesthat make simple paint jobs look richer and more dimensional.
- Durable: Great for porches, patios, entryways, and indoor displays.
- Customizable: Farmhouse, modern, traditional, glamyour snowman, your rules.
- Beginner-friendly: If you can paint a circle and glue a button, you can do this.
Main Keyword + LSI Keywords to Keep in Mind
If you’re making these to share online (or you’re a content creator), the core phrase is DIY log snowman decor.
Related terms (LSI keywords) include: wood log snowman tutorial, rustic Christmas decor, outdoor snowman decorations, painted log crafts,
farmhouse holiday decor, DIY Christmas yard decor. We’ll weave the concepts in naturallyno awkward keyword confetti.
Materials and Tools
You can keep this project super simple or go full “holiday workshop.” Here’s a practical list you can adapt to what you already
have.
Log Options
- One solid log (recommended for beginners): 18–36 inches tall, 6–10 inches in diameter.
- Stacked log rounds (classic snowman shape): three rounds, decreasing in size (e.g., 10", 8", 6" diameters).
- Wood slices (for smaller tabletop snowmen or “melted snowman” plaques): 4–10 inches across.
Supplies
- Sandpaper (80/120/220 grit) or a sanding sponge
- Wood filler (optional, for cracks/knots)
- Primer (optional but helpful for smoother, longer-lasting paint)
- Paint: exterior craft paint, acrylic, or latex (matte or satin works great)
- Paintbrushes + foam brushes (foam brushes help avoid streaks)
- Black paint pen/marker for details (optional, but makes life easier)
- Hot glue gun and glue sticks (or construction adhesive for heavy parts)
- Accessories: buttons, ribbon, twine, felt, faux greenery, small wooden balls, scrap fabric
- Clear protective topcoat (especially if outdoors): exterior-rated spar urethane, marine varnish, or outdoor clear coat spray
Tools (Depending on Your Build)
- Hand saw, miter saw, or chainsaw (only if you’re cutting logs yourself)
- Drill + screws (for mounting hats/arms or anchoring to a base)
- Dowel rod or rebar (for stacking rounds securely)
- Safety gear: dust mask/respirator, safety glasses, gloves
Choosing the Right Logs (So Your Snowman Doesn’t Crack Like a Bad Joke)
The biggest surprise for first-timers: wood is alive-ish. It expands, contracts, and dries at different speeds. That’s why
log slices and rounds can crack (called “checking”) as they dry. Cracks aren’t automatically a problemrustic decor can look
great with natural splitsbut you’ll want to plan for them so paint doesn’t flake and accessories don’t pop off.
Best Wood for Log Snowmen
- Hardwoods (oak, maple): dense and durable, but can check as it dries.
- Softer woods (pine): easier to work with, often lighter, but can dent more easily.
- Birch rounds/slices: popular for crafts because they look clean and bright with paint.
Where to Get Logs
- Firewood bundles (look for straighter pieces)
- Tree trimming services (ask for a few “cookie” rounds or short log sections)
- Woodworking stores or craft stores (pre-cut rounds/slices)
- Your own yard (if you’re already cutting or pruning)
Dry vs. Green Wood
Dry wood (seasoned firewood) is usually easiest because it’s done shrinking. Green wood (fresh-cut) is workable,
but it’s more likely to crack as it dries. If you only have green logs, you can still use themjust build with a rustic mindset and
seal/finish thoughtfully.
Prep Work: The Not-So-Glamorous Step That Makes Everything Look Better
Prep is like flossing: annoying, easy to skip, and you’ll regret it later. A little sanding and cleaning helps paint stick,
smooths rough spots, and makes your snowman look intentionally handmade instead of accidentally chaotic.
Step 1: Clean and Dry
- Brush off loose dirt and bark bits.
- Let the log dry indoors for a few days if it feels damp.
- If it’s from outside, check for bugs and remove loose bark.
Step 2: Sand for Paint Adhesion
Start with 80–120 grit for rough areas, then finish with 220 grit for the parts you’ll paint (especially the face area).
Wipe dust off with a dry cloth or vacuum brush attachment.
Step 3: Fill Cracks (Optional)
If you want a smoother “store-bought” look, use wood filler on major cracks and knots. Let it dry fully and sand smooth.
If you like rustic character, skip filler and treat cracks as “natural smile lines.”
Step 4: Prime (Optional, But Worth It)
Primer helps block wood tannins (that sneaky yellow/brown bleed-through) and gives paint a consistent base. For outdoor decor,
a primer rated for exterior use improves durability.
How to Build Your Log Snowman: 3 Popular Styles
Choose the style that matches your tools, time, and patience level. All three look greatso pick the one that makes you feel
like a crafty genius instead of a tired person with glue strings on their sweater.
Style A: One-Log Snowman (Fastest and Most Beginner-Friendly)
- Choose your log: About 24–36 inches tall looks great on a porch. A flat bottom is helpful, but you can add a base if needed.
- Paint the “snow” area: Paint most of the log white, leaving a little wood showing if you want rustic edges. Use 2–3 thin coats.
- Add a face: Paint or draw eyes, a carrot nose, and a dotted smile. A black paint pen makes this easy and crisp.
- Add buttons: Paint dots or glue on real buttons. Keep spacing consistent for a polished look.
- Make a scarf: Wrap ribbon or fabric around the “neck” area and secure with hot glue on the back.
- Top it off: Add a mini hat (small bucket, upside-down flowerpot, felt hat) or paint a hat shape directly on the log.
Pro tip: If your log is slightly uneven, rotate it until the “face side” looks most stable. Your snowman should not
look like it’s perpetually bracing for a strong gust of wind.
Style B: Stacked Log Rounds Snowman (Classic Snowman Shape)
- Select 3 rounds: Largest = base, medium = torso, smallest = head. Aim for a visible size difference so the silhouette reads “snowman.”
- Create a center support: Drill a hole down the center of each round and stack them on a dowel rod. For outdoor yard decor, consider a thicker dowel or a metal rod.
- Secure the stack: Use wood glue or construction adhesive between rounds. Clamp if possible, or stack with weight and let cure fully.
- Paint and decorate: Paint white, then add face/buttons, scarf, and hat. Add twig arms by drilling angled holes into the torso round.
This version is sturdier than it looks, especially with a dowel. It also gives you that “real snowman” shape without rolling a single snowball.
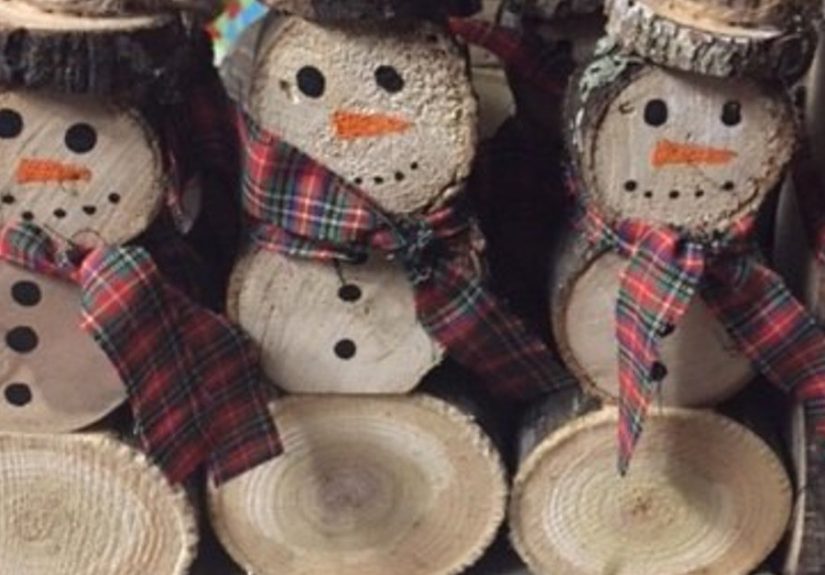
Style C: Leaning Log Snowmen Trio (The “Designer Porch” Look)
Use three different-height logs (for a “family” look). Paint and decorate each one with a slightly different personalityone with earmuffs,
one with a plaid scarf, one with a fancy top hat. Cluster them near a front door with lanterns and faux greenery.
- Height idea: 36", 28", and 20" creates a pleasing stagger.
- Personality idea: Different noses, different button styles, different scarf patterns.
Painting Tips That Make Your Snowman Look Crisp (Not Streaky)
Use Thin Coats
Multiple thin coats beat one thick coat every time. Thick paint tends to drip and can crack as it curesespecially on textured wood.
Matte White Looks More “Snowy”
Matte or flat white gives a soft, snowy look. If you prefer a cleaner “new decor” finish, satin is finejust know it can reflect light more.
Easy Face Templates
- Use coins or bottle caps to trace circles for eyes and buttons.
- Sketch the nose lightly in pencil before painting.
- Step back 6 feet to check the expressionfaces often look different from “up close” vs “porch viewing distance.”
Sealing and Weatherproofing (Especially for Outdoor Log Snowmen)
If your snowman lives outdoors, sealing matters. Sun, moisture, and temperature swings can fade paint, swell wood, and cause peeling.
A clear exterior topcoat helps protect both the paint and the wood.
Which Clear Coat Should You Use?
- Exterior spar urethane / spar varnish: Designed for outdoor exposure and wood movement. Great for porches and yard decor.
- Outdoor clear spray topcoat: Convenient for smaller pieces and quick sealing, especially around ribbons and textured surfaces.
- Interior poly (not ideal outside): Fine for indoor decor, but not your best bet for harsh outdoor conditions.
How to Apply a Clear Coat Without Ruining Your Paint Job
- Let paint cure: Dry-to-touch isn’t the same as fully cured. If you can, wait at least overnight before sealing.
- Test first: Some clear coats can slightly warm (yellow) bright whites. Test on the back or bottom.
- Apply thin coats: Two to three light coats are better than one heavy coat.
- Sand lightly between coats (optional): If you want a smoother finish, lightly sand with 220 grit after the first coat dries, then wipe dust off.
- Seal the bottom too: Moisture can creep in from the base, especially if the log sits directly on concrete or soil.
Outdoor Placement Tips
- Keep the snowman slightly sheltered if possible (under an awning or porch roof).
- Raise it off wet ground using a small base, bricks, or a hidden stand.
- If it’s in direct sun, expect to refresh the topcoat occasionally to keep paint looking sharp.
Design Ideas: From Rustic Cabin to Modern Minimal
Rustic Farmhouse Snowman
- Distressed white paint (lightly sand edges after drying)
- Burlap or plaid ribbon scarf
- Twine details and faux pine sprigs
Modern Scandinavian Snowman
- Clean white paint with minimal distressing
- Simple black eyes and a small triangle nose
- Gray knit scarf, tiny wooden bead buttons
Whimsical “Kids Will Love It” Snowman
- Rosy cheeks (soft pink circles with a sponge)
- Big smile and oversized buttons
- Bright scarf colors and a slightly tilted hat
Troubleshooting: Common Problems (and Easy Fixes)
Paint Is Bleeding Yellow/Brown
That’s tannin bleed. Fix it by priming with a stain-blocking primer and repainting. For future projects, prime firstespecially on pine or knotty pieces.
Cracks Appeared After Painting
This happens when logs continue drying. You can leave it rustic, or fill cracks with flexible wood filler, repaint, and reseal. For big outdoor pieces,
accept that nature likes to add “character.”
Accessories Keep Falling Off Outdoors
Hot glue can struggle in extreme cold/heat swings. For outdoor snowmen, reinforce key parts with small screws (hidden under ribbon) or use construction adhesive.
Clear Coat Made the White Look Warm
Some finishes naturally amber over time. Try a water-clear exterior finish, and always test first. If it already happened, repaint the white areas and reseal with a clearer product.
Time and Cost Estimate
- Time: 1–2 hours hands-on, plus drying time (paint + clear coat).
- Cost: Often $10–$30 if you already have paint and basic supplies. Logs can be free or inexpensive as firewood.
Safety Notes (Quick but Important)
- Wear eye protection when drilling or cutting.
- Use a dust mask when sanding (wood dust is not a cute craft accessory).
- Use spray sealers outdoors or with strong ventilation.
- If you’re cutting logs yourself, use proper chainsaw safety practices and protective gear.
Conclusion: Your No-Melt Winter Decor Win
DIY log snowmen are the perfect blend of rustic charm and practical decorating: easy to build, fun to personalize, and sturdy enough to survive real life.
Whether you make one statement porch snowman or a whole “snowman family,” you’re creating decor that looks warm, welcoming, and uniquely yourswithout relying
on actual snow to cooperate.
Take your time on prep, use thin paint coats, and choose an outdoor-rated clear coat if your snowman will live outside. Do that, and your log snowman will
stay cheerful long after the holiday cookies are gone (which, honestly, is the real seasonal tragedy).
of Real-World Experience: What I Learned Making Log Snowmen
The first time I made a log snowman, I thought I could “skip the sanding” because the log looked pretty smooth already. Friends, that decision lasted exactly
one coat of paint. The surface fuzzed up in spots, the brush caught on tiny splinters, and my snowman’s “cheek” developed a texture best described as
“rugged drywall.” I learned fast: even a quick once-over with a sanding sponge makes painting calmer, cleaner, and way less likely to end in muttered
holiday-themed sarcasm.
The second lesson: logs have opinions about drying. I brought in a fresh-cut piece because it was the perfect size, painted it the same day, and felt
incredibly productive. Two days later, a crack appeared right down the frontstraight through the button line like it was trying to split the snowman into
a “before and after” photo. I could have panicked, but honestly? It looked kind of charming. I filled the crack on one version to see the difference and left
it natural on another. The rustic crack ended up being everyone’s favorite. That’s when I stopped treating imperfections like failure and started treating
them like “design texture.”
Accessories taught me another practical truth: hot glue is not always the hero we want it to be outdoors. On a cold night, I found a scarf bow on the porch
steps like it had tried to escape. The fix was simpleeither add a hidden staple/screw under the scarf wrap, or use a stronger adhesive where it counts.
Now I use hot glue for quick positioning and reinforcement, then add a tiny screw or dab of construction adhesive for anything that needs to survive wind,
temperature swings, and curious pets.
The best upgrade I ever made was switching from “one thick coat of white” to multiple thin coats. Thick paint felt faster, but it dried unevenly and
sometimes looked lumpy on textured grain. Thin coats leveled out better, and the finish looked cleaner from the curbwhich matters because porch decor is
usually admired from a distance while someone is juggling packages and wondering if they left the oven on.
Finally, I learned that the face is everything. You can have the fanciest scarf and the cutest buttons, but if the eyes are uneven, your snowman will look
mildly suspiciouslike it knows what you did with the last slice of pie. Now I lightly pencil the face first, step back, and adjust before paint ever touches
the wood. It takes two minutes and saves you from repainting a whole “forehead area” later. In the end, making log snowmen is surprisingly relaxing: you
start with a rough log, add a few simple details, and suddenly you’ve got a cheerful winter character that’s basically impossible not to smile at.


