Table of Contents >> Show >> Hide
- What Makes an Eye Look Realistic?
- Materials You’ll Need
- Before You Start: Quick Eye Anatomy Check
- Step-by-Step: How to Draw a Realistic Eye
- Step 1: Set Up Your Reference and Light Sketch
- Step 2: Determine the Eye Angle
- Step 3: Sketch the Eye Shape and Tear Duct
- Step 4: Add the Eyelids and Crease
- Step 5: Place the Iris
- Step 6: Add the Pupil and Main Highlight
- Step 7: Map Out Light and Shadow
- Step 8: Shade the Pupil First
- Step 9: Build Iris Texture with Radial Strokes
- Step 10: Shade the Sclera (Eye White) and Tear Duct
- Step 11: Define Eyelids, Waterline, and Shadows
- Step 12: Draw Natural-Looking Eyelashes
- Step 13: Add the Eyebrow and Surrounding Skin
- Step 14: Refine, Blend, and Add Final Highlights
- Common Mistakes When Drawing a Realistic Eye
- Practice Plan: Level Up Your Eye Drawings
- Real-World Experiences: What Artists Learn from Drawing Eyes
- Conclusion
Drawing a realistic eye is one of those classic art milestones. The first few attempts usually
look like surprised almonds, but once you understand structure, shading, and a few pro tricks,
your pencil eye drawings start to feel alive. In this step-by-step tutorial, we’ll walk through
how to draw a realistic eye in 14 clear steps, using the same kinds of techniques taught in
professional art classes and detailed online tutorials.
We’ll cover everything from the basic eye shape and tear duct to shading the iris, placing
highlights, and drawing believable eyelashes. Imagine that after every step, you’d see a
picture showing your progress that’s the “with pictures” part. Even without actual images
here, you’ll know exactly what your drawing should look like as you go.
What Makes an Eye Look Realistic?
Before jumping into the 14 steps, it helps to understand what separates a realistic eye drawing
from a flat, cartoonish one. Artists who specialize in realistic eyes focus on a few key
elements:
- Accurate eye structure: The eye isn’t just a flat almond shape it’s a sphere
sitting in a socket, with eyelids wrapping around it. - Convincing light and shadow: The upper eyelid casts a shadow over the iris,
and the “white” of the eye is actually full of subtle shading. - Iris detail: Radial lines, darker edges, and careful value changes give the
iris that “glass-like” look. - Natural eyelashes: Lashes vary in length, direction, and spacing they’re not
straight, identical spikes. - Highlights and reflections: A well-placed highlight makes the eye look moist
and three-dimensional.
Keep these ideas in mind as you follow the steps. They’re the secret sauce behind
hyper-realistic eye drawings taught in many studio and online courses.
Materials You’ll Need
You can draw a realistic eye with just a simple pencil and paper, but having the right tools
makes life easier:
- Smooth drawing paper or sketchbook
- Graphite pencils (HB or 2H for light lines, 2B–4B for shading, 6B for deep darks)
- Kneaded eraser (for lifting highlights and soft corrections)
- Regular vinyl eraser (for sharper erasing)
- Blending stump, tissue, or cotton swab (optional but helpful)
- A good reference photo of an eye (front view is easiest)
Before You Start: Quick Eye Anatomy Check
You don’t need a medical degree, but knowing the main parts of the eye will make your drawings
more believable:
- Eyelids: Upper and lower lids wrap around the eyeball and create creases
and shadows. - Sclera: The “white” of the eye it’s curved and picks up a lot of subtle
shading. - Iris: The colored ring of the eye with lots of fine texture.
- Pupil: The dark center opening usually the darkest value in the eye.
- Tear duct: The small, pinkish area in the inner corner of the eye.
- Waterline: The moist edge along the lower lid.
- Eyebrow: Frames the eye and helps sell the expression.
As you draw, think of the eye as a sphere with lids and skin sitting on top. That mindset alone
can instantly improve your realistic eye drawing.
Step-by-Step: How to Draw a Realistic Eye
Step 1: Set Up Your Reference and Light Sketch
Start by lightly sketching a guideline circle to represent the eyeball. Keep your pencil
pressure soft so you can erase easily later. If you’re using a reference photo, glance back and
forth between your paper and the image to match the overall size and orientation of the eye.
At this stage, your drawing will look like a simple circle on the page that’s your base
structure, not the final eye shape.
Step 2: Determine the Eye Angle
Next, lightly draw a straight line across the circle to set the tilt of the eye. Is the eye
straight, slightly tilted up, or slightly tilted down? This line acts as a horizon for your eye
and helps you place the lids consistently.
Imagine a reference “picture” here: one eye with a flat line (neutral gaze) and another with a
slanted line (more dramatic angle). This simple step keeps your realistic eye drawing from
looking lopsided.
Step 3: Sketch the Eye Shape and Tear Duct
Use the circle and the angle line as guides to draw the actual eye opening the almond-shaped
outline of the lids. The upper lid usually has a more pronounced curve than the lower lid.
On the inner corner, add the tear duct as a small, rounded triangle or bean-like shape. Make
sure the opening of the eye isn’t a perfect mirror image on both sides; a bit of asymmetry looks
more natural.
Step 4: Add the Eyelids and Crease
Just above the upper lash line, sketch the crease of the upper eyelid. It generally follows the
shape of the eye but doesn’t touch it. Beneath the eye, hint at the lower eyelid with a gentle
curved line that sits slightly away from the eye opening.
Think of these as “picture frame” lines around the eyeball. They help show the thickness of the
lids and make the eye feel three-dimensional.
Step 5: Place the Iris
Inside the eye opening, draw a circle for the iris. It should be partially covered by the upper
lid in most realistic looks. To keep the iris truly round, lightly draw the full circle first,
then erase the parts hidden behind the lids.
Center the iris depending on where the eye is looking. To avoid a “staring” look, make sure
there’s a consistent gap between the iris and the inner and outer corners of the eye.
Step 6: Add the Pupil and Main Highlight
In the center of the iris, draw a smaller circle for the pupil. Keep this shape clean and
clearly defined. Then, add a highlight usually a small circle, oval, or rectangle shape that
overlaps the pupil and iris. This is the reflection of your light source.
Leave this highlight shape completely white for now. It’s going to be one of the brightest
areas in your realistic eye drawing and will make the eye look glossy and alive.
Step 7: Map Out Light and Shadow
Before heavy shading, lightly mark where your darkest areas will be:
- The pupil (very dark)
- The outer rim of the iris
- The shadow cast by the upper lid over the top of the iris
- The crease of the upper lid
- The deepest areas around the tear duct and edges of the sclera
Think of this like planning your “shading map” so you don’t end up over-darkening the whites of
the eye or making everything the same value.
Step 8: Shade the Pupil First
Fill in the pupil using a soft pencil (2B–4B). Build the value gradually, layering strokes until
it becomes one of the darkest spots in the drawing. Be careful not to shade over your highlight
shape that area should stay clean and bright.
A rich, dark pupil adds instant contrast and gives you a reference point for how dark other
areas should be.
Step 9: Build Iris Texture with Radial Strokes
Now for the fun part: iris texture. Using light, controlled strokes, draw lines that radiate
outward from the pupil toward the edge of the iris. They don’t have to be perfectly straight
slight variations and broken lines feel more natural.
Darken the outer edge of the iris (called the limbal ring) to make the eye look more focused and
three-dimensional. Add mid-tone shading in the iris while preserving lighter areas that suggest
reflected light and color variation.
If you imagine a “picture” of this stage, your iris now looks like a sunburst darker near the
rim, darker around the pupil, and full of soft texture in between.
Step 10: Shade the Sclera (Eye White) and Tear Duct
The sclera is not pure white. Lightly shade the corners of the eye, especially near the lids and
opposite the highlight. Use soft strokes and blend gently to keep this area subtle.
In the tear duct, use a slightly darker value and soft shapes to suggest its rounded, moist
surface. Add a tiny highlight here as well just a small bright spot that makes the corner of
the eye look wet.
Step 11: Define Eyelids, Waterline, and Shadows
Go back to the upper and lower eyelids and darken the lash lines where the lashes grow. Add a
soft, curved shadow just under the upper lid and above the iris this is the cast shadow from
the lid, and it’s crucial for realism.
Lightly shade the skin right under the lower lid, blending it into the surrounding area. Along
the waterline, keep a lighter, slightly glossy band to show that this area is moist.
Step 12: Draw Natural-Looking Eyelashes
Time to tackle eyelashes the part that often makes or breaks realistic eye drawing. Instead of
drawing straight, identical spikes, think of each lash as a slightly curved stroke that grows
out from the lid, not straight up from the eyeball.
- Vary the length and direction slightly.
- Group lashes in small clusters instead of spacing them evenly.
- Use a confident flicking motion as you draw each one.
On the lower lid, lashes are shorter, fewer, and more delicate. Keep them lighter and more
subtle to avoid an overdone, mascara-heavy look (unless that’s your style choice).
Step 13: Add the Eyebrow and Surrounding Skin
Sketch the basic shape of the eyebrow using light strokes, then build up individual hairs that
follow the natural growth direction: usually upward near the inner corner and slanting toward
the temple as they move outward.
Add soft shading around the eye socket to show depth. A little darkness above the eye, around
the crease, and near the bridge of the nose helps anchor the eye into the face, instead of
making it look like it’s floating.
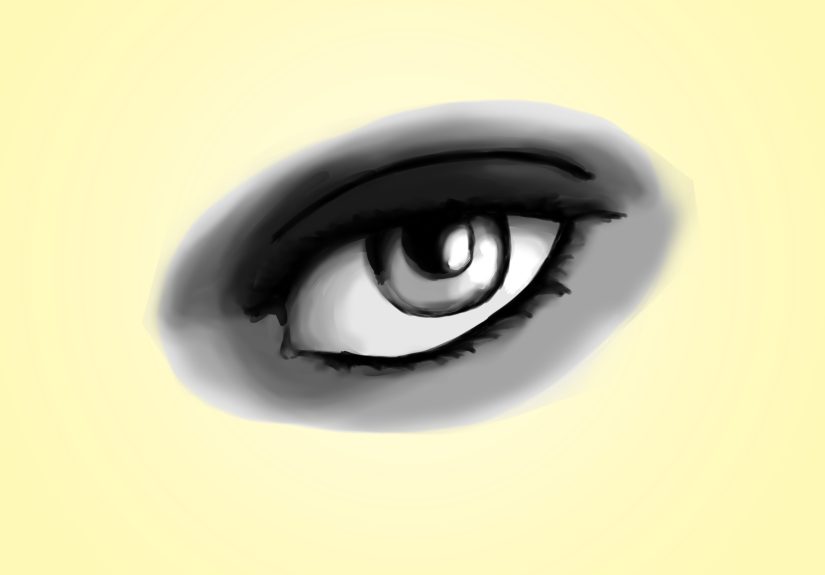
Step 14: Refine, Blend, and Add Final Highlights
Step back and look at your drawing as a whole:
- Deepen shadows where needed (crease, pupil, upper lash line).
- Use a blending stump or tissue to smooth rough graphite in the iris and skin, but avoid
over-blending the iris texture. - With a kneaded eraser, lift tiny highlights on the lower lid, iris, and tear duct.
This final pass is where your realistic eye drawing really comes to life. Small value tweaks and
sharp highlights can make the eye look glossy, three-dimensional, and expressive.
Common Mistakes When Drawing a Realistic Eye
Even experienced artists run into a few recurring issues. Watch out for these:
- Over-shading the sclera: If the eye white is as dark as the skin, the eye
looks sunken or ill. Keep its values lighter overall. - Perfectly even eyelashes: Uniform length and spacing make lashes look like a
comb. Break up the pattern. - Ignoring the lid shadow: Without that shadow over the iris, the eye can look
flat and pasted on. - Flat iris: If the iris has only one value, it feels like a sticker. Add depth
with a darker rim and richer mid-tones. - Highlights in the wrong place: Highlights should be consistent with your
light source direction across both eyes in a portrait.
Practice Plan: Level Up Your Eye Drawings
Realistic eye drawing is a skill built on repetition. Here’s a simple practice plan:
- Day 1–3: Fill a page with just eye shapes and lid creases. No shading, just
clean structure. - Day 4–6: Focus on irises and pupils. Practice shading round shapes with
smooth gradients and strong highlights. - Day 7–9: Draw only eyebrows and eyelashes on simple eye shapes to master
direction and flow. - Day 10–14: Complete a full realistic eye drawing each day, using different
references and lighting conditions.
By the end of this mini-bootcamp, you’ll see a noticeable jump in how believable your eyes look
and drawing them will feel much less intimidating.
Real-World Experiences: What Artists Learn from Drawing Eyes
If you ask a room full of artists which facial feature they obsessed over first, a lot of them
will say “eyes.” There’s something magnetic about getting them right. Many beginners start out
drawing the same eye over and over often a perfectly centered, forward-facing eye and
wonder why the results still feel stiff. The breakthrough usually comes when they stop copying
a generic symbol and start really observing a real, human eye.
One common experience is realizing just how much variety exists from one person’s eye to the
next. Some irises have bold, dark rims; others look almost smoky and soft. In certain lighting,
the highlight might be a crisp square from a window, while in other cases it’s a soft, fuzzy
glow from a lamp. As you build a habit of studying reference photos, you’ll notice these subtle
differences and start to capture them in your drawings. That’s when your realistic eye drawing
stops looking “generic” and starts feeling personal.
Another big lesson artists talk about is patience. Many people rush the iris, scribbling in some
lines and calling it done. But when you slow down layering values, darkening the outer rim,
gently blending, then reintroducing fine lines the eye suddenly gains depth. It’s almost like
focusing a camera lens. At first it’s fuzzy, then with a few extra passes, everything snaps into
place. This patience carries over into other subjects too, from portraits to still lifes.
Artists also quickly discover the power of a kneaded eraser. Instead of thinking of it as a
“mistake fixer,” they start using it as a drawing tool. Lightly tapping the iris to lift tiny
flecks of graphite can create subtle shimmer and texture. Lifting a thin highlight along the
lower eyelid makes the eye look watery and alive. That push-and-pull between darkening with the
pencil and lightening with the eraser becomes a kind of visual conversation on the page.
Finally, many artists find that the more eyes they draw, the less scared they are of “messing
up.” Early on, one crooked eyelash or slightly off-center pupil can feel like a disaster. With
practice, you realize that every drawing is just data: a chance to understand how light wraps
around a sphere, how skin folds, how lashes fan out. Over time, drawing eyes becomes oddly
relaxing a familiar routine where you know that if you start with good structure, build your
shading slowly, and keep an eye on your highlights, the end result will be satisfying.
So when you work through these 14 steps, think of yourself as joining that long line of artists
who learned realism one eye at a time. Each sketch is another rep, another moment where your
hand and eye coordination improves. Keep your reference nearby, stay curious, and don’t be
afraid to fill entire sketchbook pages with eyes. It’s one of the most efficient and honestly,
most fun ways to grow as an artist.
Conclusion
Learning how to draw a realistic eye in 14 steps isn’t just about copying a formula it’s about
training yourself to see structure, light, and detail. Start with a solid base shape, place the
iris and pupil carefully, build your shading in deliberate layers, and finish with confident
eyelashes and crisp highlights. With each new drawing, your eyes (the ones in your head, not
just on the paper) will get better at spotting what makes a real eye feel alive.
Whether you’re sketching for fun, building a portfolio, or following along with “pictures” in a
step-by-step tutorial, these techniques will help you move beyond flat, symbolic eyes and into
the world of convincing, expressive, realistic eye drawings.