Table of Contents >> Show >> Hide
- Step 1: Confirm It’s Carpenter Bees (Not Bumble Bees, Wasps, or Termites)
- Step 2: Understand What You’re Fighting (So You Stop Losing Rematches)
- Step 3: Pro Gear and Safety Setup
- Step 4: Treat Active Carpenter Bee Holes Like a Pro
- Step 5: Repair Carpenter Bee Damage the Right Way
- Step 6: Prevention That Actually Works (So You’re Not Doing This Every Spring)
- When to Call a Pest Pro
- FAQ: Carpenter Bees, Answered Without the Panic
- 500-Word Experience Add-On: What “Like a Pro” Looks Like in Real Life
- SEO Tags
Carpenter bees are basically tiny contractors with terrible boundaries. They don’t eat your wood like termites do
they remodel it, drilling neat, half-inch round entry holes and carving tunnels (a.k.a. “galleries”) for their
next generation. One hole isn’t usually a structural emergency, but repeat tenants plus moisture and hungry woodpeckers?
That’s how a “cute springtime buzz” turns into “why is my fascia board confetti?”
This guide walks you through a pro-style plan: confirm it’s carpenter bees, knock out the active adults, treat the
tunnels properly, repair the holes the right way, and make your home a lot less attractive for next season’s
wood-boring audition.
Step 1: Confirm It’s Carpenter Bees (Not Bumble Bees, Wasps, or Termites)
Quick ID checklist
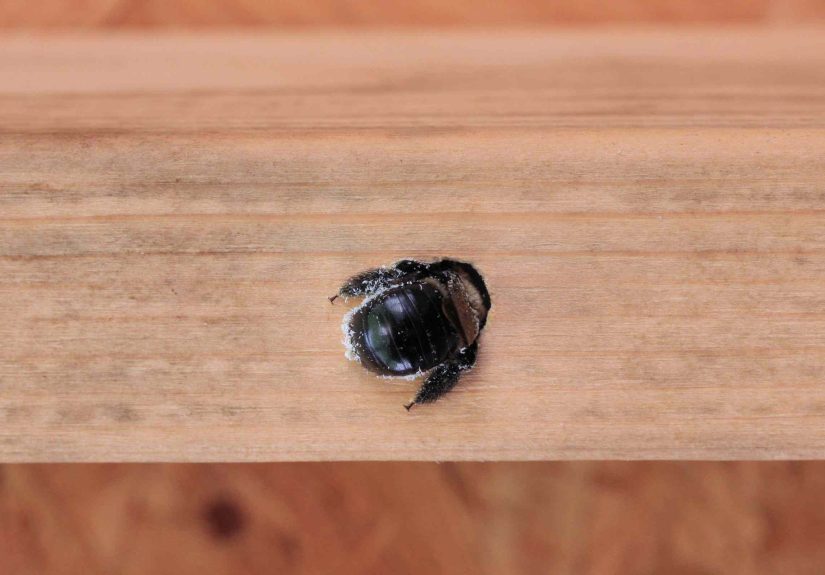
- Perfectly round holes about 1/2 inch wide, often under eaves, railings, fascia, trim, pergolas, decks, and outdoor furniture.
- Fresh sawdust (frass) piled under the hole like someone sharpened a pencil on your porch.
- Loud hovering “guard” bees that act tough. (Plot twist: the pushiest ones are often males that can’t sting.)
- Shiny black abdomen on many common carpenter bee speciesless fuzzy than bumble bees.
Look for the “L-shaped tunnel” clue
Carpenter bees usually drill straight in for a short distance, then make a turn and follow the wood grain. If you’ve
ever wondered why the problem keeps coming back even after you “filled the hole,” that tunnel design is the reason.
Step 2: Understand What You’re Fighting (So You Stop Losing Rematches)
Carpenter bees are typically solitaryno giant hive hidden in your wallbut they’re persistent. Many adults return to
the same general area year after year, expanding old tunnels or starting new ones nearby. The main risk isn’t that one
bee will turn your deck into dust overnight; it’s repeated tunneling, moisture intrusion, and secondary damage (hello,
woodpeckers) that can accelerate deterioration.
Translation: you need a plan that handles today’s bees and next season’s return visit.
Step 3: Pro Gear and Safety Setup
What you’ll want on hand
- Flashlight or headlamp (you’ll treat at dusk or after dark)
- Protective gloves and eye protection
- A labeled carpenter bee / bee-and-wasp aerosol (for quick knockdown)
- An insecticidal dust labeled for carpenter bees (often the “pro” option for lasting tunnel control)
- A bulb duster/hand duster to apply dust cleanly
- Wood filler/putty, exterior caulk (for surface finishing), and/or wooden dowels + wood glue
- Sandpaper, primer, and paint (or exterior-grade sealant)
Safety note (the boring but important part)
Use only products labeled for carpenter bees and follow the label instructions exactly (application method, protective
equipment, re-entry time, and where you can spray). Keep kids and pets away during treatment. If you’re treating
overhead areas, eye protection is non-negotiable unless you enjoy “mystery dust” as a lifestyle.
Step 4: Treat Active Carpenter Bee Holes Like a Pro
Best time to treat: evening or night
Pros target carpenter bee tunnels in the late evening or after dark, when adult bees are more likely to be inside.
Aim for a calm, cooler night if possible. Midday treatments often miss key players because they’re out flying.
Option A: The “Knockdown + Residual” method (best for active infestations)
-
Start with a targeted aerosol.
Stand back and apply a directed stream into the entrance hole for a few seconds. This helps immobilize or kill
adults near the entrance. -
Follow with insecticidal dust (the tunnel insurance).
Once the aerosol settles, apply a small puff or two of dust into the entrance using a hand duster.
You’re not trying to pack the tunnel like a powdered donutlight coverage helps the bees contact the dust and
spread it within the gallery. -
Repeat for every hole you can find.
Missing one active tunnel is how the bees keep their lease.
Option B: Dust-only method (often the most “pro” tunnel strategy)
If you’re comfortable using dust properly, it’s a strong option because it can remain effective longer in protected
galleries. Treat after dark, apply a small puff into each entrance, and let bee traffic do the distribution work.
Important: Don’t seal holes immediately
This is the most common DIY mistake: treating and sealing right away. Wait at least 24–72 hours
(and in some situations a few days) before plugging. The goal is to allow any adults insideor returningto contact
the treatment and track it deeper into the tunnel. Plugging too soon can also force trapped bees to chew new exit
holes nearby, which is the opposite of “problem solved.”
Step 5: Repair Carpenter Bee Damage the Right Way
After treatment, plug tunnels to stop re-use
Once you’ve waited long enough for treatment to work, plug the entrance so new bees can’t move in like it’s a
pre-furnished studio apartment.
Good plug options (choose based on your surface)
- Wooden dowel + exterior wood glue: A solid, durable plug for the tunnel entrance.
- Wood putty/filler: Great for smoothing the surface afterward (especially on trim and railings).
- Steel wool + filler (situational): Some homeowners use it as a physical barrier before finishing, but it should still be sealed and protected from moisture.
Finish it like you mean it
- Sand smooth once the filler cures.
- Prime bare wood (especially outdoors).
- Paint or seal the repaired surface. Painted wood is generally less attractive for carpenter bee nesting than bare, weathered wood.
If the wood is heavily tunneled, soft, or water-damaged, patching alone can be a short-term fix. Consider replacing
severely damaged boards (especially structural deck members) with pressure-treated lumber or a less attractive
exterior material where practical.
Step 6: Prevention That Actually Works (So You’re Not Doing This Every Spring)
1) Remove the welcome sign: exposed, unfinished wood
Carpenter bees strongly prefer bare or weathered woodespecially protected areas like undersides of eaves and shaded
trim where paint fails first. Maintaining paint, varnish, or a protective sealant can help reduce new nesting.
2) Inspect early and often
In spring, walk your home’s exterior and check:
deck railings, fascia boards, soffits, pergolas, porch ceilings, fence posts, and outdoor furniture. Early holes are
easier to treat than a full “tunnel neighborhood.”
3) Consider traps as a supplemental tool
Carpenter bee traps can help reduce local pressure, especially when placed where bees are actively scouting.
Think of traps as your “extra goalie,” not the whole defense. Place them near problem areas early in the season and
empty them regularly. If traps catch mostly males and your damage continues, don’t assume failureassume the females
are still finding bare wood somewhere else.
4) Reduce secondary damage from woodpeckers
If woodpeckers are attacking, it usually means there are larvae inside tunnels. Treating the bees and repairing
damage promptly helps remove the food source that attracts pecking in the first place.
When to Call a Pest Pro
- High or hard-to-reach galleries (second story eaves, steep roofs, chimney trim)
- Widespread infestation with dozens of tunnels across multiple sides of the home
- Recurring damage year after year despite repairs and sealing
- Sting risk or allergy concerns (even if stings are uncommon, don’t gamble)
- Structural concerns (soft deck members, sagging boards, or major woodpecker destruction)
FAQ: Carpenter Bees, Answered Without the Panic
Do carpenter bees sting?
Females can sting but are usually not aggressive unless handled or trapped. Males may hover and act intimidating,
but they typically can’t sting. Either way, treat at night and give them space.
Will carpenter bees destroy my house?
One season of activity usually isn’t a structural catastrophe. The bigger issue is repeated nesting in the same areas,
expanding tunnels over time, plus moisture and woodpecker damage. Address it early and you prevent the expensive
version of the story.
Do “natural sprays” like vinegar or essential oils work?
Some strong scents may discourage scouting temporarily, but they rarely solve an active tunnel problem on their own.
If bees are already nesting, you’ll get better results from targeted tunnel treatment, followed by repair and sealing.
500-Word Experience Add-On: What “Like a Pro” Looks Like in Real Life
The biggest difference between a homeowner who wins and a homeowner who gets stuck in an annual carpenter-bee
subscription plan isn’t braveryit’s sequencing. I’ve seen people do the “right” actions in the wrong order and then
conclude nothing works. Here are the patterns that show up over and over, and how to fix them.
Experience #1: The “I sealed it, so it’s sealed” myth. Someone finds a clean, round hole, squeezes in
caulk like they’re icing a cupcake, and calls it done. Two weeks later: new holes, same area. Why? Because the tunnel
doesn’t end at the entrance, and sealing without treatment can trap adults inside. They don’t surrenderthey renovate.
Pros treat first, wait, and then plug in a way that actually blocks re-use.
Experience #2: Daytime spraying feels productive… and misses the target. It’s tempting to spray when
you see bees hovering. But that’s like trying to solve a leak by yelling at the water. Treating after dark is quietly
effective because the adults are more likely inside the gallery. A calm evening treatment tends to hit more bees per
application, which means fewer repeat applications.
Experience #3: One hole treated, ten holes ignored. Carpenter bee damage is often clusteredrailings,
trim seams, and protected undersides. People treat the obvious hole at eye level and miss the “hidden” entrances under
the railing lip or soffit edge. The “pro move” is a slow inspection with a flashlight, circling the structure, and
marking holes with painter’s tape so none are forgotten.
Experience #4: Repairs that look pretty but don’t change behavior. If you patch holes and leave the
surrounding wood weathered and bare, you’re fixing yesterday while advertising for tomorrow. Painting or sealing isn’t
glamorous, but it’s one of the strongest deterrents. The pro approach is: treat, repair, then maintain the finish,
especially in sheltered spots where paint fails first.
Experience #5: Traps used like magic wands. Traps can help, but they’re not mind readers. A trap hung
far from the active area might catch a few curious bees while the real nesting continues under your eaves. The best
results come when traps are placed near known activity early in the season and paired with repairs that remove exposed
wood. Think “supporting actor,” not “lead role.”
Experience #6: Ignoring woodpeckers until the trim explodes. When woodpeckers start hammering near
galleries, it’s a signal that larvae may be inside. Waiting doesn’t usually improve the situation. Treating the bees,
repairing damage, and closing up tunnels reduces the food source and helps stop the secondary destruction.
Experience #7: The real win is prevention you can keep up with. The best plan is the one you’ll
actually do: a spring inspection walk, quick treatment of new holes, sealing and paint touch-ups in problem spots, and
replacing badly damaged boards when needed. That’s how “like a pro” looks: not one dramatic weekend, but a simple
routine that makes your home a lousy place to drill.