Table of Contents >> Show >> Hide
- Why hand-hemming is worth it
- Main keyword to remember
- What you’ll need
- Pick the right hem style (so you don’t fight your fabric)
- Before you start: the 3 rules that prevent crooked hems
- The 12 steps to hem a dress by hand
- Step 1: Decide the finished length
- Step 2: Let the dress hang if it’s drapey or bias-cut
- Step 3: Mark the hem evenly all the way around
- Step 4: Add hem allowance, then trim
- Step 5: Finish (or stabilize) the raw edge
- Step 6: Press the first fold
- Step 7: Press the second fold to create the hem depth
- Step 8: Pin (or baste) the hem in place
- Step 9: Thread your needle and hide the knot
- Step 10: Use a blind hem stitch (slip stitch) for an invisible finish
- Step 11: Adjust your stitch choice for fabric thickness or stretch
- Step 12: Secure the end, bury the thread tail, and press
- Quick troubleshooting (because hems love drama)
- Conclusion: a better hem is mostly prep
- Extra: of real-world hemming experiences (so you feel normal)
Hemming a dress by hand is basically the sewing version of brushing your hair before a photo: it looks like a small detail,
but it’s the difference between “I made this!” and “I made this… in the dark… on a moving bus.”
The good news? Hand hemming is beginner-friendly, quietly powerful, and requires exactly zero intimidating machinery.
With the right prep, the right stitch, and a little patience, you can get a clean, professional-looking hem that stays put
(even when you’re dancing, speed-walking, or dramatically leaving a room).
Why hand-hemming is worth it
A hand-stitched hem can be nearly invisible from the outside, which is perfect for dress fabrics that don’t love heavy topstitching.
It’s also easier to control on curves, slippery fabrics, and fancy hems where a sewing machine might chew, pucker, or create
that “wavy lettuce edge” look (delicious in salads, less exciting on a skirt).
Main keyword to remember
If you’re here for one phrase, it’s this: hem a dress by hand. Everything else is just helpful details
and mild emotional support.
What you’ll need
- Hand sewing needle (sharp for woven fabrics; ballpoint is helpful for knits)
- Thread that matches your dress (or a shade darker if you’re between colors)
- Sharp fabric scissors (not the “paper scissors” that everyone uses anyway)
- Measuring tape or ruler
- Dressmaker’s chalk, washable marker, or pins for marking
- Straight pins or clips
- Iron + ironing board (pressing is not optional if you want it to look polished)
- Seam gauge or hem gauge (optional, but it’s like a cheat code for even hems)
- Thimble (optional, but your fingers may write you a thank-you note)
- Seam ripper (just in case your “temporary stitch” becomes emotionally permanent)
Pick the right hem style (so you don’t fight your fabric)
Before you stitch anything, choose a hem finish that matches the fabric and the vibe:
- Blind hem (slip stitch): nearly invisible from the outside; great for most woven dresses.
- Catch stitch (herringbone): flexible and strong; excellent for thicker fabrics and some knits.
- Double-fold hem: tidy and sturdy; best on medium-weight fabrics with enough hem allowance.
- Narrow hem: sleek and lightweight; ideal for chiffon, voile, and other floaty fabrics.
- Hem tape (fusible): fast fix; good for emergencies, but stitching lasts longer.
If you’re unsure, go with a blind hem (slip stitch) for woven dresses. It’s the “little black dress” of hand hems:
appropriate almost everywhere.
Before you start: the 3 rules that prevent crooked hems
- Try it on with the right shoes. A hem measured in bare feet may become a tripping hazard in heels.
-
Let certain dresses hang before hemming. If the skirt is bias-cut or very drapey, the fabric can “drop”
and become uneven after hanging. Giving it time to settle helps you hem the true final length. -
Press as you go. Sewing without pressing is like frosting a cake that’s still warm. Technically possible.
Emotionally risky.
The 12 steps to hem a dress by hand
Step 1: Decide the finished length
Put on the dress with the shoes and undergarments you’ll actually wear. Stand normally (no “fashion pose” unless you plan
to live that way). Decide where you want the hem to hit and whether you want a narrow hem or a deeper hem.
Step 2: Let the dress hang if it’s drapey or bias-cut
If the dress is cut on the bias or made of a fluid fabric, hang it for a day so it can relax and drop. This reduces the chance
of an uneven hem later. If you’re short on time, hanging it overnight is still better than nothing.
Step 3: Mark the hem evenly all the way around
Use chalk, washable marker, or pins to mark the hem at your chosen length. Measure from the floor up or from the waist down
consistentlyjust don’t switch methods halfway through like a sitcom character making a very avoidable mistake.
Tip: Mark more points than you think you need, especially at side seams and around curves. The more reference points, the more even your hem.
Step 4: Add hem allowance, then trim
Decide your hem allowance (common options: 1 inch for a standard hem, 1/2 inch for a narrow hem). Measure down from your marked line,
add the allowance, then trim the excess fabric carefully. Trim slowlyfabric is famously not re-growable.
Step 5: Finish (or stabilize) the raw edge
Some fabrics fray if you look at them too hard. If your dress fabric frays, consider finishing the raw edge before folding:
you can do a simple hand overcast stitch, use pinking shears, or apply a narrow strip of seam binding.
For very lightweight fabrics, a narrow hem can “self-finish” the edge by folding it twice.
Step 6: Press the first fold
Fold the raw edge up by about 1/4 inch (or smaller for a narrow hem) and press it. This hides the raw edge and creates a cleaner finish.
A seam gauge or hem gauge helps you keep the fold consistent.
Step 7: Press the second fold to create the hem depth
Fold the hem up again to your final hem depth (for example, another 3/4 inch for a 1-inch hem total). Press thoroughly.
Pressing sets the fold so your stitching is easier, straighter, and less rage-inducing.
Step 8: Pin (or baste) the hem in place
Pin perpendicular to the fold so you can remove pins as you sew. If the fabric is slippery or the hem is curved,
consider basting (a long, temporary running stitch) to hold everything steady.
Basting is like training wheels: not glamorous, extremely effective.
Step 9: Thread your needle and hide the knot
Cut a comfortable length of thread (about 18–24 inches). Longer thread tangles more and tests your patience.
Knot the end and start inside the folded hem so the knot is hidden between layers.
If you want extra smooth sewing, you can run the thread through beeswax (optional).
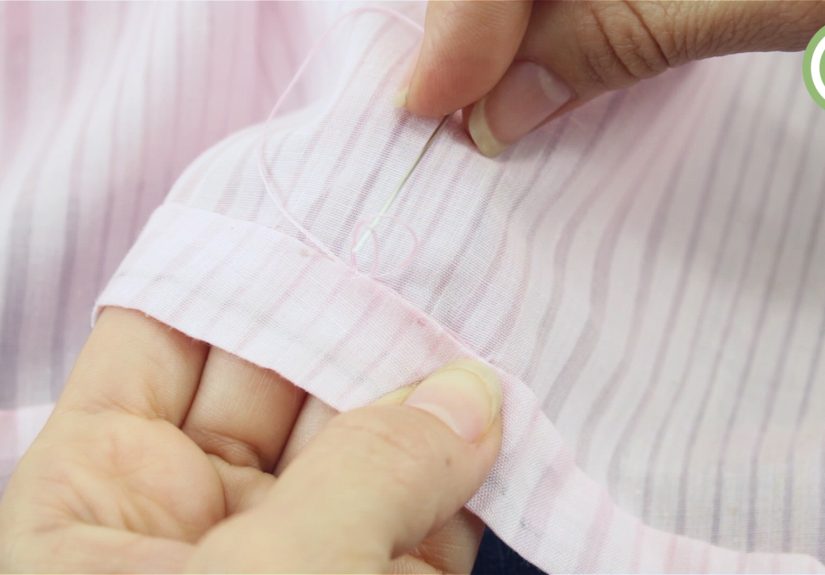
Step 10: Use a blind hem stitch (slip stitch) for an invisible finish
This is the classic “where did the stitches go?” hem. Here’s how:
- Insert the needle into the folded edge of the hem and travel inside the fold a short distance.
- Come out and take a tiny bite (just a few threads) from the dress fabric above the hem fold.
- Go back into the folded hem edge, traveling a short distance again.
- Repeat: tiny bite in the dress fabric, then hide the stitch in the hem fold.
Keep the thread tension gentle. Pulling too tight can pucker the hem and create a ridge on the outside.
Your goal is “secure and relaxed,” like a cat in a sunbeam.
Step 11: Adjust your stitch choice for fabric thickness or stretch
Not all dresses want the same hem stitch:
-
Thicker fabrics (wool, heavy crepe): consider a catch stitch on the inside.
It’s flexible and lies flatter across bulk. - Knit dresses: a catch stitch can allow a bit of give. Use a ballpoint needle to avoid snagging fibers.
- Very lightweight fabrics: use smaller stitches and a narrower hem to avoid drag and show-through.
If your dress has a lining, hem the lining separately (often slightly shorter) so it doesn’t peek out or pull.
Step 12: Secure the end, bury the thread tail, and press
When you reach the end, make a small knot close to the fabric. For extra neatness, bury the thread tail inside the hem fold
by running the needle through the fold for an inch, then trim. Finish with a final press.
Use steam if the fabric allows, and press from the wrong side when possible to avoid shine.
Quick troubleshooting (because hems love drama)
My hem looks wavy
Common causes: stretching the fabric while sewing, pressing too aggressively on knits, or pulling thread too tight.
Solution: use gentle tension, support the fabric on the table, and consider a more flexible stitch (like catch stitch) for knits.
Stitches are showing on the outside
Your “tiny bites” might be too big. Try picking up fewer threads from the outer fabric, and match thread color more closely.
Also, sew in good lightingyour future self deserves that.
The hem is bulky
Trim seam allowances near side seams, grade layers if possible, and consider a narrower hem. Thick fabric may benefit from catch stitch
rather than folding a deep double hem.
The hem is uneven
Re-check your markings and measure from consistent reference points. If the dress is bias-cut, hanging time matters.
You may need to re-level the hem before stitching.
Conclusion: a better hem is mostly prep
If you take nothing else from this guide, remember: a beautiful hand-sewn hem is built on
accurate marking, careful pressing, and tiny, consistent stitches.
Once you’ve done it a couple of times, hemming becomes less of a chore and more like finishing a good book:
satisfying, tidy, and a little “look what I did” moment at the end.
Extra: of real-world hemming experiences (so you feel normal)
Hemming looks calm on tutorials, but in real life it often happens in the final hour before an eventwhen your iron is out,
your thread is mysteriously knotted, and your dress is giving you “are you sure about this?” energy.
If that’s you, congratulations: you are participating in a time-honored tradition known as panic hemming.
One of the most common experiences people report is the “shoe surprise.” You mark the hem in socks, it looks perfect,
then you put on heels and suddenly your dress becomes a high-low situation you did not consent to. That’s why hemming
with the actual shoes matters so muchespecially for midis and maxis, where even half an inch changes the whole look.
A practical trick is to keep the dress on a hanger and pin a note to it: “HEM WITH HEELS.” Future you will be grateful.
Another classic moment is discovering that fabric has opinions. Lightweight, drapey skirts may look even on the table,
then hang overnight and develop a “long side” as the bias areas relax. People often think they measured wrong (and sometimes they did),
but often the fabric simply settled into its final shape. The fix is not complicated, but it does require patience:
let it hang, then re-level and trim before stitching. It feels like an extra step because it is an extra stepbut it’s
the difference between a hem that swishes beautifully and one that quietly points at your mistakes every time you walk.
There’s also the experience of choosing the wrong stitch and immediately knowing it. A whipstitch can be fast,
but on some fabrics it can show as tiny dots on the outside. A blind hem stitch is stealthier, but it takes a little rhythm
to get consistent. Many beginners describe the “aha” moment when they realize the blind hem stitch isn’t about speed
it’s about tiny bites and calm tension. Once that clicks, the stitching becomes almost meditative. Almost. Let’s not get carried away.
Finally, hemming often teaches the sneaky power of pressing. People will spend 30 minutes trying to “force” a fold with pins,
then press it for 10 seconds and suddenly everything behaves. Pressing sets the shape of the hem, keeps the allowance even,
and makes the stitching cleaner. If you’ve ever finished a hem and thought, “Wait… I’m kind of proud of this,”
there’s a strong chance the iron deserves partial credit.
The best part? After you hem a dress by hand once or twice, you start seeing hems everywherein thrift finds,
in off-the-rack dresses that almost fit perfectly, in closet staples that just need a refresh. Hemming becomes less of a scary alteration
and more of a practical life skill. And that’s a glow-up worth stitching for.