Table of Contents >> Show >> Hide
- What Makes a Classic Tiramisu Classic?
- Ingredients for a Professional-Style Tiramisu
- Before You Start: Tiny Details That Make a Big Difference
- How to Make Classic Tiramisu in 4 Steps
- Expert Tips for Better Tiramisu
- Common Tiramisu Mistakes and How to Avoid Them
- Serving Ideas and Easy Variations
- How to Store Tiramisu
- Why This 4-Step Tiramisu Method Works
- Real-Life Tiramisu Experiences: What I Learned the Hard Way
- Conclusion
Tiramisu is what happens when coffee, cream, and good decisions get together in one pan. This classic Italian dessert looks fancy enough to impress dinner guests, in-laws, or that one friend who says things like, “I only eat artisanal desserts.” But the truth is wonderfully unfair: tiramisu is not hard. It just has a glamorous reputation, like a movie star wearing sunglasses indoors.
If you have ever stared at a bakery slice of tiramisu and assumed it required a culinary degree, a dramatic Italian grandmother, and a backup whisk, relax. You can absolutely make a classic tiramisu at home. In fact, once you understand the rhythm of the recipe, it becomes one of the easiest no-bake desserts in your rotation. Brew coffee, whip cream, layer cookies, chill, and suddenly you are the sort of person who “has tiramisu in the fridge.” That is powerful energy.
This guide breaks everything down into four clean, manageable steps. You will learn how to build that signature flavor with espresso-soaked ladyfingers, a rich mascarpone filling, and a snowy dusting of cocoa powder. You will also get pro tips for avoiding soggy layers, runny cream, and the heartbreak of a tiramisu that looks more like sweet beige soup.
What Makes a Classic Tiramisu Classic?
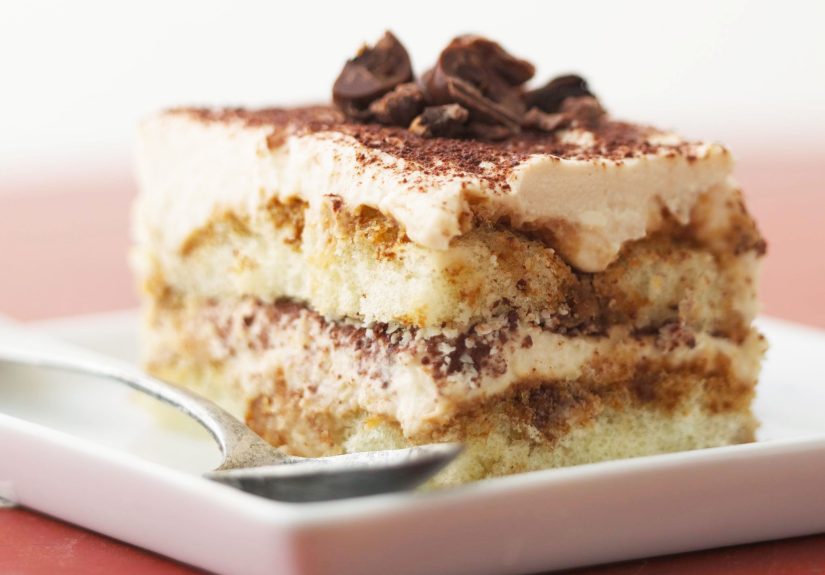
A classic tiramisu recipe is built on a few iconic elements: ladyfingers, strong coffee or espresso, mascarpone, eggs, sugar, cocoa powder, and sometimes a splash of Marsala wine, rum, or coffee liqueur. The magic comes from contrast. The cookies are soft but not mushy. The filling is rich but airy. The coffee is bold, while the cocoa adds a slightly bitter finish that keeps the dessert from becoming too sweet.
At its best, homemade tiramisu tastes balanced, light on the spoon, and deeply satisfying. It should not hit you like a sugar truck. It should whisper, “I’m elegant,” then follow it up with a coffee-flavored uppercut.
Ingredients for a Professional-Style Tiramisu
For the coffee soak
- 1 3/4 cups strong espresso or very strong brewed coffee, cooled
- 2 to 3 tablespoons Marsala wine, dark rum, or coffee liqueur (optional)
For the mascarpone filling
- 6 large egg yolks
- 3/4 cup granulated sugar
- 16 ounces mascarpone cheese
- 1 cup cold heavy cream
- 1 teaspoon vanilla extract
- Pinch of fine salt
For assembly
- 24 to 30 ladyfingers
- Unsweetened cocoa powder, for dusting
- Optional: finely grated dark chocolate for the top
Pro note: If you want the classic flavor with extra peace of mind, use pasteurized eggs. If you want a completely egg-free shortcut, you can skip the yolks and make a whipped mascarpone cream instead, but that shifts the dessert slightly away from traditional tiramisu.
Before You Start: Tiny Details That Make a Big Difference
Great tiramisu is a game of small choices. Use strong coffee, not sad brown water. Use real mascarpone, not cream cheese pretending to be sophisticated. Let the coffee cool before dipping the ladyfingers. Keep the heavy cream cold so it whips properly. And do not overmix mascarpone unless you enjoy fixing grainy filling while muttering at the counter.
Also, tiramisu is a make-ahead dessert, which is chef code for “the refrigerator does half the work.” This means patience is part of the recipe. I know. Rude.
How to Make Classic Tiramisu in 4 Steps
Step 1: Brew the coffee and prep your station
Brew your espresso or strong coffee first, then let it cool completely. Stir in Marsala, rum, or coffee liqueur if you want a more traditional, grown-up flavor. Pour the mixture into a shallow bowl or dish wide enough for dipping ladyfingers.
Set out your serving dish, ideally an 8-inch square or similar pan. Have your ladyfingers ready to go, because once the filling is done, assembly moves fast. This is not the moment to start hunting through the pantry like a pirate looking for treasure.
Why this step matters: Cool coffee keeps the ladyfingers from going limp too quickly. A shallow bowl makes dipping fast and even. Good mise en place makes you feel like a pro, even if you are wearing pajama pants.
Step 2: Make the mascarpone filling
In a heatproof bowl set over barely simmering water, whisk together the egg yolks and sugar for about 5 to 7 minutes, until the mixture becomes pale, slightly thickened, and smooth. Remove it from the heat and let it cool until just warm, not hot.
In a separate bowl, whisk the mascarpone gently until smooth. In another bowl, whip the cold heavy cream with the vanilla and salt until medium peaks form. Fold the mascarpone into the yolk mixture, then gently fold in the whipped cream until the filling looks airy and silky.
Why this step matters: The cooked yolk-and-sugar base adds body and richness. Folding in whipped cream keeps the texture light, which is the difference between elegant tiramisu and what feels like frosting wearing a disguise.
Pro tip: Do not beat mascarpone aggressively. It can loosen or turn grainy. Gentle mixing wins here. Tiramisu rewards calm energy.
Step 3: Dip and layer the ladyfingers
Dip each ladyfinger quickly into the coffee mixture, about 1 second per side. Quick means quick. These cookies are tiny espresso sponges with trust issues. Soak them too long and they collapse into wet regret.
Arrange a layer of dipped ladyfingers in the bottom of your pan. Spread half of the mascarpone filling over the top in an even layer. Repeat with another layer of dipped ladyfingers, then finish with the remaining filling.
Use an offset spatula or the back of a spoon to smooth the top. If a few cookies crack or the rows look less than perfect, congratulations: you are making dessert, not laying bathroom tile.
Why this step matters: The brief dip keeps the structure intact while still allowing the cookies to soften as the tiramisu chills. Even layers make every slice look polished and taste balanced.
Step 4: Chill, dust, and serve
Cover the tiramisu and refrigerate it for at least 6 hours, though overnight is even better. This rest time allows the ladyfingers to soften properly and the layers to settle into that dreamy sliceable texture everyone wants.
Right before serving, dust the top generously with unsweetened cocoa powder. Add finely grated dark chocolate if you want a little extra drama. Then slice and serve cold.
Why this step matters: Fresh cocoa on top gives tiramisu its signature finish, while the chill time transforms separate layers into one cohesive dessert. Cutting it too early is like leaving a movie before the ending. Technically possible, emotionally wrong.
Expert Tips for Better Tiramisu
Use strong coffee
The coffee flavor should be assertive enough to stand up to the creamy filling. Weak coffee makes the dessert taste flat. Espresso is ideal, but very strong brewed coffee works beautifully too.
Do not oversoak the ladyfingers
This is the number-one tiramisu mistake. The cookies continue absorbing moisture in the refrigerator. What feels slightly firm during assembly becomes perfectly tender later.
Keep the filling light
Fold, do not mash. The mascarpone mixture should feel fluffy and smooth, not dense and overworked. That delicate texture is part of what makes classic tiramisu feel restaurant-worthy.
Chill long enough
Tiramisu is better the next day. The flavor deepens, the texture improves, and your stress level drops because dessert is already done.
Dust cocoa at the end
If you dust it too early, the cocoa can absorb moisture and darken. Still tasty, just less attractive. And tiramisu deserves to be pretty.
Common Tiramisu Mistakes and How to Avoid Them
Mistake 1: Runny filling. This usually happens when the cream is under-whipped, the yolk base is too warm, or the mascarpone is overmixed. Let warm components cool and keep whipped cream cold.
Mistake 2: Soggy layers. Your ladyfingers probably soaked too long. Remember: dip, do not marinate.
Mistake 3: Bland flavor. Use stronger coffee, real mascarpone, enough cocoa, and a pinch of salt in the filling. Salt quietly makes dessert taste more like itself.
Mistake 4: Messy slices. Chill longer. Tiramisu that has not rested enough will scoop well but will not slice cleanly.
Serving Ideas and Easy Variations
Classic tiramisu is perfect on its own, but you can serve it with espresso, cappuccino, or even a small glass of dessert wine. For a more polished presentation, make it in individual glasses or jars. That also neatly solves the “first slice disaster” problem, where the opening piece comes out looking like delicious rubble.
If you want to riff without losing the spirit of the dessert, try these ideas:
- Use Marsala wine for a more traditional flavor.
- Add coffee liqueur for a deeper mocha note.
- Top with shaved dark chocolate for a slightly richer finish.
- Make individual tiramisu cups for dinner parties.
But if you are aiming for the best classic tiramisu recipe, keep the structure simple. This dessert shines because of restraint, not because it needs a parade of toppings.
How to Store Tiramisu
Store tiramisu covered in the refrigerator for up to 3 days for the best texture. It is at its peak after the first overnight chill and still excellent the next day. After that, the layers can become softer and less defined. Freeze only if you must; the texture of the filling may lose some of its silky charm after thawing.
Why This 4-Step Tiramisu Method Works
This four-step tiramisu method works because it focuses on the essentials without cutting the soul out of the dessert. You still get the classic components: coffee-soaked ladyfingers, mascarpone cream, cocoa powder, and time to chill. But the process is streamlined enough for home cooks who want elegant results without needing twelve bowls and a personal pastry assistant named Luca.
In other words, it is beginner-friendly, dinner-party worthy, and dangerously repeatable.
Real-Life Tiramisu Experiences: What I Learned the Hard Way
The first time I made tiramisu, I treated the ladyfingers like biscotti at a spa. I let them lounge in the espresso bath far too long, which seemed kind and generous in the moment. It was not. By the time I layered the dessert, they had the structural integrity of wet cardboard. The final result tasted great, but serving it required a spoon, optimism, and a willingness to describe the texture as “rustic.” That was the day I learned the single most important tiramisu lesson: a quick dip is enough.
The second lesson came from mascarpone. I assumed it behaved like cream cheese and attacked it with full mixer speed. Bad idea. Mascarpone is much more delicate. Overworking it can make the filling loose or grainy, which is deeply annoying when you are trying to look competent in your own kitchen. Now I always stir it gently just until smooth, and the filling stays soft, rich, and beautifully stable.
I also learned that tiramisu is a dessert built on patience more than effort. The active work is not especially hard, but the waiting is non-negotiable. On one occasion, I tried to serve it after only two hours because guests were arriving and I felt bold. What I got was not exactly a slice. It was more of a creamy landslide with strong coffee notes. Perfectly edible, obviously, because we are not wasteful people, but not the polished layered dessert I had imagined. After an overnight chill, the leftovers were dramatically better. That was humbling, and also delicious.
Another interesting thing I noticed is how much coffee choice matters. I once made tiramisu with regular drip coffee that was technically coffee but emotionally tired. The dessert looked the part, yet the flavor lacked that deep, bittersweet backbone that makes classic tiramisu memorable. Since then, I have used espresso or very strong brewed coffee every time, and the difference is immediate. The dessert tastes more balanced, more grown-up, and far less like it is apologizing for itself.
The most rewarding part of making tiramisu, though, is how dramatic the payoff feels compared with the effort involved. You layer a few simple ingredients into a dish, tuck it into the fridge, and the next day it emerges transformed into something that tastes like a celebration. People assume it took ages. They take one bite and suddenly start using words like “luxurious” and “restaurant-quality.” You nod modestly, while internally remembering that the refrigerator did a shocking amount of the work.
If you make tiramisu more than once, you start to develop instincts: how thick the filling should be, how fast to dip the cookies, how much cocoa is just enough and how much becomes a dust storm. That is when the dessert becomes truly fun. It stops feeling like a recipe you are carefully following and starts feeling like one you understand. And that, honestly, is when you begin making tiramisu like a pro.
Conclusion
If you have been searching for how to make classic tiramisu without turning your kitchen into a stress laboratory, this is your sign to go for it. The formula is simple: strong coffee, airy mascarpone filling, quick-dipped ladyfingers, and a proper chill. Keep those four elements in balance, and you will have a tiramisu recipe that feels timeless, tastes elegant, and earns repeat requests from everyone lucky enough to get a fork.
So yes, classic tiramisu really can be made like a pro in only four steps. The secret is not culinary magic. It is just good ingredients, gentle technique, and enough self-control not to soak the cookies into oblivion.