Table of Contents >> Show >> Hide
- What Makes a Gingerbread House Work (and Not Become a Gingerbread Pile)
- Tools and Supplies (a.k.a. Your Gingerbread House Survival Kit)
- Step 1: Choose (or Make) a Template That Won’t Betray You
- Step 2: Make “Construction Gingerbread” That’s Built to Stand
- Step 3: Make Royal Icing “Glue” That Holds Like It Means It
- Step 4: Assemble the House (Slow Is Smooth, Smooth Is Stable)
- Step 5: Decorate Like a Pro (Even If You’re Not One)
- Food Safety and “Should We Eat This?” Reality Check
- Troubleshooting: Fixes for the Most Common Gingerbread Disasters
- A Simple 2-Day Gingerbread House Timeline (Sanity-Friendly)
- Extra 2022 Touches: Small Upgrades That Make a Big Difference
- Experience Section: What It’s Really Like to Build a Gingerbread House (and Why You’ll Do It Again)
Gingerbread houses are the only “real estate” project where it’s totally normal to hold up a wall with a soup can,
seal a roof with sugar cement, and brag about your landscaping made of gumdrops. If you’ve ever opened a gingerbread
kit, watched one wall slide away like it’s late for a meeting, and thought, “So this is how avalanches start,”
you’re in the right place.
This step-by-step guide walks you through making a sturdy gingerbread house from scratch (or upgrading a kit),
mixing a royal icing “glue” that actually holds, assembling without tears, and decorating like you mean it.
We’ll also include a 2022-style approach: smarter shortcuts, cleaner designs, and less stressbecause the holidays
are busy enough without a cookie collapse.
What Makes a Gingerbread House Work (and Not Become a Gingerbread Pile)
A gingerbread house succeeds when three things are true: the panels are flat and firm, the “mortar” (icing) sets
hard, and you assemble in stages instead of trying to build and decorate everything in a frantic 12-minute sprint.
Think of it like building with edible bricksyour job is to keep moisture low, structure supported, and patience high.
Pick Your Build Style: Kit, Scratch, or “Hybrid Hero”
- Kit: Fastest. Great for first-timers. Biggest risk is flimsy icing and warped panels.
- Scratch: Best flavor and strongest structure if you use “construction” gingerbread (more on that soon).
- Hybrid: Use a kit for panels, but make your own stiff royal icing and level the edges. This is the sweet spot for most people.
Tools and Supplies (a.k.a. Your Gingerbread House Survival Kit)
Must-haves
- Baking sheets + parchment paper or silicone mats
- Rolling pin + spacers (or two wooden spoons as thickness guides)
- Sharp knife or pizza cutter
- Ruler (yes, we’re measuring cookie architecture)
- Stand mixer or hand mixer (royal icing is not a “gentle whisk” situation)
- Piping bags + round tips (or zip-top bags with a tiny corner snipped)
- Cardboard or a serving board for the base (wrap in foil or parchment for easy cleanup)
Nice-to-haves that feel like cheating (in a good way)
- Bench scraper for crisp edges
- Small offset spatula for smoothing icing
- Food-safe gloves (optional, but helpful if you’re handling sticky candies)
- LED tea lights or mini string lights for the inside (battery-only, please)
Step 1: Choose (or Make) a Template That Won’t Betray You
If you’re baking your own panels, a template keeps every piece consistentwhich means your roof actually meets your walls.
You can make one from cardstock or thin cardboard: two side walls, two front/back walls (with gables if you want a peaked roof),
and two roof rectangles. Keep it simple for your first build: a classic cottage is easier than a mansion with turrets.
Beginner-friendly dimensions (easy cottage)
- Side walls: about 4.5 x 8 inches
- Front/back: about 4.5 x 5 inches (plus a triangle gable if doing a peaked roof)
- Roof: about 4.5 x 9 inches (two pieces)
Want the easiest of all? An A-frame “cabin” uses just two big roof/wall panels and two end trianglesfewer seams, fewer problems,
and it still looks adorable on a table.
Step 2: Make “Construction Gingerbread” That’s Built to Stand
Here’s the big secret that pros mention again and again: gingerbread that tastes soft and cakey is wonderful to eat
but not ideal for building. “Construction gingerbread” is designed to bake up firm and stable, with minimal puffing and warping.
Translation: less leavening, careful rolling thickness, and a slightly drier bake.
Construction gingerbread formula (sturdy + still tasty)
- Dry: all-purpose flour, ginger, cinnamon, cloves (optional), salt
- Sweet/structure: molasses (classic), brown sugar or granulated sugar
- Binder: eggs
- Fat: a modest amount of butter (too much fat can soften structure)
How to mix it (without overworking)
- Cream butter and sugar until combined (not fluffy like cakethis is more “construction crew,” less “cupcake”).
- Mix in molasses and eggs.
- Whisk dry ingredients separately, then add to wet to form a firm dough.
- Chill the dough 1–2 hours (or overnight) so it rolls cleanly and holds shape.
Rolling and baking for flat panels
- Thickness: Aim for about 1/4 inch. Too thin = brittle. Too thick = heavy roof slumps.
- Evenness: Use spacers or guides so your walls aren’t “1/8-inch here, 3/8-inch over there.”
- Cut before baking: Trace and cut shapes on the rolled dough directly on parchment.
- Bake until firm: You want the pieces dry and set, not soft in the center.
- Trim warm: If edges spread a bit, trim while still warm for crisp seams.
- Cool flat: Let panels cool on a flat surface. If you notice a curl, gently weigh them with another sheet pan for a few minutes.
If you’re using a kit: still inspect the panels. If anything is bowed, you can often flatten it by letting the pieces rest
in a cool, dry spot with something flat on top (not heavy enough to snap itjust firm).
Step 3: Make Royal Icing “Glue” That Holds Like It Means It
Royal icing is the classic gingerbread house mortar because it dries hard. The key is consistency: for building,
you want it thickmore like toothpaste or peanut butter than drizzle. For decorating (snow swirls, icicles),
you can loosen a portion with a few drops of water.
Two safe, reliable options
- Meringue powder method: Confectioners’ sugar + meringue powder + water. This is popular because it’s stable and convenient.
- Pasteurized egg whites method: Confectioners’ sugar + pasteurized egg whites + a stabilizer (lemon juice or cream of tartar).
Mixing tips (so you don’t end up with sugar soup)
- Start with less water than you think you need. You can add drops; you can’t “un-add” a splash.
- Beat until thick and glossy, and the icing holds peaks.
- Cover immediately when not in use. Royal icing dries out faster than a joke told at the wrong time.
Quick test: Drag a knife through the icing. The “path” should stay visible for a moment and slowly close.
If it instantly floods back together, it’s too runny for constructionadd more powdered sugar.
Step 4: Assemble the House (Slow Is Smooth, Smooth Is Stable)
Assembly is where most gingerbread dreams go to wobble. The fix? Build in stages and let seams set before adding weight.
Your future self will thank you while you’re calmly piping snow instead of holding a wall with your elbow.
1) Prep the base
- Wrap cardboard/board with foil or parchment.
- Pipe a thick outline of royal icing where the walls will sit.
- If you’re adding “snowdrifts,” do it after the structure is stablenot now.
2) Attach the walls
- Pipe icing along the bottom edge of the first wall and stand it on the base.
- Pipe icing along the side edge of the next wall and press it to form a corner.
- Use mugs, cans, or small containers as supports while it sets.
- Repeat for all walls, then pipe extra icing along inside seams (interior reinforcement matters).
3) Let it set
Give the walls at least 20–30 minutes to firm up before touching the roof. If you can, wait longer.
For maximum sturdiness, many bakers let the walls set for a few hours or even overnight.
4) Add the roof
- Pipe a thick bead along the top edges of the walls and along the roof seam line.
- Set roof panels in place and support them if they slide.
- Pipe icing along the roof ridge and seams like you’re caulking a tiny cookie cabin.
If the roof keeps slipping, don’t fight physicspause and let the walls set longer, or build an A-frame next time.
Even candy deserves a stable foundation.
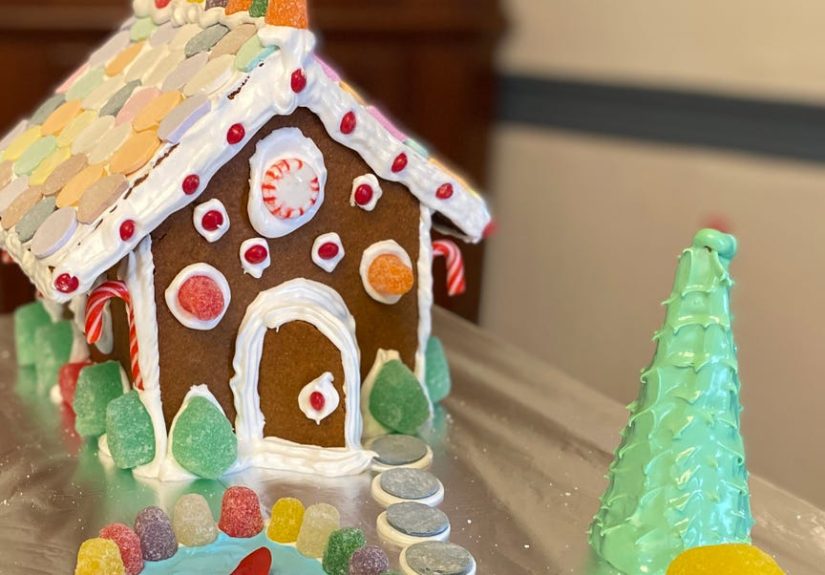
Step 5: Decorate Like a Pro (Even If You’re Not One)
Decorating is where gingerbread houses become gingerbread stories. The easiest pro move is to decorate panels
while they’re flatthen assemble. But if your house is already standing, no worries: you can still add plenty of charm.
Decoration strategy: pick a theme
- Classic 2022 cottage: white icing “snow,” peppermint roof, pretzel fences, candy cane pathway.
- Minimalist: clean piping, gumdrop “wreath,” coconut snow, fewer candies for a modern look.
- Kids’ candy carnival: everything goes, including the marshmallow chimney that defies logic.
Roof ideas that are easy and sturdy
- Overlapping cookies (thin wafers, chocolate squares, or small crackers) like shingles
- Peppermints or cereal “tiles” for a neat pattern
- Thick piped icing lines with sprinkles pressed in
“Snow” that looks great in photos
- Fine shredded coconut (fresh snow vibes)
- Powdered sugar dusting right before serving/display (don’t do this days in advanceit can absorb moisture)
- White sanding sugar for sparkle without melting
Stained-glass windows (the crowd-pleaser)
Cut window openings in your wall panels before baking. Once baked, place the panels on parchment,
fill the openings with crushed clear hard candy (like Jolly Ranchers), and bake at a low temperature
(around 300°F) just until melted. Cool completely before assembling so the “glass” sets.
Food Safety and “Should We Eat This?” Reality Check
Gingerbread houses can be eaten, but many are displayed for daysor handled by many handswhich makes them more “decor”
than “dessert.” If you plan to eat yours, keep it clean during building and use a royal icing method that avoids raw egg whites,
such as meringue powder or pasteurized egg whites. Also, store the house in a cool, dry place away from humidity.
A practical rule: if the house has been sitting out for a long time, is dusty, or has seen a parade of sticky fingers,
treat it like a centerpiece and make separate gingerbread cookies for snacking.
Troubleshooting: Fixes for the Most Common Gingerbread Disasters
Problem: My walls won’t stand up
- Use thicker icing (add powdered sugar).
- Hold panels with mugs/cans and give them time.
- Pipe icing on both the base edge and the wall edgemore contact points = more stability.
Problem: Panels warped or don’t fit
- Trim edges with a sharp knife to square them up.
- Sand lightly with a microplane/grater if needed (gentle!).
- Pipe a thicker “gap-filling” seam and cover with decorations (architecture meets camouflage).
Problem: Roof keeps sliding
- Let walls set longer before adding roof.
- Use supports while drying.
- Add interior icing “buttresses” (extra blobs where roof meets wall from the inside).
Problem: Icing is drying in the bowl
- Cover with plastic wrap touching the surface, or a damp towel over the bowl.
- Work in smaller batches.
Problem: Humidity is making everything sticky
- Build in the driest room you’ve got.
- Avoid steaming dishwashers and boiling pots nearby.
- Store the finished house in a cool, dry area (not the fridge, which can add moisture).
A Simple 2-Day Gingerbread House Timeline (Sanity-Friendly)
Day 1: Bake and prep
- Make dough, chill, roll, cut, bake panels.
- Trim edges while warm, cool flat.
- Make royal icing; store airtight.
Day 2: Build and decorate
- Assemble walls and let set.
- Add roof and let set (longer is better).
- Decorate: shingles, windows, snow, details.
Extra 2022 Touches: Small Upgrades That Make a Big Difference
In 2022, a lot of holiday baking leaned into two ideas at once: make it easier and make it prettier.
That’s a great mindset for gingerbread houses. You don’t need a candy store explosion to make something charming.
- Cleaner lines: Use piped “trim” and fewer candy types for a more polished look.
- Mixed textures: Combine coconut snow, sanding sugar sparkle, and cookie shingles for depth.
- Warm glow: Add battery LED lights inside so the windows shine.
- Better shortcuts: Hybrid builds (kit panels + homemade stiff icing) save time and prevent collapses.
Experience Section: What It’s Really Like to Build a Gingerbread House (and Why You’ll Do It Again)
Here’s the honest truth: the first gingerbread house you build teaches you more than any recipe ever will. The second one
makes you feel like a wizard. And somewhere around the third, you start saying sentences like, “Hand me the piping bag,
I need structural reinforcement,” which is a very normal holiday thing to say.
One of the most common experiences is the “confidence spike” right after the panels come out of the oven. They look perfect.
You tap one gently and it seems solid. You start imagining a tiny candy village, maybe with a pretzel fence and a gumdrop garden.
Then assembly begins, and suddenly you understand why real contractors drink coffee. Walls that looked identical on the tray
feel slightly different once they’re upright. One corner wants to behave; the other corner wants to audition for a slapstick comedy.
This is where the best gingerbread house builders learn their favorite life skill: propping things up and walking away.
Not foreverjust long enough. A mug becomes a support beam. A soup can becomes a “temporary brace.” A small spice jar becomes a roof assistant.
It’s oddly satisfying, like you’re building a tiny edible set for a holiday movie, and your cast is mostly kitchenware.
Decorating brings a different kind of drama: the candy avalanche. You press one gumdrop into icing, it slides, you press it again,
and suddenly you’ve learned that gravity is not impressed by your festive intentions. The fix is almost always the same:
thicker icing, smaller sections, and letting things set before adding more weight. In other words, the gingerbread house teaches you
project managementexcept your reward is sprinkles.
If you’re building with kids (or a very enthusiastic adult), the experience gets even better. Someone will absolutely try to “improve”
your carefully piped roof pattern by adding one more candy. Then another. Then five. Eventually you’ll look at the house and realize
it has become a candy-themed art installation. And that’s finebecause gingerbread houses aren’t just about the final photo.
They’re about the laughter, the teamwork, and the moment someone says, “This is the best chimney I’ve ever built,” while holding a marshmallow.
The most surprising experience is what happens after the house is done. You’ll probably stare at it longer than you expect.
You’ll notice tiny details you forgot you addedlike a pretzel “log pile” or a peppermint path that curves just right.
And even if the seams aren’t perfect, the whole thing feels like an accomplishment because it is: you made edible architecture.
In the end, the gingerbread house becomes a holiday memory you can point to, laugh about, and (maybe) nibbleone crooked, charming shingle at a time.