Table of Contents >> Show >> Hide
- Why Clear Ice Is a Big Deal (Besides Looking Ridiculously Cool)
- The Science of Cloudy Ice (A Tiny Horror Movie in Your Freezer)
- The Best Home Method: The Cooler Technique (Directional Freezing Made Easy)
- How to Cut Clear Ice Like a Bartender (Without Losing a Finger)
- Do You Need Distilled Water or Boiled Water?
- Clear Ice Molds and Gadgets: When Convenience Wins
- Bartender Tips: Storage, Handling, and Serving (Where Most People Blow It)
- Troubleshooting: Why Your Ice Isn’t Clear (Yet)
- When You Want to Go Full Pro: How Bars Make Crystal-Clear Blocks
- Bonus Section: Ice Well Wisdom ( of Real-World Experience, Minus the Bar Drama)
- Conclusion: Clear Ice Is a Skill You Can Steal (Politely) from the Pros
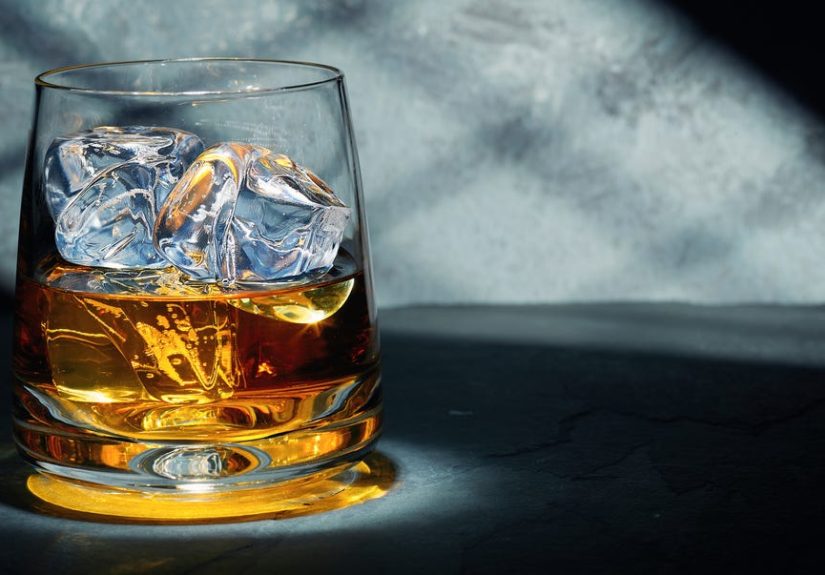
Clear ice is the tuxedo of frozen water: it makes everything look fancier, melts slower, and silently judges your
cloudy freezer cubes from across the room. If you’ve ever wondered why the ice at great cocktail bars looks like it
was carved from a glacier (and why your home ice looks like it went through a stressful breakup), the difference
isn’t “better vibes.” It’s technique.
This guide walks you through the most reliable way to make clear ice for cocktails at homeplus the
bartender habits that keep that ice crystal-clear, slow-melting, and ready for Old Fashioneds, Negronis, and any
drink that deserves better than sad, crackly cubes.
Why Clear Ice Is a Big Deal (Besides Looking Ridiculously Cool)
Clear ice isn’t just a vanity project for people who alphabetize bitters. It’s practical:
- Slower dilution: Clear ice tends to be denser and more uniform, so it melts more predictablyespecially in big formats.
- Better texture: Fewer internal fractures means less “ice shrapnel” and fewer weird fast-melt channels.
- Sharper presentation: A transparent cube in amber whiskey is basically liquid jewelry.
The key point bartenders know: clarity helps, but size and shape help even more. A big cube or sphere has a
lower surface-area-to-volume ratio, meaning it melts slower than a handful of small cubes. Clear ice just makes that
big cube look like it belongs in a magazine instead of a gas station soda fountain.
The Science of Cloudy Ice (A Tiny Horror Movie in Your Freezer)
Cloudiness is mostly trapped stuffair bubbles, dissolved gases, and mineralscaught inside the ice as water freezes.
In a typical freezer tray, water starts freezing from multiple directions at once (sides, bottom, top), which
corrals bubbles and impurities into the middle like a group project where everyone panics at the deadline.
Directional Freezing: The Trick Behind Bar-Quality Ice
Bars and craft ice companies control how water freezes. The most important concept is
directional freezing: forcing the ice to freeze in one direction so bubbles and impurities get
pushed into the last part of the water to freeze (which you later discard).
In nature, you can see this in ponds: ice often forms clearer near the top because freezing happens gradually from
the surface downward, pushing sediment and bubbles away from the early-frozen layer. At home, we mimic that with
insulation.
The Best Home Method: The Cooler Technique (Directional Freezing Made Easy)
If you want reliable clear ice cubes without buying specialized gear, this is your move. It produces
a big clear slab you can cut into bartender-style cubes.
What You Need
- A small hard-sided cooler that fits in your freezer (2–5 quarts is plenty)
- Water (filtered is nice; tap can work depending on your area)
- A cutting board or sturdy surface
- A serrated knife or bread knife (for scoring)
- A rubber mallet (or something you don’t mind whacking with)
- A towel (for grip and to prevent ice from skating away like it has plans)
- Optional: gloves for cold protection and grip
Step-by-Step: Make a Clear Ice Block
-
Fill the cooler with water. Aim for 3–5 inches deep. You don’t need to fill it to the brimunless
you enjoy cleaning frozen waterfalls. -
Put it in the freezer with the lid off. Lid off is important: it encourages freezing from the top
down instead of trapping cold air in a way that can freeze the sides too aggressively. -
Freeze until most (not all) of it is solid. This is the whole game. You want a thick clear slab
on top and a little liquid water underneath. Typical timing is around 18–24 hours, but your freezer’s temperature
and how full it is will change that. -
Pull the cooler before it freezes completely. If you freeze the entire thing solid, the last part
(where the junk gets pushed) will lock into place and you’ll have a cloudy section you must cut off anyway. -
Unmold the ice block. Let it sit at room temp for 5–10 minutes, then invert it. If it’s stubborn,
run a little cool water over the outside of the cooler for a few seconds to loosen the edges. -
Trim the cloudy bottom. Flip the block so the cloudy part is down. Use your knife to score a line
where clear becomes cloudy, then tap with the mallet to break it off. Keep the cloudy scrap for shaking cocktails
(it’s still icedon’t send it to emotional exile).
How to Tell When It’s “Ready”
The goal is a mostly frozen block with a little unfrozen water at the bottom. If you see a thick, clear top and the
bottom looks slushy or liquid, you’re in the sweet spot. If it’s fully solid and cloudy at the base, you waited a
bit too longbut you can still salvage clear ice by trimming the cloudy portion.
How to Cut Clear Ice Like a Bartender (Without Losing a Finger)
Bars often cut big cubes from clear blocks because large-format ice looks great and melts slowly in spirit-forward
drinks. At home, you can do a simplified version.
Basic Cutting Method: Score and Crack
- Temper the block. Let it sit 5–10 minutes so the outside isn’t brittle-cold.
- Wrap in a towel for grip and to keep it from sliding.
-
Score lines with a serrated knife where you want the cube edges. You’re not sawing throughjust
creating a weak point. -
Tap along the score with a mallet. The ice usually snaps cleanly along your line (like it respects
boundaries, which is more than we can say for some guests). - Square the edges by shaving small imperfections with the knife as needed.
Popular Shapes and When to Use Them
- 2-inch cube: The classic for Old Fashioneds, Negronis, and sipping spirits.
- Spheres: Beautiful, slow-melting, and dramaticgreat for whiskey and strong stirred drinks.
- Spears: Ideal for highballs because they slide into tall glasses and melt slowly.
- Crushed ice: Not for clarity flexingthis is for juleps, tiki drinks, and “vacation in a glass.”
Do You Need Distilled Water or Boiled Water?
Let’s settle a common internet bar fight: water quality matters, but freezing method matters more.
Filtering can help reduce off flavors and some minerals. Distilled water can reduce mineral content. Boiling can
remove some dissolved gases. But none of these fixes beats directional freezing for truly clear, large-format ice.
A Practical Water Guide
- If your tap water tastes good: Start there. Many people get excellent results with tap water using directional freezing.
- If your tap water tastes weird: Use filtered water. Your ice will taste like your water, and your cocktail will absolutely notice.
- If you want maximum control: Use distilled or filtered water, and keep your freezer odor-free.
- Boiling: It can slightly reduce bubbles in some cases, but it’s not the secret sauce. Directional freezing is.
Clear Ice Molds and Gadgets: When Convenience Wins
If cutting blocks sounds like a fun hobby until you remember you also have laundry, consider a clear ice mold. Most
of the good ones work by directional freezing: insulation on the sides, freezing from top to bottom, and a reservoir
to trap cloudy ice where you don’t want it.
What to Look for in a Clear Ice Maker
- Insulation around the sides and bottom
- A “waste” reservoir for cloudy ice
- Large cube size (around 2 inches) for cocktail use
- Easy release so you’re not wrestling silicone at midnight
These tools are especially good if you want consistent cubes or spheres with less effort. The trade-off is batch
size: a cooler can give you a block big enough for a weekend party; molds usually make a few pieces at a time.
Bartender Tips: Storage, Handling, and Serving (Where Most People Blow It)
1) Store Ice Like It’s Food (Because It Basically Is)
Ice absorbs odors. If your freezer smells like garlic bread and existential dread, your ice will, too. Store clear
cubes in a sealed container or freezer bag once they’ve hardened. If you’re making a big batch, wrap cubes so they
don’t clink into each other and chip.
2) Temper Before Service
Straight-from-the-freezer ice can crack when it hits room-temp glass or liquid, especially if it has sharp corners.
Bars often “temper” cubes for a minute or twojust enough to relax the surface. At home, let the cube sit out for
60–120 seconds before dropping it into a glass. It’s a tiny habit that prevents dramatic fractures.
3) Match Ice to the Cocktail
- Stirred, spirit-forward cocktails: Use one big clear cube or sphere for slow dilution and maximum elegance.
- Shaken sours (Daiquiri, Whiskey Sour): Regular ice is fine for shaking; serve up without ice or over fresh cubes.
- Highballs: Spears or tall, stacked clear cubes melt slower and keep carbonation happier.
- Tiki and juleps: Crushed ice is the pointclarity is optional, joy is mandatory.
4) Use the “Ugly Ice” Strategically
The cloudy offcuts from your clear block are perfect for shaking. They cool quickly, and nobody is judging the ice
inside a shaker tin. Save the pretty cubes for serving.
Troubleshooting: Why Your Ice Isn’t Clear (Yet)
Your whole block is cloudy
- The cooler lid was on, or the sides froze too quickly.
- You froze it too long and the “junk zone” fully solidified through the block.
- Your freezer may be extremely cold or blasting airflow directly on the cooler.
Your ice is clear but full of cracks
- It wasn’t tempered before cutting or serving.
- The block froze too quickly (try a slightly warmer freezer setting if safe for food storage).
- Sharp corners + thermal shock = instant spiderwebs.
Your ice tastes “off”
- Freezer odors (store ice sealed).
- Old ice (yes, ice gets staleespecially if uncovered).
- Strong-tasting tap water (filter it).
When You Want to Go Full Pro: How Bars Make Crystal-Clear Blocks
Many top cocktail programs use specialized clear-ice machines that freeze large blocks slowly and directionally,
often with water circulation to keep bubbles from getting trapped. These blocks get cut down into cubes, spears, and
spheres using saws and custom tools. At home, the cooler method is the best “low-tech version” of that same
principleminus the industrial equipment and the suspiciously confident guy with a chainsaw.
Bonus Section: Ice Well Wisdom ( of Real-World Experience, Minus the Bar Drama)
Ask a room full of bartenders about ice and you’ll get the same look you’d see if you asked chefs about knives:
reverence, strong opinions, and at least one person who’s about to give a 12-minute monologue. Here are the
experience-based lessons that come up again and againlearned through busy shifts, cracked cubes, and the occasional
“why is the freezer full of coolers?” household negotiation.
First: clear ice is a process, not a personality trait. The first batch is rarely perfect. People
tend to blame their water, their freezer, or the alignment of the planetsbut most issues come down to timing. Pull
the cooler too early and you get a thin sheet. Pull it too late and the cloudy section grows like a villain’s
origin story. The sweet spot usually shows up after a couple of runs, when you learn how your freezer behaves on a
normal weeknight versus the day after you crammed it full of groceries.
Second: storage is where dreams go to die. You can make gorgeous clear cubes and still end up with a
drink that smells faintly like last month’s takeout if the ice sits uncovered. That’s why pros treat ice like an
ingredient: sealed container, minimal exposure, and no hanging out next to the frozen fish. If you want your
cocktail to taste clean, your ice needs to live a clean life.
Third: “tempering” sounds fancy until you realize it means “let the ice calm down.” In a busy bar,
dropping a rock-hard cube straight into a warm glass can cause instant cracking. At home, the same thing happens,
especially with sharp-edged cubes. The fix is hilariously simple: give the cube a minute on the counter. That small
pause saves you from the heartbreak of watching your perfect cube split like it just heard a bad joke.
Fourth: ugly ice is not failureugly ice is utility. The cloudy bottom of a directional
freezing block is excellent for shaking and chilling. Many bartenders keep a separate bin for “service ice” (pretty,
big, slow-melting) and “work ice” (whatever gets the job done fast). At home, you can do the same: pretty cubes for
the glass, cloudy scraps for the shaker.
Fifth: the best clear ice setup is the one you’ll actually use. Some people love the ritual of
cutting blocks into cubes like a tiny ice sculptor. Others want four perfect cubes with zero drama. Both approaches
are valid. The only wrong method is the one that makes you give up and go back to cloudy cubes out of spite. Pick a
routine that fits your life: cooler blocks for parties, a clear ice mold for weekdays, and a healthy acceptance
that sometimes your drink will be delicious even if the ice isn’t runway-ready.
Conclusion: Clear Ice Is a Skill You Can Steal (Politely) from the Pros
Making clear ice at home is mostly about controlling how water freezes. Use directional freezing,
trim the cloudy section, and handle your cubes like a bartender: store them sealed, temper before serving, and match
ice format to the drink. Once you do it a couple of times, the process becomes routineand your cocktails will look
like they have a reservation somewhere expensive.