Table of Contents >> Show >> Hide
- Quick Table of Contents
- The Big Idea: Make Smoke, Then Trap It
- Safety First (Because Smoke Is Still… Smoke)
- Method 1: Turn a Charcoal Grill into a Smoker
- Method 2: Smoke on a Gas Grill (Foil Pouch or Smoker Box)
- Method 3: Oven “Smoking” (The Cleanest Way Indoors)
- Method 4: Stovetop Smoking in a Pot or Wok
- Method 5: Smoke Tubes & Smoking Guns (Small-Space Magic)
- Wood & Flavor Pairing Cheat Sheet
- Troubleshooting: Fix Bitter Smoke & Dry Meat
- Food Safety & Target Temps
- Wrap-Up: Pick Your Path and Start Small
- Extra: Real-World Experiences When You Smoke Food Without a Smoker (500+ Words)
Want that dreamy, barbecue-joint aroma but you don’t own a smoker (or the backyard, patience, and neighborly forgiveness it often requires)?
Good news: you can smoke food without a smoker using gear you probably already haveyour grill, your oven, even a humble pot with a lid.
The trick is understanding what smoking really is: controlled heat + clean smoke + time. Not “set off the smoke alarm and hope for the best.”
In this guide, you’ll learn several practical ways to get legit smoky flavorwhether you’ve got a gas grill, a charcoal kettle, an oven, or nothing but a stovetop and stubborn optimism.
We’ll cover wood choices, temperature control, food safety, and the rookie mistakes that make food taste like a damp campfire.
(Spoiler: lifting the lid every 90 seconds is not “checking,” it’s “letting all the smoke escape.”)
Quick Table of Contents
- The Big Idea: Make Smoke, Then Trap It
- Safety First (Because Smoke Is Still… Smoke)
- Method 1: Turn a Charcoal Grill into a Smoker
- Method 2: Smoke on a Gas Grill (Foil Pouch or Smoker Box)
- Method 3: Oven “Smoking” (The Cleanest Way Indoors)
- Method 4: Stovetop Smoking in a Pot or Wok
- Method 5: Smoke Tubes & Smoking Guns (Small-Space Magic)
- Wood & Flavor Pairing Cheat Sheet
- Troubleshooting: Fix Bitter Smoke & Dry Meat
- Food Safety & Target Temps
- Wrap-Up
- Extra: Real-World Experiences (500+ Words)
- SEO Tags (JSON)
The Big Idea: Make Smoke, Then Trap It
Smoking is basically flavor delivery. Wood smolders, releasing aromatic compounds that stick to the surface of foodespecially when the surface is slightly moist.
That’s why a quick dry brine, a spritz, or a water pan can help. The goal is not “maximum smoke” but clean, thin smoke and steady heat.
Think “gentle perfume,” not “bonfire in a broom closet.”
Two rules that make everything easier
- Use indirect heat. Food sits away from the flame/coals so it cooks slowly and absorbs smoke.
- Keep airflow moving. Stale smoke turns harsh. You want smoke that drifts, not smoke that sulks.
Safety First (Because Smoke Is Still… Smoke)
Before we get delicious, let’s get smart. Whether you’re smoking outdoors or indoors, you’re creating combustion byproducts.
That means you need ventilation, attention, and a plan.
- Ventilation: If you smoke indoors, run the strongest exhaust fan you have and crack a window. If your alarm is sensitive, consider temporarily moving it (if safe/allowed) or using a fan to redirect airflow.
- Heat protection: Wood chips, foil packets, and pans get screaming hot. Use tongs and heatproof gloves.
- Thermometer: Don’t guess. A probe thermometer is the difference between “tender brisket vibes” and “why is it still rubbery?”
- Fire safety: Keep a lid nearby to smother flare-ups. And never leave a smoking setup unattended “just for a minute.” That minute has hobbies.
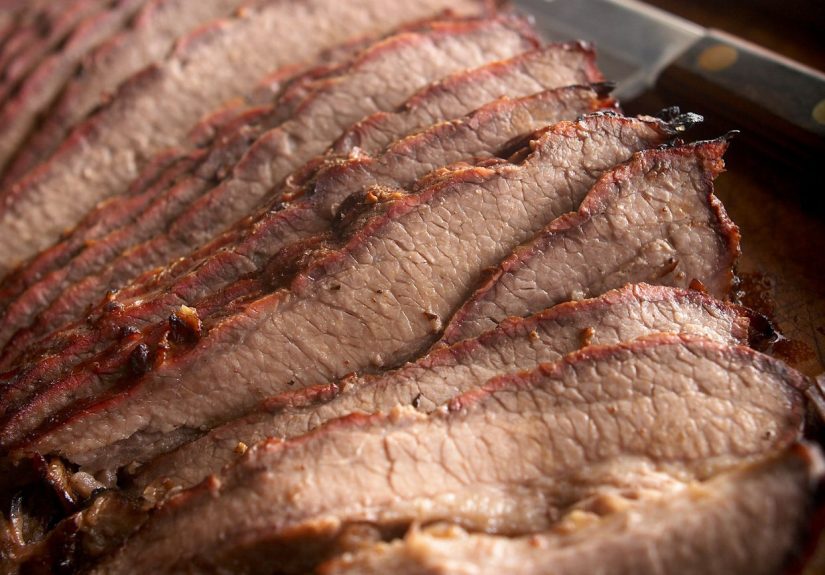
Method 1: Turn a Charcoal Grill into a Smoker
If you have a charcoal grill, you’re basically one clever setup away from smoking like a pro. The easiest approach is to create a long, slow burn and let wood chunks
add flavor along the way.
Option A: Two-Zone “Low and Slow” Setup
- Bank coals to one side (hot zone). Leave the other side empty (cool zone).
- Add a drip pan on the cool side. For longer cooks, add hot water to help stabilize temperature and reduce flare-ups.
- Add wood chunks (not a mountainjust a few pieces) directly onto the coals.
- Put food on the cool side, close the lid, and adjust vents to hold roughly 225–275°F.
- Resist the urge to peek. Every lid lift dumps heat and smoke. Your grill is not a reality show; it doesn’t need constant check-ins.
Option B: The Charcoal “Snake” for Longer Cooks
Want steady heat for hours without babysitting? Arrange briquettes in a curved “snake” around the edge of the grill, tuck wood chunks along the path, then light
one end. The fire slowly crawls forward, giving you a surprisingly stable low-temp cook.
Best foods for this method
- Pork shoulder (pulled pork)
- Ribs
- Whole chicken or turkey breast
- Chuck roast (budget brisket energy)
Method 2: Smoke on a Gas Grill (Foil Pouch or Smoker Box)
Gas grills get a bad rap in smoke circles, but they can absolutely produce delicious resultsespecially for poultry, fish, pork chops, and even ribs.
The secret is adding a smoke source and cooking on indirect heat.
Step-by-step: Gas grill smoking (beginner-proof)
- Preheat the grill (10–15 minutes).
- Create your smoke source:
- Smoker box: fill with wood chips and place over a lit burner.
- Foil pouch: wrap a handful of chips in heavy-duty foil; poke a few holes on top.
- Foil pan method: put chips in a small foil pan, cover with foil, poke holes.
- Set up indirect heat: leave one burner on (hot side), turn the other off (cool side).
- Add a water pan near the heat source if you’re doing a longer cook. It helps steady temps and keeps the cooking environment more forgiving.
- Wait for “clean” smokethin and wispythen put the food on the cool side and close the lid.
- Hold a steady temp (often 225–275°F for smoke-style cooking). Adjust burners as needed.
Quick example: Smoked salmon on a gas grill
- Dry brine salmon 30–60 minutes with salt + a little brown sugar.
- Rinse, pat dry, and let it air-dry 10 minutes (helps smoke cling).
- Smoke on indirect heat around 225–250°F until it flakes easily, usually 30–60 minutes depending on thickness.
- Finish with lemon and cracked pepper. Try not to act smug. (You earned it.)
Method 3: Oven “Smoking” (The Cleanest Way Indoors)
Can you smoke in an oven? Sort of. You can create smoky flavor indoors, but most home ovens ventmeaning you’ll lose smoke and potentially perfume your kitchen
curtains for weeks. The smartest oven approach is usually short smoke exposure + low roast.
Oven method that actually works
- Line a roasting pan with foil for easier cleanup.
- Add wood chips in the bottom (some people soak; others prefer dryeither can work, but you want smoldering, not flaming).
- Place a rack above the chips so the food isn’t sitting on them.
- Start hot briefly to get chips smoking (keep a close eye), then drop the oven to a low temp (often 250–300°F) to finish cooking gently.
- Ventilate and accept that your home may smell “pleasantly rustic” for a bit.
This is a great method for foods that don’t need hours of smokelike chicken pieces, sausages, and fish. For ribs or larger cuts, many cooks use the oven mainly
for tenderness and add smoke flavor outdoors (grill) or via a shorter stovetop smoke step.
Method 4: Stovetop Smoking in a Pot or Wok
This is the “I refuse to buy a smoker on principle” method. With a sturdy pot or wok, foil, a rack/steamer insert, and a lid, you can create a mini smoking chamber.
It’s fast, intense, and perfect for adding smoke flavor before finishing in the oven.
Basic stovetop smoker setup
- Line the bottom of a pot/wok with several layers of foil (leave overhang for sealing).
- Add smoking material: wood chips, or a tea-smoking blend (tea + rice + sugar).
- Set a rack above the smoking material (food must not touch it).
- Seal tightly with the lid and (if needed) extra foil around the edges.
- Heat until smoke forms, then reduce heat to maintain smoldering for 10–20 minutes depending on food.
- Finish cooking in the oven if needed (especially for chicken or thicker cuts).
What to smoke on the stovetop
- Chicken wings or thighs (smoke 10–15 minutes, then bake to temp)
- Tofu (smoke 8–12 minutes, then crisp in a pan)
- Hard-boiled eggs (smoke 8–10 minutes; shockingly good)
- Salt, nuts, or butter (short smoke exposure = huge payoff)
Note: This method makes real smoke quickly. If your ventilation is weak, choose a different method or take it outdoors with a camping burner.
Delicious should not equal “evacuation drill.”
Method 5: Smoke Tubes & Smoking Guns (Small-Space Magic)
If you want smoky flavor without turning your whole cooking setup into a science project, two gadgets are worth knowing:
smoke tubes and smoking guns.
Smoke tubes (for grills, even gas)
A smoke tube is a perforated metal tube you fill with pellets and light. It smolders for a long time and generates steady smokegreat for boosting smoke in a grill.
You can use it for hot smoking (while cooking) or for gentle cold-smoke-style flavor if you keep the environment cool.
Smoking guns (for finished foods and cocktails)
A smoking gun burns a small amount of wood chips and pumps the smoke through a hose into a covered container. It won’t mimic a 10-hour brisket session,
but it’s incredible for quick smoky accents: butter, salsa, cheese, salt, roasted vegetables, even bourbon.
Quick example: 5-minute smoked butter
- Put softened butter in a bowl and cover with a larger bowl or plastic wrap dome.
- Pipe smoke in, let it sit 3–5 minutes.
- Stir, taste, repeat if needed. Stop before it tastes like you licked a fireplace.
Wood & Flavor Pairing Cheat Sheet
You don’t need a lumber degree to choose wood. Start mild, use less than you think, and aim for clean smoke.
Here’s a simple pairing guide:
- Apple / Cherry: mild, slightly sweet; great for poultry, pork, fish, veggies
- Pecan: nutty and smooth; excellent for pork and chicken
- Hickory: classic BBQ punch; great for ribs, pork shoulder, stronger meats
- Oak: balanced and versatile; great for beef and “big” cuts
- Mesquite: bold and intense; best in small doses or quick cooks
Troubleshooting: Fix Bitter Smoke & Dry Meat
Problem: “My food tastes bitter / like ash”
- Too much wood: Start with 1–3 chunks or a small handful of chips. You can always add more later.
- Dirty smoke: Thick white smoke can taste harsh. You want thin, light smoke. Make sure the fire is hot enough to burn clean.
- Bad airflow: Don’t choke vents completely. Smoke needs movement to stay “fresh.”
- Dripping on the smoke source: Use a drip pan so fat doesn’t hit coals/chips and turn acrid.
Problem: “My meat is dry”
- Too hot: Indirect zone might be hotter than you think. Use an ambient probe near the food.
- No rest time: Let meat rest before slicing so juices redistribute.
- Wrong cut for the job: Lean cuts dry out fast. Start with chicken thighs, pork shoulder, or salmon for easier wins.
Problem: “I’m not getting enough smoke flavor”
- Your smoke is escaping: Keep the lid closed. Seriously. The lid is the flavor’s rent-controlled apartment.
- Food surface is too dry: A light spritz or a water pan can help smoke adhere.
- Cook is too short: Some foods need only a little smoke; others need time. Consider a stronger wood (hickory/oak) or a longer low-temp phase.
Food Safety & Target Temps
Smoking often happens at lower temperatures, which makes food safety non-negotiable. Use a thermometer and cook to safe internal temperatures.
A few common benchmarks:
- Poultry: 165°F
- Ground meats: 160°F (varies by type, but this is a common safe minimum)
- Steaks/roasts (beef/pork/lamb): 145°F + rest time (depending on cut and preference)
Also, keep raw and cooked foods separated, don’t reuse marinades without boiling, and don’t leave perishables hanging out while you “just get the smoke going.”
Smoke flavor is great; food poisoning is a terrible personality.
Wrap-Up: Pick Your Path and Start Small
You don’t need an actual smoker to make smoky food. You need a smoke source, indirect heat, and enough patience to let the process work.
Start with a simple win: smoked salmon on a gas grill, stovetop-smoked wings finished in the oven, or a charcoal two-zone chicken cook.
Once you taste that first real smoky bite, you’ll either (A) feel incredibly accomplished or (B) start browsing smokers online at 2 a.m.
Both outcomes are normal.
Extra: Real-World Experiences When You Smoke Food Without a Smoker (500+ Words)
The first time most people try DIY smoking, the experience is equal parts “I am a culinary genius” and “why does my kitchen smell like a frontier reenactment?”
That’s because smoke is dramatic. It’s not subtle. It’s the theater kid of cooking techniquesit shows up early, wants attention, and somehow leaves glitter behind
(except the glitter is a lingering aroma in your hoodie).
One common early lesson: your sense of smell will lie to you mid-cook. After 20 minutes around smoke, your nose gets used to it and you start thinking,
“Wow, I’m barely getting any smoke flavor.” Then you serve the food and everyone else takes one bite and goes, “OH. That is SMOKED.” This is why it helps to start mild.
You can add smoke later (even with a smoking gun), but you can’t un-smoke a chicken breast that tastes like it’s been camping since 1997.
Another universal experience is the lid-lifting reflex. Beginners lift the lid constantly because it’s satisfying to see progress.
Unfortunately, smoke works best when it’s trapped around the food. Every peek is basically you opening the door while flavor is trying to move in.
A good mental trick: set a timer. Tell yourself you’re not “allowed” to open the grill or pot until the timer goes off. This turns impatience into a game,
and games are easier than discipline.
Indoor smokers (pot/wok method) tend to teach a different set of lessonsmainly that sealing matters. If you don’t crimp the foil well, smoke leaks,
and the whole method turns into a half-smoke, half-ventilation stress test. People also learn quickly that wood chips can go from “smoldering nicely” to “is that flame?”
faster than you can say, “Where did I put the lid?” The fix is simple: keep heat controlled and stay nearby. Stovetop smoking is a short sprint, not a marathon.
There’s also the “I used the wrong food” moment. DIY smoking is easiest with forgiving foods: chicken thighs, pork shoulder, salmon, sausage, mushrooms.
Dry, lean cuts can be tricky because smoke exposure often means longer cooking, and longer cooking can mean dryness if you’re not careful.
Many people find success by smoking for flavor, then finishing with a gentler method. For example: stovetop smoke wings for 12 minutes,
then finish in the oven until crisp and safely cooked. Or smoke a thick pork chop on the grill, then sear quickly at the end for a nice crust.
And yes, there’s always one batch that tastes “off,” and it’s almost always because of dirty smoke or too much wood.
Thick, billowy smoke looks cool in photos, but it can taste bitter. Clean smoke is often lighter than people expect.
The funny part is that once you nail it, you start chasing that “barely visible smoke” like it’s the holy grailbecause it kind of is.
You learn to trust the process: steady temperature, small amounts of wood, and letting time do the work.
Finally, the best experience: the first time you serve DIY-smoked food to friends or family and they assume you own a fancy setup.
You can either tell the truth (“It was a foil pouch and vibes”) or accept your new identity as The Smoke Wizard.
Either way, you’ll remember that moment every time you smell applewood and think, “Yep. I can do this whenever I want.”