Table of Contents >> Show >> Hide
- Why a Great Backsplash Starts Before the First Tile
- How to Prepare the Wall for Backsplash Tile
- Plan the Layout Before You Mix Mortar
- Choose the Right Mortar, Adhesive, and Grout
- How to Install the Tile Without Making It Look DIY
- How to Grout a Backsplash for a Clean Finish
- The Pro Detail Most DIYers Miss: Caulk the Right Joints
- Design Tips That Make a Backsplash Look Custom
- Common Backsplash Mistakes to Avoid
- Real-World Experience: What Tiling a Backsplash Actually Teaches You
- Conclusion
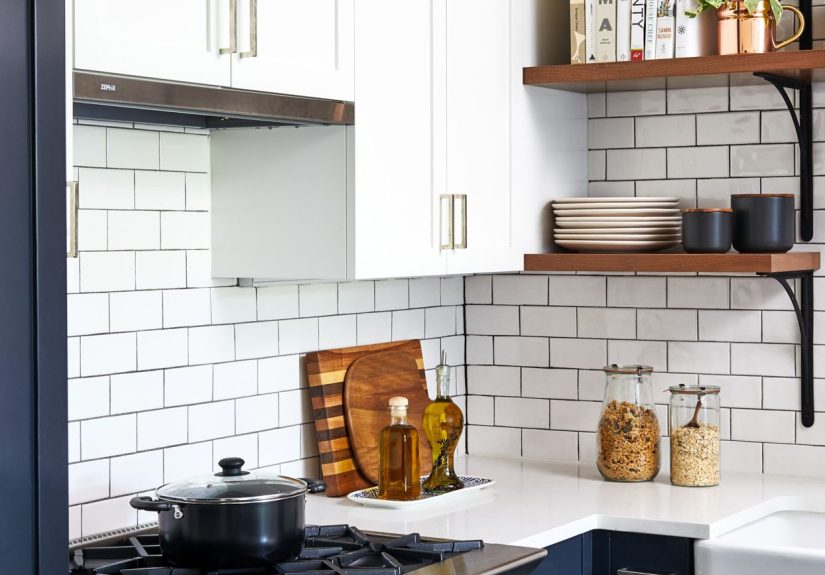
A tile backsplash is one of those home upgrades that punches far above its weight. It protects the wall from sauce splatters, coffee drips, and whatever mystery explosion happened near the blender, while also making your kitchen look far more pulled together than your junk drawer ever will. And the good news? Learning how to tile a backsplash like a pro is absolutely doable for a determined DIYer with patience, a level, and a willingness to stop eyeballing things “close enough.”
The trick is understanding that a professional-looking backsplash is not about speed. It is about preparation, layout, clean cuts, and resisting the urge to rush the grout stage because you are tired, hungry, or suddenly convinced takeout menus count as interior design. When done right, a backsplash tile installation looks crisp, symmetrical, durable, and intentional. When done wrong, it can look like your wall lost an argument with a box of subway tile.
This guide walks through the full process step by step, from planning the layout and choosing materials to setting tile, grouting, caulking, and handling those annoying outlet cuts with confidence. Whether you are installing ceramic subway tile, porcelain mosaic sheets, glass tile, or natural stone, these backsplash installation tips will help you get a finish that looks polished and lasts.
Why a Great Backsplash Starts Before the First Tile
If you want pro results, think like a pro before you open the mortar. The most common backsplash mistakes happen long before the first tile touches the wall. Poor surface prep, a rushed layout, and incorrect adhesive choices can create crooked lines, weak bond strength, lippage, and grout cracks later on.
Start by choosing the right tile for your kitchen style and your skill level. A classic 3-by-6 subway tile in a running bond pattern is beginner-friendly because it is forgiving and easy to cut. Mosaic sheets go up faster but require careful alignment to avoid visible sheet lines. Glass tile looks gorgeous but often needs special handling, white mortar, and more precise cuts. Natural stone adds warmth and texture, but many stone products need sealing before grout so they do not stain during installation.
Then gather the right tools. At minimum, you will need tile, spacers, a notched trowel, thinset mortar or an approved wall adhesive, a margin trowel, level, tape measure, tile cutter or wet saw, grout float, sponge, buckets, caulk, and safety gear. If you are tiling around outlets, add a voltage tester and box extenders to your list. Yes, this is the part where you turn off the power at the breaker. Electricity and wet mortar are not a charming kitchen duo.
How to Prepare the Wall for Backsplash Tile
Surface preparation is the part nobody brags about on social media, but it is what separates a clean install from a future repair project. Your wall should be clean, smooth, dry, and structurally sound. Grease, soap film, loose paint, wallpaper, and crumbs from the Paleo era can interfere with adhesion.
Clean and repair first
Wipe the wall thoroughly, especially behind the range where grease loves to throw little farewell parties. Patch holes, scrape bumps, sand rough spots, and remove anything loose. A backsplash is not a magic blanket that hides all sins. Tile reflects unevenness more than people expect, particularly glossy tile.
Check whether you need backer board
For many standard kitchen backsplash installations, tile can go over properly prepared drywall in a dry interior area. But if the wall is damaged, noticeably uneven, or located in a moisture-prone zone, a suitable backer board or tile-approved substrate can create a better surface. The goal is a flat, stable foundation that will not shift or soften later.
Protect the work area
Cover the countertops, tape off adjacent surfaces, remove outlet covers, and pull appliances away from the wall if you are tiling behind them. If you are serious about tiling a backsplash like a pro, protect the space like a pro too. Mortar has a terrific sense of direction when it comes to landing on the one thing you forgot to cover.
Plan the Layout Before You Mix Mortar
Layout is where a backsplash either starts looking custom or starts looking suspicious. Professionals do not simply begin at one end and hope for the best. They dry-fit, mark reference lines, and make sure the cuts land in places that look intentional.
Find your focal point
Usually, that is the area over the sink or range. Mark the center of that section and create a plumb vertical line. Dry-lay tile along the countertop with spacers to see how the pattern falls. If your end pieces will be tiny slivers, shift the layout so both sides finish with larger, more balanced cuts. Tiny sliver cuts are the backsplash equivalent of showing up to a wedding in gym shorts.
Check the countertop level
Countertops are not always level, even when they look fine at first glance. Use a level to find the lowest point. From there, mark a reference line one tile height up, allowing for the recommended gap at the countertop. This helps keep the tile rows visually level even if the counter has slight variation. If needed, install a temporary ledger board along that line to support the first full row.
Plan for outlets, corners, and edges
Look at every interruption: outlets, switches, windows, corners, the underside of cabinets, and the end of the backsplash run. Decide ahead of time where trim pieces, bullnose tile, or metal edge profiles will go. Pro-looking edges do not happen accidentally. They are planned, cut, and finished with purpose.
Choose the Right Mortar, Adhesive, and Grout
If you want to know how to install a tile backsplash the smart way, this is a big one. Not every setting material works the same way, and not every tile should be treated like basic ceramic.
Thinset vs. mastic
For many pros, polymer-modified thinset mortar is the go-to choice because it offers strong bond performance and works well with ceramic, porcelain, and many stone tiles. Premixed wall adhesive, often called mastic or Type 1 adhesive, can be acceptable for certain dry-area backsplash projects with smaller wall tile, but it can dry more slowly behind dense or larger-format tile. If you want the safest all-around recommendation, thinset usually wins the popularity contest for a reason.
Pick the right trowel
The trowel notch size should match the tile and manufacturer guidance. Too little mortar can reduce coverage. Too much can squeeze into joints and turn cleanup into a side quest. For many backsplash tiles, a small V-notch or square-notch trowel works well, but always match the trowel to the tile type and size.
Use the right grout
For narrow grout joints under 1/8 inch, unsanded grout is often the better fit. For joints 1/8 inch or wider, sanded grout is commonly used. Some homeowners also choose high-performance or stain-resistant grout for easier kitchen cleanup. If you are using polished stone, glass, or scratch-prone tile, confirm the grout choice with the tile manufacturer before charging ahead like a hero in aisle twelve.
How to Install the Tile Without Making It Look DIY
Now comes the fun part: setting tile. This is where good prep turns into visible progress. It is also where patience matters most.
Step 1: Mix and spread in small sections
Mix only as much mortar as you can use before it skins over. Spread it on a small area of the wall using the flat side of the trowel first, then comb it with the notched side in one direction. Straight, even ridges matter because they help you achieve better contact when the tile is pressed in.
Step 2: Press tile in and collapse the ridges
Set each tile or sheet into the mortar and move it slightly perpendicular to the trowel lines. That motion helps collapse the ridges and improves coverage. Use spacers to keep joints consistent, and keep checking with a level. If you are using mosaics, align each sheet carefully so the seams disappear into the pattern instead of announcing themselves from across the room.
Step 3: Watch for lippage and mortar squeeze-out
Lippage is when one tile sits higher than its neighbor, and it is the reason some backsplashes look expensive while others look like a topographical map. Use a grout float or gentle hand pressure to keep the surface even. Clean extra mortar from tile faces and grout joints as you go. Dried thinset in a grout joint is a tiny problem now and a giant annoyance later.
Step 4: Cut around outlets and edges carefully
Measure twice, mark clearly, and cut slowly. Straight cuts may work with a manual cutter, while outlet notches and L-shaped cuts are usually easier with a wet saw or a rotary tool with a tile-cutting bit. Slightly rough cuts are often hidden by outlet covers, but wild overcuts will not magically become artistic. Keep outlet openings neat, and use box extenders if the finished tile surface leaves the electrical box recessed.
Step 5: Let it cure
Once the tile is set, stop touching it. Resist. Back away. Most backsplash installations need about 24 hours before grouting, though the exact timing depends on the product, tile density, humidity, and temperature. Read the bag, bucket, or technical sheet instead of trusting your inner optimist.
How to Grout a Backsplash for a Clean Finish
Grout changes everything. The right color can make tile pop, make a pattern feel more modern, or soften the whole wall into a calm background. The wrong application can leave haze, pinholes, and enough frustration to make you reconsider open shelving forever.
Apply grout methodically
Remove spacers from grout joints and mix the grout according to the manufacturer’s directions. Use a rubber float at an angle to force grout into the joints. Work in small sections. On a backsplash, that usually means a manageable area rather than the whole wall at once. Push firmly so joints fill completely.
Clean at the right time
After the grout firms slightly, wipe diagonally with a damp sponge. Not soaking wet. Damp. Overwashing can weaken the joints and pull out color. Underwashing leaves haze that later requires more elbow grease than anyone enjoys. A second buff with a microfiber cloth after the haze dries often helps reveal the clean finish you were hoping for.
Seal when needed
Some grouts and many natural stones benefit from sealing. Porous stone may also need pre-sealing before grout. Always check the tile and grout product instructions. In kitchens, sealing can add stain protection and make everyday cleanup easier, which is great because tomato sauce never calls before dropping by.
The Pro Detail Most DIYers Miss: Caulk the Right Joints
One of the biggest differences between a beginner backsplash and a professional one is knowing where not to grout. Changes of plane and movement joints should generally be caulked, not grouted. That includes the joint where the backsplash meets the countertop, inside corners, and around sinks or other transitions.
Use a color-matched caulk for a cleaner look. This joint allows movement and helps prevent cracking. Grout is rigid. Kitchens are not. Cabinets shift a little, counters move a little, houses settle a little, and your backsplash would very much prefer some flexibility in those areas.
Design Tips That Make a Backsplash Look Custom
Once the technical side is handled, a few design choices can make the final result feel custom instead of cookie-cutter.
Run the tile with intention
Decide whether the tile stops at the bottom of the upper cabinets, extends to the ceiling, or wraps around a window. Full-height tile behind the range often creates a more dramatic look.
Use trim for polished edges
Bullnose tile, pencil trim, or metal edge profiles can finish exposed edges neatly and protect them from chips. This small detail often makes a backsplash look more complete.
Choose grout color strategically
Matching grout gives a softer, more seamless look. Contrasting grout highlights the pattern and gives subway tile more visual rhythm. Neither is wrong; it just depends on whether you want quiet elegance or a backsplash with opinions.
Common Backsplash Mistakes to Avoid
- Starting without a dry layout
- Ignoring an out-of-level countertop
- Using the wrong adhesive for the tile type
- Spreading too much mortar at once
- Letting mortar harden in grout joints
- Grouting movement joints instead of caulking them
- Rushing cleanup and leaving grout haze
- Forgetting to turn off power before working around outlets
Real-World Experience: What Tiling a Backsplash Actually Teaches You
There is the official version of backsplash installation, and then there is the real-life version where you discover that one wall is not perfectly flat, one outlet is weirdly placed, and one tile absolutely refuses to cooperate because apparently it has its own agenda. That is why experience matters so much with a project like this. Even if you follow every technical step, the lived experience of tiling teaches you a few things that instruction sheets rarely explain well.
First, layout nerves are real. Nearly everyone feels confident until the dry-fit begins. Suddenly, the question is not “Can I tile this wall?” but “Why do these last two pieces look tiny and mildly embarrassing?” That moment is normal. It is also why experienced installers spend extra time adjusting the layout before any mortar is mixed. A thirty-minute layout change can save you from staring at awkward cuts for the next ten years.
Second, the first few rows are emotionally dramatic. You will place a tile, step back, squint, and wonder whether it is level or whether your kitchen has become a funhouse. This is where slow, steady checking pays off. People with the best-looking backsplashes are usually not the fastest workers. They are the ones who keep a sponge nearby, clean joints as they go, and recheck alignment before the mortar locks everything in place.
Third, outlet cuts are always the part people remember. Ask anyone who has tiled a backsplash and they will probably tell you a story about measuring an outlet opening three times, cutting once, and still walking back to the saw with a sigh. The good news is that this gets easier with practice. The even better news is that cover plates hide minor imperfections, which feels like a small act of mercy from the home improvement universe.
Fourth, grout changes your mood more than you expect. Before grout, a backsplash can look unfinished and a little chaotic. After grout, it suddenly looks intentional, sharp, and complete. This is often the moment when DIYers go from “I hope this works” to “I should probably tile everything I own.” That confidence boost is real, but so is the temptation to rush. The people happiest with the final result are usually the ones who let everything cure properly, clean carefully, and caulk the finish lines instead of blasting through the last step.
And finally, tiling teaches patience in a very specific, slightly dusty way. You learn that details matter. You learn that a level is your best friend and your harshest critic. You learn that small mistakes are easier to fix early. Most of all, you learn that professional-looking work is rarely about secret tricks. It is about consistency, planning, and doing the unglamorous parts well. That is the real experience behind learning how to tile a backsplash like a pro: the finished wall looks stylish, but the real victory is realizing you built that crisp, durable, beautiful surface one careful piece at a time.
Conclusion
If you want to tile a backsplash like a pro, focus on the fundamentals: prep the wall properly, plan the layout before you commit, use the right mortar and grout, make clean cuts, and finish with careful grouting and color-matched caulk at transitions. Those are the details that turn a backsplash tile project from “pretty good for DIY” into “wait, you did that yourself?”
A beautiful kitchen backsplash is not just about style. It is also about durability, maintenance, and smart installation choices that hold up to daily life. Get the prep right, stay patient through the messy middle, and give the finishing details the attention they deserve. The result is a backsplash that looks polished, performs well, and makes your kitchen feel upgraded every single day.