Table of Contents >> Show >> Hide
- Why felt woodland animals feel like instant comfort
- First, a quick translation: “felt animals” can mean two different crafts
- Needle felting 101: the simple science behind the magic
- How to build a “collection” that looks curated (not chaotic)
- A step-by-step example: making a needle-felted fox (without losing your mind)
- Small details that make your animals look “finished”
- Display ideas that feel straight out of a cozy cabin daydream
- Care and storage: keep your felt critters cute, clean, and unchewed
- How to photograph your felt woodland animals for a Bored Panda-style post
- Common needle-felting problems (and fixes that actually work)
- Experience Notes: what it feels like to build a felt woodland animal collection (an extra )
- Conclusion: your tiny forest is officially a lifestyle
There are two kinds of people in the world: the ones who scroll past handmade crafts on Bored Panda like
“neat!” and the ones who stop dead in their tracks and whisper, “I must adopt every tiny forest creature
immediately.” If you’re reading this, congratulationsyou’re in Group Two. Welcome to the soft, fuzzy,
strangely addictive universe of felt woodland animals: pocket-size foxes, palm-size rabbits, and
little owls that look like they know your secrets (and are judging your snack choices).
This article is a deep, practical, fun guide inspired by the vibe of a Bored Panda-style showcase:
a cohesive “collection” of felt forest animals that looks curated, storybook-ready, and honestly
a little too charming for its own good. We’ll cover what felt animal art actually is, how needle
felting works, how to build a collection that looks intentional (not like a wool explosion happened),
how to store it without turning it into a moth buffet, and how to photograph your critters so they
look like the main characters they clearly believe they are.
Why felt woodland animals feel like instant comfort
Woodland animals hit a sweet spot: they’re familiar, whimsical, and naturally “collectible.”
A fox, a deer, a rabbit, a squirrelthese are the cast of a thousand bedtime stories. In felt form,
they become decor, gifts, ornaments, nursery companions, and desk mascots that silently encourage you
to answer emails with slightly more grace.
There’s also a practical reason they’re so popular: needle-felted animals scale beautifully. You can
start small (a chubby acorn mouse), level up to more detailed pieces (a deer with a delicate muzzle),
and eventually build a whole forest ensemble without needing a kiln, a studio, or a deep emotional
relationship with power tools.
First, a quick translation: “felt animals” can mean two different crafts
1) Sewn felt animals (cut-and-stitch)
This is the classic craft-store felt approach: you cut shapes from felt sheets, stitch them together,
and stuff them. It’s fantastic for simple ornaments, garlands, and kid-friendly projectsespecially
when you want crisp silhouettes and clean edges.
2) Needle-felted animals (sculpted wool)
This is the “how is that made of wool?!” style you often see in viral craft posts: you sculpt loose
wool fibers into a 3D animal using a special barbed needle. The repeated stabbing motion tangles the
fibers together, gradually firming them into a shape you can refine and detail.
For a “collection” of woodland animals with a soft, lifelike (or delightfully cartoonish) finish,
needle felting is usually the star of the showbecause it lets you sculpt cheeks, snouts, ears,
paws, and tiny personalities.
Needle felting 101: the simple science behind the magic
Needle felting works because wool fibers have microscopic scales that catch and lock together.
A felting needle has barbs that push fibers into each other as you stab in and out, creating a denser,
sturdier mass over time. Think of it like sculpting with cloudsif clouds were determined to become
a raccoon.
The starter toolkit (what you actually need)
- Wool roving or carded wool in your main animal colors (plus a little white/black for details).
- Core wool (optional but helpful): a cheaper wool used for the inner “body” so you save the pretty colors for the outside.
- Felting needles in a few sizes (coarse for shaping fast, fine for details).
- Foam pad or felting mat to protect your work surface (and your needles).
- Finger guards (highly recommended unless you enjoy surprise punctures).
- Small scissors for trimming fuzzy flyaways.
- Optional armature wire/pipe cleaners if you want poseable legs, tails, or more stable miniatures.
Safety, but make it realistic
Felting needles are tiny, sharp, and brittle. They can snap if you bend them, and they will absolutely
find your fingertip if you get too confident. Work on a mat, stab straight in and out (not at an angle),
and slow down when you’re attaching small pieces like ears or paws.
How to build a “collection” that looks curated (not chaotic)
A collection isn’t just “a bunch of animals.” It’s a set. A little universe. A vibe. The secret is
consistencythen letting personality do the rest.
Pick a scale and stick with it
Decide early: are your animals palm-size (about 3–5 inches tall), ornament-size (1–3 inches),
or plushy-little-friend size (6–10 inches)? When everything shares a similar scale, the whole group
looks intentional even if each animal has its own expression (from “sweet baby” to “tiny tax auditor”).
Choose a color palette that makes the set feel cohesive
Woodland palettes usually work best with warm browns, creams, rust, charcoal, and muted greens. Even
if you add whimsical touches (a mushroom hat, a scarf, rosy cheeks), keeping the base colors consistent
makes the group feel like it belongs together.
Build your cast like a storybook
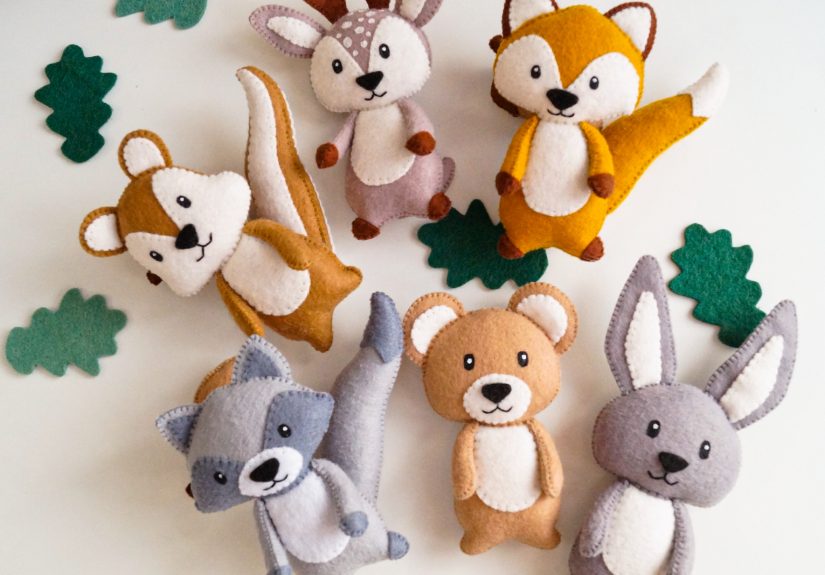
A classic starter lineup for felt woodland animals often includes:
- Fox (the charismatic troublemaker)
- Deer (the gentle, elegant lead)
- Rabbit (the soft-hearted optimist)
- Owl (the wise one who definitely knows the plot twists)
- Squirrel (pure chaos, powered by acorns)
- Hedgehog (introvert icon)
Once you have 4–6 animals, your “collection” feels completeand you can expand seasonally (winter scarf
edition), or by habitat (meadow friends, forest floor friends), or by theme (tiny bakery animals, anyone?).
A step-by-step example: making a needle-felted fox (without losing your mind)
Let’s walk through one animal so you can see how the process actually flows. A fox is ideal: recognizable
silhouette, simple color blocks, and plenty of room for personality.
Step 1: Build a firm core (the “potato” phase)
Start with core wool (or any base color you don’t mind hiding) and roll it into an oval for the body.
Stab repeatedly, rotating as you go, until it feels springy but holds its shape. You’re aiming for “dense
sponge,” not “marshmallow that panics when touched.”
Step 2: Add the head and define the silhouette
Make a slightly smaller oval for the head and attach it by felting wool across the “neck seam,” stabbing
through the join so the fibers lock. Add a small wedge of wool to form the muzzle; felt it in place and
refine until the head reads as “fox,” not “mysterious orange bean.”
Step 3: Wrap in color (the glow-up)
Pull thin sheets of orange/rust wool and layer them over the core. Tack them down lightly at first, then
felt more firmly once the coverage looks even. Add white on the chest and muzzle, then a little darker
wool along the legs and ears for contrast.
Step 4: Ears, tail, and tiny drama
Fox ears are small triangles. Felt two triangles separately until they’re firm, then attach them by
felting their bases into the head. For the tail, form a cylinder that tapers, attach it, and add a white
tip. Tilt the tail slightly for movementlike your fox is mid-prance and knows you’re watching.
Step 5: Face details that sell the character
Add eyes in one of two ways: tiny bead eyes (fast, bold expression) or felted eyes (softer, storybook look).
For a felted nose, use a pinch of black wool and felt it into a neat triangle at the muzzle tip. Then
refine the cheeks by adding tiny wisps of wool and sculpting them into placethis is where “cute blob”
becomes “forest celebrity.”
Small details that make your animals look “finished”
Clean edges and smooth surfaces
If your sculpture looks fuzzy, don’t panic. That’s normal. You can refine by using a finer needle and
shallow, controlled stabs to “tuck in” loose fibers. Small scissors can also help trim stray flyaways
(carefullydon’t give your deer an accidental buzz cut).
Simple shaping tricks
- Need a flatter belly? Felt more on one side while pressing the shape against the mat.
- Want a defined snout? Add a small wedge and felt around the edges to create a seam line.
- Cheeks too pointy? Add a whisper of wool and blend it in to soften the transition.
Consistency across the set
Collections look best when details repeat: the same style of eyes, the same blush technique, the same
general “finish” level. It’s okay if your first animal looks slightly differentcall it the “prototype”
and pretend you meant to do it for artistic reasons.
Display ideas that feel straight out of a cozy cabin daydream
Shadow box “forest scene”
Arrange your animals on mossy greens or felt “ground,” add mini mushrooms, pinecones, and a paper backdrop.
It turns your collection into a tiny diorama that looks like a storybook paused mid-page.
Seasonal ornaments and garlands
Smaller animals (or just their faces) make adorable ornaments. Felt works beautifully for holiday crafts,
and woodland themes fit winter décor like they were born to wear tiny scarves.
Nursery shelf characters
Keep them out of direct sunlight and away from sticky little hands if you want them pristine. Or accept
that your rabbit will eventually attend a tea party hosted by a toddler, and that’s part of its destiny.
Care and storage: keep your felt critters cute, clean, and unchewed
Wool is durable, but it benefits from gentle handling. For most needle-felted sculptures, think “spot care,”
not “full spa day.”
Cleaning basics
- Dust first: A soft brush or gentle lint roller can remove surface lint.
- Spot clean: Use a tiny amount of gentle wool-safe cleanser on a cloth and dabdon’t soak.
- Air dry: If it gets damp, reshape gently and let it dry fully before storing.
Moth prevention (because your fox should not become a snack)
Moths and other fabric pests are attracted to natural fibers, especially if there are oils or food stains.
Store your felt animals clean and dry, preferably in sealed bins. If you ever suspect pests, common guidance
includes sealing items and freezing them for a period of time (a simple, chemical-free approach used for
woolen items).
Smart storage setup
- Store in airtight containers with a low-humidity environment.
- Add cedar or lavender sachets if you like (and refresh them occasionally).
- Avoid attics/basements that swing hot-to-humid; your animals prefer “cozy cabin,” not “swamp sauna.”
How to photograph your felt woodland animals for a Bored Panda-style post
The internet loves craft photos that feel warm, bright, and story-forward. Your goal isn’t just to show
the animalsit’s to introduce the cast.
Use soft natural light
Window light is your best friend. It shows the wool texture without harsh shadows. Avoid direct midday sun
that makes everything look like a crime scene investigation.
Shoot in sets: solo portraits + group shots
Do one “character portrait” per animal, then a few group photos that show scale and cohesion. Add simple
props (acorns, leaves, a tiny book) so viewers instantly understand the woodland vibe.
Get close to the face
People fall in love through the eyes. A close-up of your owl’s face is basically the craft equivalent of a
movie trailer: it sells the whole project in two seconds.
Common needle-felting problems (and fixes that actually work)
“My animal is lumpy.”
Add thin layers and felt evenly. Don’t try to cover everything with one thick wad of wool. Think “build
in coats,” not “dump the whole sweater at once.”
“My needle keeps breaking.”
This usually happens when you stab at an angle or hit a hard surface under the mat. Keep the needle moving
straight in and straight out, and make sure your mat is thick enough for the depth you’re felting.
“It’s too fuzzy.”
Switch to a finer needle for finishing, then do shallow stabs to tuck fibers in. A careful trim can help,
toojust don’t over-trim and expose the core.
“The face looks… concerned.”
Adjust eye placement. Tiny changes make a big difference: closer eyes often look cuter; higher eyes can
look surprised; lower eyes can look sleepy. If needed, add a tiny bit of wool to reshape the cheeks or brow.
Experience Notes: what it feels like to build a felt woodland animal collection (an extra )
Building a felt woodland animal collection is one of those crafts that starts as “I’ll make one cute thing”
and quietly turns into “I now run a small forest community on my bookshelf.” The first experience most
people share is how oddly satisfying the process feels. Needle felting is repetitive, but not boring.
It’s the kind of rhythm where your hands are busy, your brain gets to exhale, and time does that trick
where 20 minutes becomes an hour because you were focused on making a rabbit’s cheeks look friendly instead
of mildly judgmental.
The second experience is the emotional roller coaster of the “ugly middle.” Early on, the animals often
look like abstract potatoes. This is normal. In fact, it’s basically a rite of passage. A fox might look
like a traffic cone with dreams. A deer might resemble a cinnamon roll that’s trying its best. The
collection only starts feeling magical when you commit to the unglamorous steps: firming the core,
smoothing the surface, layering color slowly, and repeatedly checking the silhouette from different angles.
The good news is that wool is forgiving. If something looks off, you can add more, sculpt more, and
refine moreuntil your animal finally “clicks” into character.
Another common experience is developing opinions you never expected to have, like “I’m a 38-gauge needle
person for shaping, but a fine needle is my soulmate for finishing.” You also start noticing how tiny
adjustments change the whole mood. Tilt an ear forward and the animal looks curious. Angle it back and it
looks shy. Move eyes a few millimeters and your squirrel goes from “sweet snack hoarder” to “chaotic
mastermind.” This is where the collection becomes more than craft practiceit becomes storytelling.
You’re not just making forms; you’re creating a cast.
As your collection grows, you’ll likely experience the “cohesion itch.” You’ll want them to match:
similar scale, similar eye style, similar finish. This is also normal (and honestly, kind of delightful).
Many makers end up making one “standard” animal firstlike a foxand then using it as a reference point
for size and detail level. Over time, the set looks less like random experiments and more like a curated
world: a deer that looks like the gentle leader, a hedgehog who reads tiny books, an owl who probably runs
the local library. And yesat some point, you will consider making accessories. Scarves happen. Little
mushroom hats happen. It’s fine. No one is judging you. Your owl approves.
Finally, there’s the experience of sharing: photographing your animals, posting them, and watching people
respond like you just introduced them to a new species of happiness. That’s the secret reward of a felt
woodland collection. It’s soft art with a big reaction. It makes people smile fastand in internet time,
that’s basically magic.
Conclusion: your tiny forest is officially a lifestyle
A felt woodland animal collection is equal parts craft, décor, and storytelling. Whether you’re needle
felting a simple bunny for your desk or building a full cast of forest characters worthy of a Bored
Panda-style showcase, the keys are consistency, patience, and a willingness to let the “potato phase”
exist. Start with a small set, refine your technique, store them thoughtfully, and take photos that show
the personality you worked so hard to sculptone tiny stab at a time.