Table of Contents >> Show >> Hide
- Why Peel & Stick Wallpaper Is So Popular Right Now
- A Quick Reality Check Before You Unroll a Single Panel
- Peel & Stick Wallpaper Ideas That Look Like You Hired Someone
- 1) The one-wall wonder (accent wall, but not the 2012 kind)
- 2) The ceiling “fifth wall”
- 3) Powder room maximalism
- 4) A “tile” backsplash look without the tile
- 5) Stair risers that feel custom
- 6) Closet and pantry “secret style”
- 7) Built-ins and bookcase back panels
- 8) A faux headboard wall
- 9) Wainscoting with a twist
- 10) The home office Zoom-wall
- 11) Laundry and mudroom mood-lifters
- 12) Furniture and small-surface upgrades
- How to Choose a Pattern You Won’t Regret Next Month
- Install Like a Pro (Even If You’re Not One)
- Removal and Aftercare: Keeping It Renter-Friendly
- Conclusion
- Real-World Experiences and Lessons (About )
Peel-and-stick wallpaper is the design world’s legal loophole: you get a whole new vibe without a landlord meeting, a painter quote, or the emotional commitment of “this color is forever.” It’s also wildly satisfyinglike putting a screen protector on perfectly (rare, but legendary when it happens).
Still, “removable” doesn’t automatically mean “effortless.” The difference between a crisp, boutique-hotel finish and a wrinkly sticker tragedy usually comes down to three things: where you use it, what you choose, and how you install it. Below are peel & stick wallpaper ideas you can actually pull offplus the practical tips that keep your walls (and your mood) intact.
Why Peel & Stick Wallpaper Is So Popular Right Now
Peel-and-stick (also called removable or self-adhesive) wallpaper skips paste, water trays, and major cleanup. Done right, it can:
- Create instant focal points (accent walls, ceilings, nooks)
- Define zones in open layouts (a work corner that looks intentional)
- Upgrade awkward spaces (powder rooms, laundry rooms, stair risers)
- Deliver big style with low risk if you’re renting or you redecorate often
A Quick Reality Check Before You Unroll a Single Panel
Do a test patch
Stick a sample on a discreet spot for 24–48 hours, then remove it slowly. This tiny experiment can save you from peeled paint, lifting edges, or a “why is my wall shedding?” surprise.
Pick the right surface
Smooth, clean, dry walls are the sweet spot. Heavy texture (orange peel, knockdown, popcorn) reduces contact, which can lead to bubbles or edges that lift over time. If your walls are lightly textured, choose a thicker, fabric-like removable wallpaper and expect extra smoothing.
Paint finish and curing time matter
Many pros and manufacturers recommend primed walls painted in eggshell, satin, or semi-gloss for better adhesion and cleaner removal than chalkier flat paint. And if you painted recently, let the paint fully cure (often around four weeks) before wallpaperingdry-to-the-touch isn’t the same as fully cured.
Peel & Stick Wallpaper Ideas That Look Like You Hired Someone
1) The one-wall wonder (accent wall, but not the 2012 kind)
Wallpaper the wall your eyes land on first: behind the sofa, the bed, or the dining table. For a grown-up look, try large botanicals, modern toile, or a tailored stripe. For instant drama, go moody with dark florals or a graphic geometric.
Design shortcut: If you’re nervous about seam gaps, choose a pattern with a background color close to your wall paint. Tiny “oops” moments fade into the background.
2) The ceiling “fifth wall”
Ceilings are underrated real estate. A subtle linen or grasscloth-look adds quiet texture; a starry or cloud mural makes nurseries dreamy; a crisp stripe can visually stretch a room. Keep the surrounding walls calmer so the ceiling feels boldnot busy.
3) Powder room maximalism
Small room, big payoff. Powder rooms can handle bolder patternstropical palms, jewel-toned florals, playful animal printsbecause you’re in there briefly and usually not showering in steam. Pair with simple hardware and a solid-color vanity so the wallpaper stays the hero.
4) A “tile” backsplash look without the tile
Tile-pattern peel-and-stick wallpaper can mimic subway tile, Moroccan motifs, or marble squaresespecially behind a coffee bar or on a short backsplash run. Avoid spots that get direct heat or constant splashes, and consider a thin bead of clear caulk along the countertop edge for extra durability.
Best use case: A breakfast nook wall, coffee bar, or a low-splash area where you want the look without the demo.
5) Stair risers that feel custom
Wallpaper on risers adds personality without taking over the whole hallway. Use a repeating geometric for clean rhythm, a soft stripe for classic charm, or mix coordinating prints for a curated look. It’s also a fantastic place to use leftovers from a bigger project.
6) Closet and pantry “secret style”
Line the back wall of a closet, linen cabinet, or pantry. It’s low risk, high joyand it makes everyday storage feel surprisingly intentional. Light patterns bounce light in darker closets; deeper tones feel luxe in walk-ins with good lighting.
7) Built-ins and bookcase back panels
Add depth by wallpapering the back of shelves. Grasscloth-look patterns add texture behind books; tiny geometrics read almost like a neutral. Because you’re working in smaller sections (and shelves hide seams), this is one of the easiest “looks expensive” upgrades.
8) A faux headboard wall
No headboard? Wallpaper a wide panel behind the bed and treat it like one. Frame it with thin trim if you want extra polish. Arches, scallops, and murals shine here because they read like intentional architecture.
9) Wainscoting with a twist
Try wallpaper on the upper half of the wall and paint below (or vice versa). It adds structure, hides scuffs where furniture bumps, and makes hallways and dining rooms feel more “designed.” Medium-scale motifs and stripes tend to look best when visually “cut” by molding.
10) The home office Zoom-wall
Wallpaper the wall behind your desk for a clean backdrop that separates work from lifeeven if your office is a corner of your bedroom. Subtle textures and low-contrast geometrics feel polished; a bolder print can be fun if the rest of the room stays calm.
Pro tip: If your camera background tends to blur, pick patterns with clear shapes (not super tiny detail) so it still reads as intentional.
11) Laundry and mudroom mood-lifters
These hardworking spaces deserve more than leftover beige. Add wallpaper above hooks, behind shelves, or on the wall facing the door. Gingham, stripes, and cheerful fruit prints read cleanly even in small, busy rooms.
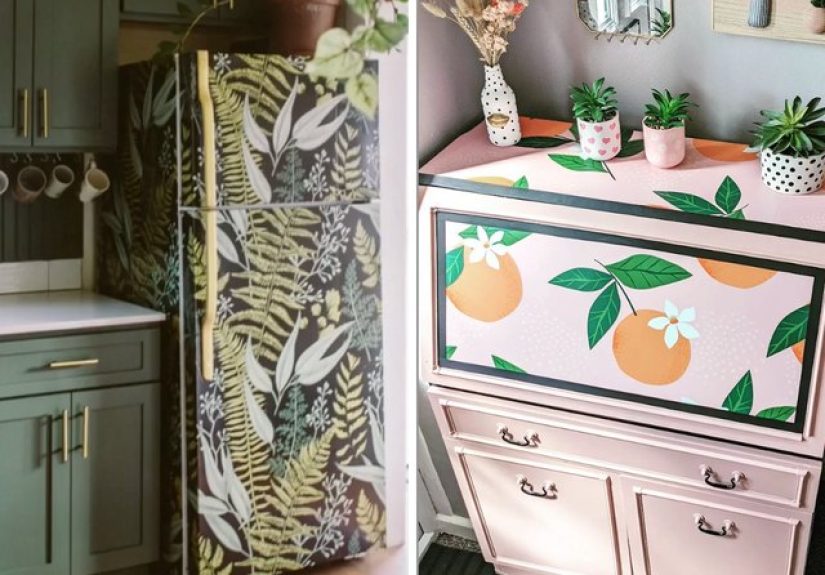
12) Furniture and small-surface upgrades
Use peel-and-stick wallpaper on drawer fronts, the back of a dresser, tabletops (protect with glass or a clear cover if needed), or inside glass-front cabinets. It’s a personality transplant for thrifted pieceswithout a full repaint.
How to Choose a Pattern You Won’t Regret Next Month
- Scale matters: Large patterns can make small rooms feel intentional; tiny prints can look busy if there’s already a lot going on.
- Mind the repeat: Big repeats require extra material for pattern matching. Ordering a bit extra is cheaper than “almost matching.”
- Use stripes strategically: Vertical stripes make ceilings feel higher; horizontal stripes can widen narrow walls.
- Consider seam visibility: A background color close to your wall paint helps hide tiny gaps at seams.
- Match the room’s job: Calmer textures for bedrooms, playful prints for powder rooms, and cleaner patterns for kitchens and workspaces.
Install Like a Pro (Even If You’re Not One)
Prep the wall
Clean the surface, patch dings, sand bumps, and let everything dry. Remove outlet covers and switch plates for a cleaner finish (turn off power at the breaker if you’re working close to wiring).
Measure, cut, and label
Measure wall height and add a couple inches for trimming. Pre-cut panels and lay them out in order, matching the pattern on the floor. Label the backs lightly so Panel 3 doesn’t show up where Panel 1 should be.
Start with a plumb line
Walls are rarely perfectly straight. Use a level or laser to mark a vertical guideline for the first panel. If the first panel is crooked, the rest will happily follow it into chaos.
Peel slowly and smooth as you go
Peel 8–12 inches at the top, stick, then keep peeling and smoothing downward. Work from the center outward with a smoothing tool to push out air bubbles. If you get a bubble, lifting and re-sticking is usually safer than trying to “stretch it flat.”
Trim with a fresh blade
Leave a little overhang at ceilings and baseboards, then trim cleanly with a straightedge. Swap blades oftendull blades tear wallpaper and your patience equally.
Handle corners and seams thoughtfully
Inside corners are rarely perfectly square. Many DIYers get cleaner results by trimming near the corner and starting a new panel on the next wall rather than wrapping one piece tightly around. Follow your product’s guidance on seams: some are designed for butt seams, while others hide better with a tiny overlap.
Removal and Aftercare: Keeping It Renter-Friendly
To remove, peel slowly at a low angle. If it resists, use gentle heat from a hair dryer to soften adhesive. Clean leftover residue with mild soap and water, and spot-test stronger adhesive removers on painted walls first.
Conclusion
Peel-and-stick wallpaper is the rare upgrade that’s dramatic, budget-friendly, and (usually) reversible. Choose the right surface, plan for pattern repeats, and take your time with the first panel. Whether you go bold in a powder room, subtle behind shelves, or brave on the ceiling, the best idea is the one that makes you smile when you walk in.
Real-World Experiences and Lessons (About )
In real homes, peel-and-stick wallpaper tends to deliver two emotional arcs: the opening montage where everything looks effortless, and the mid-movie plot twist when the first panel tries to drift off-level like it has places to be. The people who end up happiest usually treat the project more like baking than like “slap it on and pray.” They slow down for preppatching tiny dents, sanding a rough spot, wiping the wallbecause dust, grime, and texture are basically kryptonite for adhesives. That extra half hour feels boring in the moment, but it’s often the difference between a smooth, clean finish and a wall that looks like it’s wearing a wrinkled shirt.
A very common first-timer lesson is that wall texture isn’t a suggestion; it’s a personality trait. Light texture can be workable with thicker, fabric-like wallpaper, but heavy orange peel or knockdown often leads to edges lifting laterespecially near door frames where bags, elbows, and daily traffic brush by. Renters who avoid heartbreak often start with smaller “training-wheels” projects: the back of a bookcase, a closet wall, a laundry nook, or the inside of a cabinet. If a sample patch stays put and peels cleanly, that’s your green light to go bigger. If it fights you, you’ve learned a valuable truth with a two-inch squareinstead of a whole room.
Another repeat experience: pattern matching is where budgets go to cry. Big florals, tile looks, and bold geometrics are stunning, but their repeats can demand extra material for alignment. Many DIYers learn the hard way that ordering “exact square footage” is how you end up with one panel where the vines suddenly teleport. The veterans plan for waste, order an extra roll, and keep scraps. Those scraps become lifesavers for patching around outlets, repairing an over-enthusiastic utility-knife cut, or redoing a panel that got creased during a rushed “I can totally do this alone” moment.
Speaking of alone: the “solo vs. helper” debate is real. Plenty of people install by themselves, but most agree a second set of hands makes the top alignment calmer and the seams cleaner. One person keeps the panel true to the plumb line while the other smooths downward. It’s not about strength; it’s about avoiding the slow, sneaky slide that happens while you’re busy fighting a bubble the size of a grape. When help isn’t available, the best strategy is methodical pace: peel the backing in short sections, smooth thoroughly, step back, and only then continue. The wallpaper will still be there in five minutes. Your sanity might not be.
Humidity is the final boss. In bathrooms and laundry areas, the first failure point is usually an edge near steam. The installs that last tend to use moisture-resistant products, run the exhaust fan, and avoid the direct shower-spray zone. In kitchens, peel-and-stick “backsplash” looks hold up best in low-heat areas like coffee bars or side walls, not behind a constantly simmering pot. A small but popular insurance policy is pressing seams and edges firmly during installation and adding a thin bead of clear caulk along the counter line where water likes to sneak in.
The best part? Peel-and-stick wallpaper changes how people decorate. Because it’s reversible, they take bigger creative swings: moody color, playful prints, even a ceiling moment. If they change their mind, they peel it off, touch up a tiny scuff, and move on like someone who has mastered the art of temporary commitmentwhich, honestly, might be the most modern design skill of all.