Table of Contents >> Show >> Hide
- Why Learning to Fill a Pastry Bag Properly Matters
- Pastry Bag Basics Before You Start
- What You Need to Fill a Pastry Bag (Without Losing Your Cool)
- Step-by-Step Instructions for Filling a Pastry Bag
- Step 1: Choose the Right Filling Consistency
- Step 2: Insert the Coupler and/or Piping Tip First
- Step 3: Create a Seal at the Bottom (Optional but Very Helpful)
- Step 4: Set the Bag in a Tall Glass or Measuring Cup
- Step 5: Fold a Cuff (If You’re Not Using a Glass)
- Step 6: Add the Filling with a Spatula or Spoon
- Step 7: Don’t Overfill the Bag
- Step 8: Unfold the Cuff and Push the Filling Down
- Step 9: Twist the Top to Seal the Bag
- Step 10: Prime the Bag Before Piping
- How to Hold the Bag After Filling (Because This Affects Everything)
- Common Mistakes When Filling a Pastry Bag (and How to Avoid Them)
- Quick Tips for Different Types of Fillings
- How to Refill a Pastry Bag Mid-Project
- Beginner-Friendly Practice Ideas After Filling the Bag
- Conclusion
- Real-World Experiences and Practical Lessons from Filling Pastry Bags (Extended Section)
If you’ve ever tried decorating cupcakes and ended up wearing more frosting than the cupcakes themselves, welcome. You are among friends. Filling a pastry bag looks like one of those “easy on TV” skillsright up until buttercream is on your wrist, your counter, and somehow your elbow.
The good news: filling a pastry bag is not hard. It’s mostly about setup, portion control, and a couple of small moves that prevent a big mess. Once you learn the workflow, you can fill pastry bags for buttercream, royal icing, whipped cream, mashed potatoes, deviled egg filling, choux batter, and more with confidence (and dramatically fewer paper towels).
In this guide, you’ll get beginner-friendly, step-by-step instructions for filling a pastry bag, plus pro-level tips, common mistakes, and real-life examples so you can pipe like you meant to do that.
Why Learning to Fill a Pastry Bag Properly Matters
A pastry bag is basically a precision tool. If it’s filled incorrectly, three annoying things happen fast: the filling leaks out the top, air pockets cause splatters, and your grip becomes awkward. That means uneven pressure, messy piping, and a quick slide into “I’m just going to spread frosting with a spoon.”
When it’s filled correctly, the bag is easier to control, your hands get less tired, and your lines, swirls, and dollops look cleaner. In other words: same frosting, much better results.
Pastry Bag Basics Before You Start
What Is a Pastry Bag?
A pastry bag (also called a piping bag) is a cone-shaped bag used to pipe semi-soft foods through a tip or cut opening. You can use it for decorating, portioning, filling pastries, and shaping doughs or batters.
Disposable vs. Reusable Bags
Disposable pastry bags are convenient, great for multiple colors, and ideal when cleanup time is short.
Reusable pastry bags are sturdy, economical over time, and a nice choice if you decorate often.
Both work well. The filling technique is nearly the same.
Do You Need a Tip and Coupler?
Not always.
- Tip only: Great for simple jobs and single-tip decorating.
- Coupler + tip: Helpful if you want to switch piping tips without refilling the bag.
- No tip: Fine for basic piping, lettering, drizzles, or when using thicker fillings and a larger cut opening.
What You Need to Fill a Pastry Bag (Without Losing Your Cool)
- Pastry bag (disposable or reusable)
- Piping tip (optional) and coupler (optional)
- Scissors
- Filling (frosting, icing, whipped cream, batter, etc.)
- Spatula, spoon, or bench scraper
- Tall glass, measuring cup, or quart container (highly recommended)
- Rubber band, bag tie, twist tie, or binder clip (optional)
- Damp towel or paper towel for wiping the tip (optional, but smart)
Step-by-Step Instructions for Filling a Pastry Bag
Step 1: Choose the Right Filling Consistency
Before touching the bag, check your filling. Lumpy frosting or overly warm buttercream can turn piping into a wrestling match.
- Too stiff? It takes too much pressure and can split the bag or tire your hand.
- Too loose? It leaks, droops, and won’t hold shape.
- Lumpy? It can clog the tip.
Quick fix: stir the filling until smooth, scrape down the bowl, and remove obvious lumps before loading the bag.
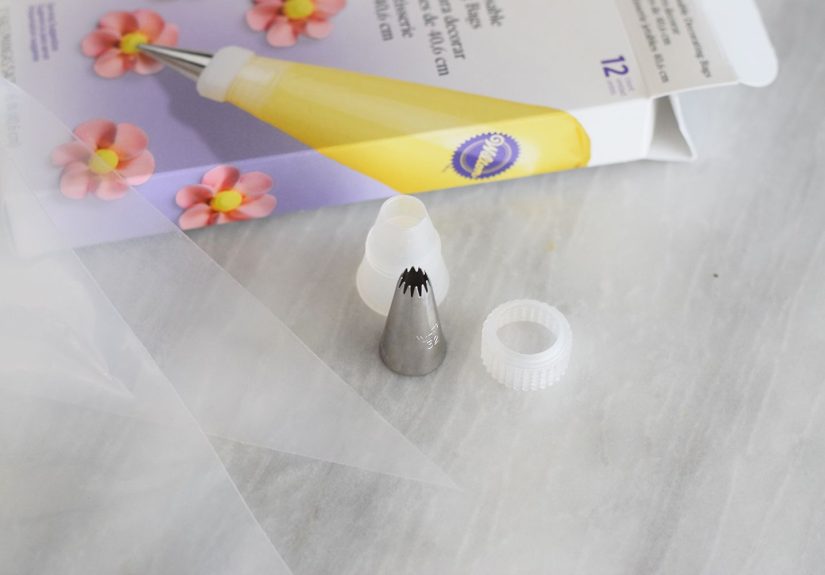
Step 2: Insert the Coupler and/or Piping Tip First
This sounds obvious, but it’s one of the most common mistakes: people fill the bag, then realize the tip is still sitting on the counter looking judgmental.
If using a coupler:
- Drop the coupler base into the bag.
- Push it toward the pointed end.
- Snip a small opening so the coupler protrudes snugly.
- Add the piping tip on the outside and secure it with the coupler ring.
If using just a piping tip:
- Slide the tip into the bag.
- Mark where the tip should emerge.
- Cut conservatively (small opening first).
- Test the fit; trim a tiny bit more only if needed.
Important: A snug fit matters. If you cut too much, the tip can slip out under pressureand your frosting can make a break for freedom.
Step 3: Create a Seal at the Bottom (Optional but Very Helpful)
If your filling is loose (like royal icing or soft frosting), twist the bag just above the tip and tuck that twist slightly into the coupler/tip area to prevent premature leaking while you fill. This little trick saves a surprising amount of mess.
Step 4: Set the Bag in a Tall Glass or Measuring Cup
This is the game-changing move.
Place the pastry bag tip-side down into a tall glass, large measuring cup, or quart container. Fold the top of the bag down over the rim to make a wide cuff. Now the bag stays open on its own, and you have both hands free to transfer filling cleanly.
Why this works so well:
- Keeps the bag upright
- Keeps the outside of the bag cleaner
- Reduces flopping, twisting, and accidental smears
- Makes it much easier for beginners
Could you fill it in your hand? Yes. Should you, while learning? Only if you enjoy suspense.
Step 5: Fold a Cuff (If You’re Not Using a Glass)
If you prefer hand-filling, fold the top half of the bag outward to create a cuff. This gives you a cleaner grip and helps keep the opening wide. Hold the bag under the cuff with your non-dominant hand and fill with your dominant hand.
The cuff also acts like a splash guard for the outer bag surface, which is exactly where frosting likes to go when you least need it.
Step 6: Add the Filling with a Spatula or Spoon
Use a spatula, spoon, or bench scraper to transfer the filling into the bag. Press the filling down gently as you go rather than dropping giant scoops in from above.
This helps:
- reduce air pockets
- keep the bag stable
- avoid frosting on the rim and outside of the bag
Pro move: scrape the spatula against the inside edge of the cuff or glass rim before pulling it out. Less waste, less mess, fewer frosting fingerprints on everything you own.
Step 7: Don’t Overfill the Bag
This is the number-one rule.
Fill the pastry bag only about 1/2 to 2/3 full (some bakers go up to 3/4 depending on the filling and bag size). More than that, and the bag gets hard to control, leaks out the top, and requires more pressure to squeeze.
For thick fillings like ganache, mashed potatoes, or stiff buttercream, it’s usually better to fill less and refill more often. Your hands will thank you.
Step 8: Unfold the Cuff and Push the Filling Down
Remove the bag from the glass (or unfold the cuff if hand-filling). Gently gather the top and use your fingers to press the filling down toward the tip.
If you see air pockets, massage or press them out now. Air trapped in the bag can cause sputtering when you pipe, which is a fancy way of saying “random frosting explosion.”
Step 9: Twist the Top to Seal the Bag
Twist the top of the pastry bag tightly just above the filling. This creates pressure from the back and keeps filling from squeezing upward.
You can:
- hold the twisted top in your palm while piping, or
- secure it with a rubber band, bag tie, twist tie, or binder clip
A clip is especially useful if you’re decorating in stages or passing the bag to kids (or adults who decorate like kids).
Step 10: Prime the Bag Before Piping
With the bag twisted shut, gently squeeze from the top to push the filling all the way down to the tip. For some setups, you may need to untwist the small seal near the tip first.
Pipe a small test swirl onto parchment paper or a plate to make sure:
- the tip is attached securely,
- the filling is flowing evenly, and
- the consistency works for the design you want.
Bonus: if the first squeeze is messy, it happens on parchmentnot on your cake.
How to Hold the Bag After Filling (Because This Affects Everything)
Once filled, where you apply pressure matters more than people expect.
- Apply pressure from the top/back (behind the filling), not the middle.
- Use your palm for steady pressure on thicker fillings.
- Use your other hand near the tip/coupler to guide and stabilize, especially for detail work.
- Keep twisting as the bag empties so pressure stays consistent.
If you squeeze from the middle, filling can back up and leak out the top. That is not “rustic.”
Common Mistakes When Filling a Pastry Bag (and How to Avoid Them)
1) Cutting Too Much Off the End
If the hole is too large, the tip can pop out or wobble. Start small. You can always trim more.
2) Overfilling the Bag
Tempting? Yes. Helpful? No. A smaller, manageable fill gives you better control and cleaner results.
3) Forgetting the Tip/Coupler
Insert hardware before filling. Future You will be delighted.
4) Skipping the Glass/Cup Holder
You can fill by hand, but the glass method is easier, cleaner, and more consistentespecially for beginners.
5) Leaving Air Pockets Inside
Press the filling down before piping and do a test squeeze first.
6) Using the Wrong Consistency
Even perfect bag-filling technique can’t save icing that’s too runny or frosting that’s too stiff for your chosen tip.
Quick Tips for Different Types of Fillings
Buttercream Frosting
Use a spatula to load it and keep the bag no more than 2/3 full. Warm hands can soften buttercream quickly, so work in batches if your kitchen is warm.
Royal Icing
A coupler and snug fit are especially helpful because royal icing can be runny. Keep a small twist seal near the tip while filling to prevent dripping.
Whipped Cream
Use chilled whipped cream and work quickly. Warm whipped cream loses structure and can make your piping look soft and droopy.
Thick Fillings (Ganache, Mashed Potatoes, Choux Dough)
Fill less than usual and use steady pressure from the palm. If the filling is extremely thick, a larger tip or tipless bag opening may be easier.
How to Refill a Pastry Bag Mid-Project
Refilling is normal. Professionals do it toothey just don’t sigh as loudly.
- Set the bag tip-up in a glass (or lay it on a tray).
- Untwist and open the top carefully.
- Add more filling without exceeding the fill line.
- Push filling down, remove air pockets, and retwist.
- Test pipe again before returning to your final surface.
If you’re switching colors often, using multiple smaller bags can be faster and much cleaner than repeatedly washing and refilling one bag.
Beginner-Friendly Practice Ideas After Filling the Bag
Want to build confidence fast? Practice on parchment paper first.
- Dots and pearl borders
- Simple lines and zigzags
- Rosettes and stars
- Shell borders
- Writing short words
You can scrape many frostings back into the bowl and reuse them for practice. That means low pressure, low waste, and no audience.
Conclusion
Filling a pastry bag is one of those kitchen skills that looks intimidating until you learn the rhythm: prep the tip, set the bag in a glass, fill only partway, push out air, twist tightly, and pipe from the back. That’s it. Once you’ve done it a few times, it becomes second natureand your cupcakes, cookies, cakes, and filled pastries will look dramatically better.
Start simple, don’t overfill, and remember: every cake decorator in history has had at least one frosting mishap. The difference is they kept piping anyway.
Real-World Experiences and Practical Lessons from Filling Pastry Bags (Extended Section)
The biggest shift for most beginners happens the first time they use a tall glass to hold the bag. I’ve seen people go from “I hate pastry bags” to “Wait… that’s it?” in about 30 seconds. Before using the glass method, they usually try to balance the bag in one hand while scooping frosting with the other, which leads to a floppy bag opening and frosting smeared all over the outside. Once the bag is cuffed over a glass, the whole process becomes calmer. It feels less like juggling and more like loading a tool.
Another common experience: overfilling because refilling sounds annoying. It seems efficient to pack in as much frosting as possible, but in practice it creates a heavy, slippery bag that is harder to squeeze and harder to guide. For home bakers decorating cupcakes, smaller fills almost always produce better-looking swirls because pressure is more consistent. Yes, you refill more oftenbut each round of piping is smoother, cleaner, and faster.
A lot of people also discover that “bad piping” is often just an air-pocket problem. They assume they lack skill when the bag sputters, spits, or skips. In reality, the frosting may simply not be pressed down properly. A quick test squeeze onto parchment reveals this immediately. Once the air is removed and the bag is retwisted, their lines become much cleaner without changing tips, recipes, or technique.
For cookie decorators, especially those using royal icing, the small twist-seal near the tip during filling is a quiet hero. Royal icing can drip while you’re loading the bag, and beginners are often surprised by how much leaks out before they even start decorating. Creating that temporary seal buys time and keeps the workstation clean. It also makes multi-bag setups less chaotic when several icing colors are being filled at once.
People working with thick fillingslike ganache, mashed potatoes, or choux pasteusually learn a different lesson: hand fatigue is real. When the filling is dense, the bag should be loaded lightly and squeezed with the whole palm, not pinched with fingertips. Using a larger opening or a wider tip can make the job dramatically easier. This is one of those moments where technique matters more than strength.
And then there’s the “in a pinch” experience: no pastry bag, guests arriving, frosting ready. A zip-top bag in a measuring cup can absolutely save dessert. It won’t always produce bakery-perfect results, but it can still make neat stripes, swirls, and simple borders when used carefully. That backup method is worth knowing because it keeps a missing tool from turning into a canceled decorating plan.
The most useful long-term habit, though, is testing on parchment first. It turns decorating from a high-pressure final exam into a practice session. You can check consistency, fix the cut size, warm or chill the frosting if needed, and build hand control before touching the cake. That one habit is often what separates “messy but fun” from “wow, did you make that?”