Table of Contents >> Show >> Hide
- Why a Folding Mobile Workbench Belongs in Every Small Shop
- Planning Your Folding Mobile Workbench Build
- Basic Materials and Tools Checklist
- Step-by-Step: How to Build a Folding Mobile Workbench
- Smart Add-Ons to Upgrade Your Mobile Workbench
- Using and Maintaining Your Folding Mobile Workbench
- Saturday Morning Workshop: Real-World Lessons from the Garage
Picture this: It’s Saturday morning, your coffee is just right, motivation is high… and your “workshop”
is actually the same corner of the garage where the bikes, holiday decorations, and mystery boxes live.
You want a solid work surface, but you also want to, you know, park the car at night.
That’s where a folding mobile workbench becomes the hero of your weekend. Inspired by
the popular Family Handyman projecta compact bench that folds down to just a few inches thick and rolls
out of the way when you’re doneit’s a smart solution for anyone working in a small shop, basement, or
multipurpose garage.
In this guide, you’ll learn what makes a mobile folding workbench so useful, how to plan your own build,
and step-by-step instructions and tips drawn from DIY pros and woodworking enthusiasts across the United
States. We’ll also dig into real-life experiences and lessons learned from Saturday morning workshops,
so you don’t repeat the same “why is this not level?” mistakes.
Why a Folding Mobile Workbench Belongs in Every Small Shop
A traditional, fixed workbench is greatif you have the space for it. Many DIYers don’t. Between
vehicles, kids’ gear, lawn equipment, and storage, floor space is prime real estate. A
folding mobile workbench gives you the best of both worlds:
- Solid work surface: A thick plywood or MDF top provides a flat, sturdy workspace.
- Mobility: Locking casters let you roll the bench wherever the project (or power outlet) is.
- Fold-flat convenience: Many designs fold to under 7 inches thick, so they tuck against a wall when not in use.
- Space efficiency: Ideal for one-car garages, basement workshops, or shared spaces.
- Budget-friendly: Most builds use standard 2x4s, 3/4-inch plywood, and basic hardware.
Compared with wall-mounted fold-down benches, a folding mobile workbench wins when you need to
reposition your work area or spin a project around, which is especially handy when working with long
boards, sheet goods, or bigger tools.
Planning Your Folding Mobile Workbench Build
Before you start cutting 2x4s like a Saturday-morning lumber ninja, take a few minutes to plan. Good
planning saves time, money, and trips back to the home center.
Decide on Size and Height
The Family Handyman–style bench is a compact rectangle sized for common sheet goodsoften around
24–30 inches deep and 48–60 inches longbig enough for most DIY tasks but small enough to fold and store
easily. Think about:
- Your height: Many workbenches sit between 34 and 38 inches tall. Taller DIYers may prefer the higher end of that range.
- Vehicle clearance: Make sure the folded bench doesn’t block your car or garage door.
- Tool use: If you plan to clamp a miter saw or benchtop tools, verify the bench size and height work with them.
Choose Materials
Most folding mobile workbenches use simple lumber and plywood:
- Frame: 2×4 construction lumber is strong, affordable, and easy to work with.
- Top: 3/4-inch plywood or MDF creates a sturdy work surface. Plywood handles moisture and abuse a bit better.
- Braces and trim: 1×4 boards work well for stiffening and edge protection.
- Hardware: Hinges, lag screws or structural screws, wood screws, and locking casters rated for your expected load.
Plan for Mobility and Storage
Decide how mobile you really need the bench to be. Heavy-duty locking casters are almost always worth it,
letting you roll the workbench into the driveway when you need more light or dust control.
While you’re at it, consider storage:
- A lower shelf for tools, clamps, and sanders.
- Holes or dog tracks in the top for clamping.
- A side-mounted clamp rack or power strip so your essentials are always within reach.
Safety and Stability First
A folding workbench still has to be rock solid when it’s in use. Make sure:
- The hinges and folding legs are beefy enough to support your expected loads.
- Casters have secure brakes so the bench does not “walk” across the floor while you’re cutting.
- Cross-bracing or stretchers stiffen the frame and prevent wobble.
If you’re ever unsure, overbuild a little. A slightly heavier bench is better than one that flexes when you start sanding or chiseling.
Basic Materials and Tools Checklist
Exact measurements will depend on your plan, but a typical DIY mobile workbench uses:
- 7–10 pieces of 2×4 lumber (8 feet long)
- 1 sheet of 3/4-inch plywood (4×8 feet), cut down for the top and optional shelf
- 1–2 pieces of 1×4 lumber for braces or trim
- 4 heavy-duty locking casters (2–3 inch or larger, rated for a few hundred pounds total)
- Hinges for the folding mechanism (often 3-inch or similar)
- Wood screws in various lengths, plus construction adhesive or wood glue
- Optional: pocket-hole screws and jig for clean, strong joints
For tools, you can build a folding workbench using basic gear:
- Circular saw or miter saw
- Drill/driver, drill bits, and drivers
- Measuring tape, square, and pencil
- Clamps for glue-ups and assembly
- Safety gear: eye and hearing protection, dust mask
Step-by-Step: How to Build a Folding Mobile Workbench
Every plan is a little different, but most folding mobile workbenches follow the same basic flow. Think of
this as a road map you can adapt to your chosen design or dimensions.
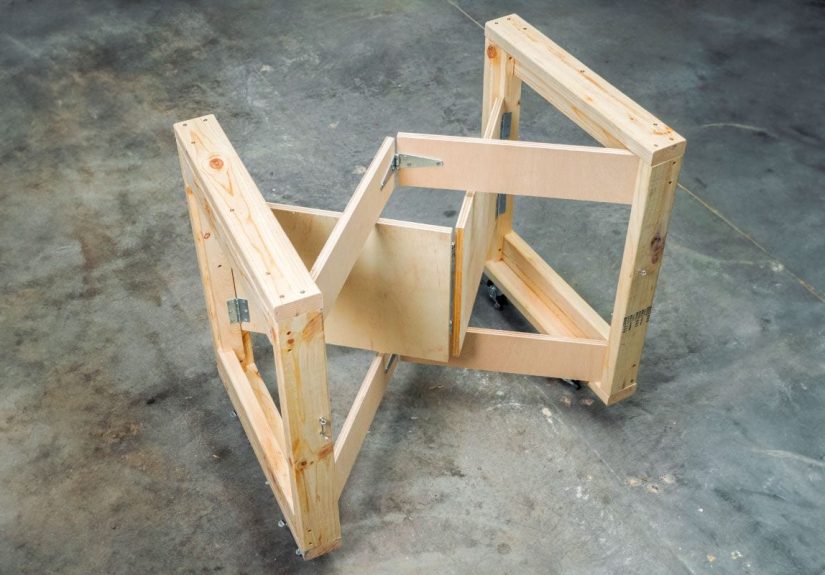
Step 1: Build the Side Frames
Cut your 2x4s for the legs and horizontal rails. Typically, you’ll need four legs and multiple rails to
connect them at the top and bottom. Build two identical rectangular frames.
Use screws and glue (or pocket-hole joinery) to assemble each frame. Make sure everything is square; a
crooked frame becomes a crooked bench.
Step 2: Connect the Frames and Add Folding Panels
Join the two side frames with long 2×4 stretchers at the top and bottom. This creates the “backbone” of
your workbench. For a folding design, the top or center of the bench often includes hinged panels or
legs that swing out into position when in use and fold back when stored.
Many designs use:
- A fixed back frame that stays upright or against the wall
- Folding front legs or panels connected by sturdy hinges
Test the motion of the folding parts now, before you add the heavy top. They should swing smoothly and
lock into a stable position without racking.
Step 3: Attach the Worktop
Cut your plywood top to size and dry-fit it on the frame. Once you’re happy, fasten it using wood glue
and screws from underneath where possible, so you don’t pepper the surface with screw heads.
If you plan to use bench dogs, clamps, or jigs, now is a good time to lay out a hole pattern or
T-track locations. Many DIYers leave the top plain at first and customize it after a few weeks of use,
once they see how they naturally work at the bench.
Step 4: Install the Casters
Flip the bench carefully and fasten the locking casters to the bottoms of the legs. Follow the caster
manufacturer’s instructions and use appropriately sized screws or lag bolts.
Check that:
- All casters are the same height so the bench doesn’t rock.
- The brakes are easy to reach with your foot from the working side of the bench.
- You can still fold the bench without the wheels colliding with anything.
Step 5: Add Bracing, Shelf, and Storage
A lower shelf made from plywood or MDF dramatically increases stability and gives you a place to store
tools and supplies. Between the added weight and extra cross-bracing, your workbench will feel much more
solid.
For even more efficiency, add:
- A small clamp rack mounted to one end
- A paper-towel or shop-towel holder
- Hooks for extension cords or safety gear
- A power strip screwed to the frame, with the cord routed safely
Step 6: Test the Fold and Fine-Tune
With everything assembled, test the full cycle:
- Roll the bench into position and lock the casters.
- Unfold the legs or panels until they’re fully supported.
- Check for wobble, racking, or hinge strain.
- Fold the bench back up and roll it into storage.
If it feels bouncy or shaky, add diagonal bracing or adjust any out-of-square connections. Small tweaks
now will pay off for years of projects.
Smart Add-Ons to Upgrade Your Mobile Workbench
Once the basic folding mobile workbench is done, it’s basically a blank canvas. Many woodworkers treat it
as “shop central” and continue upgrading it over time.
- Clamp rack: A dedicated clamp rack on the side or end of the bench keeps your clamps close to the action and can roll right where you need it.
- Fence or stop system: Add a simple wood fence or flip-down stops to make repetitive cuts easier.
- Tool docks: Mount docking stations for drills, impact drivers, and battery chargers near the bench.
- Storage bins: Stackable bins on the lower shelf keep fasteners, glue, and sanding discs organized.
Think of your bench as a constantly evolving station. The more projects you complete, the more obvious it
becomes what belongs permanently “in the prime zone” within arm’s reach.
Using and Maintaining Your Folding Mobile Workbench
A well-built workbench doesn’t need much pampering, but a little maintenance will keep it in top shape:
- Protect the top: A coat of polyurethane, varnish, or even paste wax helps glue scrape off more easily.
- Check fasteners: Every few months, snug up any screws or bolts on casters, hinges, and braces.
- Lubricate moving parts: A bit of dry lube or paste wax on hinges can keep the folding motion smooth.
- Mind the load: Don’t overload the bench beyond what your hinges, frame, and casters can handle.
When you’re done for the day, brush off sawdust, fold the bench, lock it in place, and roll it back
against the wall. The satisfaction of reclaiming your parking space while your “shop” is still ready
for next weekend is part of the magic.
Saturday Morning Workshop: Real-World Lessons from the Garage
Building a folding mobile workbench is one thing; actually living with it over dozens of
Saturday morning projects is another. Here are some real-world lessons, habits, and funny little moments
that tend to show up once the bench becomes part of your weekend routine.
First, you quickly realize how much time you used to waste just setting up. Before the mobile workbench,
a typical Saturday might involve dragging sawhorses out, finding a loose sheet of plywood, trying to
balance everything, and then realizing you forgot an extension cord. With a folding mobile bench, the
ritual becomes pleasantly predictable: roll it out, lock the casters, unfold the legs, plug in the power
strip, and you’re building within minutes. That simple routine makes it much easier to tackle “quick”
jobs that would have felt like a hassle before.
You’ll also discover your “personal workflow” without even trying. After a few weekends, you may notice
that you always set the miter saw on one end, clamp small parts near the front left corner, and lay out
fasteners on the right side. Many DIYers eventually add small upgrades that match these habits: a clamp
rack near the front left leg, a magnetic strip for drill bits on the right, or a dedicated bin for
pocket screws right under the spot where you usually stand. The bench starts to feel like it was custom
designed just for youbecause, in a way, it was.
Another common experience: realizing how much a good workbench improves accuracy. With a solid, level
surface at a comfortable height, cuts line up better, joints close more tightly, and glue-ups are less
stressful. Projects that used to feel frustratinglike assembling cabinets, building drawers, or gluing
up edge-joined panelssuddenly feel manageable. It’s not that you became a master woodworker overnight;
your bench just stopped fighting you.
Of course, the bench will collect a few battle scars. There will be the first accidental saw kerf across
the top, the scorch mark from a project that ran a little too hot, and the inevitable glue blobs you
forget to scrape off right away. Over time, those marks turn into a visual history of your projects:
the spot where you built that first planter box, the corner that held your kid’s science-fair project, the
clamp dents from that heavy tabletop you were so proud of.
One of the biggest benefits shows up when friends or family pitch in. Having a sturdy, mobile bench makes
it easy to include a helper. You can roll the bench into the driveway for better light, or reposition it
so someone else can sand while you cut. A folding bench also helps keep things safer; tools and workpieces
live on a stable surface instead of balancing on makeshift supports or sitting on the floor where someone
might trip.
Finally, a folding mobile workbench has a subtle psychological perk: it creates a clear “project mode.”
When the bench is rolled out and unfolded, it signals that it’s time to build something. When it’s folded
and stored, your garage goes back to being a parking space or play area. That on/off switch helps keep
your home from feeling permanently cluttered with half-finished projects, and it makes each Saturday
morning workshop feel like an intentional, focused block of creative time.
Over months and years, that simple weekend ritualrolling out your bench, putting on safety glasses, and
turning ideas into sawdustadds up to real skills and real projects. Cabinets, outdoor furniture, shop
storage, gifts, maybe even a new dining table all start at the same place: a solid, reliable surface
that’s ready whenever you are.