Table of Contents >> Show >> Hide
- What Hand Planes Do (and Why They’re Still Worth Your Time)
- Meet the Hand Plane Family
- Choosing Your First Planes: A Simple, Smart Roadmap
- Hand Plane Anatomy: The Parts You Actually Need to Understand
- Setup and Tuning: Make Your Plane Work for You
- Sharpening Without Losing Your Weekend
- Using a Hand Plane: Technique That Makes the Tool Feel “Easy”
- Tear-Out and Other Drama: Troubleshooting Fast
- Maintenance: Keep It Working Like a Favorite Coffee Mug
- Beginner Mistakes (So You Can Skip Them)
- Wrap-Up: Build Your Plane Kit One Success at a Time
- Experience Notes: What Woodworkers Learn the Hard Way (So You Don’t Have To)
Hand planes are one of those tools that look suspiciously simplelike a fancy doorstop with ambitionsuntil you actually use one and realize it can leave a surface so clean you’ll side-eye your sandpaper like, “So… what exactly do you do here?” A well-set plane can flatten boards, fit joinery, break edges, and even deliver a finish-ready surface with nothing more than a sharp iron and a little technique.
This guide helps you choose the right hand planes for your work, get them tuned without falling into a week-long “restoration lifestyle,” and use them with confidencewhether you’re building a cutting board, a cabinet, or a table that you swear will be “the last one.”
What Hand Planes Do (and Why They’re Still Worth Your Time)
In practical terms, hand planes do three big jobs: remove material (fast or slow), straighten wood (flat faces and square edges), and smooth surfaces (often better than sanding). They also do smaller, magical jobs: trimming a proud tenon, flushing a dovetail, easing a sharp edge, or sneaking up on a fit when “just one more pass” is the right amount (instead of the amount that ruins it).
Power tools are great at making wood approximately the size you want. Hand planes are great at making wood exactly the size you wantand doing it quietly enough that you can still hear yourself making questionable design decisions.
Meet the Hand Plane Family
Bench planes (your flattening and smoothing workhorses)
Bench planes are the classic metal-bodied planes you’ll see labeled by numbers (like No. 4, No. 5, No. 7). Size matters because length affects how the plane “rides” the wood: longer planes bridge over hollows and help true a surface; shorter planes follow the bumps more.
- Scrub plane: the “chainsaw of hand planes.” Heavy camber, thick shavings, fast stock removal.
- Jack plane (often No. 5): the versatile all-rounder for initial flattening, thickness tweaks, and general work.
- Fore plane (often No. 6): a longer jackgreat for truing faces and edges with fewer passes.
- Jointer plane (often No. 7 or No. 8): long, steady, and excellent for straight edges and big panels.
- Smoothing plane (often No. 3 or No. 4): the finisher for whisper-thin shavings and final surface quality.
Block planes (the one you’ll grab 47 times a day)
Block planes are small, one-hand-friendly planes ideal for trimming end grain, breaking edges, chamfering, and quick cleanup. Many have an adjustable mouth, which helps you switch between “bitey” and “polite” depending on the job.
Specialty planes (when you want to feel like a wizard)
Once you’ve got a basic kit, specialty planes can make joinery and fitting faster and cleaner:
- Shoulder plane: trues tenon cheeks and shoulders, cleans rabbets, and fine-tunes joinery fit.
- Rabbet plane: cuts rabbets/rebates and shoulders where a bench plane can’t reach.
- Router plane: levels dados, hinge mortises, and inlays to a consistent depth.
- Scraper plane: great for tricky grain when you want smoothness without tear-out drama.
Wooden and Japanese planes (different style, same goal)
Wooden-bodied Western planes and Japanese planes (kanna) can be unbelievably smooth and satisfying to use. They often require different setup habitsespecially around sole tuning and blade adjustmentbut the payoff can be excellent performance with a lighter feel on the wood.
Choosing Your First Planes: A Simple, Smart Roadmap
If you want to build a useful “starter kit”
You can do a lot with just a few planes. Here are three common approaches, depending on your projects and patience level:
- Minimalist (2 planes): a block plane + a jack or smoother. Great for small projects, quick trimming, and learning.
- Balanced (3 planes): a block plane + a jack (No. 5) + a smoother (No. 4). This covers most furniture work and makes flattening/smoothing feel far less like punishment.
- Panel-friendly (4 planes): add a jointer (No. 7) once you’re edge-jointing boards for panels or tabletops.
New vs. vintage: choose your adventure
New premium planes typically arrive close to ready: sharpen, set, and go. That’s a big deal if your goal is building projects instead of collecting “parts planes” and learning the ancient art of removing rust in twelve different ways.
Vintage planes can be excellent value, especially older quality bench planes, but assume you’ll tune, clean, and sharpen. If you enjoy tool rehab, it’s fun. If you don’t, it’s… character building.
Bevel-down vs. bevel-up: which style fits your work?
Most classic bench planes are bevel-down: the bevel faces down, and the cutting angle is largely determined by the frog angle (commonly around 45° on many bench planes). Bevel-down planes often pair well with a cap iron (chipbreaker) to help manage tear-out.
Bevel-up planes (common in many block planes and some “low-angle” bench planes) have the bevel facing up. The cutting angle becomes the bed angle plus your honed bevel. This can be handy if you like swapping blades honed to different angles for different woods.
Neither system is “the one true plane.” Think of it like pizza styles: both are valid, and the arguments can get weirdly emotional.
What to look for when buying (so you don’t buy regret)
- Comfort: the handles should feel natural. You’ll be pushing this tool with your whole body.
- Solid adjusters: depth and lateral adjustment should move predictably without slop or drama.
- Flat-enough sole: it doesn’t need to be perfect, but it shouldn’t rock like a toddler’s high chair.
- Blade quality: thicker irons can reduce chatter and hold an edge longer, but technique and sharpening matter more than hype.
- Adjustable mouth (especially on block planes): very useful for switching from coarse work to fine finishing.
Hand Plane Anatomy: The Parts You Actually Need to Understand
You don’t need a mechanical engineering degree. You just need to know which knobs do what before you start turning everything at once.
- Iron (blade): the cutting edge. Sharpness is non-negotiable.
- Cap iron / chipbreaker (common on bevel-down bench planes): supports the iron and can help control tear-out when set correctly.
- Lever cap: clamps the blade assembly. Too loose = chatter; too tight = you can’t adjust anything.
- Frog: the “bed” that supports the iron and sets the cutting geometry (and sometimes the mouth opening).
- Mouth: the opening in front of the blade. Tighter mouths generally help for fine work.
- Depth adjuster: moves the blade in/out to control shaving thickness.
- Lateral adjuster: shifts the blade side-to-side so the edge cuts evenly across the mouth.
Setup and Tuning: Make Your Plane Work for You
The goal isn’t “museum restoration.” The goal is a plane that takes consistent shavings, doesn’t clog, and leaves a clean surface. Here’s a practical tuning sequence that gets you there efficiently.
1) Clean and inspect
Remove the iron assembly and clean the plane body. On a used plane, clear gunk from the frog, mouth, and depth-adjust yoke area. A little grime is normal; a tar pit is not.
2) Check the sole (don’t panic-flatten)
Many planes work beautifully without obsessively flattening the sole. Use a straightedge to check for obvious rocking or severe hollows. If you need to flatten, use adhesive-backed sandpaper on a known-flat surface (like thick glass or a granite reference plate), and take a few controlled passes. Stop when the plane behaves; perfection is optional.
3) Sharpen the iron (the part that changes everything)
Your plane is only as good as its edge. A typical approach is a 25° primary bevel with a 30° microbevel, then a polished back near the edge. If you’re new, a honing guide can make angles repeatable and reduce frustration.
4) Fit and set the cap iron / chipbreaker (for bevel-down bench planes)
If your plane uses a chipbreaker, make sure the leading edge of the breaker mates tightly to the ironno gaps for shavings to wedge into. For general work, the breaker can sit a bit back from the cutting edge; for difficult grain, it often helps to set it closer (the exact distance depends on shaving thickness and wood behavior). The key is: tight contact, clean leading edge, and settings that match your cut.
5) Reassemble and set the mouth
Install the iron assembly and snug the lever cap so it holds firmly but still allows adjustment. Set the mouth more open for heavier cuts and tighter for fine smoothing. Then retract the iron fully, and bring it forward until it just starts to appear through the mouth.
6) Dial in the cut with test shavings
- Use a scrap board and take a light pass.
- If nothing happens, advance the depth slightly.
- If it digs in, retract the blade and try again.
- If the shaving is thicker on one side, use the lateral lever to even it out.
A well-set plane makes continuous shavings and feels smooth. If it chatters, clogs, or tears the surface, you’ll fix that later in the troubleshooting section.
Bonus: Wax the sole (yes, really)
A little paste wax on the sole can noticeably reduce friction. It’s one of the highest “smiles per minute” upgrades you can make.
Sharpening Without Losing Your Weekend
You don’t need a shrine of 37 stones. You need a repeatable process that gets your blade sharp, quickly, and keeps it that way. Here’s a straightforward strategy:
- Flatten and polish the back near the cutting edge (you don’t need to polish the whole back forever).
- Establish the primary bevel (often 25°) and then hone a microbevel (often ~30°) for fast touch-ups.
- Camber when appropriate: a slight curve helps avoid plane tracks on jacks and smoothers; heavy camber is for scrub work.
- Refresh often: quick touch-ups beat waiting until the blade is butter-knife dull.
Sharpening media choices (stones, diamond plates, sandpaper-on-glass) can all work. Pick one system and stick with it long enough to build muscle memory. Consistency matters more than chasing the “perfect” grit progression.
Using a Hand Plane: Technique That Makes the Tool Feel “Easy”
Read the grain (or the wood will read you)
Planing with the grain reduces tear-out. Look at the grain lines on the face and edge: you want to plane “downhill,” so the fibers lay down as you cut. When grain reverses or gets swirly, you’ll shift to lighter cuts, skew the plane, tighten the mouth, adjust the chipbreaker (if applicable), or switch tools.
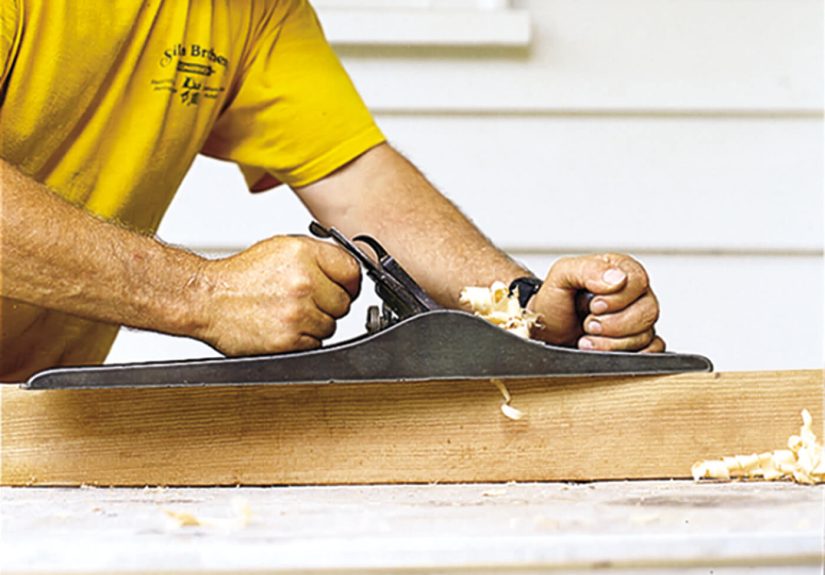
Use your whole body, not just your arms
A plane works best with steady forward motion. Stand comfortably, keep your shoulders relaxed, and push with your legs and body weight. It’s more like a smooth walking lunge than an aggressive bench-press.
Pressure shifts during the stroke
To keep things flat:
- Start: more pressure on the front knob to keep the plane from tipping down into the leading edge.
- Middle: balance pressure between front and rear.
- End: more pressure on the rear tote to avoid dipping off the trailing edge.
Skew the plane to make cutting easier
Angling the plane slightly as you push effectively lowers the cutting resistance and can reduce tear-out. It’s a simple trick that often makes a stubborn board behave.
Example: Jointing an edge for a panel glue-up
Let’s say you’re gluing up a tabletop. You want edges that are straight and square:
- Clamp the board on edge (or use a sticking board if you’re fancy).
- Use a jointer plane if you have one; otherwise a well-set jack/fore can work.
- Take full-length strokes. Check with a straightedge.
- If the edge is out of square, shift finger pressure slightly to the high side (tiny changes matter).
- For spring jointing (optional): take a couple extra passes in the middle so the ends pull tight during glue-up.
Example: Flattening a board face
A reliable sequence is:
- Traverse (across the grain) with a jack or scrub to knock down high spots quickly.
- Diagonal passes both directions to remove the traverse marks and true the surface.
- With the grain to finish, switching to a smoother for a final surface.
Tear-Out and Other Drama: Troubleshooting Fast
If the plane tears the surface
- Take a thinner shaving: retract the blade and sneak up on the cut.
- Sharpen: if you’re wondering whether it’s sharp, it isn’t.
- Tighten the mouth: especially for smoothing.
- Skew the plane: lower resistance, cleaner cut.
- Adjust the chipbreaker/cap iron: ensure tight contact; try setting it closer for difficult grain.
- Change strategy: use a higher cutting angle, a scraper, or a card scraper for truly wild grain.
If it clogs
- Open the mouth a bit for heavier cuts.
- Make sure the chipbreaker edge mates tightly to the iron (no gap for shavings to wedge).
- Reduce cut depthespecially on resinous woods.
- Clean pitch buildup from the mouth and iron.
If it chatters or feels bouncy
- Check lever cap tension (firm, not brutal).
- Ensure the iron is well supported and seated.
- Confirm the edge is sharp (dull edges invite vibration).
- Try a slightly thicker shavingsometimes “too thin” can skip and chatter on uneven stock.
Maintenance: Keep It Working Like a Favorite Coffee Mug
- Retract the blade before setting the plane down or storing it.
- Prevent rust: a light oil, paste wax, or corrosion inhibitor helpsespecially in humid shops.
- Touch up often: a quick microbevel refresh is faster than a full resharpen.
- Store smart: avoid resting the sole on gritty surfaces; a shelf liner or wooden rack is cheap insurance.
Beginner Mistakes (So You Can Skip Them)
- Trying to plane with a dull blade and blaming the plane, the wood, the weather, and eventually geometry.
- Over-flattening the sole instead of fixing the edge and setup first.
- Ignoring grain direction and wondering why the board looks like it lost a fight with a cheese grater.
- Taking too thick a shaving on a smoother and expecting a finish-ready surface.
- Adjusting everything at once (depth, lateral, mouth, chipbreaker) and getting lost.
Wrap-Up: Build Your Plane Kit One Success at a Time
If you want the shortest path to satisfying results: start with a block plane and a versatile bench plane (often a jack), learn to sharpen well, and practice on scrap until the adjustments feel natural. Add a smoother when you’re ready for cleaner finishes, and a jointer when edge-jointing becomes a regular part of your projects.
Hand planes reward “small improvements.” A slightly sharper edge, a slightly finer cut, a slightly better stanceeach one stacks. And then one day, you take a full-length shaving that curls out like a ribbon, and you understand why people get poetic about a tool made of metal and mild obsession.
Experience Notes: What Woodworkers Learn the Hard Way (So You Don’t Have To)
Ask a room full of woodworkers about hand planes and you’ll hear the same “experience lessons” show up again and againusually delivered with the tired smile of someone who once tried to plane a whole tabletop with a dull iron and a heroic attitude.
Lesson #1: Sharp beats expensive. Many beginners assume the plane isn’t “good enough.” The more common culprit is a blade that’s not truly sharpsharp enough to cut paper is not the same as sharp enough to peel consistent shavings. Experienced woodworkers often keep a quick touch-up routine close by (a fine stone or strop) so the plane stays in the sweet spot. The surprise is how little time it takes once you stop waiting until the iron is completely toast.
Lesson #2: The first setup isn’t the last setup. People expect a one-and-done tune-up. In reality, planing is a conversation between your blade, the wood, and your expectations. A setup that works beautifully on straight-grained poplar may complain loudly on reversing cherry or curly maple. Seasoned users get comfortable making tiny adjustmentsopening the mouth a hair, backing off the cut, skewing the plane, or changing their planing direction mid-board. It’s not fiddly; it’s responsive.
Lesson #3: “One more turn” is how you dig a trench. Depth adjusters can feel subtle, especially on planes with backlash. A common real-world habit is to always approach the final setting from the same direction (typically by advancing the blade, not retracting) so the mechanism is loaded consistently. Then you test on scrap. The scrap board becomes the shop’s most underappreciated heroquietly preventing rage and rework.
Lesson #4: Body mechanics matter more than grip strength. People often white-knuckle a plane, muscling it forward with their arms. Experienced planers look almost boring: relaxed shoulders, steady pace, pushing from the legs, and letting the tool do the work. The wood responds. The plane stops feeling like it’s stuck to the board, and suddenly the sound changesmore of a clean “zip” than a crunchy complaint.
Lesson #5: The grain always winsso negotiate. A lot of “experience” is learning when to change tactics. If a board starts tearing out, skilled woodworkers don’t keep bullying it. They lighten the cut, skew the plane, try the other direction, tighten the mouth, or shift to a scraper. They may even decide, pragmatically, that this particular section will get the scraper treatment and that’s okay. The goal is a clean surface, not proving a point to a piece of lumber.
Lesson #6: A small plane earns its keep. Many people buy a big jointer plane first because it looks impressive. But in day-to-day work, the plane that gets used constantly is often the block planebreaking edges, fitting parts, trimming end grain, and cleaning up joinery. Woodworkers regularly mention that once a block plane is tuned and sharp, it becomes a “reach tool,” like a tape measure or pencilalways in hand, always useful.
Lesson #7: Hand planes change how you design projects. Once you trust a plane, you’ll design with it in mind: leaving parts slightly proud for final flush-trimming, planning joinery to be tuned to fit, and relying less on sanding as a problem solver. That’s the real experience shift: planes aren’t just for smoothingthey become precision tools for building cleaner, better-fitting work with fewer “oops” moments.