Table of Contents >> Show >> Hide
- What Is Candy Cane Bark?
- Ingredients
- Equipment You’ll Want
- Step-by-Step Candy Cane Bark Recipe
- Step 1: Prep the pan
- Step 2: Crush the candy canes (without turning them into peppermint dust)
- Step 3: Melt the semisweet chocolate
- Step 4: Spread the first layer
- Step 5: Chill briefly (the “tacky stage” is the sweet spot)
- Step 6: Melt the white chocolate + add peppermint
- Step 7: Add the second layer
- Step 8: Top with crushed candy canes
- Step 9: Chill until firm
- Step 10: Break into pieces
- 3 Quick Variations (Because Options Are Joy)
- Chocolate Choices: Bars vs Chips vs Candy Coating
- Peppermint Extract vs Peppermint Oil
- Pro Tips for Perfect Candy Cane Bark
- Troubleshooting: When Chocolate Has Big Feelings
- Storage and Make-Ahead
- Gifting Ideas That Look Like You Tried (Even If You Didn’t)
- Serving Ideas
- Kitchen Stories and Real-World Candy Cane Bark Experiences (Extra )
If holiday cheer had a “snap,” it would sound exactly like candy cane bark. It’s glossy chocolate, a cool peppermint kiss, and a confetti crunch of crushed candy canesall in one no-bake treat that looks fancy enough for a cookie tin, but is easy enough to make while wearing fuzzy socks and listening to your fifth loop of “All I Want for Christmas.”
This guide gives you a reliable, crowd-pleasing candy cane bark recipe (with both layered and swirled options), plus pro tips to keep your chocolate smooth, your peppermint balanced, and your bark from turning into a sticky, streaky drama. We’ll also cover fun add-ins, gifting ideas, storage, and troubleshootingbecause sometimes chocolate has opinions.
What Is Candy Cane Bark?
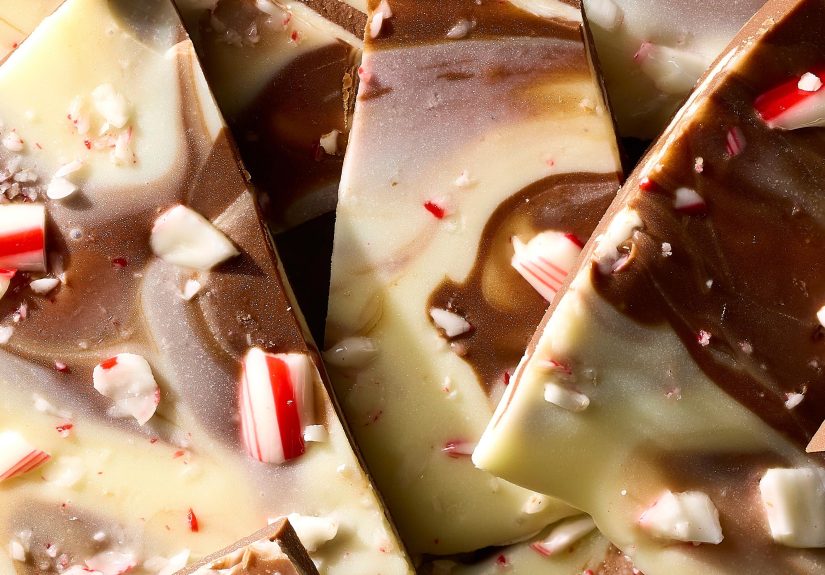
Candy cane bark is a type of chocolate bark (thin melted chocolate set on a sheet and broken into shards) topped with crushed candy canes or peppermint candies. Many versions use two layersdark (or semisweet) and white chocolateoften flavored with peppermint extract. Some recipes go ultra-simple with one layer of white chocolate and candy cane crunch. Either way, it’s a classic holiday candy because it’s fast, festive, and wildly giftable.
Ingredients
This is the “classic layered” versionsweet, minty, and balanced. It makes about 1 to 1½ pounds of bark (plenty for sharing… or “sharing”).
Base Ingredients
- 12 oz semisweet chocolate (bars chopped, or high-quality chips)
- 12 oz white chocolate (bars chopped, wafers, or good chips)
- ½ tsp peppermint extract (divided; start smallpeppermint can go from “fresh” to “toothpaste commercial” fast)
- ¾ cup crushed candy canes (about 6–8 regular canes), divided
Optional “Make It Extra” Add-Ons
- Pinch of flaky sea salt (peppermint + salt = surprisingly classy)
- ½ cup crushed pretzels for sweet-salty crunch
- Crushed cookies (chocolate sandwich cookies or shortbread)
- Sprinkles (because it’s December and rules are optional)
Equipment You’ll Want
- Rimmed baking sheet (quarter- or half-sheet pan)
- Parchment paper (or silicone mat)
- Microwave-safe bowls (or a double boiler setup)
- Offset spatula (helpful, not mandatory)
- Zip-top bag + rolling pin (for candy cane “controlled smashing”)
Step-by-Step Candy Cane Bark Recipe
Step 1: Prep the pan
Line a rimmed baking sheet with parchment paper. This makes the bark easy to lift and break later. If you plan to gift it, parchment is your future best friend (less mess, cleaner pieces).
Step 2: Crush the candy canes (without turning them into peppermint dust)
Place unwrapped candy canes in a zip-top bag. Crush with a rolling pin until you have a mix of small shards and bits. Avoid pulverizing everything into powderpowder melts into the chocolate and can create sticky spots or a weird “mint cement” top layer.
Pro move: Set aside ¼ cup of the smallest bits for that “snowy sparkle” look, and use chunkier pieces for crunch.
Step 3: Melt the semisweet chocolate
Microwave method: Add semisweet chocolate to a dry microwave-safe bowl. Microwave in 20–30 second bursts, stirring well each time. Stop heating when it’s mostly melted, then stir until smooth (residual heat finishes the job).
Double boiler method: Place chocolate in a heatproof bowl over barely simmering water. Stir until melted and smooth. Keep water away from chocolateone tiny splash can make it seize.
Step 4: Spread the first layer
Pour melted semisweet chocolate onto the lined pan and spread into a thin, even rectangle (about ¼-inch thick). Gently tap the pan on the counter to level it.
Step 5: Chill briefly (the “tacky stage” is the sweet spot)
Refrigerate the pan for 8–12 minutes, just until the chocolate is set around the edges but still slightly tacky in the center. You don’t want it rock hardif it fully sets, your layers may separate when you break the bark (aka “chocolate divorce”).
Step 6: Melt the white chocolate + add peppermint
Melt the white chocolate the same wayshort bursts, lots of stirring, low drama. Stir in ¼ tsp peppermint extract (start there; you can go up to ½ tsp total across the recipe, but subtle tastes more “holiday treat” than “minty mouthwash”).
Step 7: Add the second layer
Pour white chocolate over the semisweet layer. Spread gently into an even layer.
Want a swirled look? Instead of fully spreading smooth, drop spoonfuls of leftover semisweet chocolate on top and drag a toothpick or skewer through the layers in loose figure-eights. Keep it casualover-swirling can muddy the colors.
Step 8: Top with crushed candy canes
Immediately sprinkle the remaining crushed candy canes over the white chocolate. Gently press them in with the back of a spatula or clean hands so they stick once set (press softlynobody wants candy cane shards launching across the kitchen).
Step 9: Chill until firm
Refrigerate for 25–35 minutes, or until completely set. If your fridge is crowded with leftovers and holiday hopes, it may take a bit longer.
Step 10: Break into pieces
Lift the parchment, place bark on a cutting board, and break into irregular pieces by hand. For cleaner edges, use a large knife to score lines first, then snap. You’re making bark, not a geometry examrustic is the vibe.
3 Quick Variations (Because Options Are Joy)
1) Super Simple 3-Ingredient White Chocolate Candy Cane Bark
Melt 16–24 oz white chocolate, stir in a few drops of peppermint oil or ¼ tsp peppermint extract (optional), spread, top with crushed candy canes, chill, and break. This version is extra sweet and great for kids to help withjust supervise the candy cane smashing (it’s basically a tiny construction site).
2) Pretzel Peppermint Bark
Scatter crushed pretzels on the pan first or sprinkle over the top with candy canes. The salty crunch makes the bark taste less like “pure sugar” and more like “I meant to do that.”
3) Cookie Crunch Candy Cane Bark
Add chopped mint chocolate sandwich cookies or crushed shortbread between layers (or on top). It becomes part bark, part “holiday snack mix,” and disappears fast at parties.
Chocolate Choices: Bars vs Chips vs Candy Coating
Best flavor and texture: chopped chocolate bars or quality melting wafers. They melt smoother and tend to set with a nicer snap.
Chocolate chips: convenient, but often contain stabilizers that make them hold shape in cookiesmeaning they can melt thicker. Still works; just melt gently and stir patiently.
Candy coating / almond bark: easiest for beginners. It melts smoothly and sets reliably, but the flavor is sweeter and less “real chocolate.” If you’re making bark for a big crowd or a school event, candy coating is a practical win.
Peppermint Extract vs Peppermint Oil
Peppermint extract is common and easy to find. It’s also easier to overdo than you think. Start small (¼ tsp per layer or less) and taste carefully.
Peppermint oil is much stronger and often used in tiny drops. If you use it, choose a food-grade peppermint oil made for baking/candy, and add it sparingly. One drop too many can turn your bark into a breath mint with a chocolate hobby.
Pro Tips for Perfect Candy Cane Bark
- Keep everything dry: Water makes chocolate seize. Dry bowls, dry spatulas, dry handsthis is not the moment for “I just rinsed it, it’s fine.”
- Don’t overheat white chocolate: It scorches easily. Use short bursts and stir a lot.
- Layer timing matters: Add white chocolate when the dark layer is tacky, not fully hard, to help bonding.
- Press toppings gently: Candy canes need a little pressure to stick, but too much can sink them and cause melting streaks.
- Want extra shine and snap? Tempering helps, but it’s optional. For most home kitchens, gentle melting + proper cooling still gives great results.
Troubleshooting: When Chocolate Has Big Feelings
My chocolate looks streaky or dusty
That’s usually “bloom” (fat or sugar bloom). It can happen if chocolate gets too warm, cools unevenly, or encounters moisture. The bark is still safe and tastyjust less glossy. Store it cool and dry, and melt gently next time.
The layers separated when I broke it
The first layer likely set too firmly before adding the second. Next time, chill only until tacky. If it does happen, call it “two-tone candy cane bark” and pretend it was intentional. Confidence is a garnish.
My candy canes got sticky
Peppermint candy absorbs moisture and can dissolve slightly, especially in humid kitchens or if stored in the fridge uncovered. Make sure bark is sealed in an airtight container, and add candy cane topping promptly so it sets into the chocolate.
My white chocolate seized or turned grainy
It may have overheated or contacted moisture. Try stirring in a small amount of neutral oil or cocoa butter to smooth it out. If it’s beyond saving, use it as “peppermint rubble” over ice cream and start the layer again.
Storage and Make-Ahead
- Room temperature: 5–7 days in an airtight container in a cool, dry place.
- Refrigerator: Up to 1–2 weeks airtight (helps in warm climates, but can increase candy cane stickiness if not sealed well).
- Freezer: Up to 2–3 months. Layer pieces with parchment, seal tightly, and thaw in the fridge or at cool room temp.
Gifting Ideas That Look Like You Tried (Even If You Didn’t)
- Cellophane bags + ribbon: The classic. Add a gift tag: “Warning: Highly Snackable.”
- Cookie tins: Separate layers with parchment so the bark stays crisp and pretty.
- Hot cocoa topper: Include a few shards with a mug mixpeople love edible “extras.”
Serving Ideas
- Set out with holiday cookies for a dessert board.
- Chop and sprinkle over ice cream or brownies.
- Stir a shard into hot cocoa for a peppermint-chocolate moment.
- Use as a crunchy garnish on cupcakes or frosted cookies.
Kitchen Stories and Real-World Candy Cane Bark Experiences (Extra )
Making candy cane bark has a funny way of turning into a small holiday tradition, even for people who swear they “don’t bake.” That’s because it doesn’t feel like baking. There’s no flour to measure, no oven timing to panic over, and no mysterious moment where something is “golden brown” but also somehow still raw. It’s mostly melting, swirling, sprinklingand then pretending you have the patience to let it set.
One of the most common first-time experiences is the candy cane crushing phase, which is basically stress relief disguised as food prep. It starts politely: a few gentle taps with a rolling pin. Then you realize the candy canes are tougher than your schedule in December, and suddenly you’re hammering like you’re auditioning for a home renovation show. Tip from the real world: use a sturdy bag, push the air out before sealing, and keep one hand on the bag so it doesn’t scoot across the counter like it’s trying to escape responsibility.
Then comes the white chocolate lesson. Dark chocolate is the chill friend. It melts, it behaves, it doesn’t complain. White chocolate is more like a diva with boundaries: it demands low heat, frequent stirring, and emotional support. Many home cooks learn (the hard way) that “just a little longer” in the microwave can flip white chocolate from silky to grainy. The good news? Once you figure out the rhythmshort bursts, stir, repeatit becomes easy. And honestly, stirring between bursts makes you feel like a professional chocolatier, which is excellent for confidence.
Another classic moment is deciding between layers versus swirls. Layers look clean and bakery-pretty, like you carefully planned your life. Swirls look playful, like you have hobbies and joy. Swirls are also more forgiving: if your first layer set a bit too much, a few artistic swoops can hide minor imperfections. People often end up making both styles in the same batchhalf the pan layered, half swirledbecause it feels like getting two desserts for the effort of one.
At parties and cookie swaps, candy cane bark tends to vanish early. Not because it’s the most complicated treat, but because it’s the most snackable. It breaks into grab-and-go pieces, it doesn’t require a fork, and it tastes like the holidays without being heavy. Plus, there’s something about the peppermint crunch that makes people keep reaching for “one more piece,” which is secretly the highest compliment a recipe can get.
And if you’re making it with kids (or adults who behave like kids around candy), expect the topping station to become a “creative zone.” Someone will add extra sprinkles. Someone will insist on a snowstorm of candy cane dust. Someone will try to place peppermint shards in a perfect pattern like it’s a mosaic. The best part? It all works. Candy cane bark is flexible like that. Even when it’s not perfectly glossy, it’s still festive, still delicious, and still the kind of treat people rememberespecially when it shows up in a little bag with a ribbon and a note that says, “I made this, and yes, you should absolutely eat it with coffee.”


