Table of Contents >> Show >> Hide
- Quick Snapshot
- Why This Recipe Works (The Tiny Bit of Science That Saves Your Cookies)
- Ingredients You’ll Need
- Equipment
- Step-by-Step: Classic No-Bake Cookies
- The 60-Second Rule: Common Mistakes and How to Avoid Them
- Oats: Quick vs. Old-Fashioned (Choose Your Adventure)
- Easy Variations (Without Losing the “Classic” Soul)
- Storage and Make-Ahead Tips
- Serving Ideas (Because “Just One” Is a Lie)
- Nutrition Notes (Approximate)
- FAQ
- In the Real World: 500-ish Words of No-Bake Cookie “Been There” Energy
- Conclusion
Some days you want a homemade cookie without turning your kitchen into a sauna or committing to a
full-on baking project that requires three mixing bowls and an emotional support spatula. That’s
where classic no-bake cookies stroll in like they own the placechocolatey, peanut-buttery,
chewy with oats, and ready fast enough to qualify as a “quick win.”
This is the old-school, American pantry-staple version: a stovetop cocoa-sugar mixture briefly boiled,
then stirred into peanut butter and oats and scooped into rustic little mounds that set up like fudgy
oatmeal drops. They’re famously forgiving… right up until you ignore the boil time. (More on that very
dramatic 60 seconds in a minute.)
Quick Snapshot
- Flavor: Chocolate + peanut butter + cozy oat chew
- Texture: Fudgy set with a little bite (like a Reese’s cup got a hug from oatmeal)
- Time: About 20 minutes start-to-scoop, then 20–40 minutes to set
- Best for: Last-minute desserts, bake sales, “I forgot dessert” emergencies, hot-weather treats
Why This Recipe Works (The Tiny Bit of Science That Saves Your Cookies)
No-bake cookies are basically a fast-track candy-making moment disguised as a cookie. When you boil
sugar with milk and butter, you’re concentrating moisture and nudging the mixture toward a stage where
it will set instead of staying syrupy. That’s why the timing matters so muchand why many experienced
no-bake cookie makers aim for a temperature cue (the soft-ball stage) instead of guessing by vibes.
[2]
Think of it like this: under-boil and you get chocolate oatmeal “puddles.” Over-boil and you get dry,
crumbly “cookie gravel.” Nail it and you get that classic fudgy chew that makes people hover around
the tray like it’s a campfire.
[1]
Ingredients You’ll Need
This is the classic lineupsimple, familiar, and designed to taste like childhood summer afternoons
(even if it’s snowing outside).
[3]
Base Ingredients
- 2 cups granulated sugar
- 1/2 cup whole milk (2% works; whole is richest)
- 1/2 cup (1 stick) unsalted butter
- 3 tablespoons unsweetened cocoa powder
- 1/4 teaspoon kosher salt (or a pinch if that’s what you’ve got)
- 1/2 cup creamy peanut butter
- 1 teaspoon vanilla extract
- 3 cups quick-cooking oats
Optional (But Honestly Fantastic)
- Flaky sea salt to finish (sweet-salty magic)
- 1/2 cup chopped peanuts for crunch
- 1/2 cup shredded coconut for a “cookie swap auntie” vibe
Equipment
- Medium saucepan (heavy-bottomed helps prevent scorching)
- Wooden spoon or heatproof spatula
- Measuring cups/spoons
- Baking sheet lined with parchment or wax paper
- Cookie scoop or tablespoon
- Optional but very useful: candy thermometer [2]
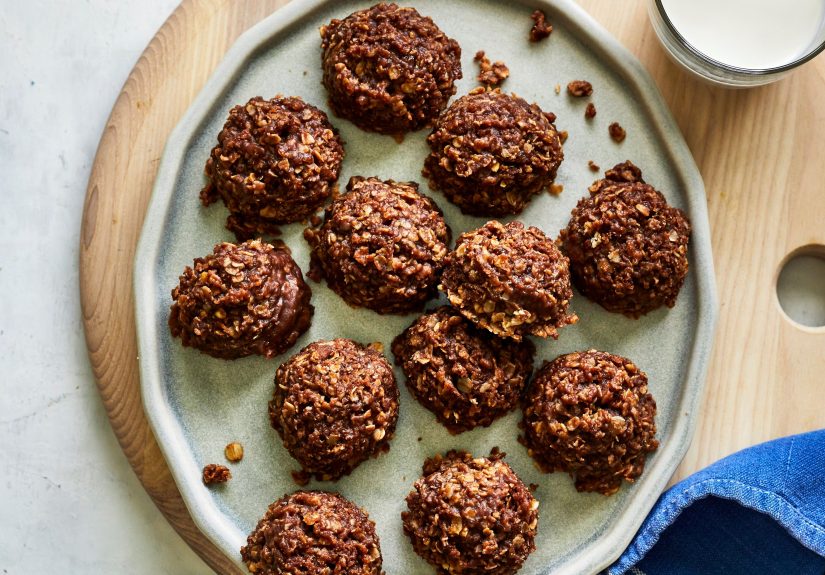
Step-by-Step: Classic No-Bake Cookies
1) Prep your landing zone
Line a baking sheet (or two) with parchment or wax paper. You want this ready because once the mixture
is done, it sets quickly and does not wait for you to remember where you put the parchment.
[3]
2) Build the chocolate base
In a medium saucepan over medium heat, combine the sugar, milk, butter, cocoa powder, and salt. Stir
until the butter melts and everything looks like a glossy hot chocolate situation.
[3]
3) Bring to a rolling boil (then start the clock)
Increase heat slightly and bring the mixture to a full rolling boilthe kind that keeps bubbling
even when you stir. Once it hits that rolling boil, boil for exactly 60 seconds.
Don’t wander off. Don’t answer “one quick text.” This is the boss level.
[1]
Want the most consistent result? Aim for about 235–240°F (soft-ball stage) on a candy
thermometer instead of relying only on timeespecially if your kitchen is humid or you’re at a different altitude.
[2]
4) Remove from heat, then add peanut butter + vanilla
Take the saucepan off the heat. Immediately stir in the peanut butter and vanilla until smooth and fully blended.
You’re creating the fudgy backbone that makes these cookies taste like chocolate-peanut butter candy with an oat
cameo.
[1]
5) Stir in the oats
Add the oats and stir until every oat is coated. The mixture will thicken as it cools.
Some bakers let it sit for a few minutes before scooping so the oats can absorb a little moisture and the cookies
set up more reliably.
[4]
6) Scoop and set
Drop heaping spoonfuls onto your lined sheet. Let them cool at room temperature until firm, usually
20–40 minutes. If you’re impatient (relatable), you can chill them to speed up setting.
[3]
The 60-Second Rule: Common Mistakes and How to Avoid Them
If your cookies are too gooey
- Likely cause: Under-boiled sugar mixture (not concentrated enough to set).
- Fix next time: Make sure you reach a true rolling boil before timing, or use a thermometer and aim for soft-ball stage.
[2] - Save this batch: Spoon it over vanilla ice cream like a warm fudge-oat sauce. Congratulationsyou invented dessert.
If your cookies are dry and crumbly
- Likely cause: Boiled too long (moisture cooked off too far).
- Another sneaky cause: Using natural peanut butter, which can make the texture drier and less cohesive in no-bake cookies.
[5] - Fix next time: Time the boil precisely, and use standard creamy peanut butter (the classic shelf-stable kind) for the most predictable set.
[5] - Save this batch: Crumble over yogurt, ice cream, or a pudding cup. It becomes “cookie crumble topping,” which sounds intentional because it is now.
If your cookies are grainy
- Likely cause: Sugar didn’t fully dissolve before boiling, or the mixture wasn’t stirred enough early on.
- Fix next time: Stir well while the butter melts and the mixture warms, and only stop stirring once it’s boiling (depending on your method).
Oats: Quick vs. Old-Fashioned (Choose Your Adventure)
The “classic” version many people grew up with uses quick-cooking oats for a smoother, more uniform bite.
[3]
Some recipes prefer old-fashioned/rolled oats for a heartier chew.
[6]
Either can workjust know the texture changes:
- Quick oats: Softer, more fudge-like cookies that set neatly.
- Old-fashioned oats: Chewier, more rustic bite (great if you like texture).
- Avoid instant oats: They can break down and get mushy in some versions.
Easy Variations (Without Losing the “Classic” Soul)
1) Sea salt finish
Sprinkle a few flakes on top right after scooping. It makes the chocolate pop and keeps sweetness in check.
[1]
2) Nut-free swap
Use sunflower seed butter (or another smooth seed butter) instead of peanut butter. You’ll keep the creamy richness
while making them more allergy-friendly.
[1]
3) No peanut butter at all
Prefer a simpler chocolate-oat cookie or need a peanut-free household option? There are classic versions made without
peanut butterstill chocolatey, still quick, still dangerously snackable.
[7]
4) Chocolate boost
Add a small handful of chocolate chips after you remove the pan from heat (so they melt into the mixture) for a deeper
chocolate flavorvery “fudge shop,” very hard to stop eating.
[8]
5) Crunchy add-ins
Stir in chopped peanuts or coconut for texture and nostalgia. (Suddenly these feel like they belong on a holiday cookie tray.)
[9]
Storage and Make-Ahead Tips
- Room temperature: In an airtight container for a few days (best in drier climates).
- Refrigerator: Helps them stay firm and fresh longer; a common recommendation is up to a week.
[10] - Freezer: Freeze for grab-and-go treats; a common guideline is up to a month for best quality.
[10]
Serving Ideas (Because “Just One” Is a Lie)
- Pair with cold milk, hot coffee, or a strong cup of tea.
- Stack on a platter with fruit for a low-effort party dessert.
- Crumble over ice cream for instant “cookie shop sundae” energy.
- Wrap two around a scoop of vanilla for a chaotic-good ice cream sandwich situation.
Nutrition Notes (Approximate)
Nutrition depends on portion size and specific ingredients, but classic no-bake cookies generally land in the “sweet treat”
category: sugar for structure, butter for richness, oats for a little heft, peanut butter for flavor and fat. If you want a
slightly less-sweet version, you can reduce the sugar a bitbut keep in mind sugar affects the set.
[2]
FAQ
Do I have to use whole milk?
Whole milk gives the richest result and a reliably creamy texture, but 2% works fine. Dairy-free milks can work too; just
know it may set a little differently, so a thermometer helps.
[1]
Can I use natural peanut butter?
You can, but it’s more likely to turn the cookies dry or crumbly because the oil separation changes how the mixture binds.
If you want the most classic, predictable result, use regular creamy peanut butter.
[5]
Why didn’t my cookies set?
Most often it’s the boil: either it didn’t reach a true rolling boil before timing, or it didn’t boil long enough to concentrate.
Next time, aim for soft-ball stage (about 235–240°F) for consistency.
[2]
What are these cookies called in different places?
Depends where you grew up. Some people call them No-Bakes, Haystacks, Mudballs, Poodgies, or Preacher Cookiesand yes,
some regions have even cheekier names.
[9]
In the Real World: 500-ish Words of No-Bake Cookie “Been There” Energy
If you’ve ever made classic no-bake cookies, you know they come with a little drama and a lot of nostalgia. They’re the kind
of recipe someone teaches you without measuring anything except the boil timebecause the boil time is the whole plot.
There’s always that moment when the pot starts bubbling and someone says, “Okay, nowDON’T GUESS. SET A TIMER.” Suddenly
everyone in the kitchen becomes extremely respectful of 60 seconds, like it’s a sacred holiday.
They’re also the ultimate “no-oven survival cookie.” Picture a sticky summer afternoon when turning on the oven feels like
lighting a bonfire indoors. No-bakes are the answer: a saucepan, a spoon, and a tray on the counter. You can make them during
a heat wave, after a long day, or in that awkward time window when you promised dessert and completely forgot until 7:42 p.m.
The mixture comes together fast, and the scooping part feels like craftingmessy, satisfying crafting you can eat.
Then there are the classic shared experiences: the first scoop that looks perfect, the second scoop that looks like a meteor,
and the rest that look like you gave up on symmetry as a concept. Nobody cares. No-bake cookies were never trying to be fancy.
They’re comfort food that shows up in paper liners at potlucks, piled on a plate at family gatherings, and tucked into lunchboxes
as a surprise treat. They’re the cookie equivalent of sweatpants: beloved, practical, and quietly unstoppable.
And if you’ve ever had a batch that didn’t set, welcome to the club. The “too soft” batch becomes ice-cream topping. The “too dry”
batch becomes cookie crumble. You learn quickly that no-bakes are less about perfection and more about adaptation. That’s part of
their charmbecause even the mistakes are delicious, they just change outfits.
The fun part is how personal they become. Some households swear by quick oats for a smoother bite, while others insist on rolled oats
for a heartier chew. Some people add coconut and call it “the good kind of haystack.” Some sprinkle flaky salt on top and act like they
invented balance. Some go full chocolate mode and stir in extra chips because life is short and the pantry is right there.
In the end, classic no-bake cookies are a tiny kitchen tradition: simple ingredients, a quick boil, and a tray of treats that tastes like
someone cared enough to make something. They’re not just a recipethey’re a reliable little ritual you can pull out whenever you need
a win (or whenever dessert is non-negotiable, which is… most days).
Conclusion
Classic no-bake cookies earn their reputation the honest way: they’re fast, flexible, and wildly satisfying with everyday ingredients.
Respect the boil, choose your oats, and you’ll get that signature fudgy-chewy texture that makes these cookies a forever favorite.
Keep a candy thermometer handy if you love consistency, and don’t be afraid to customizebecause the “classic” version has always been
the one your household actually makes.